Video bitrate affects video clarity, file size, upload time, and playback smoothness. But the right bitrate is not a fixed number. A 720p tutorial, a 1080p gameplay clip, and a 4K 60fps travel video all need different settings. In this updated guide, we'll explain the best video bitrate for 720p, 1080p, and 4K, how frame rate and codec change the recommended range, and how to adjust bitrate without making the file unnecessarily large.
You're recommended to install the handy app to optimize video bitrate for 720p, 1080p, and 4K video effortlessly: https://www.videoconverterfactory.com/download/hd-video-converter-pro.exehttps://www.videoconverterfactory.com/download/hd-video-converter-pro.exe
Bitrate determines how much information is used for each second of video. It represents the amount of data used to encode the video and directly affects video quality, file size, upload time, and streaming stability. In simple terms, a higher bitrate gives the encoder more data to describe each frame, while a lower bitrate makes the file smaller but may reduce detail.
The key is to match bitrate with resolution and frame rate. 720p video can look clean at a relatively low bitrate, 1080p needs more data to preserve sharpness, and 4K requires much more bitrate because it contains four times as many pixels as 1080p. If the bitrate is too low, the video may look blurry, pixelated, blocky, or choppy. If it is too high, the file becomes unnecessarily large without a visible quality gain.
There is no single "best" video bitrate for every file. The right value depends on resolution, frame rate, codec, scene complexity, and where the video will be watched. The table below gives practical starting points for common SDR videos encoded with H.264/AVC or H.265/HEVC. You can raise the bitrate for fast action, gaming, sports, drone footage, and heavy grain, or lower it slightly for simple talking-head videos and slideshows.
| Resolution | Common Size | 30fps Starting Point | 60fps Starting Point | Best For |
|---|---|---|---|---|
| 720p HD | 1280 x 720 | 2.5-5 Mbps | 4-7.5 Mbps | small files, online sharing, mobile viewing |
| 1080p Full HD | 1920 x 1080 | 5-8 Mbps | 8-12 Mbps | YouTube videos, tutorials, gameplay, presentations |
| 4K UHD | 3840 x 2160 | 35-80 Mbps | 53-100 Mbps | large screens, high-detail content, archiving |
For platform uploads, you can also follow the platform's own encoding guide. For example, YouTube recommends 5 Mbps for 720p SDR at standard frame rates, 8 Mbps for 1080p, and 35-45 Mbps for 4K; for high frame rates, the recommended values rise to 7.5 Mbps, 12 Mbps, and 53-68 Mbps. These numbers are good upload targets, but locally stored master files can use higher bitrates if you want to keep more detail before final compression.
Use the table as a starting point, then fine-tune the setting based on the following factors:
A higher frame rate means more frames per second, so the encoder needs more data to keep motion clean. A 720p 60fps clip usually needs more bitrate than 720p 30fps, and 4K 60fps needs much more than 4K 24fps or 30fps. For fast motion, gameplay, sports, or screen recording, use 60fps with a higher bitrate. For talking heads, tutorials, lectures, and slower scenes, 30 or 24fps is often enough and keeps file size lower.
Resolution decides how many pixels each frame contains. 720p (1280 x 720) is easier to compress and suitable for smaller screens or quick sharing. 1080p (1920 x 1080) is the common choice for clear web video. 4K (3840 x 2160) has four times the pixels of 1080p, so it needs much more data to preserve fine detail. If your source is only 720p or 1080p, simply increasing the bitrate or upscaling to 4K will not create true extra detail.
Codec efficiency changes how much bitrate you need. H.264/AVC is still widely compatible and is a safe choice for MP4 files. H.265/HEVC, VP9, and AV1 can usually keep similar visual quality at a lower bitrate, especially for 1080p and 4K. For example, a 4K video that needs a high bitrate in H.264 may look similar at a noticeably lower bitrate in H.265/HEVC or AV1. The trade-off is compatibility and encoding time, so choose a codec based on where the video will be played.
More complex scenes with fast movement, camera pans, water, leaves, smoke, film grain, and intricate textures require a higher bitrate than simple scenes. Adjust your bitrate for the most complex parts of your video instead of only looking at resolution. VBR encoding is usually better for exported files because it gives more data to difficult scenes and less data to simple scenes. CBR is more useful for live streaming when a stable network bitrate is required.
Streaming requires a balance between quality and bandwidth. A very high bitrate may look good locally but cause buffering for viewers with slower connections. For uploads to YouTube, Vimeo, Facebook, or other platforms, start with the platform's recommended bitrate for your resolution and frame rate, then adjust based on your content. For live streaming, follow the service's maximum bitrate limit to avoid dropped frames or unstable playback.
Video hosting platforms like YouTube, Facebook and Vimeo re-encode uploaded videos to reduce file size and bandwidth. Leave some room for that extra compression, especially for 1080p and 4K videos with a lot of motion. However, do not blindly multiply bitrate for every file. For clean footage, the platform's recommendation is often enough; for complex footage, a higher upload bitrate can help the final streamed version look cleaner.
Optimizing bitrate is not only about making the number higher. Proper settings help you retain visible detail, avoid pixelation, reduce buffering, control file size, and make the same video easier to share across platforms. For example, 720p video can be kept small for mobile viewing, 1080p can balance clarity and upload speed, and 4K can preserve detail for large screens or future editing.
Encoding video at 720p, 1080p, or 4K can be simple once you know which settings matter. For better quality, smaller file size, and smoother playback, adjusting bitrate is an essential step that should not be neglected. Luckily, there exists a straightforward and effectual approach to accomplish this utilizing the WonderFox HD Video Converter Factory Pro.
This robust software enables you to convert your 4K video files to an array of formats while customizing the video bitrate, resolution, frame rate, codec, and VBR/CBR mode to produce your desired output quality. Its easy-to-use interface enables both seasoned professionals and newbies to navigate and utilize its features with ease.
Free downloadFree download this amazing video bitrate converter on PC and make the most of this cutting-edge software.
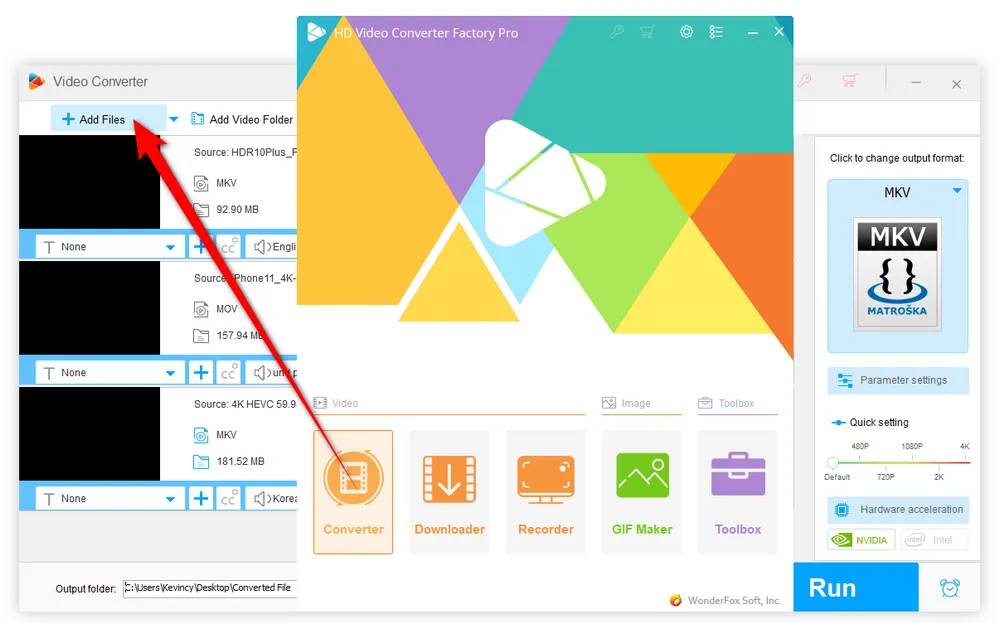
Launch HD Video Converter Factory Pro and open "Converter" module. Click on "Add Files" button to locate your 720p, 1080p, 4K, or other video files and import them. Alternatively, just drag and drop them into the window. It may need a while to load all of them.
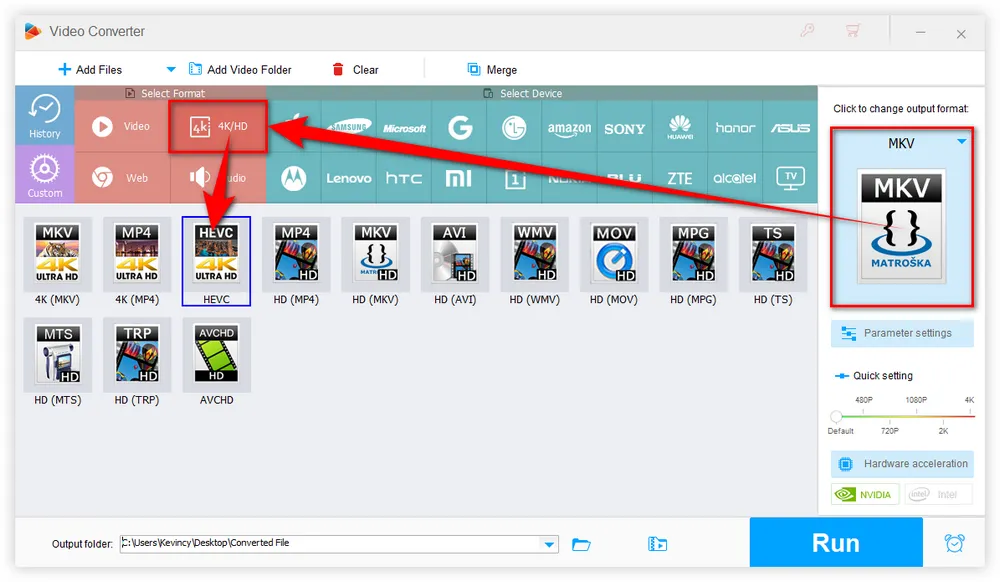
Click on the big "Format" image on the right side of the program to open the output format library of 500+ configured presets. Choose any common or device-friendly format as you wish. You're recommended to go to "Video" category and choose "MP4", or go to "4K/HD" category and choose "4K HEVC" profile in terms of the best compatibility.
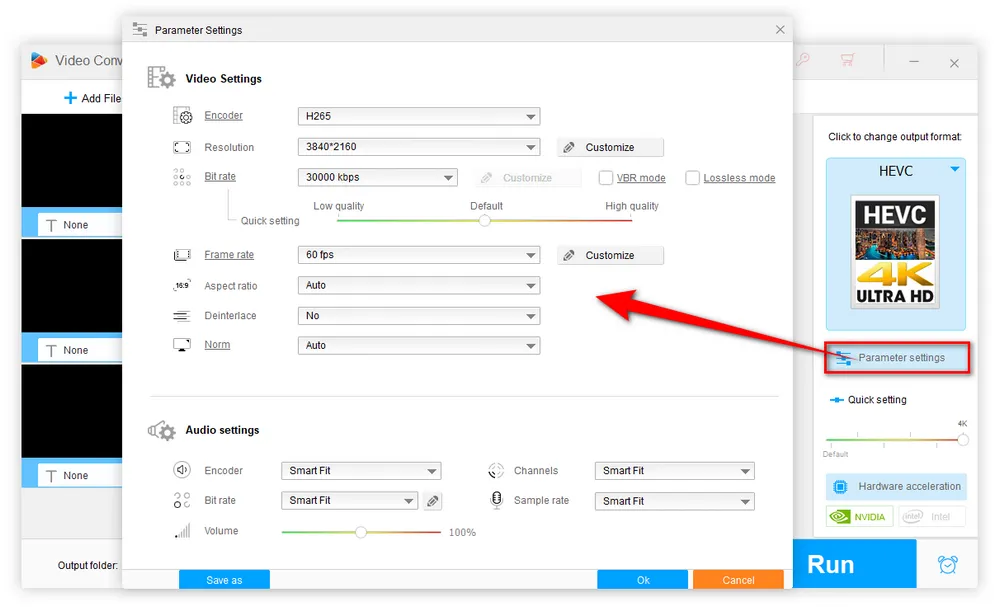
Open "Parameter settings" window, you're able to modify the values of the factors that affect video quality based on #PART 3, such as changing video codec, frame rate, resolution, VBR/CBR mode, etc. Choose 1280x720 for 720p, 1920x1080 for 1080p, or 3840x2160 for 4K when needed. You can also press "Customize" button to manually input the bitrate value. Click OK to save the changes.
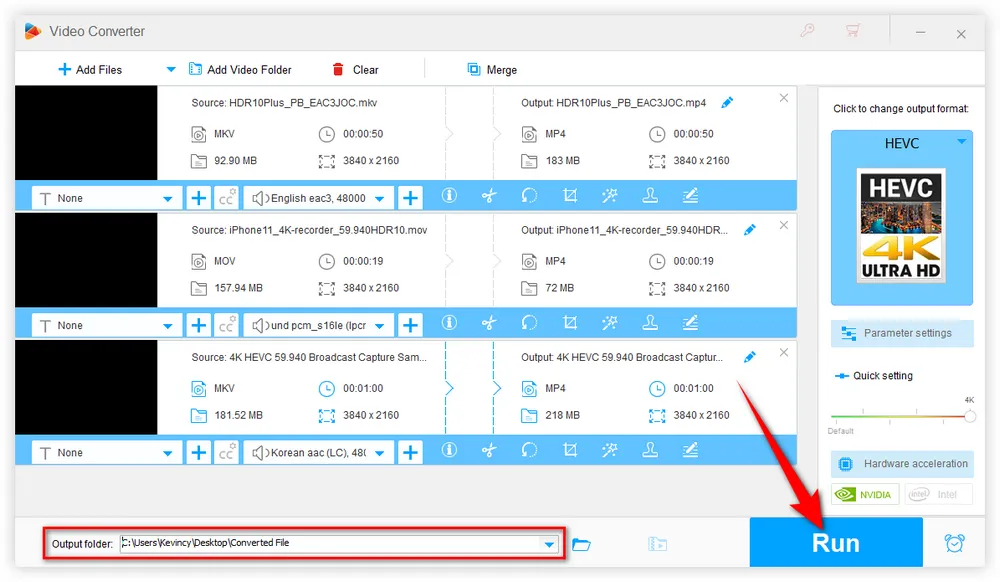
With everything all set, specify a destination directory on the bottom of the software to save the output video files. Finally, hit the "Run" button to start the processing of optimizing video bitrate at a fully hardware-accelerated speed.
Additionally, this program even comes with an editing tool bar, allowing you to trim, split, crop, rotate, flip, watermark, and join 4K video files.
A: For 720p 30fps video, 2.5-5 Mbps is a practical starting range. For 720p 60fps video, try 4-7.5 Mbps. Use the higher end for gameplay, sports, or busy scenes, and the lower end for simple talking-head or slideshow videos.
A: For 1080p 30fps video, 5-8 Mbps usually works well. For 1080p 60fps, 8-12 Mbps is a better starting point. If you use H.265/HEVC or AV1, you may be able to use a lower bitrate than H.264 while keeping similar quality.
A: For 4K 30fps video, 35-80 Mbps is a common practical range. For 4K 60fps video, try 53-100 Mbps or higher for very complex footage. Platform uploads may use different recommendations, so always check the target platform if you are preparing a video for streaming.
A: Not always. A higher bitrate helps only when the video needs more data. After a certain point, the file size keeps growing while the visual improvement becomes hard to notice. Source quality, codec, resolution, frame rate, and encoding settings also matter.
A: Use VBR for most exported or uploaded videos because it allocates bitrate more intelligently based on scene complexity. Use CBR when you need a stable bitrate, such as live streaming or a workflow that requires a fixed data rate.
A: You can check video bitrate with HD Video Converter Factory Pro, VLC, QuickTime, MediaInfo, or editing software such as Adobe Premiere Pro and Final Cut Pro. In HD Video Converter Factory Pro, you can also adjust the bitrate directly in the "Parameter settings" window.
Choosing the best video bitrate is about balance. 720p needs a modest bitrate for small and easy-to-share files, 1080p needs more data for a clean Full HD image, and 4K requires much higher bitrate to preserve fine detail. Start with the recommended ranges above, then adjust according to frame rate, codec, scene complexity, and platform requirements. With the right settings and a reliable bitrate editor, you can get a video that looks good, plays smoothly, and does not waste storage space.

Kevincy joined the WonderFox team in 2014 and has been a senior columnist ever since. With over two decades of experience in the video editing industry, he shares tutorials, tips, and how-to guides on video/audio processing and personal DVD backups. Family-oriented and passionate about helping others, he is dedicated to making video and audio processing easier for readers.
![]()
![]()
![]()
![]()

WonderFox DVD Ripper Pro
The fastest and no-difficulty DVD ripper is ready to help you back up your bunch of DVDs and convert them to digital formats. The DVD to ISO image/ DVD folder feature enables you to copy your DVD with flawless 1:1 quality and content. It also provides a conversion function, enabling you to convert your ripped DVD to any digital format you want. So do not hesitate and give it a try!
Privacy Policy | Copyright © 2009-2026 WonderFox Soft, Inc. All Rights Reserved
