 How to & Tips
![]() Convert Video
Convert Video

![]() Convert Video
Convert Video
![]() by Oswald
by Oswald
Last updated on July 18, 2023
Seren is one of the best community addon. This page is a step-by-step guide on how to install the working Seren addon on Kodi, how to integrate Seren with a Real-Debrid account, and how to install provider packages to Seren.
I'll demonstrate the installation on Windows PC, with Kodi Leia 18.9. This installation guide applies to Amazon Firestick, Fire TV, Android & iOS, Mac, Android TV, Android Boxes, etc. as well.
Seren addon is now compatible with Kodi 20 Nexus.
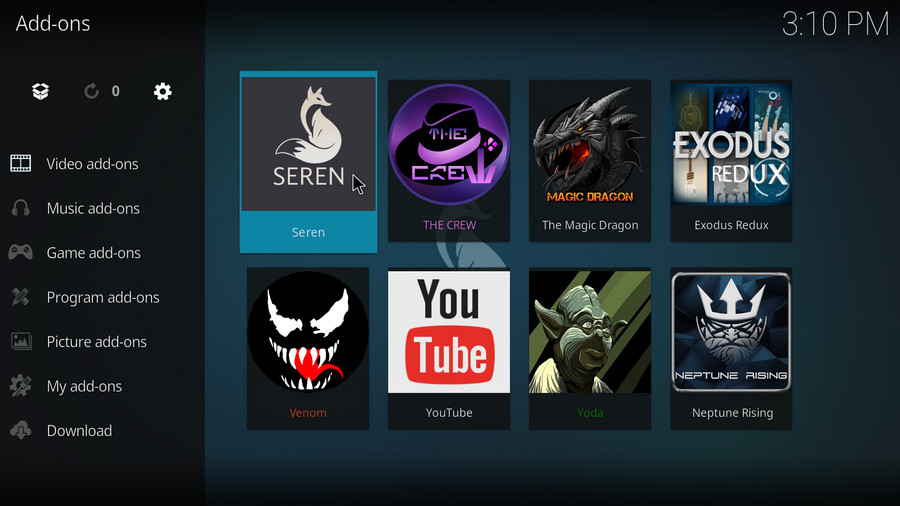
 Seren Kodi
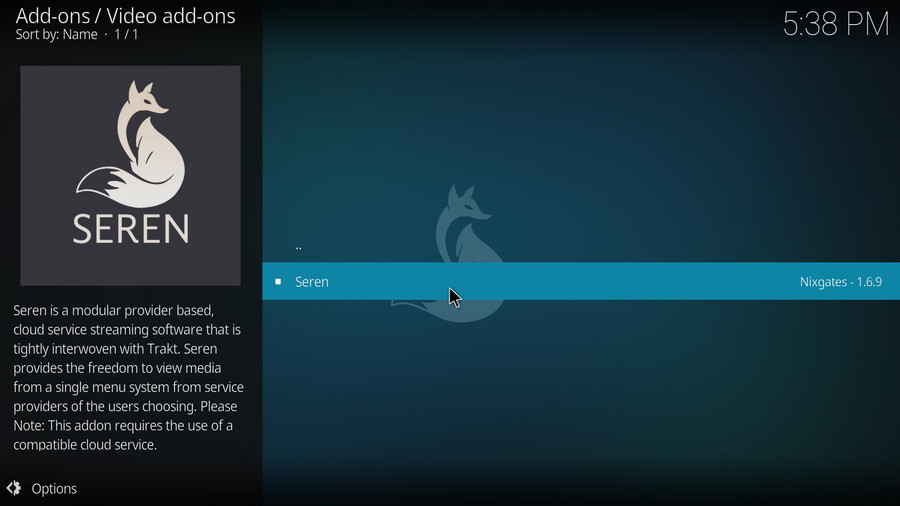
Seren is one of the best movies & TV shows addon on Kodi. Seren features continuous episodes playback, Netflix-like next-up dialog, preemptive scrapping of sources, and is tightly interwoven with Trakt.tv. With Seren's detailed categories and precise search function, users can easily access the exact link they want within a minute.
Moreover, unlike other Kodi addons which are generally built for a single service use, Seren seems a cut above. Seren is a multi-source addon works with the added ability to install custom provider modules, allowing users to connect to multiple online/offline services at once for their viewing with a single click.
More Recommended Posts: Best Kodi Matrix 19 Addons | Best Kodi 19 Matrix Builds | 12 Best Anime Addons | Best Live TV IPTV Addons
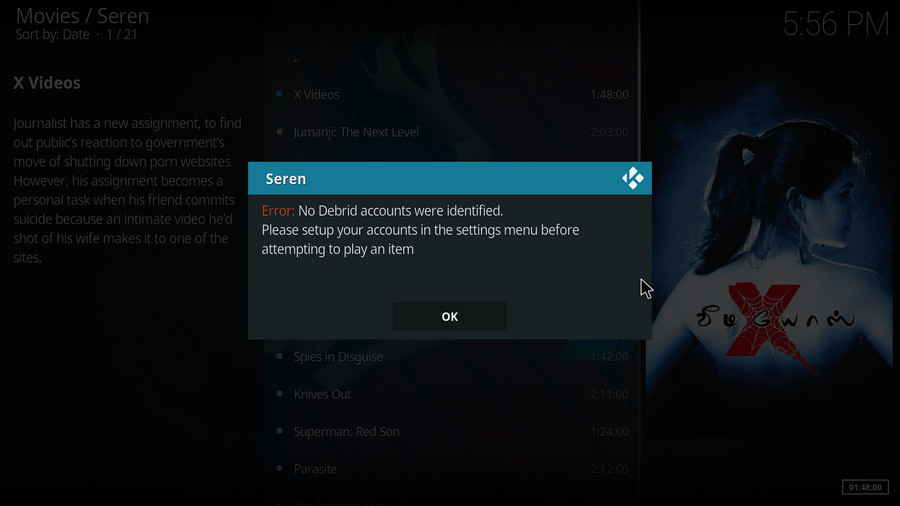
Please note that Seren addon requires the integration of a premium debrid account and the installation of provider package to play items. You can scroll down to the second tutorial to see more details.
The installation of earlier Gaia repository might bring about dependency conflict with Seren which leads to Seren not working. If you have Gaia repository installed, make sure it's the latest version from official source. >> Gaia Installation Guide
Add-on name: Seren
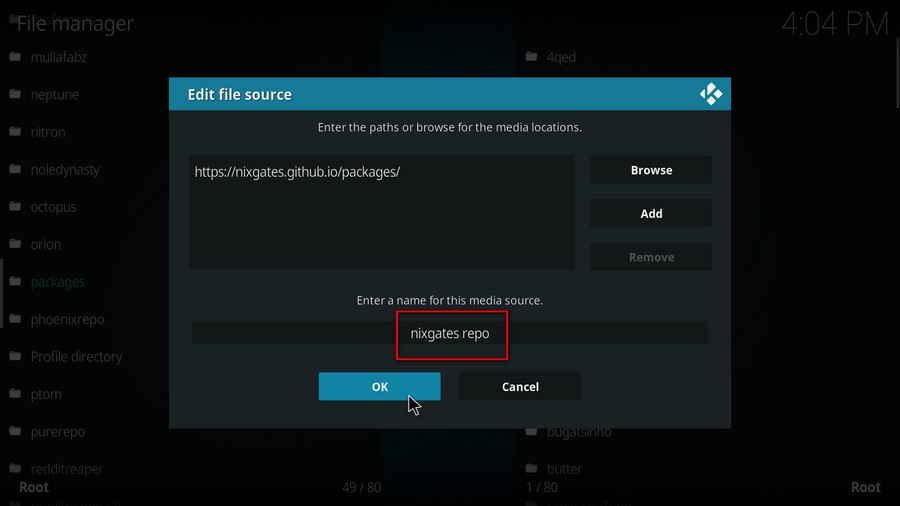
Repo Name: Nixgates Repo
The Latest Working Source URL: https://nixgates.github.io/packages
Media source naming: nixgates repo
Before starting,
· For new users, install Kodi on your device to get started. Installation guide: Windows | Fire TV Stick | Android Phone | Android Box
· Since Kodi prohibits the installation of third-party addon/repos by default for security issues, we need to set Kodi to allow installation from unknown sources to go on.
· Update Kodi to the latest version to avoid potential issues. . Update guide: Windows | Fire TV Stick
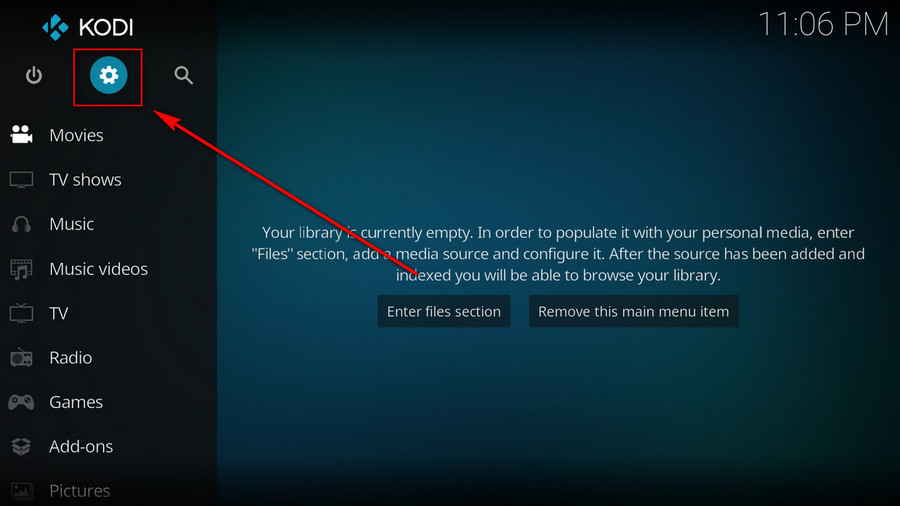
Step 1. Launch Kodi. Click on the cog icon from the upper side of the left panel to enter System.
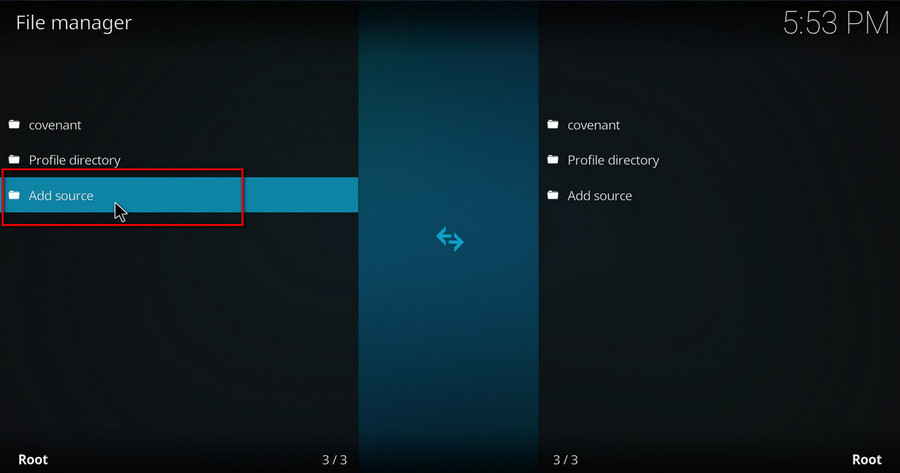
Step 2. Click on File manager from System page.

Step 3. Double click on Add source from the left column.
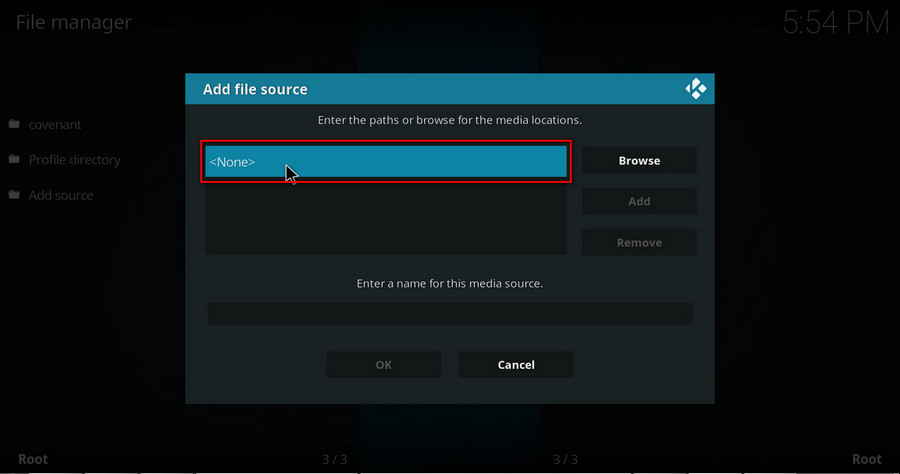
Step 4. Click on <None> from the box in the middle.
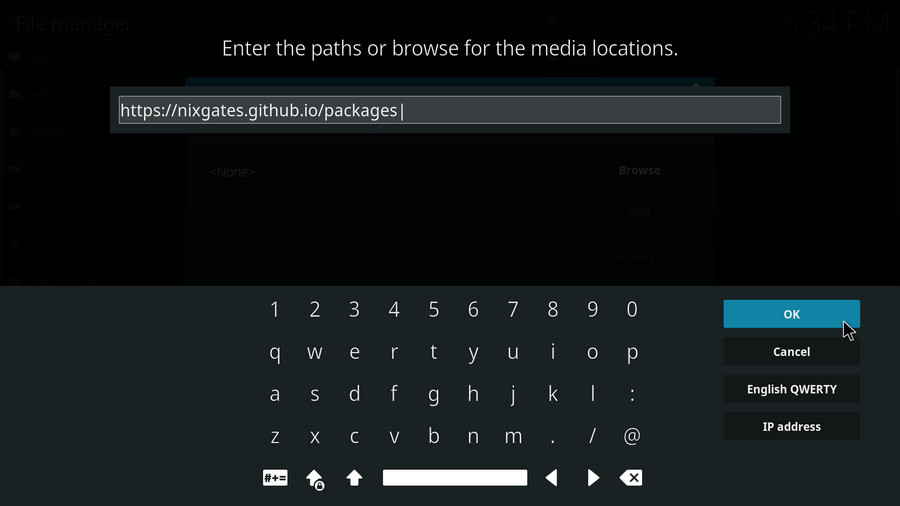
Step 5. In the pop-up box, copy & paste or type in exactly https://nixgates.github.io/packages to the media location box, and hit OK button from the lower-right side. Check for typos if you encounter Couldn't retrieve directory information.
Step 6. Define a name nixgates repo for the media source we just added, if not Click OK underneath.
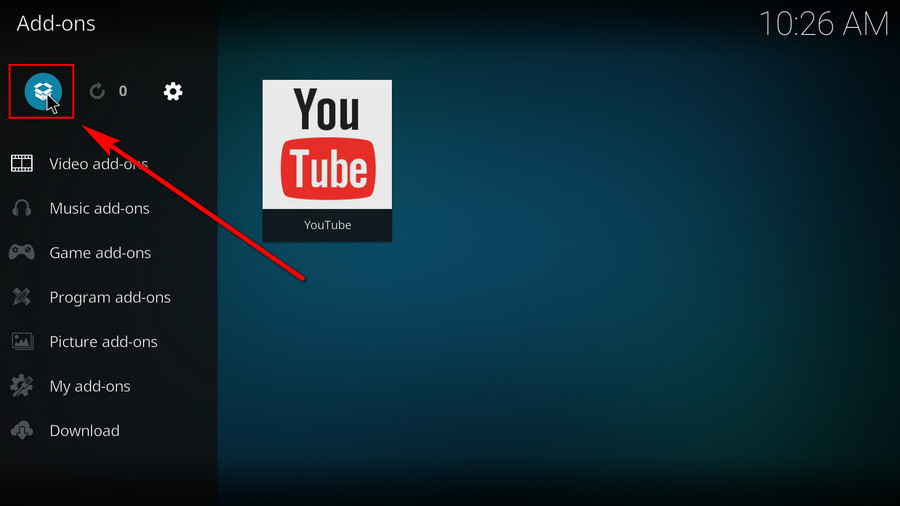
Step 7. Then get back to the main menu. Click on Add-ons from the left panel.

Step 8. Click on the box icon from the upper side of the left panel.
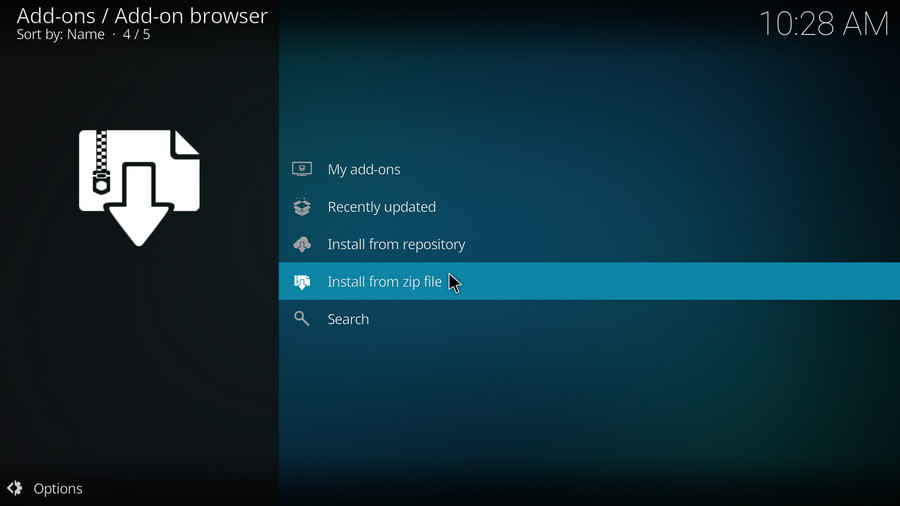
Step 9. Click Install from zip file.
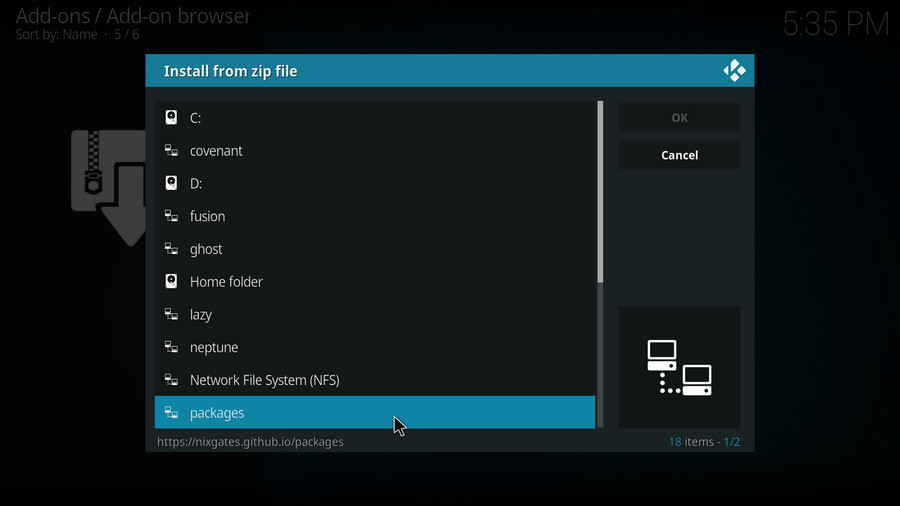
Step 10. Click on the media source packages we just added to Kodi.
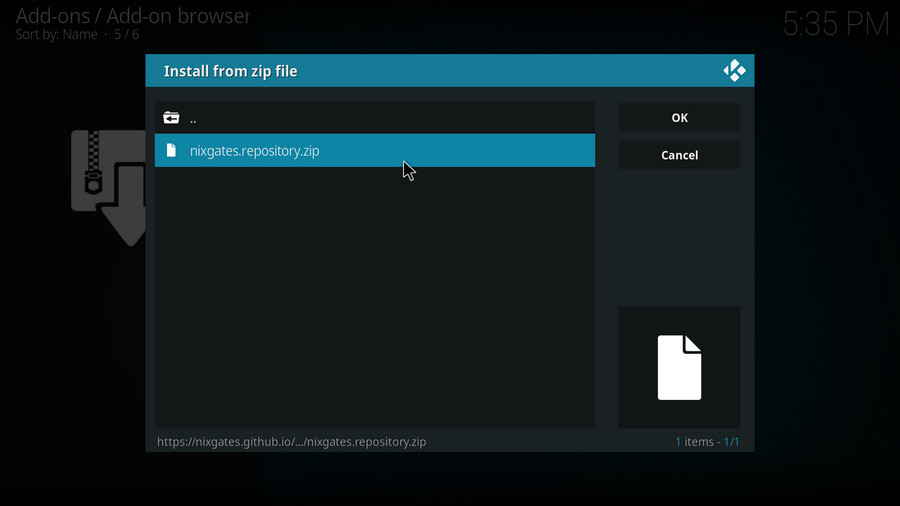
Step 11. Click on the nixgates.repository.zip file within.
Step 12. Wait until you can see a message pops up on the upper-right side saying Nixgates Repo Add-on installed. Then click Install from repository from the current page.
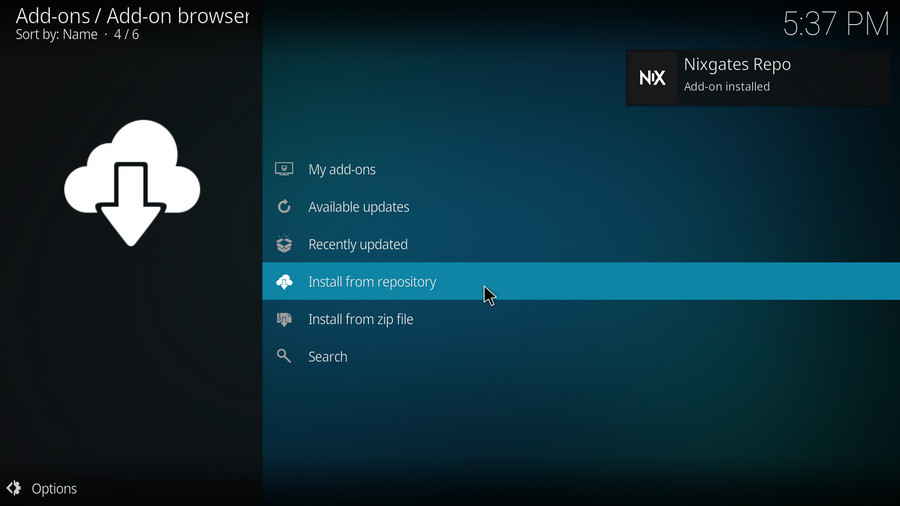
Step 13. Please note that's just the installation of repository, then it's time to add addon to Kodi from repository. Select Nixgates Repo. If you encounter "Could not connect to repository" error message, check out our troubleshootings.

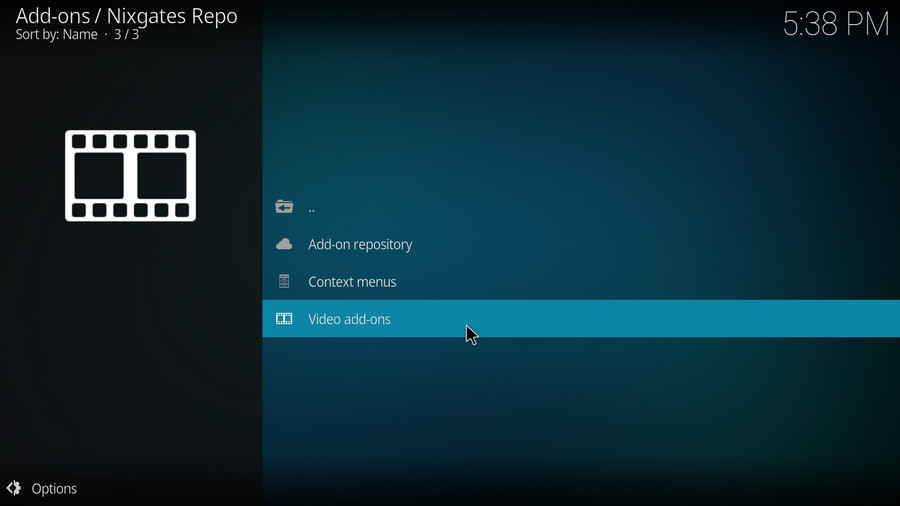
Step 14. Click Video add-ons.
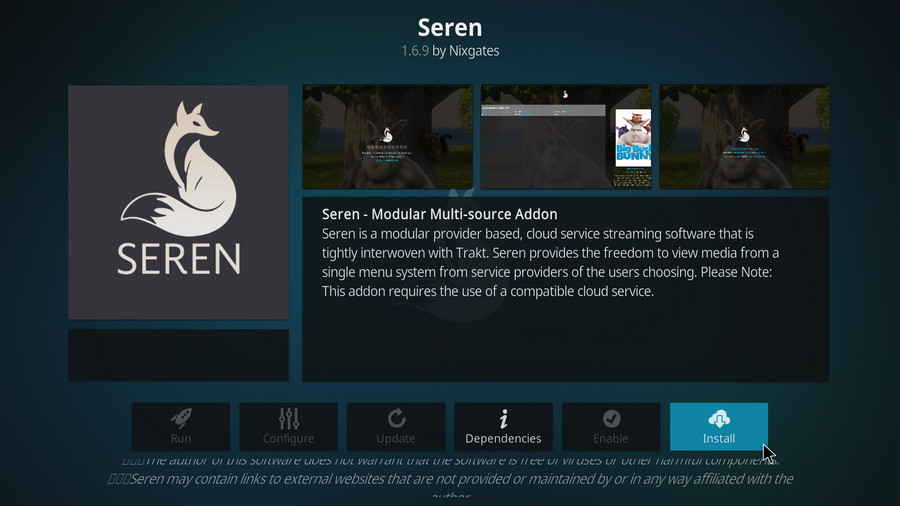
Step 15. Click on Seren.
Step 16. Click Install from the lower-right side to install Seren addon.
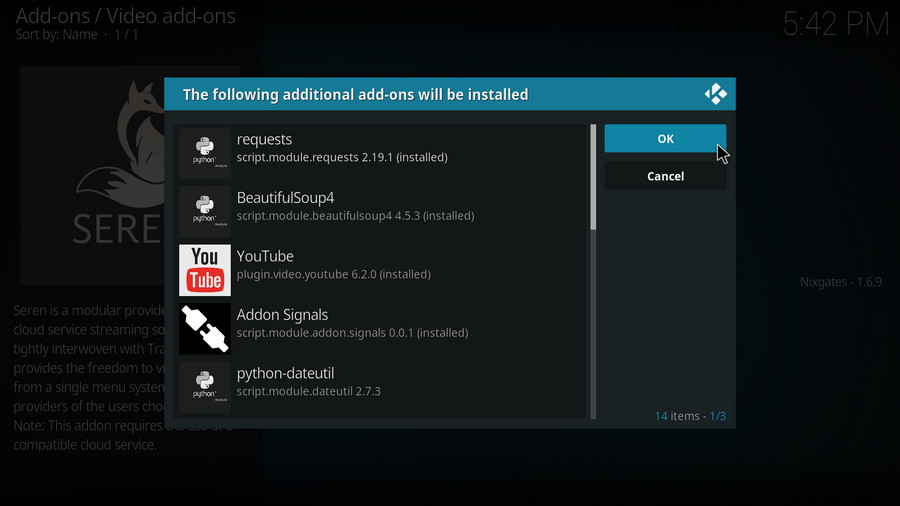
Step 17. Click OK to allow installing additional dependencies when this dialog pops up.
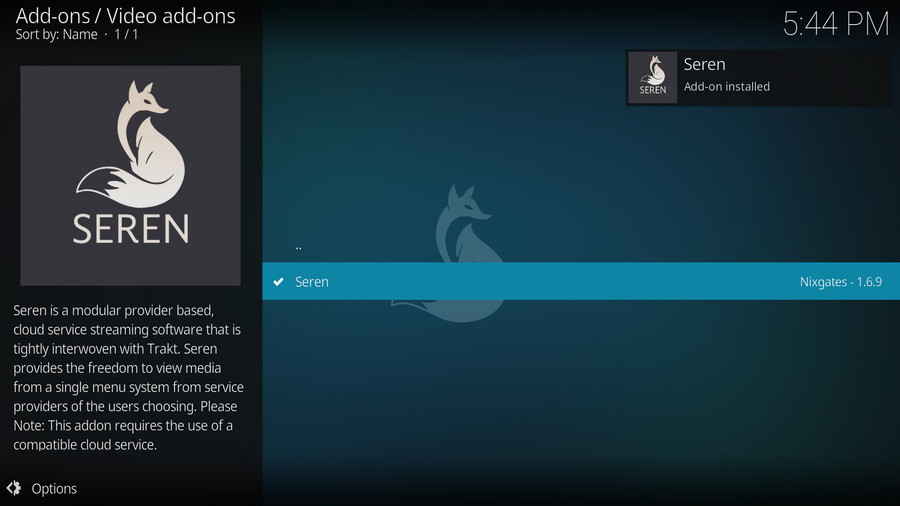
Step 18. Wait till you can see the message Seren Add-on installed pops up. That's it! You can now find you Seren addon from main menu > Add-ons. But you can't enjoy video streams with Seren yet.
*Please note that Seren addon requires the integration of a premium debrid account like Real-Debrid and Premiumize, and the installation of provider package to play items. Follow the instructions below to configure your Seren.
Major configurations Seren needs to play items correctly include debrid service integration and provider package instllation. First let's integrate debrid services with Kodi, I'll use Real-Debrid to demonstrate, and Premiumize integration can be easily implemented with personal API key.
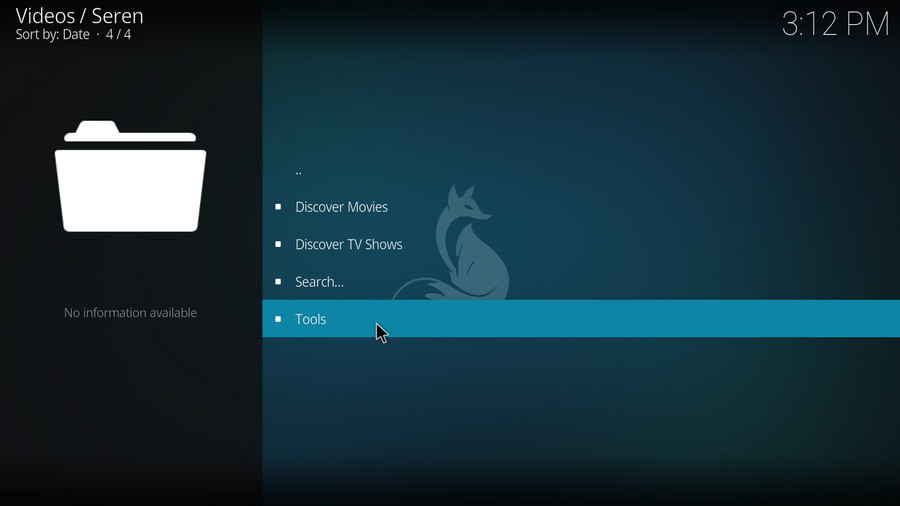
Step 1. Launch Kodi. Go to Add-ons > Video add-ons and open Seren.
Step 2. Click on Tools.
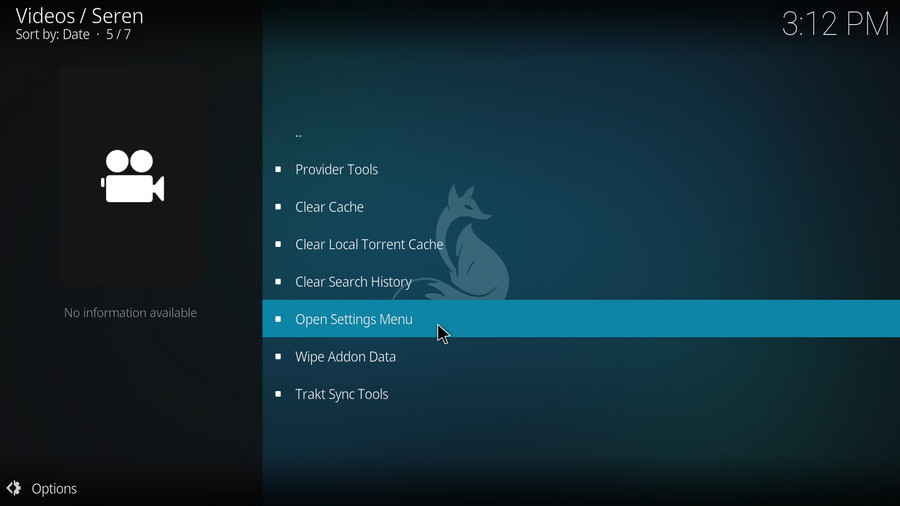
Step 3. Click on Open Settings Menu.
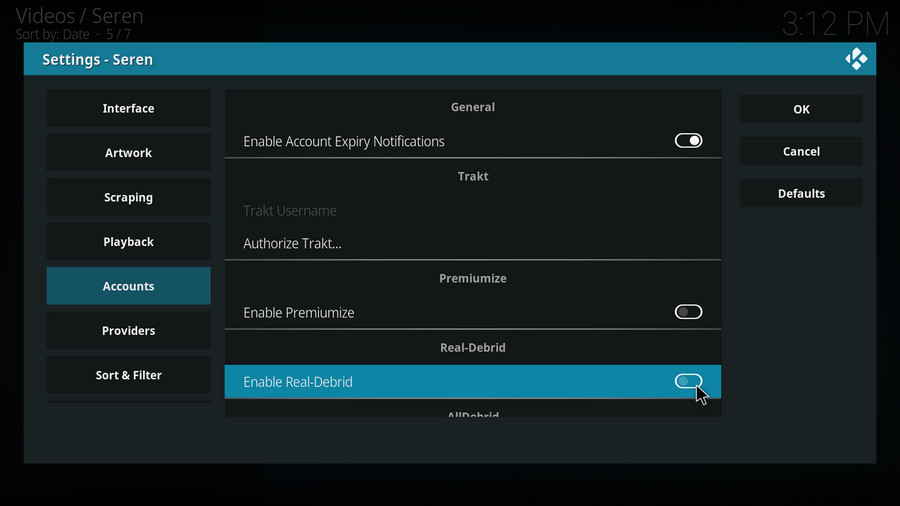
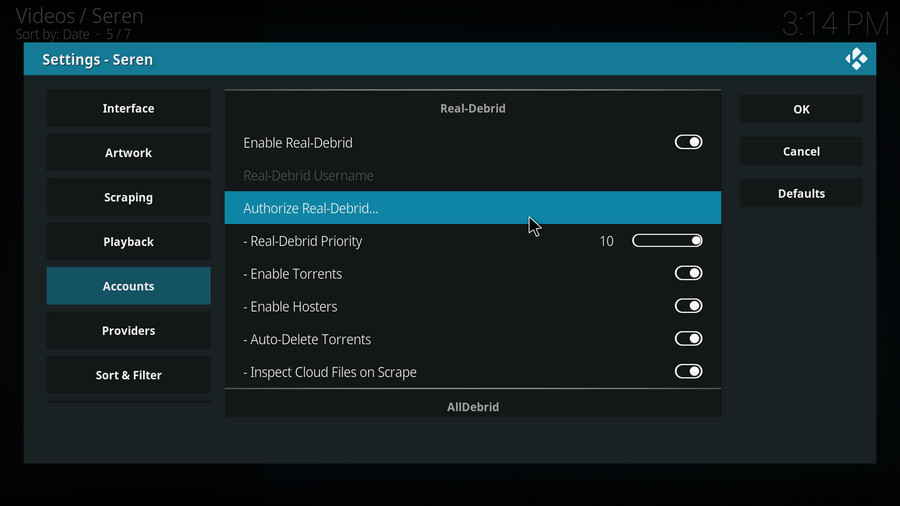
Step 4. From the Accounts tab, click on the right slider to Enable Real-Debrid.
Step 5. Scroll down and click on Authorize Real-Debrid.
Step 6. A small window will pop up with an authorization code automatically generated, and the code has been copied to your clipboard. Note that it's a temporary code that expires shortly, so we better hurry
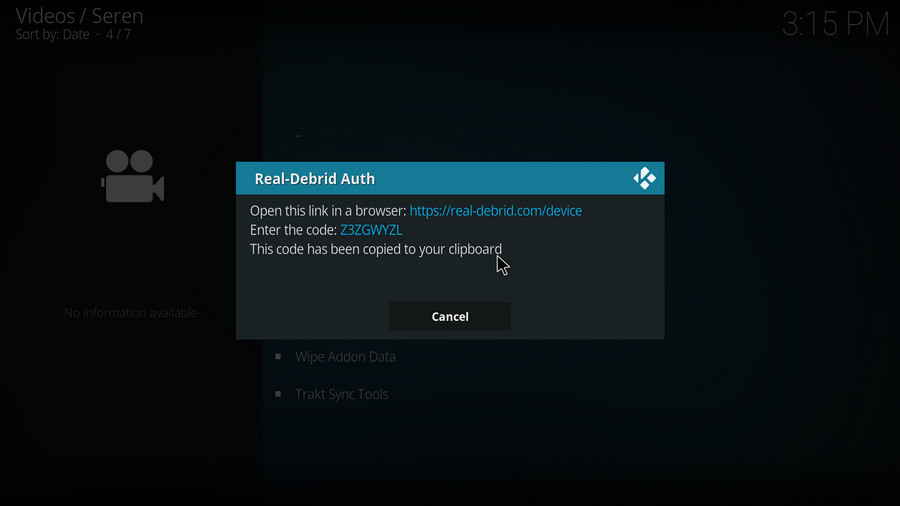
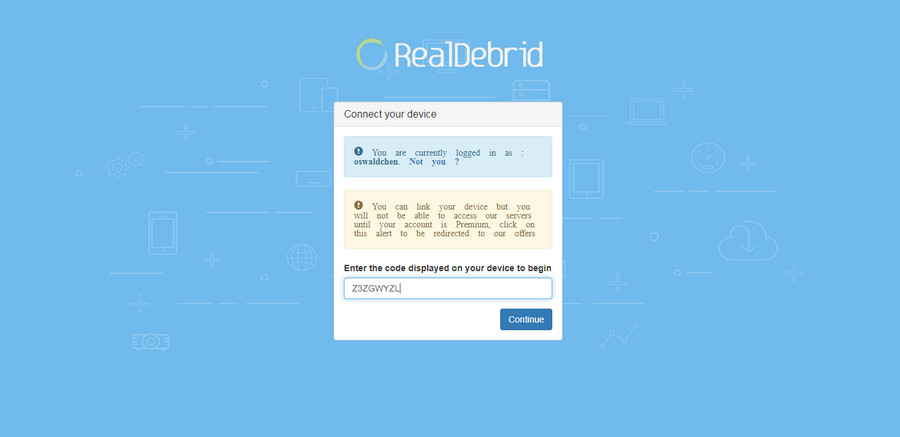
Step 7. Visit https://real-debrid.com/device with your browser, paste the authorization code into the box, and click Continue.
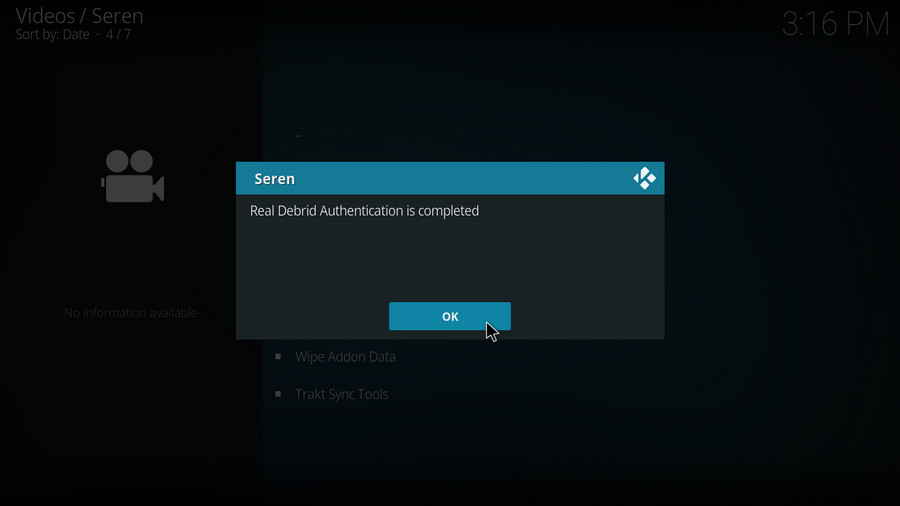
Step 8. Get back to Kodi, you can see now Real Debrid Authentication is completed. Then click OK.
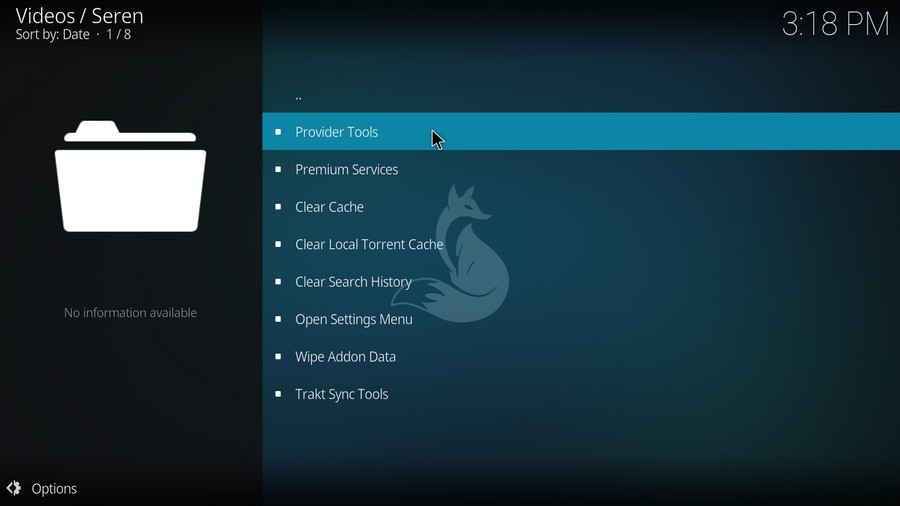
Step 9. Now let's install a provider package for Seren. Click on Provider Tools from the current interface.
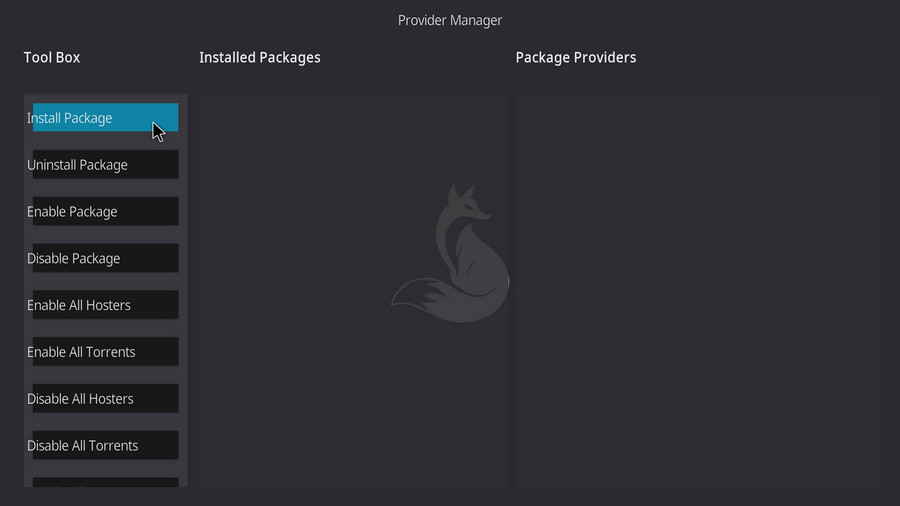
Step 10. Click on Manage Provider Packages.

Step 11. Click on Install Package from the left Tool Box.
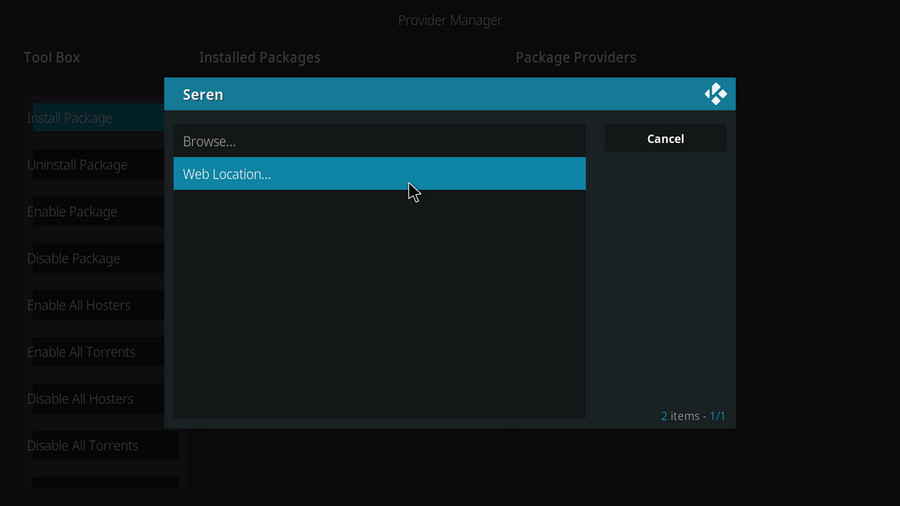
Step 12. Click on Web Location…
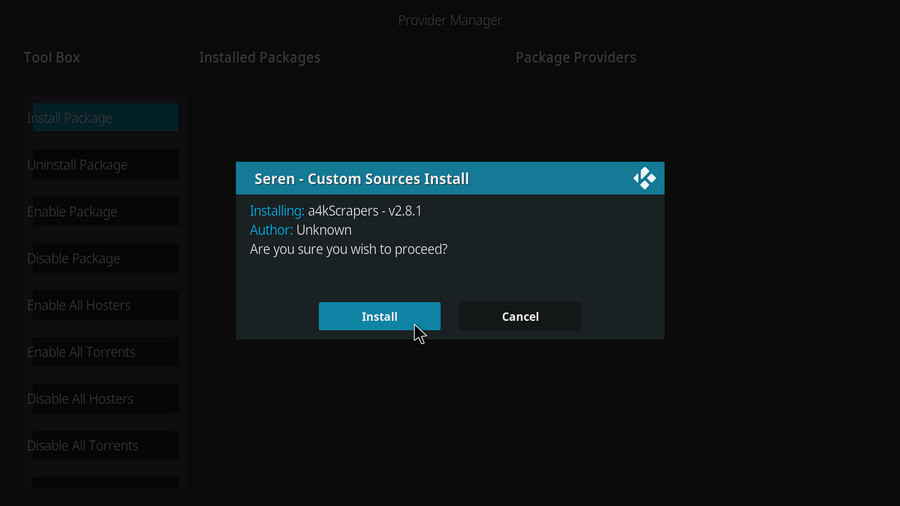
Step 13. Enter the package Zip URL http://bit.ly/a4kScrapers exactly.
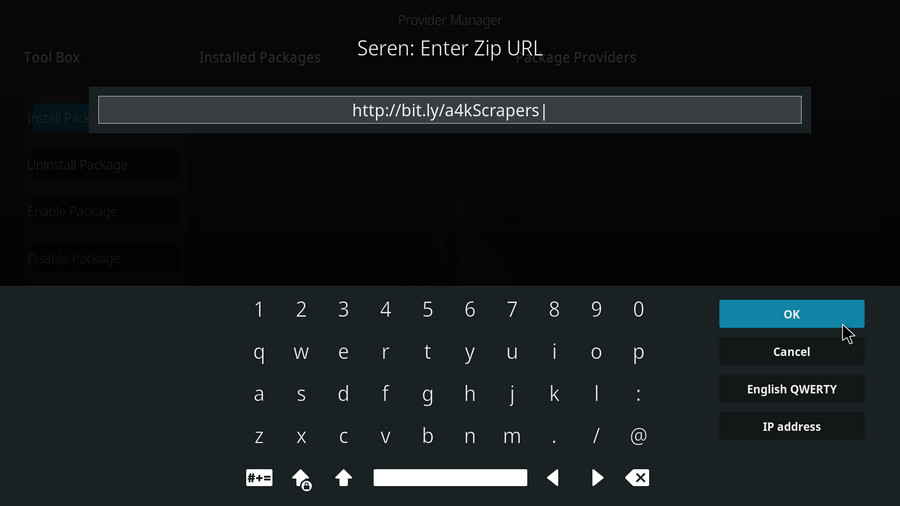
Step 14. Click Install.
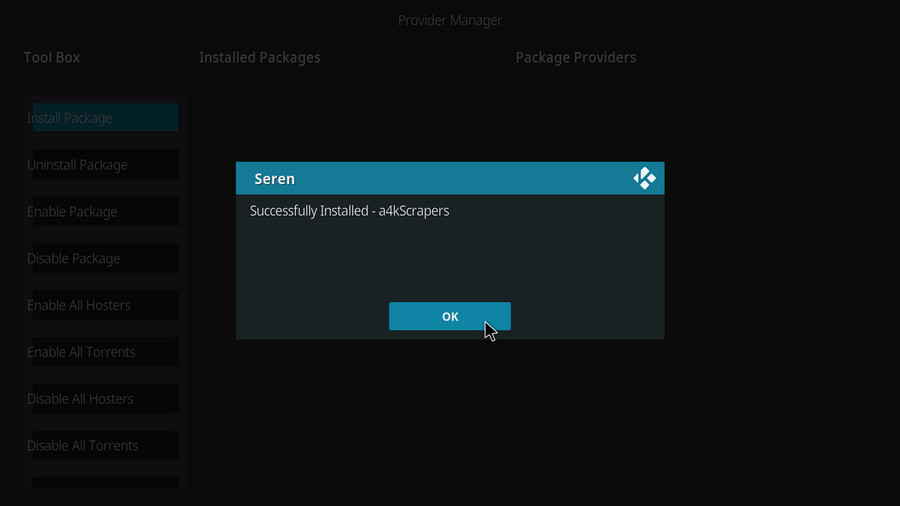
Step 15. Scraper installation complete. Click OK. Then repeat the provider installation process and add https://tinyurl.com/Lscrapers to Seren as well as a backup provider.
After that, you'll be able to stream movies and TV shows with Seren.
• Seren No Stream Available/Streaming Buffering/Stream Pending after Loading but Won't Play
The causes of no stream available and other streaming failed issue vary, most effective solutions include:
1. Use the option in your device settings or maintenance addons to clear Kodi cache.
2. Reauthorize debrid services like Real-Debrid, Premiumize and All Debrid with the updated ResolveURL.
3. Go to addon settings and switch Auto Play feature to Source Select.
4. Stop using VPN with debrid services.
5. Use a proxy to bypass ISPs blocking.
• Seren Fails to Start/Launch
That could be the addon stopped working, we'll put up an announcement from the top of the page, in that case, stay tuned to our updates. In addition, working addons will also fail to launch, try the following methods to sort that.
1. Make sure the server and port number in your Kodi Internet access match the ones of your network. Check that especially if you're using a VPN. Learn more: Kodi Proxy Settings
2. Try clearing Kodi app cache in your device settings or with maintenance tools like Open Wizard, reboot Kodi, and launch the addon again.
• Seren Error Check the Log for More Information
First try clearing Kodi app cache from your device settings, reboot Kodi, and try the previous behavior again and see if this issue still occurs. If so, learn how to check log file on Kodi and draw support from someone who can read it. Please note that don't seek assistance for third-party addons from official Kodi support channels.
• Seren Links Fails to Play Requiring Stream Authorization
If you're asked to authorize stream when trying to play a link, you can either:
1. Use a static IP address to pair with the hoster site.
2. Use a debrid service with Kodi and disable free hosters in addon settings.
Learn more: Stream Authorizations on Kodi – Is it Safe? Several Ways to Deal with Them
• Seren The Dependencies Could Not be Satisfied
This issue results from python code discrepancy of addon's dependencies. In that case, you should use a compatible version of Kodi for the addon. As always, we only advise the use of the latest stable release version of Kodi and the latest version of continually-updated addons.