Are you looking to use OBS Studio to record or livestream something on your low-end PC? If so, you may need to tweak some settings in OBS for better performance. Fortunately, we have got you covered. This post shares the best OBS settings for low-end PCs that will help you achieve a smooth recording and streaming experience. Let's dive in!
OBS Studio is a handy free screen recording and live streaming application. It is suitable for both newbies and experienced users to produce high-quality output. But to make it work well on your low-end PC, you need to adjust some OBS settings for low-end PCs. However, remember that everyone has a slightly different understanding of what constitutes a low-end PC. For the sake of this essay, we're looking at PCs that are either at or near the limits of the recommended system settings for OBS.
If you just want to use OBS for recording, then let's look at the best OBS recording settings for your low-end PCs.
FPS
FPS (frames per second) is a measure of how quickly a number of frames appear within a second. For recording on a low-end PC, the ideal OBS settings are usually 30 or 24 FPS. The quality for 30 or 24 FPS is sufficient for the videos to look good when played back. 60 FPS or greater can be taxing on a slow PC.
How to adjust FPS for recording:
1. Launch OBS and go to "File" > "Settings".
2. Swith to "Video" tab and then select 30 or lower value from the "Common FPS Values" drop-down list.
Resoltion
Resolution is also an important factor that will affect the recording performance on low-end PCs. So don't set the recording resolution too high. 1280 × 720p is recommended. It is not the highest setting for canvas resolution, but if you are worried you have a low-end computer setup that won’t be up to standard, then it might be necessary. You can also try to push the resolution to 1920 × 1080p. This provides a higher quality, but it doesn’t necessarily present the easiest option for a poor computer.
You can try to set the resolution to 1920 × 1080p to see if you are showing a video on an HD screen.
How to adjust Resolution for recording:
1. Go to "File" > "Settings".
2. Swith to "Video" tab and then modify the "Base (Canvas) Resolution" and "Output (Scaled) Resolution" to 1920 x 1080p or 1080 x 720p.

Audio Settings
In addition to the video quality, the audio is also a main factor that can affect the quality of screen recording and live streaming. So in order to have a clear sound while recording, you need to keep the optimum settings for audio too.
Detailed Audio Settings for Recording:
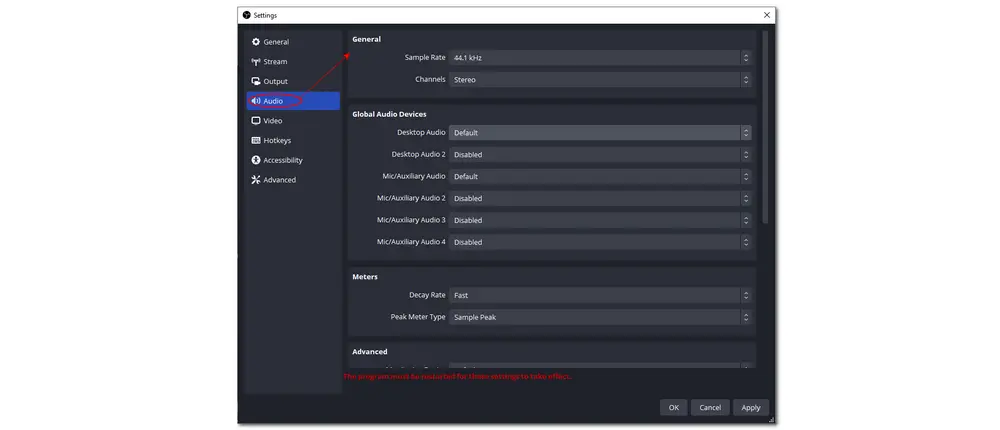
1. Switch to the “Audio” section in the “Settings” window.
2. General: Set the “Sample Rate” to the lowest “44.1kHz”. (Although “48kHz” offers the best sound, “44.1kHz” is enough for your low-end computer.) Then keep the “Channels” as “Stereo”.
3. “Global Audio Devices”: If you use a GoXLR, just apply the “Broadcast Stream Mix” to “Mic/Auxiliary Audio”. Alternatively, if you use various gadgets, then you need to apply a Desktop Audio or Microphone gadget.
4. Meter: The meter is a decibel meter (dB). The higher the decibel, the louder it is. So just choose the “Decay Rate” according to your needs. The “Peak Meter” type is for your CPU usage. If you set a higher CPU usage, select “True Peak”, otherwise select “Sample Peak”.
The rest of the options should be kept as default.
If you want to live stream with OBS, the best OBS streaming settings for a low-end PC are illustrated here. When streaming on Twitch, Facebook Live, or other streaming platforms, the minimum settings are required to keep the streaming content stable, and your computer doesn’t crash as a result.
FPS & Resolution
When live broadcasting using OBS on a low-end PC, make sure the FPS is not too high. 30 or 24 frames per second is sufficient to keep the streaming content consistent and decent. It is preferable if you can stream a video, even if it is not in high definition. If you try to stream in greater resolution than your machine can handle, it will most certainly fail or even crash.
1080 x 720p is the lowest setting that will still look decent and passable on streaming platforms. Although this kind of resolution looks poor quality on UHD screens, that doesn’t mean you should keep the resolution high.
Stream Settings
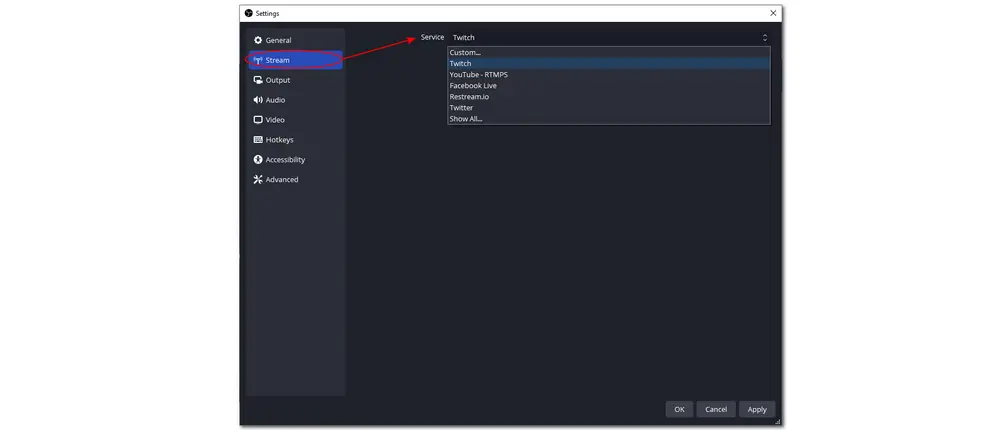
When streaming, keep in mind to ensure a fast upload speed or at least a stable internet connection before going to stream. Then go to the “Stream” tab in the “Settings” window. Choose the platform on which you are going to stream your gameplay or other shows. It has some of its own settings within and has presets for these services, and an option to sign in.
Other Streaming Settings
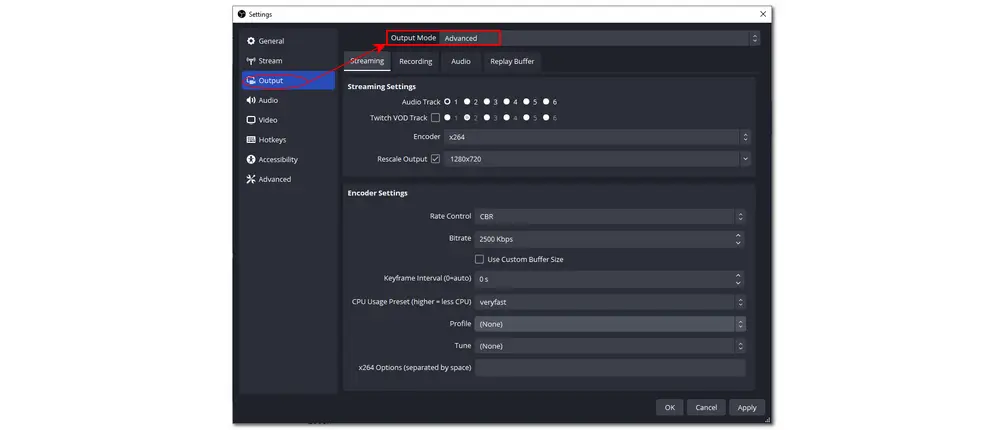
Once you are done with the general video settings, then it’s time to set the output settings.
Just switch to the “Output” section in the “Settings” window. Choose the “Output Mode” as “Advanced”. Then customize the detailed settings for the output video as follows:
Encoder: If you are not using any NVidia graphics card and relying on CPU, then set the “Encoder” under the “Streaming Settings” to “x264”.
Rescale Output: The “Rescale Output” should be set the same as the video resolution you are streaming.
Rate Control: Keep the “Rate Control” CBR.
Bitrate: For low-end PCs, it is recommended to keep the bitrate under 3000 kbps. If you’re using an NVidia card, just keep the bitrate to 3000 kbps as it is perfectly fine for it.
CPU Usage Preset: Keep it as “veryfast”.
Profile: This option is generally disabled but if you are using the NVidia card, then you can set it to “main”.
Above are the best OBS Studio settings for low end PCs. Besides using OBS to screen record on low-end computers, there are many other screen recording applications that can work on low-end PCs. If you feel troublesome to adjust each OBS setting and want to record on low-end computers, you can also try an OBS alternative program to record PC screens.
Hot Search: OBS Not Recording Full Screen | OBS MKV to MP4
WonderFox HD Video Converter Factory Pro offers a built-in screen recorder that can work smoothly on low-end PCs. It can easily record various desktop screen activities with audio (system & mic) in a few simple clicks. Practical editing and conversion features are also provided.
WonderFox HD Video Converter Factory Pro is a well-designed application that offers various video & audio processing features. It can act as the best recorder for low-end PCs that allows you to record anything on a PC screen with both system audio and microphone sounds. You can also capture gameplay in high quality at 1080p/60fps without any complex operations.
In addition to the recording feature, WonderFox HD Video Converter Factory Pro also offers some handy editing functions that allow you to improve screen recording quality, compress screen recordings, trim and crop videos, and more. Users can even use it for high-quality format conversion, quick online video downloading, and so forth.
It is 100% safe and clean for download. The streamlined and simple setup makes it accessible for both beginners and professionals. Without further ado, let’s see how to screen record with it.
Tips for System Requirements
Compatible with: Windows 11/10/8.1/8/7/Vista and lower.
Processor: Intel, AMD, 1.5 GHz or higher.
Graphics card: NVIDIA GeForce series, Intel HD Graphics, AMD Radeon™ series.
RAM: 1 GB or higher.
Hard drive space: 300 MB available hard disk space for installation.
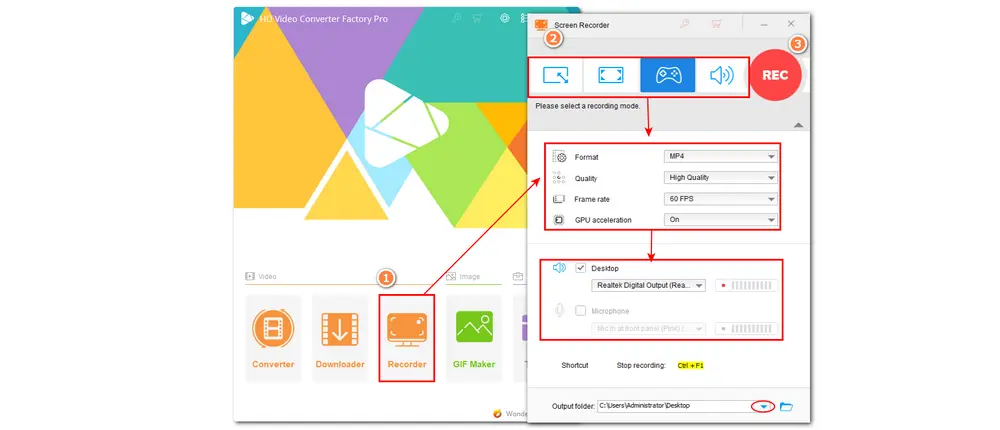
Step 1. DownloadDownload and open WonderFox HD Video Converter Factory Pro on your desktop. Then choose “Recorder” from its startup interface.
Step 2. Now select a recording mode you want to apply. (If you choose the game mode to record gameplay, you need to select the Custom mode or Full-screen mode to define the gameplay capture area.) Then, follow the workflow to modify the recording format, quality, framerate (Game mode will set the frame rate at 60 fps automatically), and GPU acceleration.
* Note that GPU acceleration only works on PCs with a certain NVidia graphic card or an Intel CPU.
Don’t forget to set an output path for the recorded file.
Step 3. Hit the red “REC” button and it will start recording after a five-second countdown. When finishing recording, just press “Ctrl + F1” to stop recording. The output folder will automatically pop up and you can view the recorded game video.
Tips. You can close the “Recorder” and enter the “Converter” to import the screen recording for editing, conversion, compressing, and more.
Above is all I want to share about the best OBS recording settings for low end PCs and laptops. Just follow this post to set your OBS, and then you can record and stream with OBS on your PCs without issue. You can also try the recommended OBS alternative recorder to capture various screen activities. It is easy to use, multi-featured, and works smoothly on low-end PCs.
Thanks for reading. Have a nice day!
Compared to other video capture software, OBS can be quite CPU-intensive due to its many options and processes, thus leading to a huge amount of processing power being used.
You can optimize OBS performance with the following tips:
1. Adjust to a lower resolution, like 720p, and a frame rate of 30 FPS.
2. Lower the stream bitrate to match your internet speed.
3. Use the x264 software encoder.
Close unnecessary programs and background tasks.
Ensure your graphics drivers are up to date.
Test different settings to find the optimal balance between performance and quality.
Yes. You can use OBS without a graphics card, but the performance may be limited on low-end PCs. Using the software encoding of x264 instead of hardware can improve the performance.

WonderFox DVD Ripper Pro
WonderFox DVD Ripper Pro is a professional DVD ripping program that can easily bypass all DVD encryptions and rip any DVD, be it homemade or commercial, to all popular formats including MP4, MKV, MP3, WAV, H264, H265, Android, iPhone, etc. without a hitch. It also lets you edit and compress DVD videos at high efficiency. Download it now and digitize your DVDs for playback and backup!
* Please DO NOT use it to rip any copy-protected DVDs for commercial purposes.
Privacy Policy | Copyright © 2009-2026 WonderFox Soft, Inc.All Rights Reserved
