You may have ever wanted to record audio in .wav format on your Windows 10 computer, right? Now you've come to the right place. In this article, we'll walk through 4 different methods of recording WAV files on Windows 10.
Not so tech-savvy? Try this novice-oriented app for audio recording, downloading, editing, compressing and converting: https://www.videoconverterfactory.com/download/hd-video-converter-pro.exehttps://www.videoconverterfactory.com/download/hd-video-converter-pro.exe
Q: "I recorded a file in Windows 10 Voice Recorder, but when I tried to upload it, the site I was uploading to said it had to be in WAV format. I can't tell what format the original file is in, and can't figure out how to change it. How do I change the Voice Recorder file to the WAV format, so I can upload it?"
A: I'm sorry to tell you that the built-in Voice Recorder app in Windows 10 only records lossy AAC audio in .m4a format. So, you have to go further and convert those M4A files to WAV format using some batch audio converters. But obviously, the audio quality won't improve. Therefore, you need to use some third-party applications to record audio in WAV format directly. Here are 4 recommended ways to record WAV files on Windows 10. Just read on!
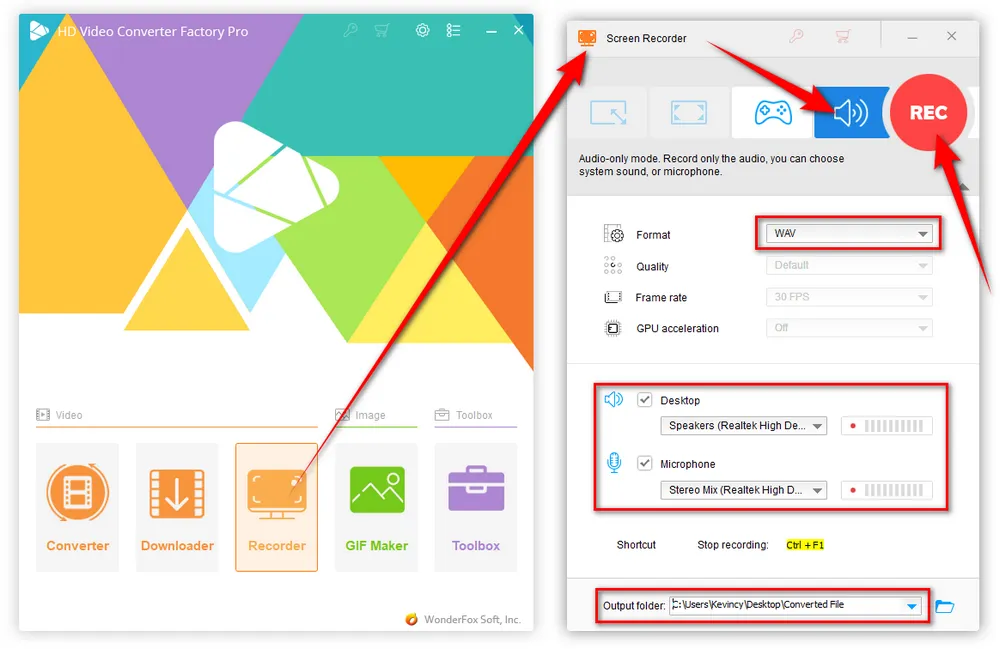
HD Video Converter Factory Pro equips a Recorder feature capable of recording screen/gameplay as well as audio-only file in WAV. You can choose to record audio from system sound or microphone without time limit. Just try it!
First, let's begin with WonderFox HD Video Converter Factory Pro. Despite the rustic product name, it in practice offers an easy entry into video and audio processing work. This novice-oriented app comes with a Recorder feature that allows you to directly record audio-only files in WAV format on Windows 10. More surprisingly, it also features multiple modules capable of audio downloading, editing, compressing and converting. The intuitive interface makes it quite easy to handle without a hitch.
Step 1. DownloadDownload, install, and run HD Video Converter Factory Pro on your Windows 10 computer.
Step 2. Open "Recorder" module from home screen, and press the "Loudspeaker" icon to switch over to "Audio-Only" mode.
Step 3. Select "WAV" option from the "Format" drop-down list. You're able to record WAV files on Windows 10 from either system sound or microphone, or both.
Step 4. Choose a destination folder for saving the recorded WAV files at the bottom of "Recorder" window.
Step 5. Click on the red "REC" button. After waiting for five seconds countdown time, it will start WAV recording on Windows 10.
Step 6. Stop recording by pressing the hotkeys "Ctrl + F1". Then the WAV files will be saved to the output folder.

Optional. When the recording is complete, you're also able to close the "Recorder" and open "Converter" on the home screen. Here, you're free to edit WAV files like trimming, splitting or merging, even making a ringtone for smartphones. Meanwhile, you can also perform the audio format conversion as you wish. The built-in 500+ configured presets will meet all your needs.

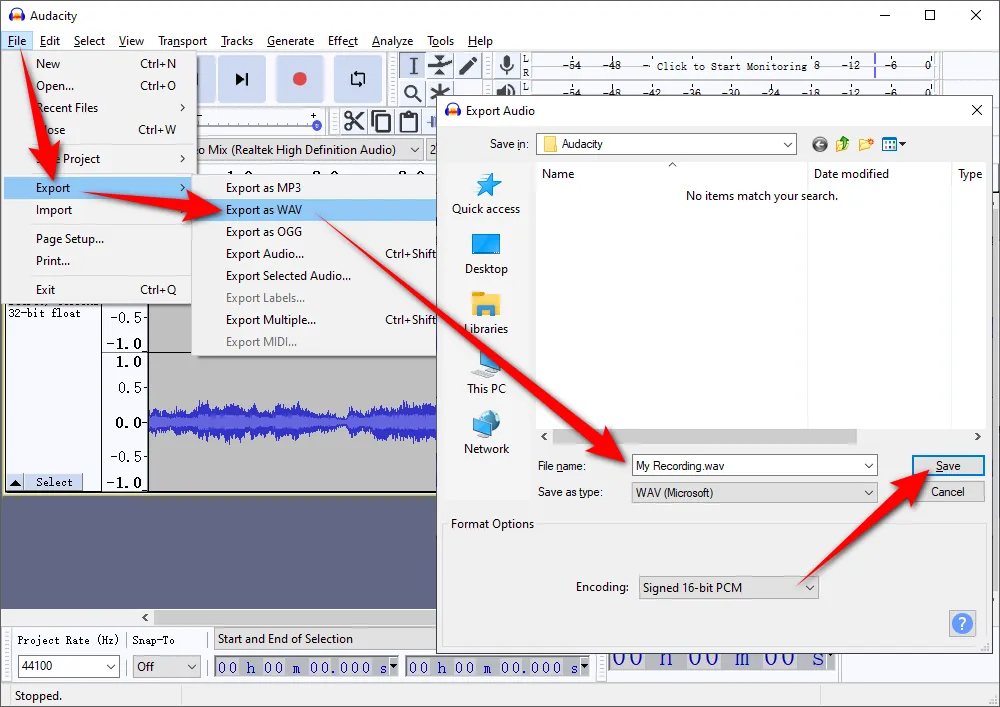
Audacity is another great option to record WAV files on Windows 10. It offers a one-stop solution to professional sound recording and editing. It's completely free, open-source and cross-platform. Here's the walkthrough about how to use Audacity to record the audio on your Windows 10 computer and save it as WAV file.
Step 1. Download and install Audacity from official website: https://www.audacityteam.org/download/. It also can be downloaded through Microsoft Store: https://apps.microsoft.com/store/detail/audacity/XP8K0J757HHRDW.
Step 2. Run Audacity. Navigate to the "Audio Host" section, select "Windows WASAPI", then choose your input source for recording the audio in the drop-down list of "Recording Devices" and "Playback Device".
Step 3. Press the red "Record" button to starting the recording process. To stop it, just click on the grey "Stop" button.

Step 4. Now you're able to either edit the recording in the workplace, such as split or merge tracks, isolate vocals, normalize audio file, audio, add effects, etc., or directly proceed to export it to WAV in Audacity.
Step 5. Click on "File" menu > "Export". Select "Export as WAV" for a single recording, or select "Export Multiple" for multiple recordings.
Step 6. Finally, press "Export" button to export WAV recording on Windows 10.

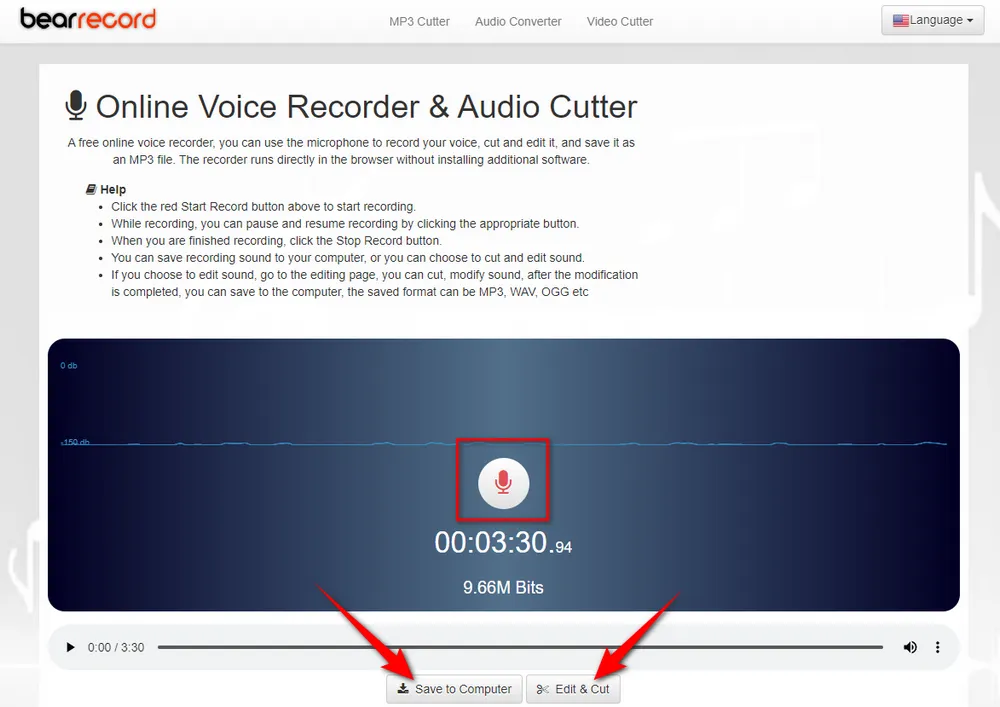
There are a few online Voice Recorders available that provide you with the ability to record any audio files into WAV format on Windows 10, and you can use these tools if you don't want any other software installed on your computer. Here I'll take "Online Voice Recorder & Audio Cutter" as an example for demonstration.
Step 1. Open the website link via your browser: https://voice-recorder-online.com/.
Step 2. Click on the red "Start Record" button to start recording.
Step 3. You're allowed to pause and resume recording by pressing the left button.
Step 4. To stop it, click the right-hand "Stop Record" button.
Step 5. Hit "Save to Computer" button to download the WAV recording to local drive.
Optional. You can also click on "Edit & Cut" button to edit and modify the recording, such as cut, crop, high-pitched, mute, fade in/out, etc.

HD Video Converter Factory Pro, a great Swiss army knife of A/V processing, works as a novice-oriented video/audio recorder, downloader, editor, compressor, converter, GIF maker, ringtone maker. Get the all-in-one app here!
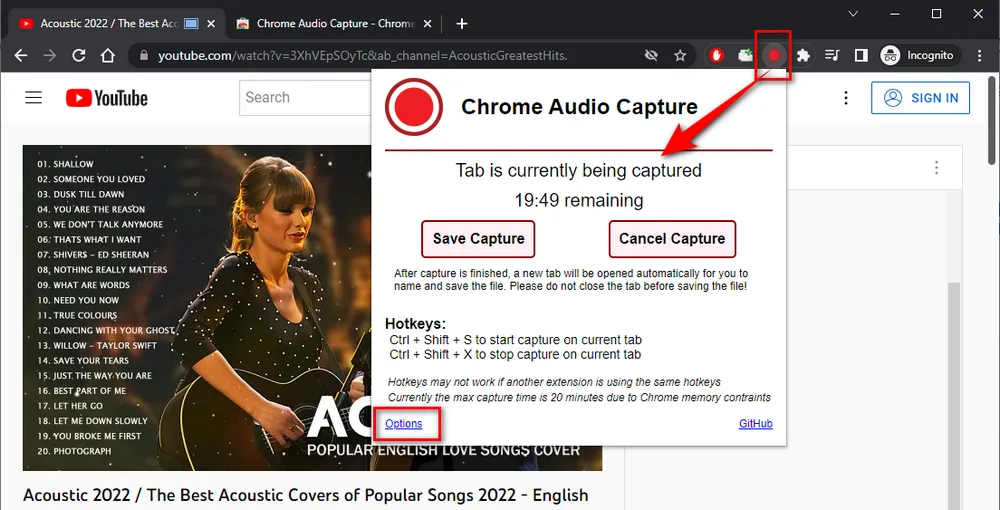
There are also some excellent browser extensions available for recording WAV files on Windows 10, and one of them is Chrome Audio Capture. As the name implies, it's a Google Chrome extension that allows you to record browser audio playing on the current tab from any website, but to your surprise, you can also add it to Microsoft Edge. It's worth noting that this extension doesn't work for recording WAV files outside the Chrome and Microsoft Edge.
Step 1. Open Chrome Audio Capture extension page: https://chrome.google.com/webstore/detail/chrome-audio-capture/kfokdmfpdnokpmpbjhjbcabgligoelgp, and add it to your Chrome or Edge.
Step 2. Simply click on the extension icon and open "Options" page. Choose ".wav" as the output file format. You can also modify recording length (Max time is 20 mins). Press "Save Settings" button.
Step 3. Play any audio source at the current browser tab.
Step 4. Click on the extension icon and hit "Start Capture" button to start the recording. Multiple tabs can be recorded simultaneously.
Step 5. Once the recording is stopped or when the time limit is reached, a new tab will be opened for you to save and name your WAV recording. Make sure to save your WAV file before closing the tab, otherwise the file will be lost!

A: The built-in Voice Recorder app doesn't directly save in WAV format. You'll need to use third-party software or convert the recordings to WAV afterwards.
A: Use a good quality microphone, record in a quiet environment, adjust your input levels properly, and consider using acoustic treatment in your recording space.
A: Yes, you can edit your WAV recordings using audio editing software like Audacity, Adobe Audition, or WavePad. These programs allow you to cut, trim, add effects, and perform other editing tasks to enhance your recordings.
A: WAV files are larger than compressed formats. A minute of stereo audio at CD quality (44.1kHz, 16-bit) is about 10MB.
That's all I want to share with you how to record WAV files on Windows 10 using 4 different simple applications, which don't require you to learn any advanced editing skill, and they are totally enough for your common audio recording and editing. Hopefully, this post would shed some light on WAV recording on Windows 10. Thanks for reading.

WonderFox DVD Ripper Pro
1. Rip DVD to 300+ presets with GPU acceleration.
2. Remove all sorts of DRM from DVD.
3. Compress an 8GB DVD to 1-2 GB digital video file.
4. 5-minutes to fast digitize DVD in MPEG-2 MPG.
5. Make a 1:1 intact digital copy (ISO or VIDEO_TS).
6. Multiple audio tracks, hard/soft and forced subs.
7. Support homemade/commercial DVD & ISO & Video_TS folder.
Privacy Policy | Copyright © 2009-2026 WonderFox Soft, Inc. All Rights Reserved