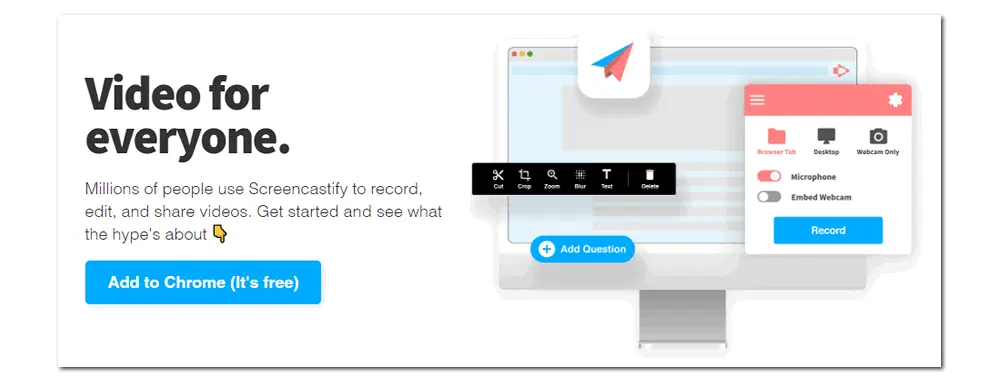
Screencastify is the leading screen recorder for Chrome that helps you record, edit, share videos, and create video assignments in seconds. It comes with easy features and requires no additional software installation. If you want to make some tutorials, demos, or presentations but don’t know how to use Screencastify, don’t worry, as we will explain everything about this recording extension in the following post. Just keep reading.
Tips. HD Video Converter Factory Pro is another solution to capture screen on a PC without lag & watermark. You can give it a try: https://www.videoconverterfactory.com/download/hd-video-converter-pro.exehttps://www.videoconverterfactory.com/download/hd-video-converter-pro.exe
Screencastify is a Chrome extension used to record your browser tab, desktop, and webcam. Before learning how to use Screencastify, you should add and install this plug-in for Chrome. If you don’t know how to do that, follow the specific guide below.
There are two ways to get the recording extension. One is to visit the homepage of Screencastify > Add to Chrome (It’s free) > Add to Chrome > Add extension, and the other is to add Screencastify – Screen Video Recorder from the Chrome web store. Then the shortcut will be added to the extensions list.
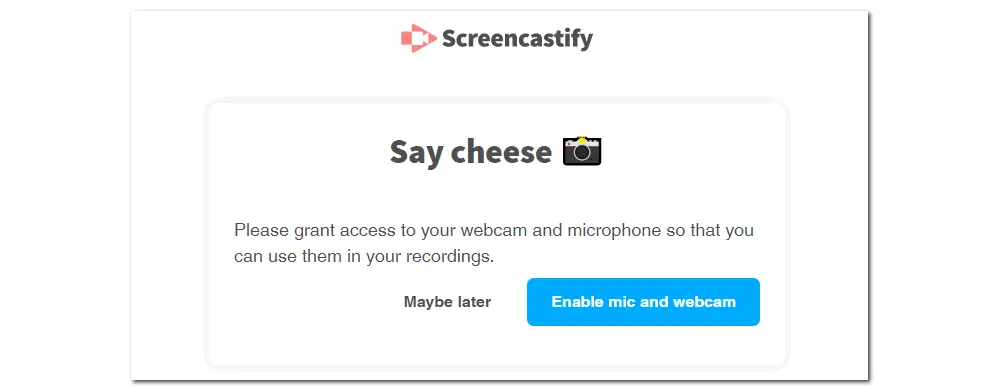
Click on the shortcut to launch Screencastify. Then you will be asked to sign in with your Google account. After that, you need to grant access to your webcam and microphone by selecting "Enable mic and webcam" so that you can use them in your recordings.
If the access is blocked, just follow its guide to authorize your mic and webcam.
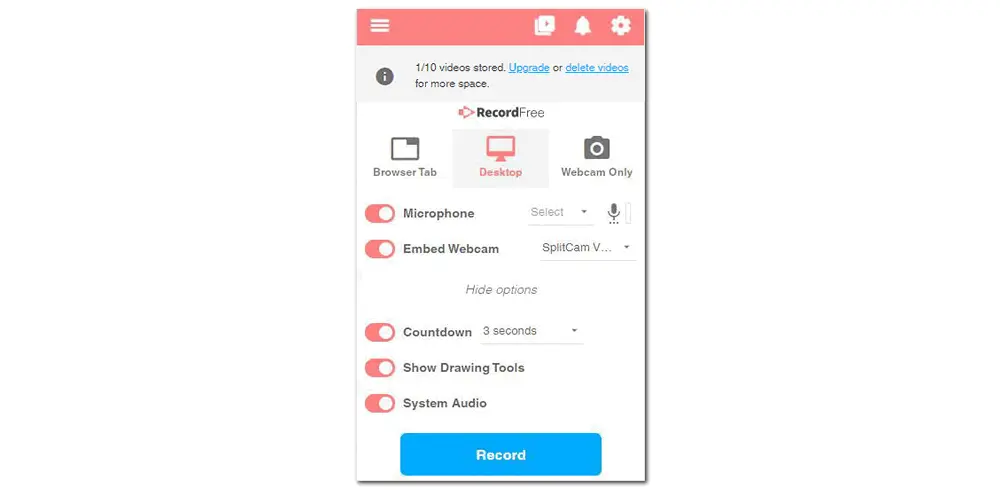
Click the extension icon in Chrome's top toolbar. In the new pop-up window, you can decide whether to record "Browser tab", "Desktop", or "Webcam Only". You can also turn on "Microphone" and select a specific audio source as Default Microphone, Communications Microphone, Stereo Mix, or Microphone. The recording volume can be adjusted as well.
If you show more options, you can set a countdown number, show drawing tools, and enable the system or tab audio according to your preference.
Now, we have installed and added the Screencastify recording extension to Chrome. Let’s see how to use Screencastify to record screen on a computer.
If you want an easier way to screen record with high quality on PCs, WonderFox HD Video Converter Factory Pro can be your option. Free download the software and learn more details in #Part 4.
Go to the Extensions at the top toolbar of Google Chrome. Click the Screencastify icon and choose the window you want to capture. Then click the Record button to start recording after the countdown. You can pause the recording and use the mouse pointer, pen, stickers, rectangle, and eraser to edit in real time.

Note: Some Mac users may encounter the error "Failed to Start Recording". Here is how to solve the Screencastify on Mac not working issue: go to System Preferences > Security & Privacy > Privacy > Screen Recording > check Google Chrome to enable the screen recording.
When you finish, click the stop button to end the recording. It will lead you to a new interface, where you can rename the file and trim unnecessary parts. Afterward, you can save the video file to your computer, export it to YouTube or Google Drive, or share the link with others.

Note: ScreencastifyFree only allows you to record 10 videos. You can upgrade to free up space and unlock the option of Export as MP4/MP3.
Hot Searches: How to Record MP4 on Windows | Best MP3 Recorder Windows 10 | Screen Recorder No Time Limit
After installing Screencastify and learning how to record on Screencastify, you know more or less about this recording extension. To make the key points clear, we have listed its main features here:
• Record the current browser tab or desktop (with webcam) or webcam only
• Screen record with system audio and microphone
• Support optimizing mic audio and recording a single application
• Provide annotation tools to keep your audience focused on what’s important
• Trim, merge, rearrange, and zoom in on clips with its web-based editor
• Download the file as MP4 or GIF, export audio only, or generate a sharable link
• Share a video in seconds to YouTube, Classroom, Gmail, etc.
• Available for Windows, Mac, and Linux
• Allow 10 videos creation, 30-minute recording length and exports in the free version
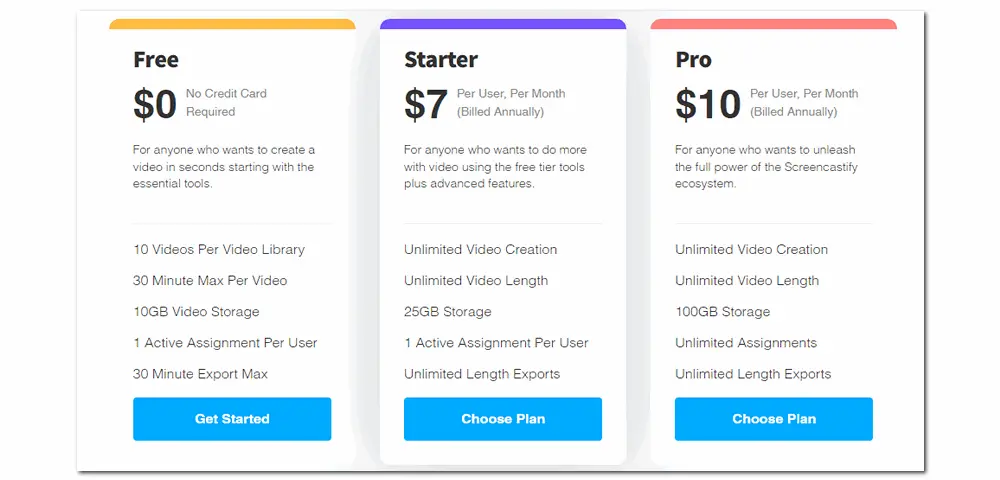
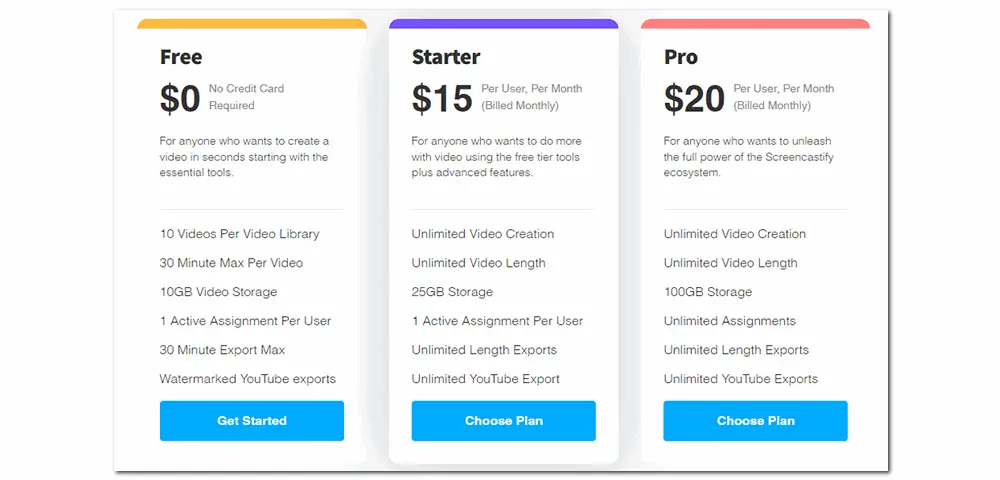
Whether you’re a novice or a seasoned video creator, you’ll find that Scrrencastify can do it all. However, for free users, many features are restricted, including 10 videos per video library, 30 minutes max per video, 30-minute export max, and watermarked YouTube exports. To get rid of these limits, you can upgrade and subscribe to one of its Annual or Monthly plans. Learn details >
Annual Plans:
Monthly Plans:
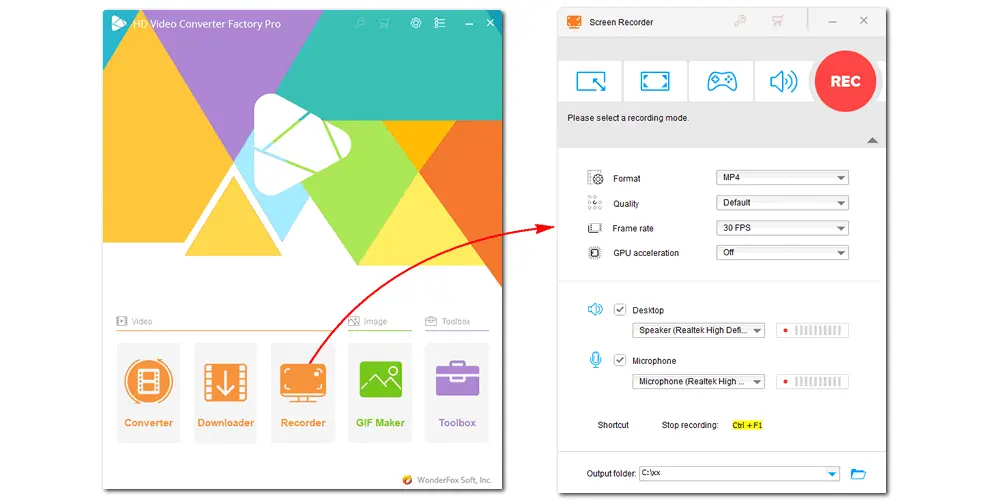
Although Screencastify makes it easy to record from Chrome, you may still meet problems like Screencastify not recording audio. Besides, you need to re-open the recorder once you click elsewhere on the screen. Then here comes the best alternative recorder – WonderFox HD Video Converter Factory Pro. It features a simple video & audio recorder, which can record anything on your computer. It provides four recording options, including part-screen, full-screen, gaming, and audio only. Related settings can be customized based on your needs. For example, you can record MOV/MP4/MKV/AVI video and MP3/WAV/AAC/AC3 audio with high quality.
Recording is one of the main functions of the versatile HD Video Converter Factory Pro. It also features a fast video converter (convert video/audio files in batch mode), downloader (save video and audio from websites), GIF maker (make GIFs from video or photos), editor (trim, crop, rotate, merge, compress, add watermark, etc.), and toolbox (make ringtones, extract subtitles from videos, and more). It’s an all-in-one and efficient video software for PCs.
Get this easy and versatile video recorder:
Price: $29.95 for 1 PC per year and $34.95 for a lifetime. (WonderFox 14th-anniversary sale, get discounts >)
–– Does Screencastify Record Computer Audio?
Yes, Screencastify can record sound from your computer. It’s also able to capture your voice from the microphone.
–– How Do I Fix Screencastify No Sound Problem?
Firstly, make sure that you have authorized Screencastify to your microphone. Before recording, enable the audio device and check the "Share system audio" option to unmute your recording.
–– How to Screen Record on Chrome?
You can use convenient Chrome recording extensions like Screencastify or utilize the simple WonderFox HD screen recorder. We’ve shown you how to use Screencastify earlier, so here shares how to record with WonderFox HD Video Converter Factory Pro:
• Free downloadFree download the recording software and launch it on your PC
• Open the Recorder. Select a recording mode and area
• Set a format, quality, audio device, and output path
• Start recording after the countdown and end it when you’re done

Step 1. Download WonderFox DVD Ripper Pro;
Step 2. Load DVD into the software;
Step 3. Select output format as MP4 or others;
Step 4 (Optional). Modify video parameters;
Step 5. Convert DVD to your desired format.
* Do not use this software to rip copy-protected DVDs for commercial use.
Privacy Policy | Copyright © 2009-2026 WonderFox Soft, Inc.All Rights Reserved
