Screen recording has become an essential tool for daily work, whether it's creating tutorials, capturing gameplay, or saving important video calls. When choosing a recording format, MP4 is the format of choice as it's compatible with a wide range of devices and platforms, making it ideal for sharing and viewing content easily.
Want to record MP4 videos on your Windows device? Finding the right MP4 recording software is the first step. Below, I'll introduce you to a powerful and user-friendly MP4 screen recorder and show you how to record MP4 on Windows. Just read and follow!
WonderFox HD Video Converter Factory Pro is a versatile video software with a screen recorder that can help you easily record your computer screen with audio. It offers different recording formats, including MP4, AVI, MOV, and MKV. Therefore, it can not only be used as an MP4 screen recorder to record MP4 on Windows, but also help you record AVI, MOV, and MKV videos directly.
It supports customizable recording areas, and you can record either the full screen or a specific section (in either horizontal or vertical orientation) as needed. In addition, it allows you to select the recording quality and frame rates to capture high-quality videos. The whole program is very simple to use. After recording, you can also use it to trim, crop, compress and convert your recordings (e.g., to FLV, MP3, etc.).
Get this screen recorder and learn how to record screen in MP4 format on Windows in the next section.
WonderFox HD Video Converter Factory Pro will help you screen capture MP4 on Windows with no watermark, no time limit, and no lag. Try the MP4 video recorder now!
* Please free download free download the recommended MP4 recording software for Windows 10 and follow the steps.
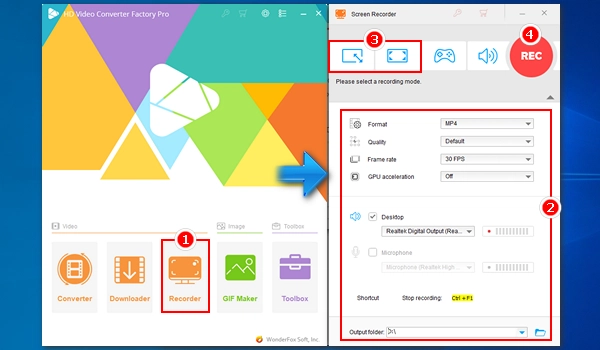
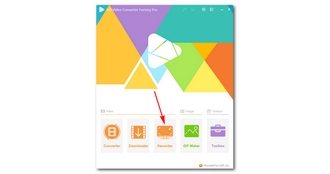
Run WonderFox HD Video Converter Factory Pro. Click Recorder to bring up the recorder window.

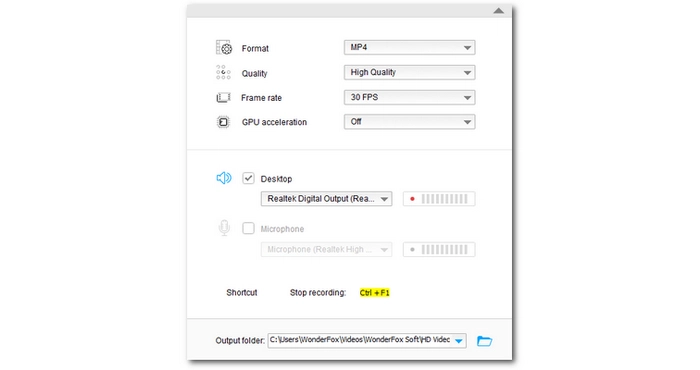
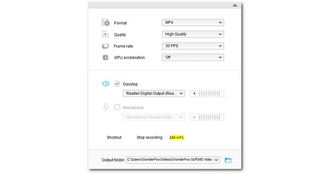
From the Format drop-down list, select MP4 as the recording format. You can also choose to record AVI, MOV, or MKV. Next, modify the quality, frame rate, and GPU acceleration or leave it as default. Then, check the Desktop option to record MP4 video with system audio. You can also tick off the Microphone if you want to capture your voice. Don’t forget to set an output folder for the recorded file via the ▼ button at the bottom.
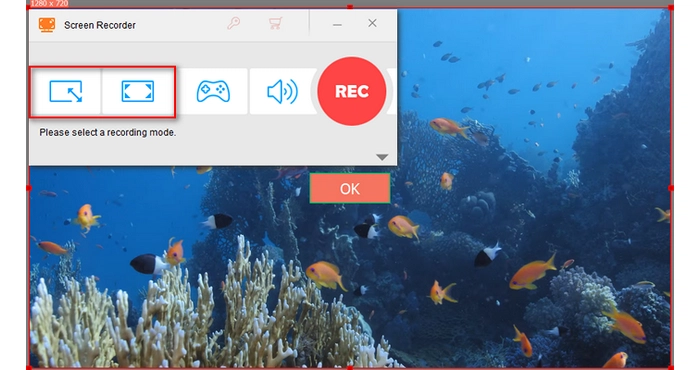
Now, head over to the top recording modes. Select the left Custom if you want to record a specific part of the screen or the second Full Screen for capturing the whole desktop. After the recording area is selected, click OK.
Finally, hit the red REC button to start recording your screen after a five-second countdown. When you finish, press the hotkeys ‘Ctrl + F1’ to stop the recording. The output folder will pop up with the MP4 video you just recorded.
That’s how you record MP4 on Windows with the recommended MP4 screen recorder. With the same steps, you can also record in AVI, MOV, and MKV format. If you need further editing of the recorded video, simply import it into the Converter module and edit it as you see fit.
I hope you find this article helpful. Thanks for reading.
I write about multimedia topics, including video and audio conversion, compression, editing, and downloading. I joined WonderFox in 2020, and my goal is to help readers solve everyday tech problems more easily. In this article, I’ve shown you how to record a video on Windows in MP4, AVI, MOV, and MKV format. Hope you found it useful!
![]()
![]()
![]()
Terms and Conditions | Privacy Policy | License Agreement | Copyright © 2009-2026 WonderFox Soft, Inc.All Rights Reserved