When you try to open a video, audio, or an existing project in Premiere Pro, it's supposed to be loaded smoothly. But sometimes, you may encounter file import failure in Premiere Pro, such as the file has no audio or video streams, there was an error decompressing audio or video, the importer reported a generic error, we were unable to open the file on disk, the file has an unsupported compression type, unsupported format or damaged file, and so on.
Such file import failure usually comes from many aspects. Typically, it involves the following factors:
❌ Unsupported video or audio type.
❌ Missing codecs.
❌ DRM protection.
❌ File corruption.
❌ Too many media cache files.
❌ Inactivated software.
❌ Software bugs.
While the reasons vary, there are general fixes to the file import failure issue in Premiere Pro. See more details in the next part.
🎯 Specific Error and Fix:
Premiere Pro MOV Import | Premiere Pro AVI Import | Premiere Pro WebM Import
One proven solution to fix the file import error in Premiere Pro is to relocate the file to a different folder. Then import the file into Premiere Pro from the new location. If lucky, the error should be fixed.
Just like moving the file to a different folder, renaming the file may also solve the Premiere Pro file import failure. By renaming the file, you can change the file name from XYZ to XYZ1 and see if it works.
If necessary, change the file extension too. For example, you can change .mp3 to .aac, .m4a, .aiff, etc., and then see whether the file can be imported into Premiere Pro successfully. If you can’t see the file extension, go to File Explorer (Windows 10) > select View > check the box before File name extensions. Now all the files on your computer will appear with the file extension.
This solution often works with audio import failure in Premiere Pro. So if you can’t import MP3, WAV, etc. into Premiere Pro, try renaming the file first.
🔔 Note: Changing the extension doesn't equal conversion.
If you encounter a file import error when importing a new video or audio file, chances are that the file is encoded in an unsupported file type, such as incompatible format, codec, and variable frame rate. In this case, you can transcode the file to a format supported by Premiere Pro. You are recommended to use an editing format instead of a delivery format so that Premiere Pro can cope with it better.
WonderFox HD Video Converter Factory Pro is a professional but easy-to-use video conversion program that can convert all mainstream video/audio formats and codecs. It can easily convert files like MP4, MP3 to Premiere Pro supported formats in just a few clicks. Moreover, it allows you to modify the parameters, such as encoder, bitrate, frame rate, resolution, etc. to improve playback performance. Now, let’s free download free download the software to convert the unsupported file for Premiere Pro.
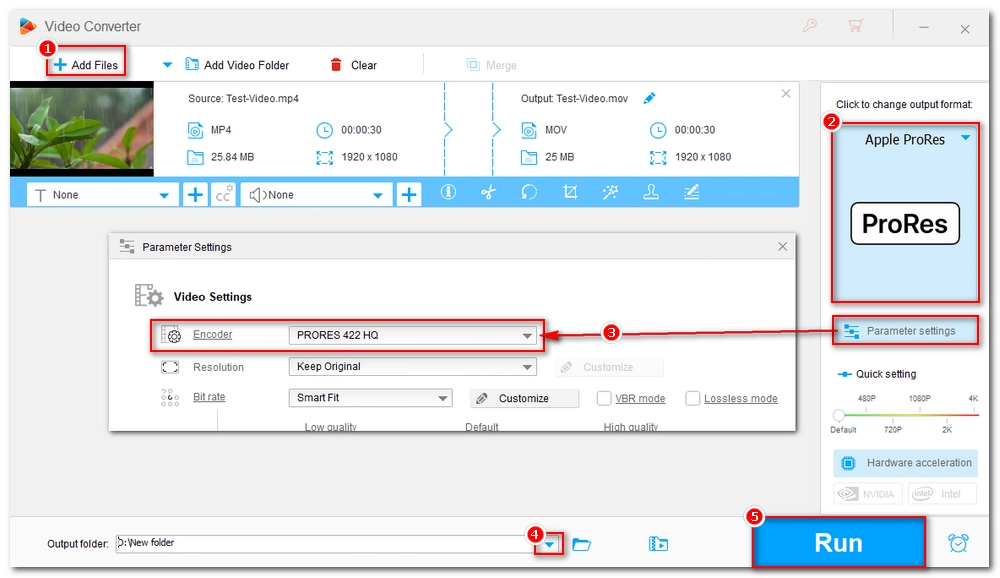
Step 1: Launch the software and open Converter. Then click Add Files to add the unsupported file. You can also directly drag the file into the program interface.
Step 2: Expand the output format page on the right. Then click the Apple tab and choose Apple ProRes. It is one of the best editing formats for Premiere Pro.
Step 3: Open Parameter settings. Then choose a preferred ProRes codec in the Video Encoder option box. Click OK to save the changes.
Step 4: Click the ▼ button to set an output folder.
Step 5: Finally, press Run to start the conversion.
💡 This program will automatically convert video to a constant frame rate that Premiere Pro supports.
After the conversion, you can try importing the converted file into Premiere Pro and see if the problem gets solved.
If you are running Windows 10 or Windows 10 N edition, Media Feature Pack may also help you fix file import failure in Premiere Pro by installing Media Player and related technologies.
Just visit the Media Feature Pack page, select your Windows edition, and then click Confirm to download the corresponding Media Feature Pack to your computer.
After the installation, try opening your media in Premiere Pro and see whether the problem persists or not.
💡 Tip: Make sure you are online and turn off the VPN so that Adobe can use the codecs to read your media file.
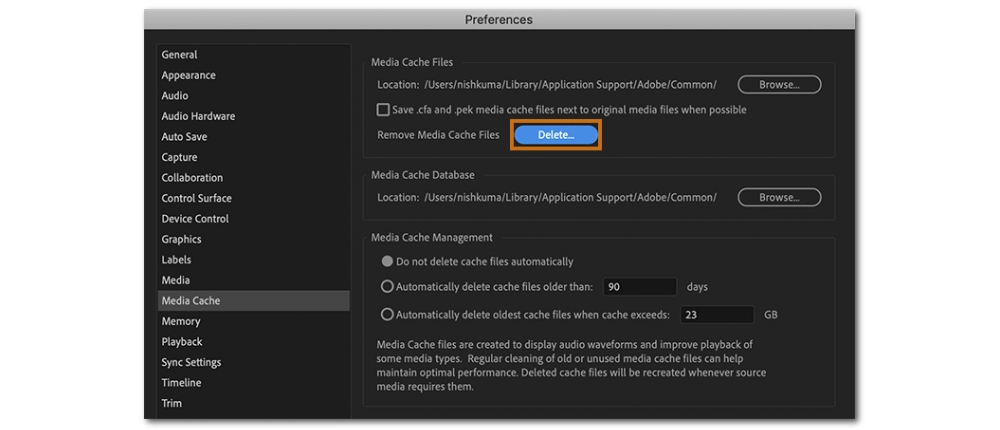
The media cache files are created to provide faster performance. But when old and unused cache files pile up, it may cause errors like file import failure in Premiere Pro. Therefore, you can try clearing or deleting the Media Cache files and see if this fixes the import problem. Here is how to delete the Media Cache in Premiere Pro.
Step 1. Open Premiere Pro.
Step 2. Go to Edit > Preferences > Media Cache. (If you opened a project, you’ll need to close it before following along with this step.)
Step 3. Click the Delete button next to Remove Media Cache Files.
Step 4. Choose Delete all media cache files from the system. Don’t worry, the deleted cache files will be automatically rebuilt the next time you start a project.
Step 5. Click OK and restart Premiere Pro.
Now, test if the file import failure is fixed by opening your media in Premiere Pro.
Alternatively, you can also go to the Media Cache folder and delete the cache files manually. On Windows, the default location of the Media Cache folder is \Users\username\AppData\Roaming\Adobe\Common. Just delete the whole folder and empty the trash bin.
Resetting preferences is another way to troubleshoot generic errors in Premiere Pro. It may just fix your file import error. Follow along with the instructions below to reset preferences to the factory defaults in Premiere Pro.
🔔 Note: You should back up your preferences in advance.
Step 1. Navigate to the preferences folder on your Windows. By default, the Preferences folder is located at C:\Users\username\Documents\Adobe\Premiere Pro\version\Profile-profilename.
Step 2. Rename the folder or move it to another place.
Step 3. Open Premiere Pro. Now, a new preferences folder with factory defaults will be generated.
Check if you are using a trial version of Premiere Pro. If you are, try upgrading to a paid Creative Cloud membership so you can access the .dll files required for importing MP4 and AVCHD files.
If your Premiere Pro is experiencing some bugs, it may result in file import failure as well. You can try to uninstall the program, and then re-install it on your computer. After installation, open the software and import your media to test if the problem goes away.
Your file may be damaged or DRM-protected, which leads to file import failure in Premiere Pro. You’ll need to re-download or re-gain the file so it can be imported into Premiere properly.
If the file is corrupt, you can also try to repair the file using a file repair tool such as Stellar Repair for Video.
Still having trouble? Here are more tips for fixing specific file import failures in Premiere Pro:
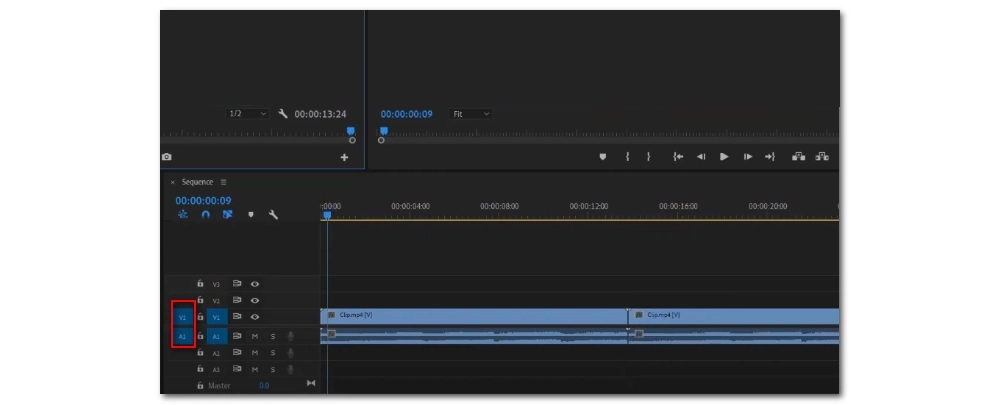
When you import MP4 into the Premiere Pro timeline, but only the audio or video is imported, it may be that you forgot to turn on the A1 or V1 source patching.
Source patching will show you the video, audio, or image to be inserted into the timeline. You need to have both A1 and V1 enabled to see the audio and video tracks. Here's how to enable them in Premiere Pro.
Step 1. Click the V1 and A1 boxes on the far left of the timeline.
Step 2. Drag the MP4 into the timeline and see if it works.
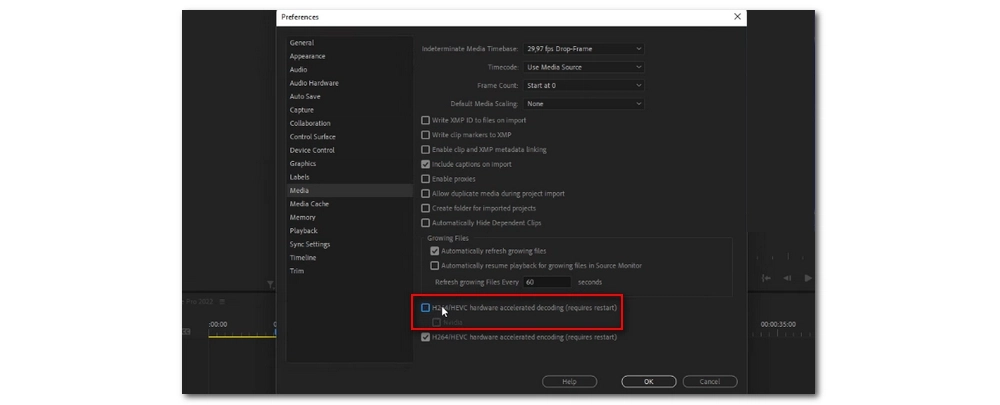
Hardware acceleration can make your rendering faster and higher quality by using the GPU. However, if your GPU is underpowered, it may cause unexpected errors. You can turn off hardware acceleration and see if that fixes Premiere Pro not importing MP4 or MKV. Here's what to do.
Step 1. Open Premiere Pro.
Step 2. Select Edit > Preferences > Media.
Step 3. Uncheck the box before H264/HEVC hardware accelerated decoding. Then click OK.
Step 4. Restart Premiere Pro and test whether the problem goes away.
If you need to import an FLV file, you can also install an FLV importer for Adobe Premiere Pro.
Moyea FLV Importer is a simple import plug-in program that allows you to import various types of FLV to Adobe Premiere without transcoding.
Step 1. Go to (http://www.video-to-flash.com/flash_video_importer/) to download the FLV Importer on your computer.
Step 2. Click it to start the setup process after finishing the downloading process.
Step 3. Launch Premiere Pro and try to import your FLV files.
I mentioned earlier changing the MP3 file extension as a possible workaround, but it doesn’t always work. To properly change the format, you'll still want to use a file converter to change the MP3 into an audio format that is compatible with Premiere Pro.
For this, WonderFox HD Video Converter Factory Pro still works. Just add the MP3 file, select an output audio format (WAV, M4A or AIFF for example), then start the conversion.
Premiere Pro is an advanced and powerful video editing software that can help us get creative and productive. However, it’s frustrating when you can’t even import a file into the program. But don’t be upset. As this kind of error is often caused by incompatible format/codec, software bugs, media cache files, etc., it is quite easy to find solutions to fix it.
In this article, I have rounded up 9 solutions to this problem. Hope these could work for you. However, if none of the methods above could fix your Premiere Pro file import failure, you should contact Customer Care for more professional solutions.
That’s all I want to share about how to solve file import failure in Premiere Pro. I hope this article was useful. Thanks for reading. Have a great day today!
I write about multimedia topics, including video and audio conversion, compression, editing, and downloading. I joined WonderFox in 2020, and my goal is to help readers solve everyday tech problems more easily. In this guide, I have gathered 9 proven fixes to file import failures in Premiere Pro. Hope these methods can resolve your issue once and for all.
![]()
![]()
![]()

WonderFox DVD Ripper Pro
WonderFox DVD Ripper Pro is a professional DVD ripping program that can easily rip any DVD (whether homemade or commercial) to all popular formats including MP4, MKV, MOV, AVI, MP3, WAV, H264, H265, Android, iPhone, and so on. It also lets you edit and compress DVD videos efficiently. Download it to enjoy a fast and trouble-free DVD ripping experience.
Privacy Policy | Copyright © 2009-2026 WonderFox Soft, Inc.All Rights Reserved
