AV1 is becoming increasingly popular, but you may get a failure message when importing AV1 files to Premiere Pro for editing. Wonder why the failure occurs? Or do you want to export AV1 files from Premiere Pro but don't find the export option?
No worries! This post will help you get AV1 video codec support in Premiere Pro for importing and exporting!
💡 Fail to import AV1 videos to Premiere Pro? Try this AV1 converter to change the AV1 codec for smooth importing and editing.
https://www.videoconverterfactory.com/download/hd-video-converter-pro.exe https://www.videoconverterfactory.com/download/hd-video-converter-pro.exe
Adobe Premiere Pro is the leading editing software among most professional video editing programs. But the support for AV1 encoding still lags in the latest version of Premiere Pro☹️☹️.
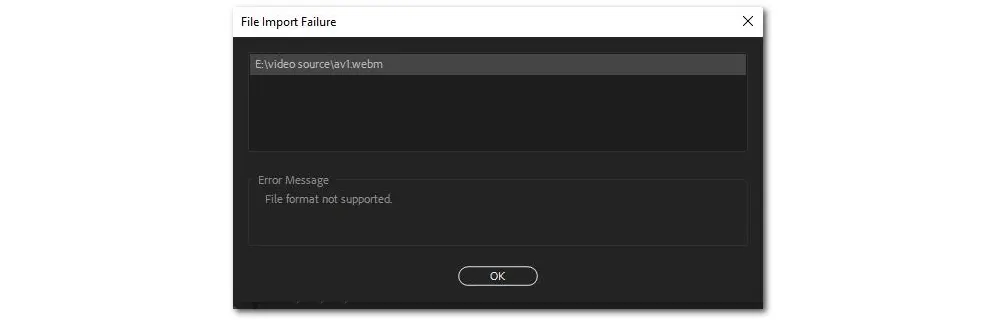
Users only get a failure message with "File format not supported" when they import an AV1 video to Premiere Pro. This doesn’t mean that you cannot process AV1 videos in Premiere Pro, though. This post shares 3 ways to help you successfully import and edit AV1 videos in Premiere Pro and export videos with AV1 codecs from Premiere Pro. Just keep reading!
Cannot import AV1 codec files into your editing programs, players, or devices? No worries. HD Video Converter Factory Pro can help you quickly transcode AV1 videos to the software or devices' compatible video codecs and formats. Try it now to fix the AV1 not supported problem!
For advanced users, you may know that Adobe Premiere Pro allows users to install various plugins to enhance the video editing experience. Although Premiere Pro doesn’t support AV1 codec, you can add plugins to enable AV1 encoding.
Autokroma Influx is a media import plugin for Adobe that allows you to import a variety of extensions, formats, containers, video and audio codecs into Premiere Pro and other Adobe products. In the release of October 2021, Autokroma Influx officially added support for video codecs like AV1, FFV1, .BIK Bink V1, H264 AVC, H264 HEVC, ProRes, GoPro, Vidvox Hap, Canopus HQ, and other new file containers and audio codecs.
How to Install Autokroma Influx to Import AV1 Videos to Premiere Pro
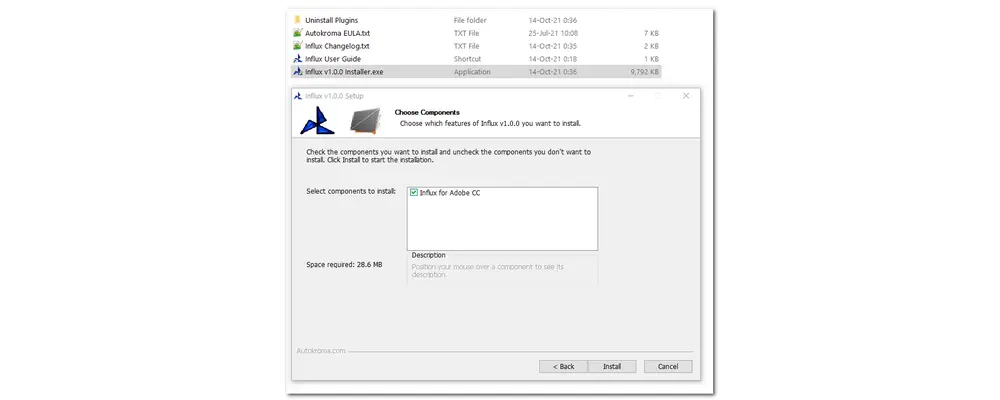
Step 1: Go to the Autokroma Influx official download page to download the Influx zip file on your desktops. Extract and run the Installer .exe, which includes Influx free trial version. You can test with the free trial firstly. Then purchase Influx to start fully decoding your files with the following steps.
Step 2: You need to edit our Config.toml file yourself manually and change what setting you would like to edit. On Windows this file is on C:\Users\[ Username]\AppData\Roaming\Autokroma\Influx\
You can disable any setting by writing false instead of true.
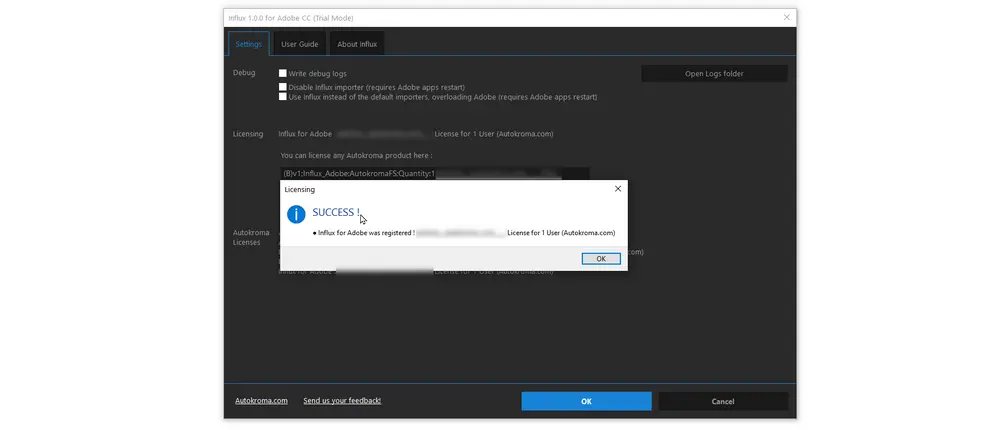
Step 3: License Influx after Purchase
Make sure you have received the code on the purchase confirmation page and by email. Copy it and move on to the next step. (The license key is in bold blue text.)
1> Open Premiere Pro, right-click on a project item, and click "Source Settings...
2> In the Settings tab, paste the license you copied previously. (If you're on Mac, use the "Paste Clipboard" button because COMMAND+V is not working.)
3> Click the "Activate" button and press "OK".
4> Restart Adobe Premiere Pro and you shouldn’t be in the Trial mode anymore.
5> Empty your Media Cache. You need to go to start Premiere without loading any project. Just go to Premiere Pro’s Preferences > Media Cache > Delete button on the top > 2nd radio Delete all media cache files from the system.
Step 4: Restart Adobe Premiere Pro and now you can have full decoding of your files. Drag and drop the AV1 encoded file to Premiere Pro and start editing now!
For beginners or users who want a quick and easy way to solve the AV1 Premiere Pro importing issue, it's strongly recommended to use an AV1 converter to transcode the AV1 codec files to Premiere Pro supported video codecs and formats.
WonderFox HD Video Converter Factory Pro seems to be the unremarkable AV1 video converter program. It can decode AV1 files in WebM or other formats and encode them with other codecs, like HEVC/H265, AVC/H264, MPEG-4, etc. in various Adobe Premiere-supported formats. Additionally, you can also use it to convert videos to AV1. It provides fast conversion speeds depending on hardware and supports batch conversion mode. In the following, let’s see how to convert AV1 to MP4 H264 or other formats for editing video in Premiere Pro smoothly.
Please free downloadfree download the software to be prepared. It is super easy and never requires a learning curve.
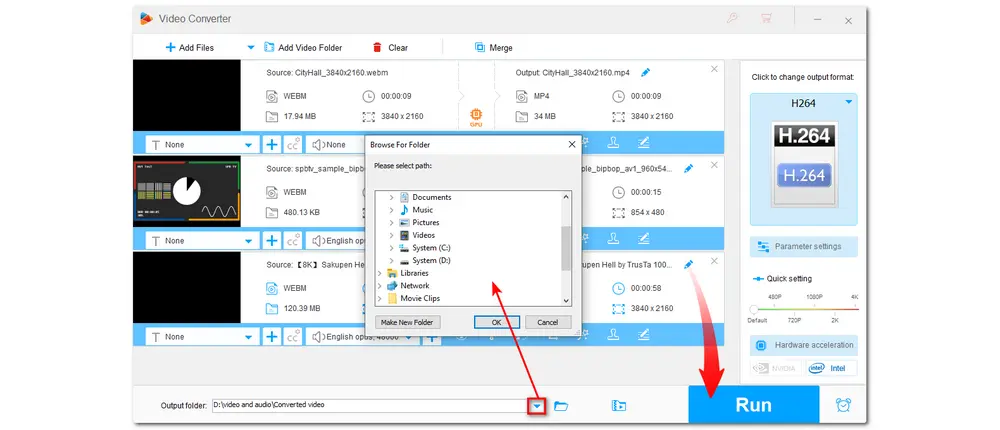
Step 1: Launch HD Video Converter Factory Pro after you install it on your desktop and enter the "Converter" program. Next, click "Add Files" or the center "+" button to import the AV1 files into the converter. You can also directly drag and drop the files into the workspace.
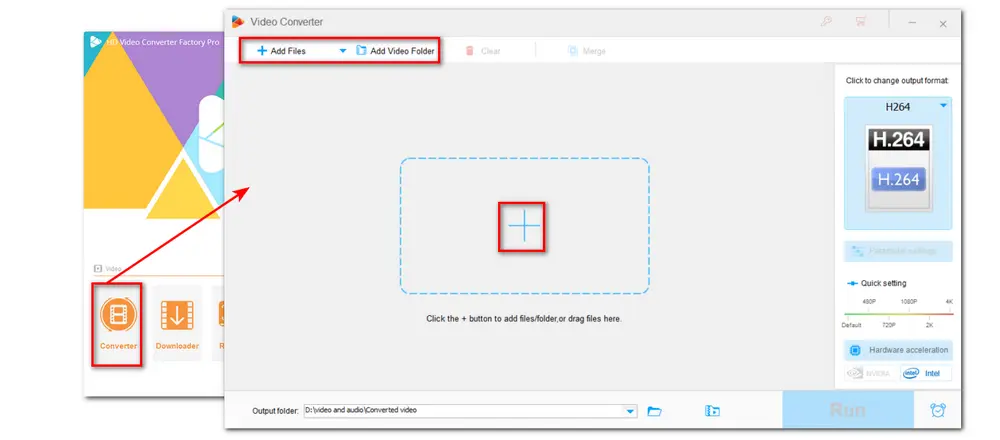
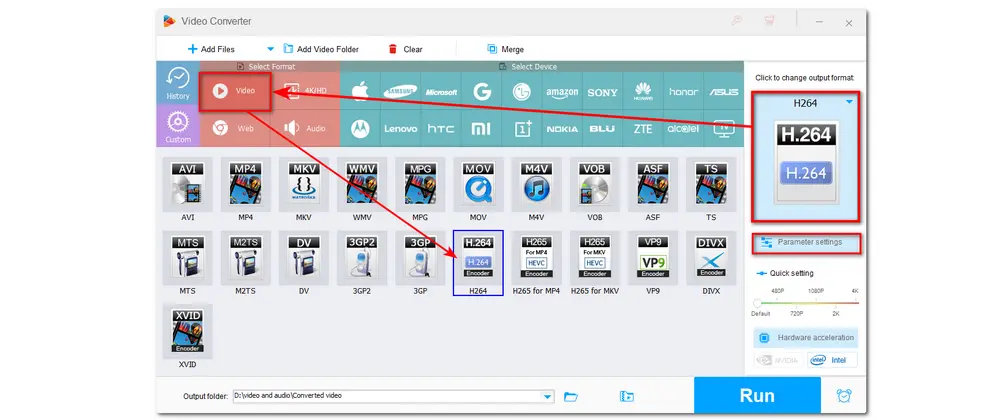
Step 2: Press the format image on the right side of the interface to expand the output format page. Head to the "Video" tab and choose "H264" as the output profile. You can surely select other Premiere supported formats.
💡 You can then enter the "Parameter settings" window to modify the output settings like encoder, resolution, bitrate, frame rate, etc.
Step 3: Click on the ▼ button to choose an output folder for the converted files. Finally, press "Run" to start the conversion at once.
Hot Search: Adobe Premiere MKV | Adobe Premiere HEVC | Premiere Pro Only Importing Audio
Voukoder is a free media encoding plugin that supports AV1 codec in Adobe Premiere Pro and Adobe Media Encoder. It's open source and can be downloaded free of charge from the Coukoder website. Instead of using any specially developed encoders, Voukoder builds on the well-established FFmpeg project and connects it directly to Adobe products through rapid memory access.
But note that the hardware accelerated AV1 encoding in Premiere Pro is only capable when Voukoder is used with Intel® Arc™ graphics.
How to Add AV1 Support to Premiere Pro with Voukoder for Exporting Encoding
Step 1: Get the free Voukoder plugin from Adobe Exchange, and install it. (It is compatible with Premiere Pro 13.0 or higher on Mac, Windows 32-bit, and Windows 64-bit.)
Step 2: Open Premiere Pro and edit videos as usual.
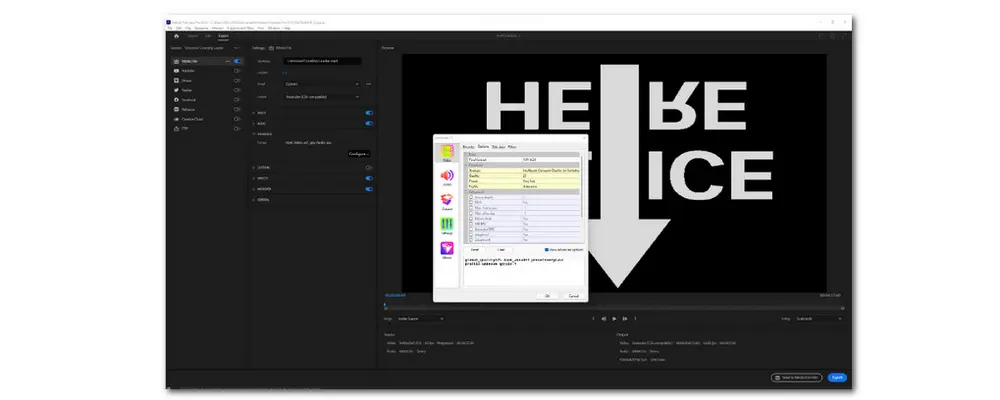
Step 3: Open the "Exporting Settings" dialog via the "File" > "Export" > "Media" menu or the CTRL-M key combination. Then, select the "Voukoder" format in the drop-down box under "Export Settings".
Step 4: The "Voukoder" exporter offers a new "Voukoder" tab in addition to the "Video" and "Audio" tabs. There you will also find an additional "Configure..." button. Click it to select the AV1 encoder.
As you can see, adding plugins to Premiere Pro for AV1 encoding is hard to handle for newbies. What’s more, there might be some errors even if you’ve changed the settings or the graphics is not qualified for hardware-accelerated AV1 encoding. Thus, transcoding AV1 video files with HD Video Converter Factory Pro may bring you a better Premiere Pro AV1 importing experience. Just download it and give it a try.
That’s all. Thanks for your reading. Have a nice day!

WonderFox DVD Ripper Pro
1. Rip DVD to 500+ presets with GPU acceleration.
2. Remove all sorts of DRM from DVD.
3. Compress an 8GB DVD to 1-2 GB digital video file.
4. 5-minutes to fast digitize DVD in MPEG-2 MPG.
5. Make a 1:1 intact digital copy (ISO or VIDEO_TS).
6. Multiple audio tracks, hard/soft and forced subs.
7. Support homemade/commercial DVD & ISO & Video_TS folder.
* Please DO NOT use it to rip any copy-protected DVDs for commercial use.
Privacy Policy | Copyright © 2009-2026 WonderFox Soft, Inc.All Rights Reserved