



As you know, a full-length video recording or footage always contains some unnecessary scenes. Therefore, video splitting is supposed to be an essential skill.
You may need to split a video for many practical reasons: trimming out unwanted scenes, saving only the highlights, cutting a large file into smaller parts for easier sharing, splitting a video in half, or creating equal-length clips such as 1-minute segments for social media. Splitting can also make a very large recording easier to store, transfer, upload, or edit on a less powerful computer.
You might think about turning to some video editing software like Adobe Premiere when you find yourself involved in the trouble. But obviously, they are not the best choices for general users in face of the costly price and complicated operations. Whether your source file is MP4, MOV, MPEG, MKV, AVI, WMV, or another common format, the methods below can help you divide the video without using a complicated professional editor.
More than a simple video and audio converter, WonderFox HD Video Converter Factory Pro includes practical editing tools for splitting, rotating, merging, cropping, and watermarking videos. Its straightforward workflow is useful when you want to divide one or several videos without learning a full timeline editor, and it can also process large local files without first uploading them to a website.
DownloadDownload this handy video splitter software and let's get started to split videos into multiple segments.
HD Video Converter Factory Pro offers a trouble-free solution to video splitting, merging, rotating, cropping, etc., letting you edit videos like a Pro. Download this easy-to-use video splitter to start your new experience.
 Download for Free
Download for Free
Download for Free
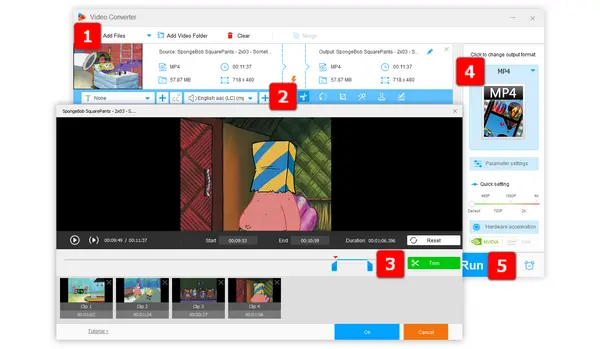
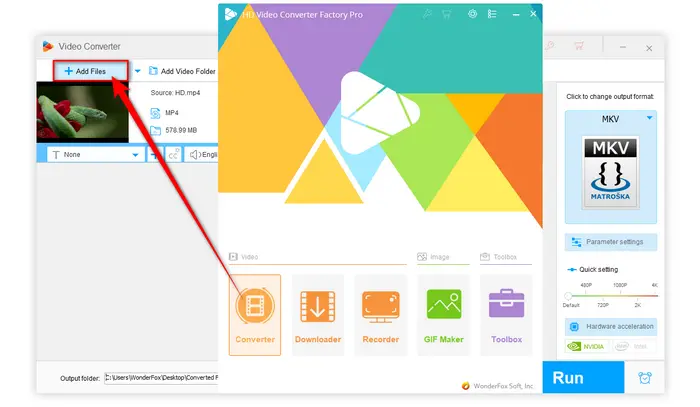
Launch HD Video Converter Factory Pro and open the "Converter" module. Next, press "Add Files" to import the video you want to split, or drag and drop it into the workspace. You can add multiple files for batch processing; if your recordings are stored together, the Add Video Folder option is also convenient for bringing them in at once.
💡 The program supports common video formats such as MP4, MOV, MPEG, MKV, AVI, WMV, and more, so you can follow the same steps whether you want to split an MP4 file, cut a MOV video into clips, divide MPEG files into several segments, or split a WMV file into smaller parts.
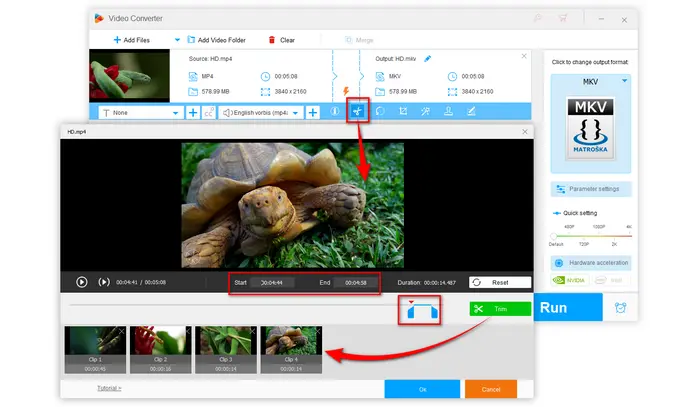
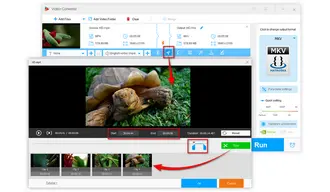
To split a video file, press the "scissors-shaped" icon to open a window, where you can drag the two blue sliders to determine the beginning and end position of your desired video segment. Or type in the Start and End time to acquire fine tuning control. Then click on the green "Trim" button on the right to cut a video clip.
Repeat the process to split the video file into different segments. The same process can be applied to other video files. Click OK to save the changes and go back to the main interface.
👉 Tips for different splitting needs:
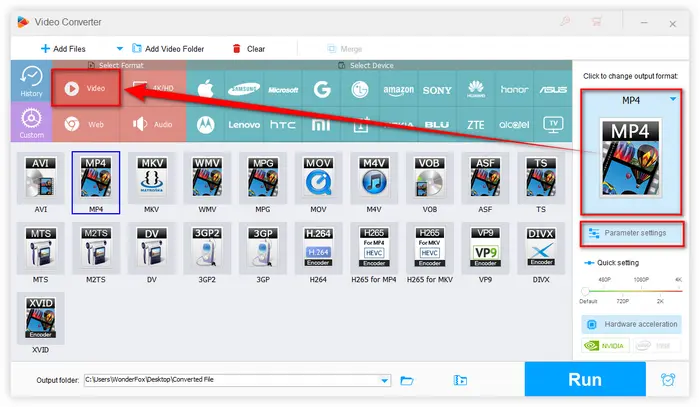
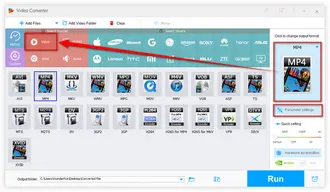
Click on the "Format" image on the right side to unfold a full list of 500+ configured presets, covering a wide range of common video/audio formats and hot devices.
If you want to keep the original format, choose the same output profile as the source video, such as MP4 for an MP4 file, MOV for a MOV file, WMV for a WMV file, or MPEG/MPG when available. You can also convert the split clips to another format, such as MP4, if you need better compatibility with phones, social media platforms, or media players.
💡 Tip: For further need, you're allowed to open "Parameter settings" window to change video codec, resolution, aspect ratio, bit rate, frame rate, etc.
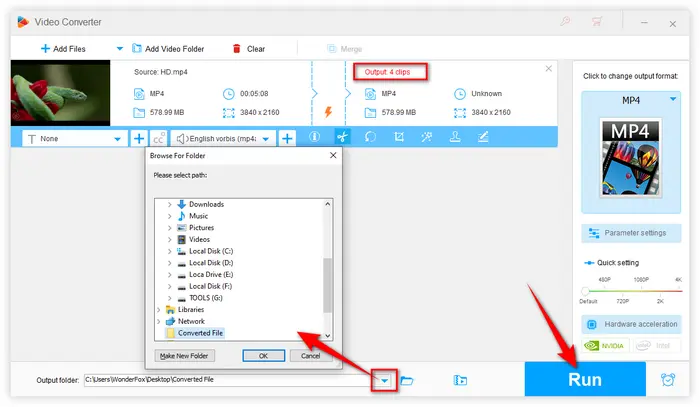
Designate a destination folder at the bottom and hit the "Run" button to export the split clips. The program supports hardware acceleration for supported encoding tasks, while the actual processing time depends on the source size, codec, output settings, and your hardware. You'll find all exported segments in the selected output directory.
👉 If you only need basic splitting and prefer a free option, WonderFox Free HD Video Converter Factory also provides the Trim workflow for common video & audio formats. The steps are similar, while this guide uses the Pro edition as the main example.
VLC Media Player does not have a conventional multi-clip splitter, but its built-in Record control can save a section of the video while it plays. This works well for grabbing one or two short clips when VLC is already installed.
Step 1. Open the source video in VLC and pause near the point where you want the new clip to begin.
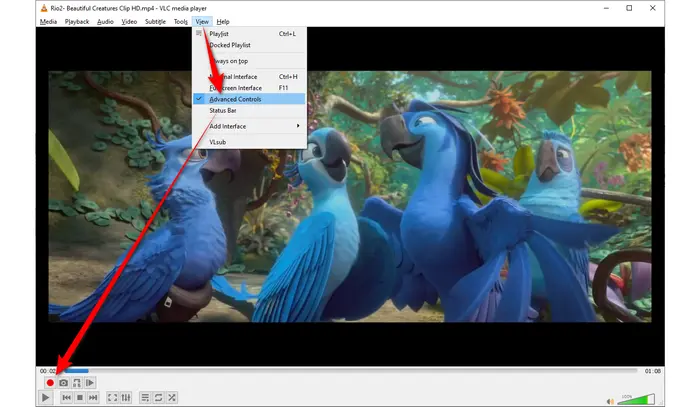
Step 2. Click View > Advanced Controls. A small toolbar with the red Record button will appear above the normal playback controls.
Step 3. Move the pointer along the playback progress bar to determine the start point. Then click the red "Record" button.
Step 4. Press the "Play" button for playback and click the "Record" button again when it reaches the end point. Repeat the process to record multiple segments in this video.
Attention. VLC records the section while it plays, so let playback continue until the desired end point instead of simply jumping the slider forward.
Step 5. VLC saves the recording automatically. To choose the destination in advance, go to Tools > Preferences > Input/Codecs, find the recording directory setting under Files, click Browse, and then save the preference.
VLC is practical for extracting a short passage, but it is inefficient for a long recording that needs to become many separate files because each section is captured during playback. For many cuts or more precise split points, use Method 1 or VSDC below.
VSDC Free Video Editor is a Windows timeline editor that gives you more control over where a video is divided and what you do with each resulting section. It is a useful free choice if you want to split first and then rearrange clips, apply different effects, or continue editing in the same project.
Step 1. Launch VSDC and create a new project. The easiest route is Import Content on the start screen: select your video, review the automatically detected project settings, and click Finish.
Step 2. Select the video on the timeline, place the playhead at the desired cut point, and click the razor-shaped Split into parts button. You can also press Ctrl + K. Repeat at other positions when you need several sections.
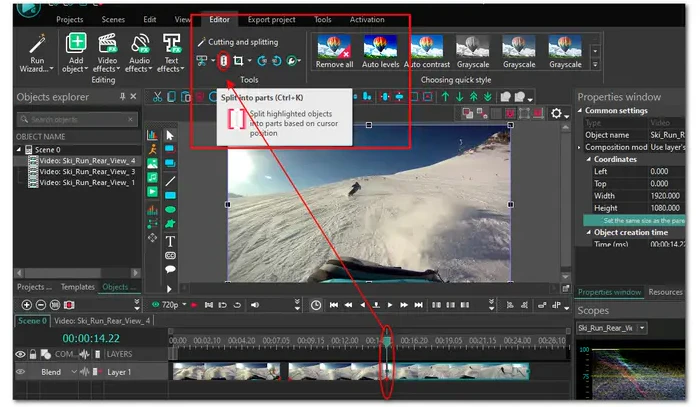
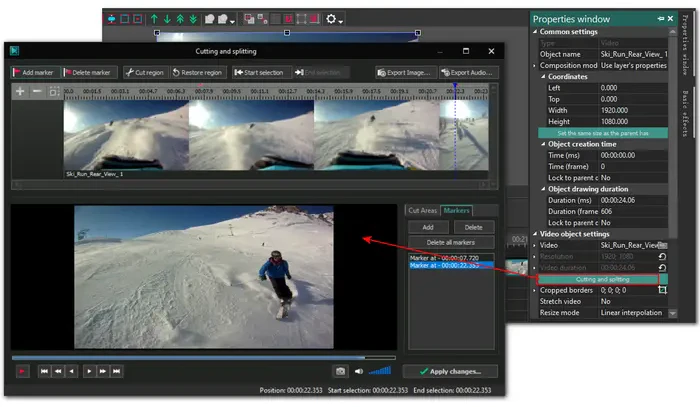
Step 3. For several split points at once, select the video and open Cutting and splitting. Add markers at the positions where you want divisions, and then click Apply changes. VSDC will place the resulting fragments one after another on the main timeline.
Step 4. Continue editing if needed, then open Export project and choose the target format and settings. If your goal is to export a project as multiple files after all editing is finished, VSDC also supports Segmentation markers and the Split file(s) By markers option in the export settings.
💡 Which VSDC split tool should you use? Split into parts is the fastest option for dividing a clip at the playhead. Cutting and splitting is more convenient when you need three or more parts or several markers. Segmentation markers are useful when you want the final export to be delivered as separate files.
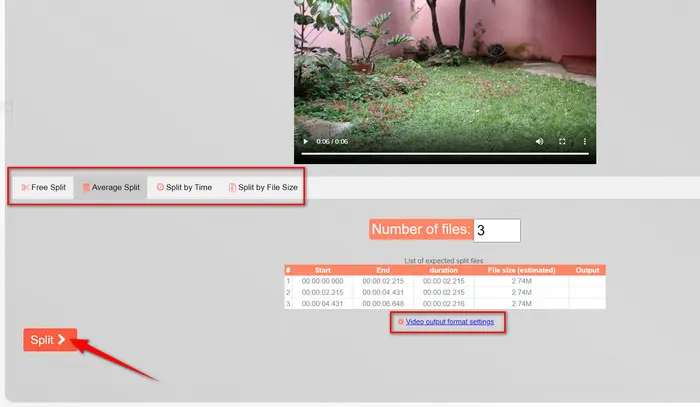
If you don't want to install any software on your PC, Split-Video.com, a free web service, can help you split videos online with 4 kinds of splitting methods: Free Split, Average Split, Split by Time, Split by File Size. It's simple, convenient and free for splitting videos in your browser.
Step 1. Open https://split-video.com/ in your frequently used browser.
Step 2. Click on the "Choose a file" button to add a video file from your computer. Or just drag and drop it to the gray area. Pay attention to whether the file format is supported.
Step 3. To split the video file, there are four modes available right there. Just choose any one to proceed.
Step 4. Click on "Video output format settings" link to choose an output video format.
Step 5. After confirming that there is no problem, click the "Split" button to start to split videos online.
Step 6. Wait for the processing, please be patient. After done, save the split videos to your computer.
💡 Online video splitters are convenient for small or occasional files. However, large HD/4K videos may take longer to upload and process, and you should avoid uploading private or sensitive videos to online services.
 Download for Free
Download for Free
Download for Free
Q1. Can I split a video into 1-minute segments?
Yes. In HD Video Converter Factory Pro, open the Trim window and create consecutive 60-second clips, such as 00:00:00–00:01:00 and 00:01:00–00:02:00. For many equal-length clips, calculate the time ranges first so you do not leave gaps or overlaps.
Q2. How do I split a video in half?
Check the full duration and use its midpoint as the split point. For a 10-minute video, for example, the two ranges are 00:00:00–00:05:00 and 00:05:00–00:10:00. In VSDC, place the playhead at that midpoint and use Split into parts.
Q3. Can I split MP4, MOV, AVI, WMV, or MPEG files with the same steps?
In general, yes. The basic workflow is the same: import the source, define the split points, create the clips, and export them. Format and codec support still varies by program, so choose an output profile that fits the device or app where the clips will be used.
Q4. What is the better way to split a very large video?
Use a desktop tool when the file is very large or you need many clips. It avoids web transfer limits and is less dependent on browser memory. HD Video Converter Factory Pro is straightforward for creating several exact ranges, while VSDC is better when the split clips still need timeline editing. VLC is less suitable because its Record method works during playback.
Q5. Can I split a video online without installing software?
Yes. If you prefer not to install anything, you can use a browser-based tool such as Split-Video.com. See Method 4 above. It is fine for occasional tasks, while desktop software is still the better choice for very large files or repeated editing work.
That’s all about how to split videos on Windows. HD Video Converter Factory Pro keeps the process simple when you need several precise clips or want to handle multiple local files. VLC is convenient for recording a short section from a video you are already playing. VSDC gives you a fuller timeline when the split is only one part of a larger editing job. Split-Video.com is a practical no-install option for occasional browser-based splitting, especially when the file is not too large.

Kevincy joined the WonderFox team in 2014 and has been a senior columnist ever since. With over two decades of experience in the video editing industry, he shares tutorials, tips, and how-to guides on video/audio processing and personal DVD backups. Family-oriented and passionate about helping others, he is dedicated to making video and audio processing easier for readers.


Kevincy joined the WonderFox team in 2014 and has been a senior columnist ever since. With over two decades of experience in the video editing industry, he shares tutorials, tips, and how-to guides on video/audio processing and personal DVD backups. Family-oriented and passionate about helping others, he is dedicated to making video and audio processing easier for readers.

Terms and Conditions | Privacy Policy | License Agreement | Copyright © 2009-2026 WonderFox Soft, Inc. All Rights Reserved