“Can you upscale video from 1080p to 4K in Premiere Pro?”
As a leading video editing program, many users may wonder if Adobe Premiere Pro can improve the video quality to 1080p or 4K resolution and how to do that.
Upscaling only the video resolution can be easy, but to increase the quality with enhanced visual details, improved sharpness and clarity, polished colors, etc., you may need a thorough guide.
This post explains the detailed steps on how to upscale video to 1080p or 4K while improving the image quality with Adobe Premiere Pro. Keep reading for more information.
Premiere Pro is a powerful video editing program, and there are three main ways that can help users upscale video to 4K. You can use it to upscale a 1080p video to match the full screen of a 4K display or improve low video quality to 4K with some other help. The detailed steps for each way are given below. Just read and start upscaling the video now!
To upscale video Premiere Pro for playback on a 4K screen, you can directly change sequence or frame size of the video to resize the video resolution. Also, this method helps with resizing videos to the same resolution when editing on the timeline. The following will take Premiere Pro upscale 1080p to 4K as an example to show you the detailed upscaling process.
Step 1. Launch Adobe Premiere Pro, create and open a project. Or you can open the existing project.
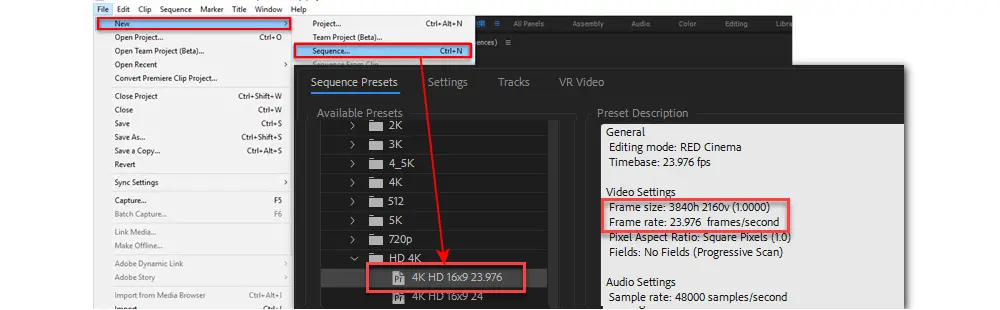
Step 2. Go to “File” > “New” > “Sequence” to open the “New Sequence” window on the top menu bar. Choose a sequence preset from the drop-down menu that matches the desired output resolution, e.g., 4K HD 16x9 23.976.
Step 3. Now import a video into the project bin and drag it to the timeline. Then an error message “Clip Mismatch Warning” will pop up, choose “Keep existing settings”.
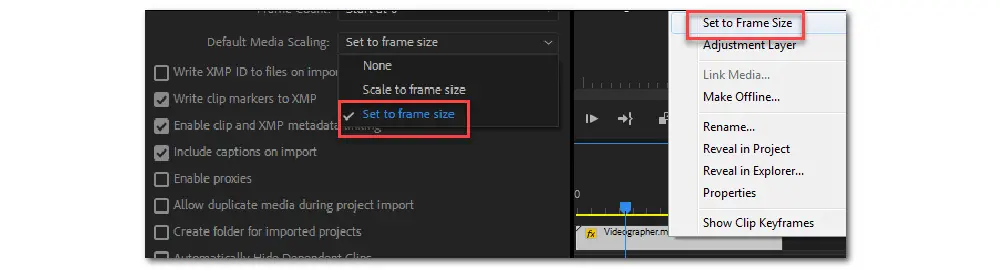
Step 4. You can see there are black bars around the video. Now right-click on the video in the timeline and choose “Set to frame size” to remove the black bars instead of “Scale to frame size”. The “Set to frame size” option can also be found in “Edit” > “Preferences” > “Media” > “Default Media Scaling” in some versions of Premiere Pro.
Differences for Set to frame size and Scale to frame size
• Both of them will make the footage fill the entire screen.
• Set to frame size: It will resize the video resolution to match the sequence settings and won’t rasterize the footage permanently. The value in the Effects control panel-scale property will be modified from 100% to another value. If you want to resize the footage later or add a zoom in/out effect, it will compute everything based on the original full frames.
• Scale to frame size: It will rasterize the footage and the scale property will be set. The value will remain 100% after scaling. And if you use the “Scale to frame size” to downscale 4K to 1080p, then the zoom in/out effect will calculate pixels based on the downscaled 1080p.
Step 5. You can zoom in on your video to check if there is any artifact or noise in the video. Then apply the unsharp mask effect to compensate for the blurred image if you desire a sharper image.
Step 6. Press “Ctrl + M” on your keyboard and tick the “Render at Maximum Depth” and “Use Maximum Render Quality”. Then set Bitrate Encoding to “VBR, 2 pass”. Click on “Export” now and you can enjoy the edited video smoothly.
This method will use another Adobe product: Adobe After Effect, which is a professional motion design app that can increase video quality and add various effects. You can use it to upscale video in Premiere Pro with the help of a dynamic link. Then you can go back to Premiere Pro for further editing with upscaled video quality. But note that this method is hardware demanding as it utilizes Premiere and After Effects simultaneously.
Step 1. Launch Adobe Premiere Pro, create a project, or open the existing project.
Step 2. Also, go to “File” > “New” > “Sequence” to open up the “New Sequence” window and then choose a preset that match your desired export resolution.
Step 3. Import a video and drag it to the timeline. Still, choose “Keep existing settings” when an error message “Clip Mismatch Warning” pops up.
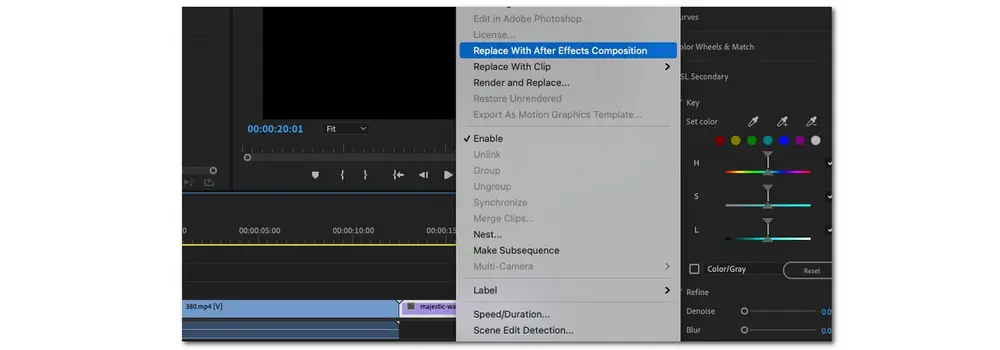
Step 4. Right-click on the video in the timeline and select “Replace With After Effects Composition” to send the video clip to After Effects.
Step 5. Now you will see a prompt to save your project. Set a name for it and choose a location to save the After Effects project.
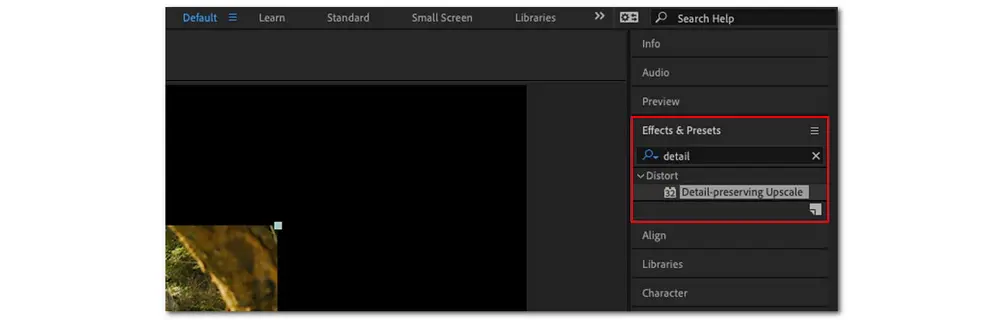
Step 6. Then you can see your clip on the canvas. Find the “Effects & Presets” panel on the right side and search for “Detail-preserving Upscale”. Double-click on it to add it to your clip.
Step 7. Go to the “Effect Controls” panel and click on “Fit to Comp Width” to upscale the footage to cover the width of the canvas. Set the scale amount to a larger percentage (200% for 1080p to 4K and 300% for 720p to 4K).
Step 8. Now save the After Effect project and go back to Premiere Pro. The video clip is now updated with the modifications applied in After Effects.
Step 9. Press “Ctrl + M” on your keyboard now to export the video. Note that the exporting settings should match your sequence settings.
Aside from using the built-in Premiere Pro feature and Premiere Pro plus After Effect to improve video quality. Premiere Pro may also work with a variety of plugins to assist in editing and video upscaling. One of the plugins that can help upscale video in Premiere Pro is the Infognition SuperResolution plugin. It makes use of motion estimation and high-frequency picture data fusion to produce a crisp and sharp image. You can use it to convert lower-quality SD video to HD, HD to 4K, and more.
Step 1. Download the Infognition SuperResolution plugin and install it.
Step 2. Create a new project or open the existing one in Premiere Pro. Drag your clip to the timeline and create a new Sequence. Go to "Sequence Settings" from the main menu and set the desired high resolution.
Step 3. Then you should see your original low-res clip surrounded by the darkness of unfilled space of high-res sequence in the master window.
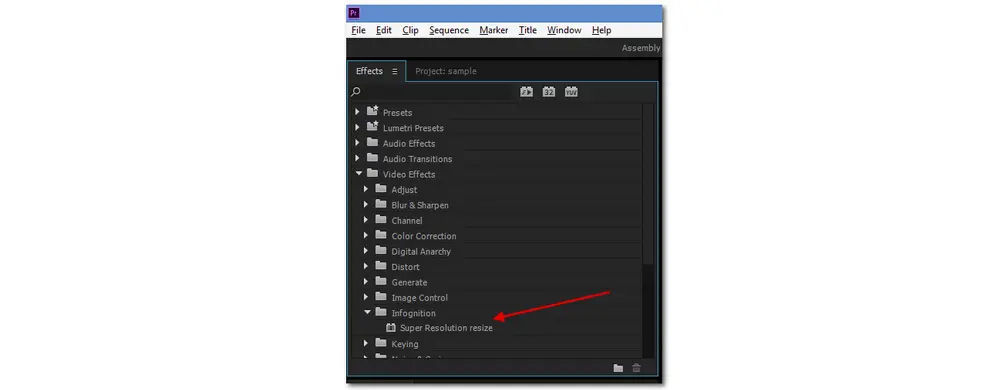
Step 4. Open the "Effects" tab, and find the "Infognition" folder under the "Video Effects" folder. Click it to see the "Super Resolution resize" effect.
Step 5. Drag the effect onto your video clip in the timeline.
Step 6. You can see the "Super Resolution resize" effect in the "Effect Controls" tab. Then set the scale factor in percent or resolution in pixels to get the desired output video resolution.
Step 7. After finishing editing, press "Ctrl + M" on your keyboard to start upscaling the video in Premiere Pro and then export.
Above are details for the three methods to upscale video in Premiere Pro. As stated before, although method 3 can upscale video with quality improved, it is hardware demanding, and when you add other GPU-intensive effects, your computer may slow down, and your CPU overheats. Thanks to AI technology, now you can increase the video resolution and quality in a few clicks with some AI video upscaling tools. However, most of them also require a very powerful computer and the processing time may be longer.
So, if you just want to upscale video from 720p to 1080p, 1080p to 4K, or more for playback on some HD screens, you can also try a lightweight video converter to resize the video resolution.
✔ Upscale SD video to 720p, 1080p, HD to 4K and more
✔ Smart quality enhancement technology for upscaling
✔ Powerful video and audio format support
✔ Change video resolution, frame rate, bitrate, etc. with ease
To resize video resolution more easily and quickly for playback on a HD/4K screen, you can try WonderFox HD Video Converter Factory Pro. It is a powerful video & audio processing tool that is capable of upscaling videos with ease. Users can use it to convert SD video to HD quality as well as enhance video from HD to 4K in a few simple clicks. In the meantime, video downscaling is also supported to reduce video file size but keep a decent video quality. Moreover, this app can also help solve the Premiere Pro video incompatibility issues like MKV not working in Premiere Pro and more. The steps are quite easy. Just downloaddownload this app and see how to upscale the video below.
Launch HD Video Converter Factory Pro and open the “Converter” from the initial interface. Then drag and drop the target files into the workspace or click the “+ Add Files” button to import the videos you want to upscale into the program.
* This tool support batch video processing for multiple files task that you can upscale videos more quickly in batch mode.

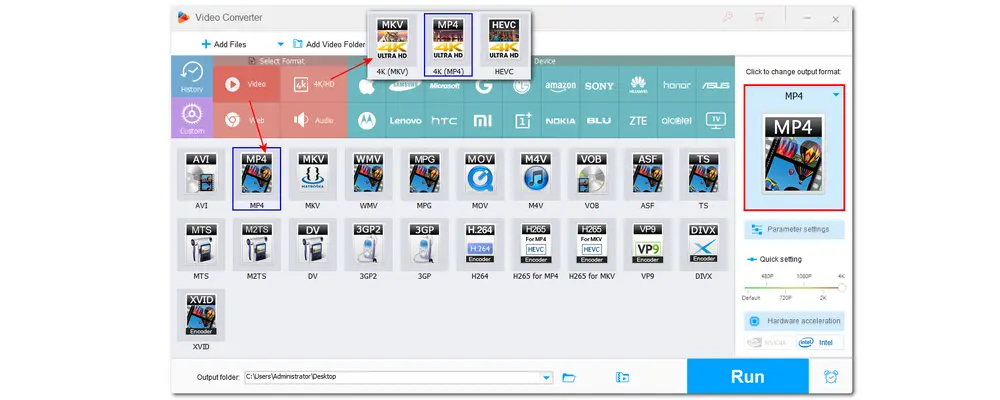
The output format is displayed on the right side of the interface. You can click it to choose a format under the “Video” tab or keep it original. For upscaling 1080p video to 4K, you can also head to the “4K/HD” section to choose “4K (MP4)" or “4K (MKV)” presets.
Here are two ways for you to adjust the video.
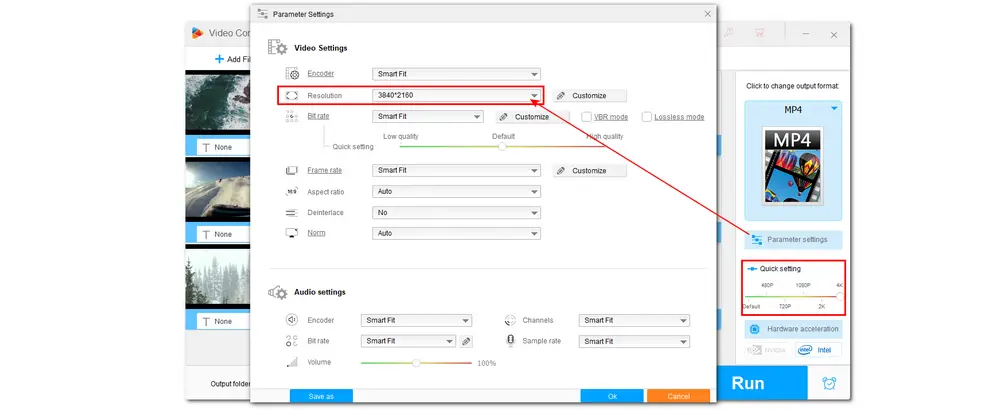
Method 1. Find the “Quick settings” section on the right side of the interface. Then drag the slider to the wanted resolution. You will see the changes in the output video section.
Method 2. Press the “Parameter settings” button below the output format image and go to the “Video” section. Then adjust the video resolution from the “Resolution” drop-down list. Here you can also apply other adjustments if needed.
Note: The original video quality determines the output quality. So upscaling a video resolution from poor to a much higher resolution will finally get a bad result. So it is advised to upscale video from 320p to 480p, 480p to 720p, etc.
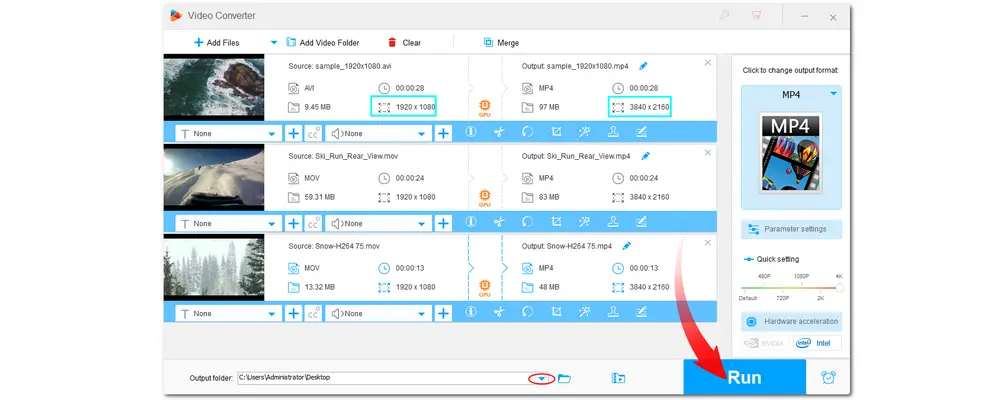
Press the bottom inverted triangle button to specify an output folder for the exported videos or you can also leave it by default. Once everything is OK, press “Run” to start the conversion.
The hardware acceleration will boost the exporting speed and you can enjoy the resized video later.
This post shares three ways to upscale video quality in Adobe Premiere Pro. You can select one or try some AI video upscaling tools according to your actual needs and the computer configuration. You can also try the recommended video converter to upscale video more easily even on low-end PCs if you just want to better enjoy a low-resolution video on a HD or 4K screen. Hope you can then get the desired files.
Thanks for reading. Have a nice day!
💡 Upscaling video is the process of increasing the video resolution from low to high in order to fit the entire area of your larger screen without sacrificing quality. It can also add extra features to the photos during the video upscaling process, making them look crisper and clearer.
💡 Yes. Adobe Premiere Pro can upscale videos to 4K resolution. Users can change and improve the video resolution and quality with its comprehensive Sequence Settings and Effect Controls. While the software has upscaling capabilities, for the greatest results, always use high-quality source footage.
💡 Yes. Adobe Premiere Pro is built to work with a wide range of video resolutions, including 4K. Users may import, edit, color grade, and export in 4K resolution thanks to its strong infrastructure. This ensures high-definition clarity for projects that necessitate clear pictures. But remember to process 4K video editing on a powerful PC setup. If not, the video editing process may be lag or choppy.

WonderFox DVD Ripper Pro
WonderFox DVD Ripper Pro is a professional DVD ripping program that can easily rip any DVD, be it homemade or commercial, to all popular formats including MP4, MKV, MP3, WAV, H264, H265, Android, iPhone, etc. without a hitch. It also lets you edit, upscale and compress DVD videos at high efficiency. Download it to enjoy a fast and trouble-free DVD-ripping experience.
* Please DO NOT use it to rip any copy-protected DVDs for commercial purposes.
Privacy Policy | Copyright © 2009-2026 WonderFox Soft, Inc.All Rights Reserved
