

Need to remove a long intro, cut out a mistake, split a long recording into short clips, or keep only the best moment from a video? This guide keeps things simple. Below, we'll show you practical ways to cut video clips on Windows, online, with FFmpeg, and with other common editors, so you can choose the method that actually fits your file and purpose.
 Kevincy | Updated on Aug 31, 2026
Raw videos are often longer than they need to be. There are often times when you're captivated by specific moments within a full-length video or recording. That's where cutting a video clip comes in! People use different words for video cutting. Knowing the small differences helps you pick the right tool and avoid extra work.
However, in most daily cases, they point to a similar goal: keeping the useful part and removing what you don't need.
The good news is that you do not need professional video editing skills to do this. A simple video cutter is enough for most daily tasks. The only thing you need to decide is which method fits your situation.
Let’s start with the easiest and most practical method for most Windows users: cutting a video with free desktop software.
WonderFox Free HD Video Converter Factory is a beginner-friendly video processing tool for Windows. It provides a straightforward and flexible way to cut common videos, including large files, private videos, screen recordings, downloaded videos, camera footage, and high-resolution footage such as 4K. Common inputs include MP4, MKV, MOV, MPEG, FLV, M4V, WMV, and more.
It works well when you simply want to save the best part of a video, remove an intro/outro, trim a screen recording, shorten a meeting recording after downloading it locally, make a 15- or 30-second clip, or split a long/4K video into smaller pieces. It also includes other useful tools such as crop, rotate, flip, merge, watermark, subtitles, parameter settings, and video downloading.
Now, get the free application and follow the steps below. 👇
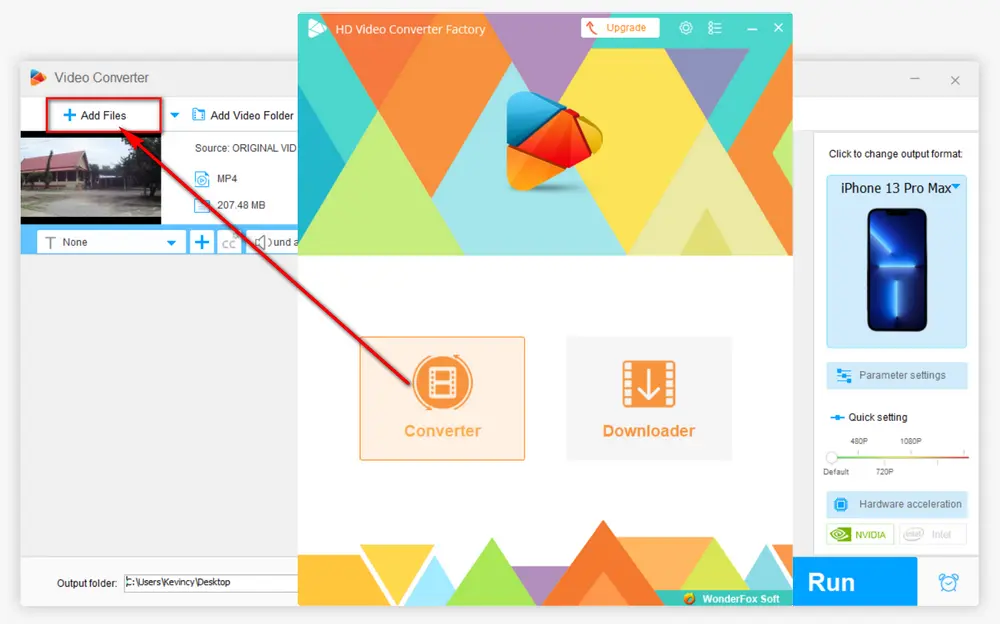
The steps below use a local video as an example. You can use the same workflow to trim recordings, gameplay clips, camera videos, downloaded videos, 4K footage, or short clips for social sharing.
💡 For a cloud meeting recording, download the video file to your computer first, then import it here.
💡 You can add more than one video and cut them one by one in the task list.
💡 Try "Downloader" if you need to save online videos first from YouTube and 1000+ supported websites.
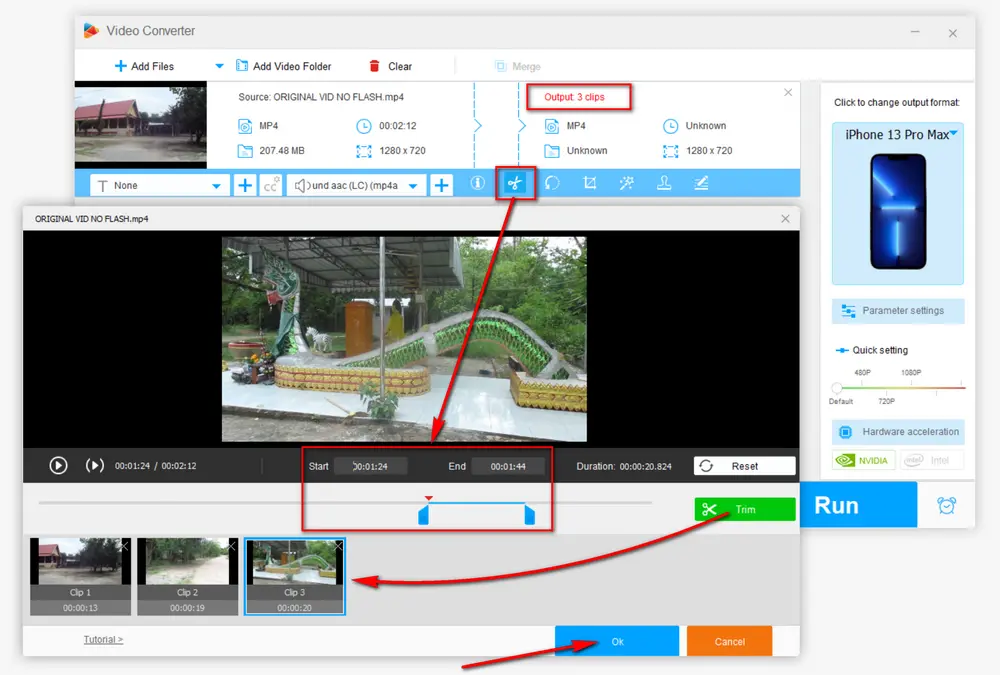
💡 To remove only the intro and outro, move the start slider forward and the end slider backward.
💡 To cut out a middle mistake, create the useful parts before and after it, export them, and then use the Merge feature if you need one final video.
💡 Need fixed-length clips? Enter exact time ranges such as 00:00:00–00:00:30, 00:00:30–00:01:00, and so on. Use 15-second intervals the same way. This is a manual but reliable method when you only need a few equal-length clips.
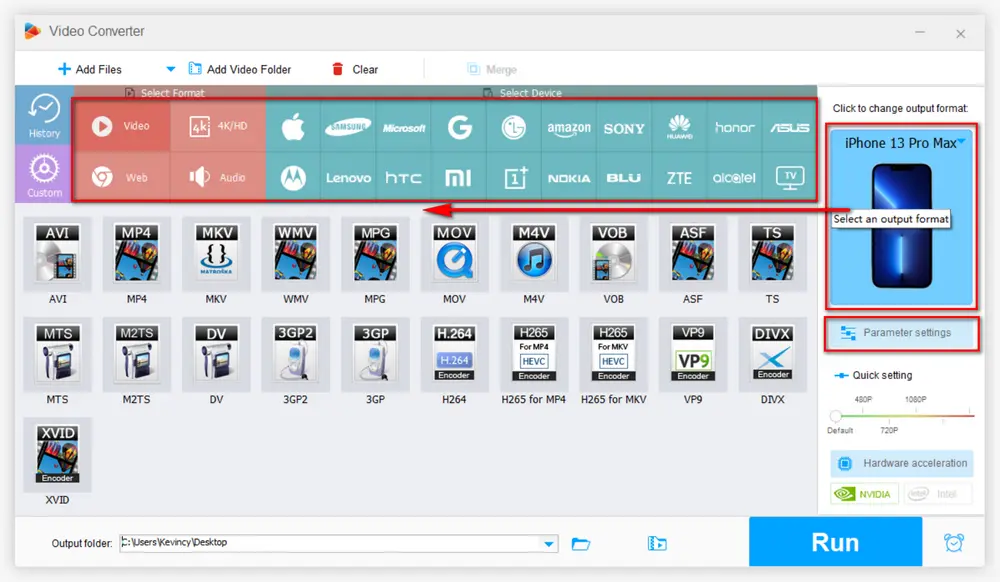
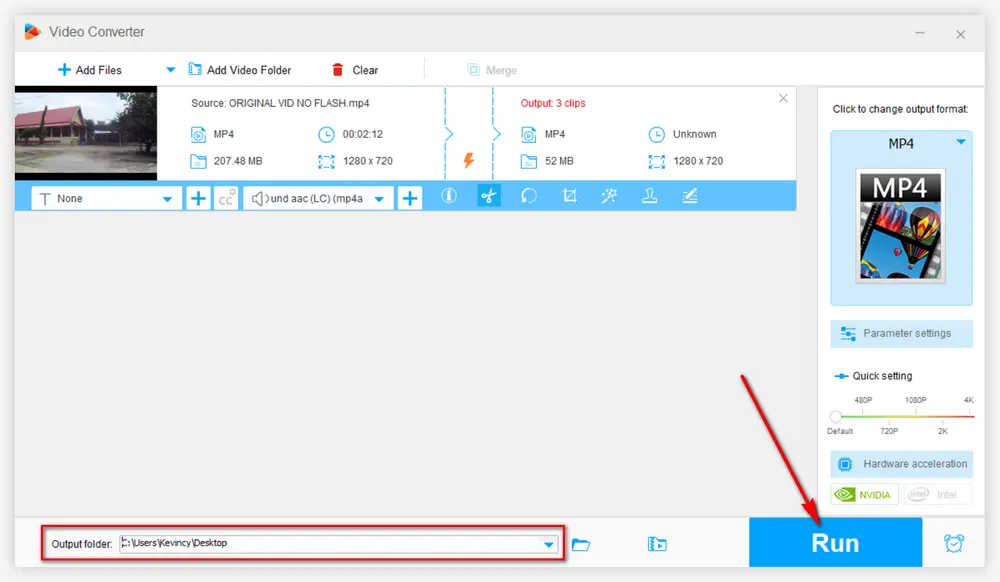
💡 To reduce quality loss, keep the output format, codec, resolution, and frame rate as close to the source video as possible.
💡 If the cut video becomes larger than expected, lower the bitrate or use a more efficient video codec in Parameter settings.
💡 For 4K footage, keep the original resolution (commonly 3840x2160) when you need to preserve UHD delivery. The free version doesn't allow for 1080p and higher output of you customize the resolution.
If you only need to cut a small video once or twice, an online video cutter can be convenient. You don't need to install software, and the basic workflow is usually upload, trim, export, and download. However, online tools are not ideal for very large files, private recordings, slow networks, or long batch jobs.
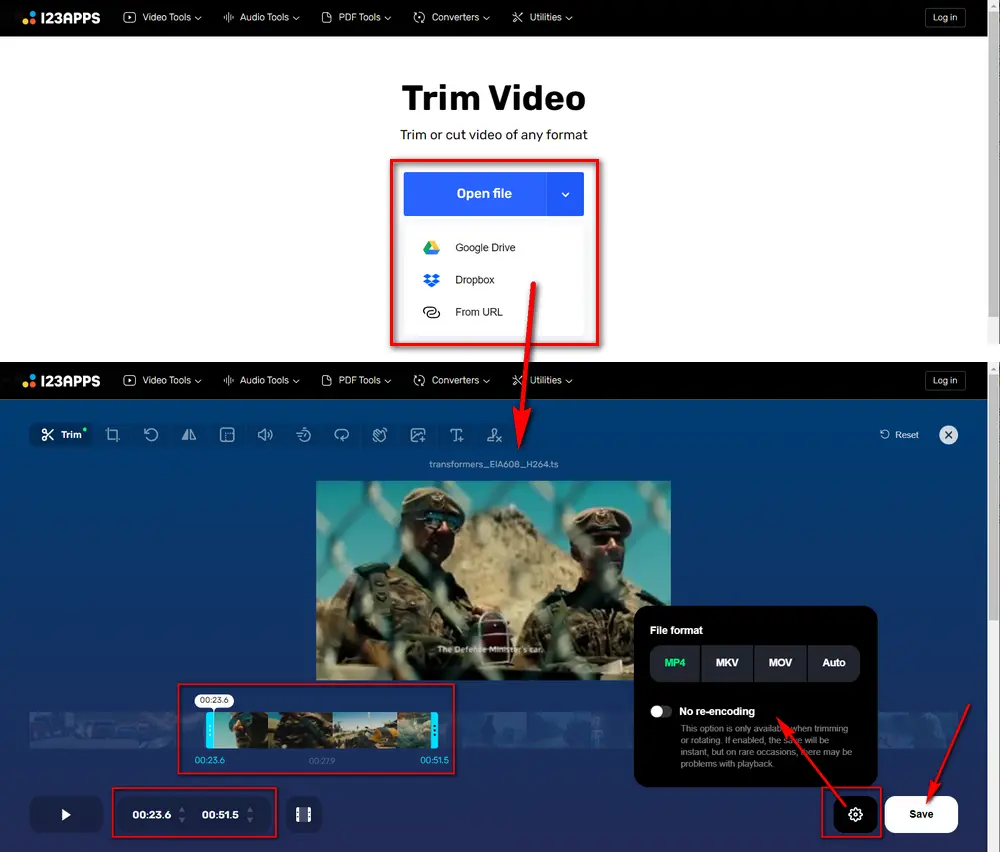
Here is a typical workflow with 123apps' Online Video Cutter:
Step 1. Open https://online-video-cutter.com/ in your browser.
Step 2. Click "Open file" or drag and drop a video from your computer. You can also import a file from supported cloud or URL options if available.
Step 3. Move the handles on the timeline to choose the part you want to keep. For more control, enter the start and end time manually.
Step 4. Choose the export format or keep the default option if you don't have a special requirement.
Step 5. Click "Save" and download the processed clip when the export is finished.
Note. Online cutters are best for simple beginning/end trimming or one short clip. If you need to cut many clips from the same video, process large GoPro footage, or edit meeting recordings privately, a local desktop tool is usually more practical.
Beyond that, several browser-based editors cater to different needs and preferences:
Microsoft Clipchamp: Good for Windows users who want a timeline editor for trimming, splitting, adding text, and exporting simple projects. It is more feature-rich than a single-purpose cutter, so the workflow takes a little longer.
Adobe Express Video Trimmer: A simple browser option for trimming the beginning and end of a video without learning a full editor. Current account, file, and export limits can vary.
VEED Online Video Cutter: A browser-based editor for cutting, trimming, splitting, and doing additional edits such as text or audio changes. Free-plan export limits can change, so check the current terms before working on a long project.
Clideo Video Trimmer: A straightforward option for common formats such as MP4, MOV, and AVI when you only need a quick browser-based trim.
Kapwing: A timeline-style web editor that is more useful when a simple trim grows into a small social-media edit. Account and export limits depend on the current plan.
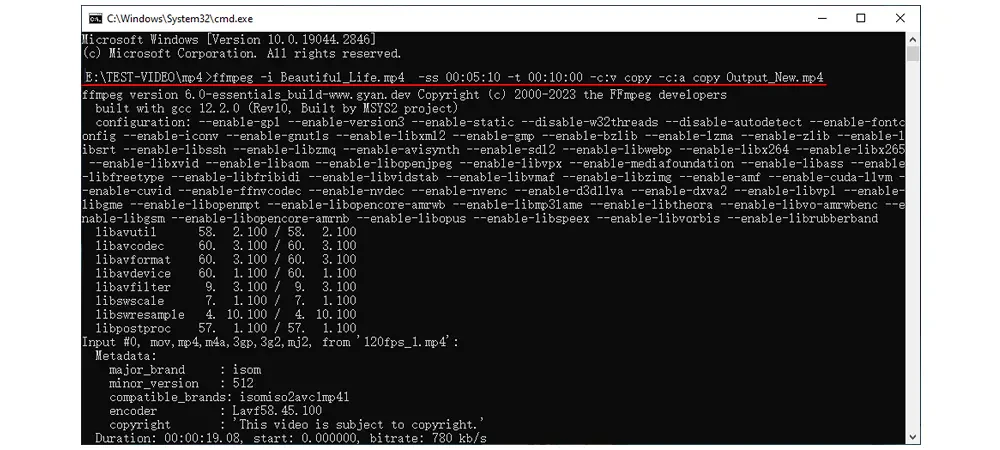
FFmpeg is a powerful command-line option for users who are comfortable with commands. It is especially useful when you want a repeatable workflow or need to process videos through scripts. But for beginners, typing commands can be easy to get wrong, so double-check the time values and file names before pressing Enter.
Cut a clip by start time and duration:
ffmpeg -ss 00:01:30 -i input.mp4 -t 00:00:20 -c copy output.mp4
This command starts at 00:01:30 and keeps the next 20 seconds. The -c copy option avoids re-encoding, so it is fast. But because it cuts near keyframes, the start point may not always be frame-perfect.
Cut a clip from one time to another:
ffmpeg -ss 00:01:30 -to 00:03:00 -i input.mp4 -c copy output.mp4
Use re-encoding for more accurate cutting:
ffmpeg -ss 00:01:30 -i input.mp4 -t 00:00:20 -c:v libx264 -c:a aac output.mp4
Re-encoding is usually slower, but it can produce a more accurate start and end point. If your video has sync issues after stream-copy cutting, try the re-encoding command instead.
Different tools are suitable for different situations. Here are some realistic choices without turning this guide into a long list of repeated format-specific tutorials.
The current Microsoft Photos app can still handle a basic start/end trim. Open the video in Photos, choose Trim (Ctrl + E), move the start and end sliders, and select Save as Copy (or use the adjacent save option if you intentionally want to overwrite the original). The old Photos Video Editor/storyboard workflow has been replaced by Clipchamp, so older instructions that rely on "Edit & Create" or "New video project" may no longer match an up-to-date Windows installation.
If you need to cut out a middle section, split a video into several pieces, add text, or build a small timeline project, open the video in Clipchamp instead. It is more capable than Photos but also heavier for a simple two-point trim.
After Effects is mainly a motion-graphics and compositing application, not a dedicated video cutter. But if your footage is already part of an After Effects project, you can select the layer, move the playhead to a cut point, and choose Edit > Split Layer (Ctrl + Shift + D on Windows or Command + Shift + D on macOS). You can also trim a layer's In/Out points to the playhead with Alt + [ / Alt + ] on Windows or Option + [ / Option + ] on macOS.
Use After Effects when the cut is part of an effects/compositing workflow. For simply extracting a few clips from a video, a lightweight cutter is faster and easier.
VLC can help you save a segment through its Record feature or Convert/Save feature, but it is not designed as a direct video cutter. Use it when you already have VLC installed and only need a quick rough cut. For precise trimming, multiple clips, or a cleaner workflow, a dedicated cutter is easier.
For a video stored in Microsoft 365, Stream/Clipchamp can trim the visible start and end of a video in the browser. This is useful for sharing a cleaner playback link. But if you need a new local file or want to remove a middle section, download the recording and use a local editor.
For Zoom cloud recordings, the built-in trimmer is convenient for hiding unwanted start/end parts for viewers. If you need to edit the downloaded file itself, trim the local recording with desktop software instead. Local Zoom recordings are commonly found in the Documents > Zoom folder unless you changed the recording location.
Timeline editors are better when you need ripple delete, transitions, audio adjustment, multiple tracks, text, or more advanced editing. OpenShot is free and can cut videos with a razor/slice tool. Lightworks and Premiere Pro offer more professional workflows but have a steeper learning curve. If your only task is cutting several clips, they may feel heavier than necessary.
For short phone videos, Snapchat clips, or social posts, the built-in gallery/editor on iPhone or Android is often enough to trim the beginning and end. For larger videos or files transferred from camera/action cam, editing on a PC usually gives you more stable performance and more export choices.
Sometimes. If the tool can copy the original video and audio streams without re-encoding, quality loss can be avoided. But precise cutting often requires re-encoding, especially when the cut point is not on a keyframe. To reduce quality loss, keep the output settings close to the original file.
Create one clip before the unwanted part and another clip after it. Then merge the two useful clips into one video. Timeline editors can also do this with split and ripple delete.
The output file size depends on bitrate, codec, resolution, frame rate, and audio settings. A short clip can still be large if it is exported with a high bitrate. Lower the bitrate or choose a more efficient codec if you need a smaller file.
VLC is fine for a rough trim through recording or Convert/Save, but it is not a dedicated video cutter. It may be inconvenient when you need accurate time control or multiple clips.
For cloud recordings, yes, there are built-in options for basic start/end trimming or viewer playback trimming. But if you need an edited local copy or want to cut out a middle section, download the recording and edit the video file locally.
Use exact time ranges in the cutter: for 30-second clips, make 00:00:00–00:00:30, 00:00:30–00:01:00, 00:01:00–00:01:30, and continue as needed. For 15-second clips, use 15-second intervals. If you need dozens or hundreds of equal segments, an automated splitter or FFmpeg script is more efficient than creating every clip manually.
For Windows users, WonderFox Free HD Video Converter Factory is the simplest local method in this guide. Online tools are also easy for small one-off videos, while FFmpeg and professional editors are better for users with specific technical or advanced editing needs.
That's all about how to cut video clips. For most users, the easiest way is to use WonderFox Free HD Video Converter Factory: import your video, select the part you want to keep, choose an output profile, and export the result. For a quick small file, an online video cutter can also help. For command-line users, FFmpeg is powerful but less beginner-friendly.
Pick the method based on your file size, privacy needs, accuracy requirements, and whether you want a simple clip or a more polished edit. The same basic choices apply whether you are trimming a short phone video, making 15/30-second segments, or cutting a large 4K recording. Hopefully this guide helps you finish the job faster and with fewer detours.

Kevincy joined the WonderFox team in 2014 and has been a senior columnist ever since. With over two decades of experience in the video editing industry, he shares tutorials, tips, and how-to guides on video/audio processing and personal DVD backups. Family-oriented and passionate about helping others, he is dedicated to making video and audio processing easier for readers.


Kevincy joined the WonderFox team in 2014 and has been a senior columnist ever since. With over two decades of experience in the video editing industry, he shares tutorials, tips, and how-to guides on video/audio processing and personal DVD backups. Family-oriented and passionate about helping others, he is dedicated to making video and audio processing easier for readers.

Privacy Policy | Copyright © 2009-2026 WonderFox Soft, Inc. All Rights Reserved

 Free Download
 Check Details
 Windows, 100% Clean!