Exported a large file from Adobe Media Encoder? A large file will influence the uploading and sharing speed, take up a lot of storage space, etc. In this case, you may wonder how to compress the video when exporting from Adobe Media Encoder.
No worries, this post shares a step-by-step guide to help you compress videos in Adobe Media Encoder.
💡 Tips. You can try the recommended video compressor to compress multiple large videos in batches.
https://www.videoconverterfactory.com/download/hd-video-converter-pro.exe https://www.videoconverterfactory.com/download/hd-video-converter-pro.exe
Here is a step-by-step guide on how to compress videos in Adobe Media Encoder. Just read on! If you don't like the text tutorial, here is also a video tutorial for you from YouTube.
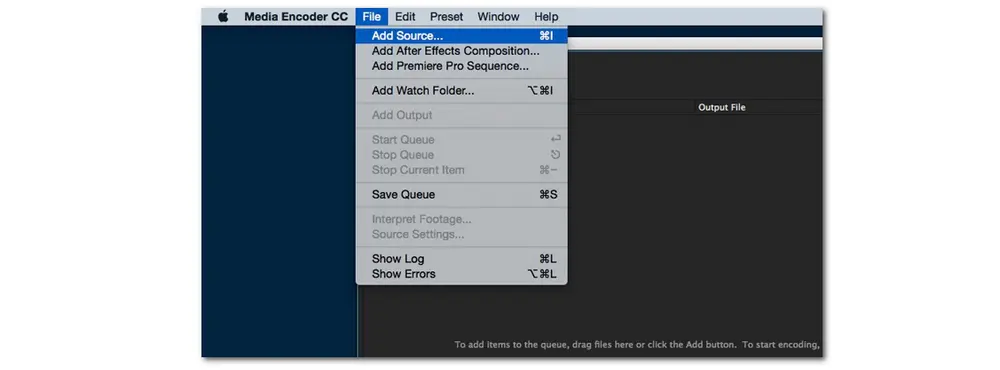
Launch Adobe Media Encoder and click “File” > “Add Source” to select the file you want to compress and add it to the queue. You can also drag and drop the video file into the program.
💡 Tips. Adobe Media Encoder cannot support all video files. If you encounter issues when importing your video to Adobe Media Encoder, you can use WonderFox HD Video Converter Factory Pro to change the video format/codec or directly compress the video.
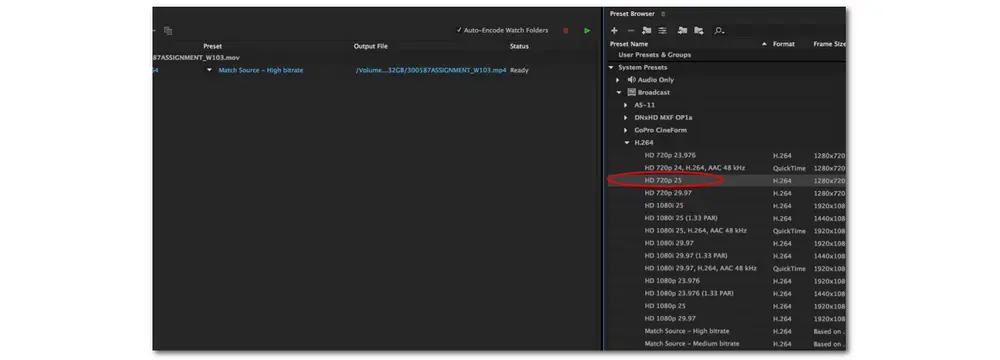
On the right side of the interface, scroll down and select a lower resolution from the “Preset” menu.
Generally, “H.264 HD 720p 25” is recommended for a good balance between file size and video quality. You can also choose other presets to compress video according to your desires.
However, if you want to compress video while keeping the decent quality, you'd better not choose a very low video resolution. For example, you can compress your 4K video to 1080p, 1080p to 720p, etc. instead of compressing 4K to 720p.
You can also compress video for the web with Media Encoder, as it offers many web presets like YouTube, Facebook, Twitter, etc.
🎯 For example, if you want to post the video on YouTube, use one of the YouTube presets, which will quickly and easily provide you with the video parameters necessary for that platform.
* Keep in mind that higher resolution means a larger file size and better video quality, while lower resolution will inevitably sacrifice video quality.
🎯 Recommended settings for compressing videos:
Generally, for most videos, you can use H.264 or H.265 as the video encoder, adjust the bitrate settings to VBR (2-Pass Encoding) for better quality at a given file size, use Adaptive Bitrate options for higher-resolution videos, and set 24-30 fps for the frame rate to compress your videos while keeping decent quality.
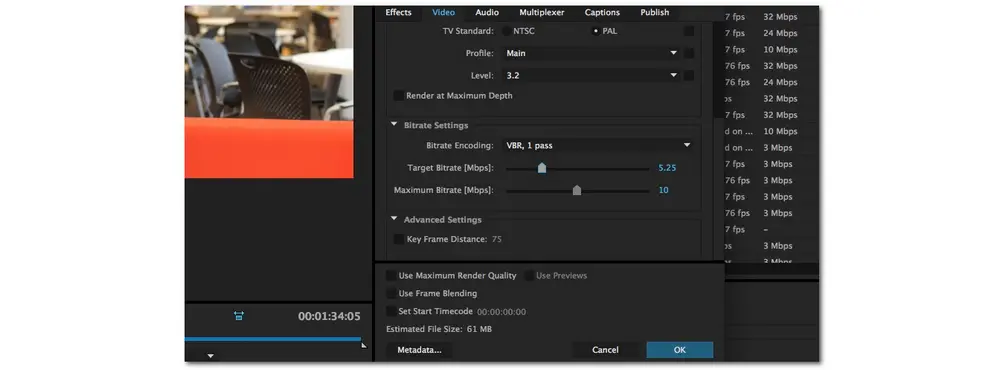
If needed, you can right-click on the file name and select “Export Settings” to adjust more detailed export options like bitrate, render quality, estimated file size, etc. to reduce the video file size to your desired one.
Then, click "OK" to save these settings.
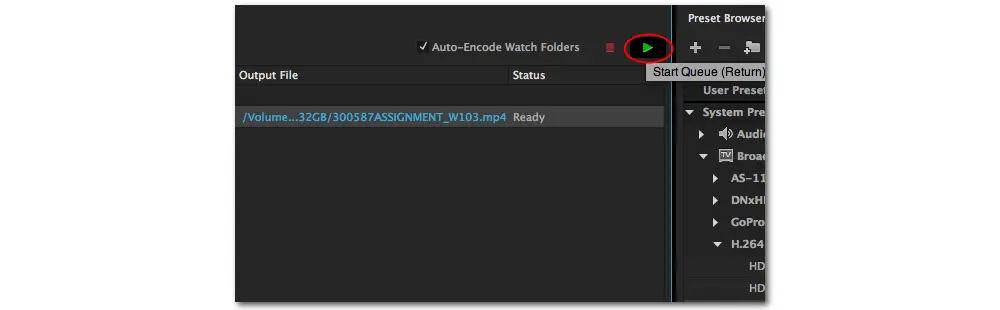
Once finished adjusting, you can set the file location for your output video and click the green arrow icon at the top of the interface to start the compressing process. It will show the processing bar and estimated finish time for the job at the bottom of the interface.
Compressing video with Adobe Media Encoder isn’t a tough task. If you still have problems with the compression process in Adobe Media Encoder, here is a video tutorial on YouTube for you. The used app version is Adobe Media Encoder CC 2018 but it also works for the latest version!
✔ Reduce Large File Size with high-quality preserved
✔ Batch compress multiple video & audio files
✔ All formats supported to compress without conversion
✔ Simple, efficient, and more features than compression
WonderFox HD Video Converter Factory Pro offers a simple way for Windows users to compress video and audio files.
It can compress large videos by changing the format/codec, trimming the unwanted parts, decreasing the resolution, reducing the bitrate, and more. 4K and 8K video compression is also supported. Its batch compression mode can also set the compression ratio for multiple files and start the compression with one click.
Moreover, it supports a wide range of file formats and can compress MP4, MKV, MOV, WebM, MPEG, etc. without any issue. As a video converter, this app can also convert your files for uploading, playing, and editing without format compatibility issues!
The following part will show you how to compress video with decreasing the video resolution. DownloadDownload WonderFox HD Video Converter Factory Pro here to get started now.
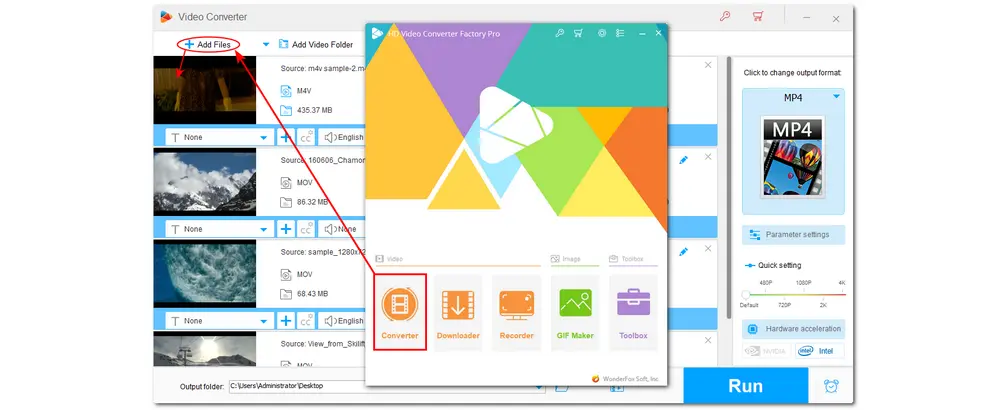
Step 1. Launch HD Video Converter Factory Pro and open the “Converter” module. Then click “+ Add Files” to import the video files you want to compress. Drag-n-drop is also supported.
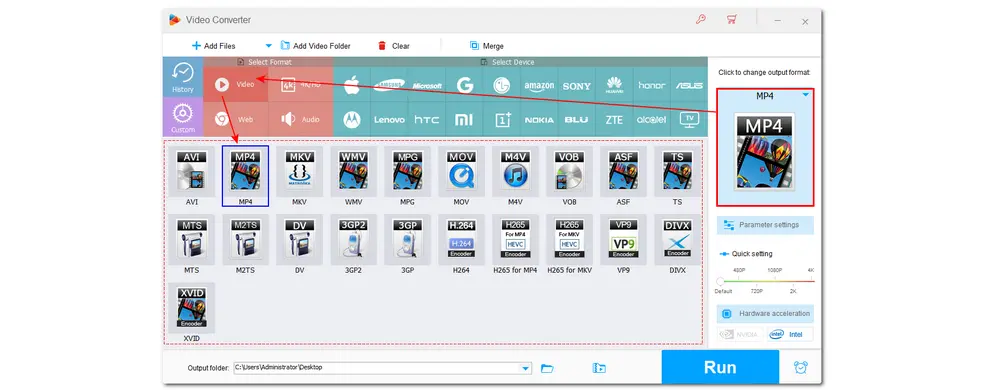
Step 2. Press the format image on the right side to enter the output format library. Select an output format (e.g., MP4) under the “Video” tab or just leave it as default.
💡 You can also choose H265, VP9, etc. advanced encoders with higher compression ratios to compress the video while keeping high quality.
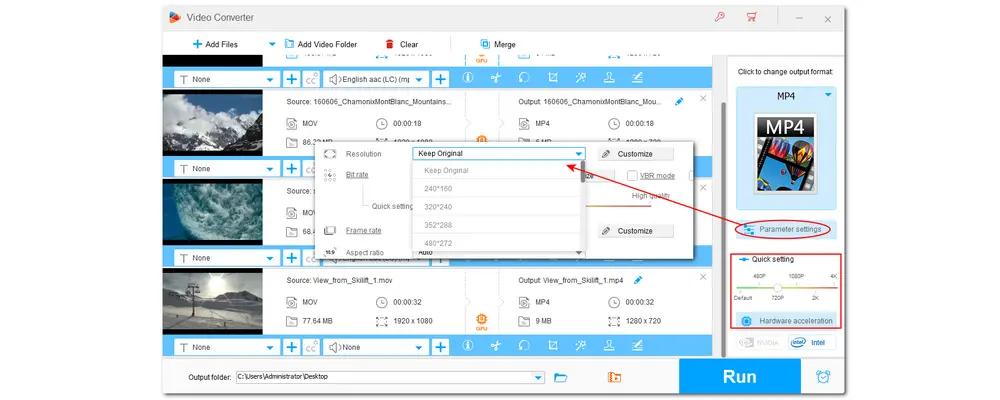
Step 3. Open the "Parameter settings" window to change the video parameters. Go to the "Resolution" section and select a desired output video resolution from the drop-down list. Then press OK to save the change. You can also adjust the video resolution in the "Quick settings" section below the "Parameter settings" button.
Step 4. WonderFox will show the estimated output file size on the conversion tasks.
Once you compress the videos to the desired file size, click the bottom inverted triangle button to specify an output path.
Finally, click "Run" to start compressing.
💡 If your computer supports hardware acceleration (Intel QSV and Nvidia NVENC), GPU acceleration will be enabled for H.264 and H.265/HEVC encoding to improve the compression speed and performance.
💡 Once finished conversion, you can click "Open" on the pop-up window to quickly access the converted files.
💡 For more compression methods, you can refer to this post: 6 Effective Methods to Compress Large Video Files

That’s all I want to share with you about how to compress video with Adobe Media Encoder. You can follow the text guide or video tutorial to compress videos in Adobe Media Encoder. If you have many exported large video files to compress, it's highly recommended to download WonderFox HD Video Converter Factory Pro to batch compress videos easily.
Thanks for reading. Have a nice day!
Yes. Adobe Media Encoder can compress video via its export settings. It offers you many presets to lower the video resolution and bitrate to make video size smaller for faster workflow, uploading, and sharing. If you export a video in a larger file size than the original video, try the compressing steps shared in this post.
1. Open Media Encoder and import the video.
2. Choose and apply a lower resolution setting, such as 1080p or 720p.
3. Make a folder for the video, then choose an export location.
4. Click the Play icon in the video file queue to begin compressing videos in Adobe Media Encoder.
Tips: The output settings also include several options for reducing video file size. Lowering the bitrate is an effective approach to achieve a smaller file size.
Video compression makes files easier to upload, save, work with, and manage. Moreover, smaller files are almost usually easier on bandwidth and system resources.
The most common formats are MP4, MOV, AVI, and MKV. YouTube uses MP4 and AVI files. Anyway, you're recommended to convert video to MP4 since it has the best compatibility with various platforms and devices.
For a smaller video file size, you can set the video resolution to 1080p or 720p, adjust the frame rate to 25fps, and bitrate to 16 Mbps. Then choose H.264 or HEVC as the video codec.

WonderFox DVD Ripper Pro
1. Rip DVD to 500+ presets with GPU acceleration.
2. Remove all sorts of DRM from DVD.
3. Compress an 8GB DVD to 1-2 GB digital video file.
4. 5-minutes to fast digitize DVD in MPEG-2 MPG.
5. Make a 1:1 intact digital copy (ISO or VIDEO_TS).
6. Multiple audio tracks, hard/soft and forced subs.
7. Support homemade/commercial DVD & ISO & Video_TS folder.
* Please DO NOT use it to rip any copy-protected DVDs for commercial purposes.
Privacy Policy | Copyright © 2009-2026 WonderFox Soft, Inc.All Rights Reserved
