WonderFox HD Video Converter Factory Pro


FFmpeg is a powerful, open-source command line tool used for processing multimedia files. You can use it to transcode, edit, stream, play, and also compress videos. You may have run into many forum discussions on how to compress videos using FFmpeg. If you’re overwhelmed with different answers to this question and still have no idea which command you should choose for the best FFmpeg video compression, stay on this page.
Here, we will detail how to compress videos with FFmpeg, covering from the very first installation step to file exporting. Just in case, we also provide you with an FFmpeg alternative with a straightforward UI if you prefer a quicker yet still effective compression solution.
Now, let’s see step by step how to reduce video file size using FFmpeg. We will start with the first installation process.
Visit FFmpeg official website.
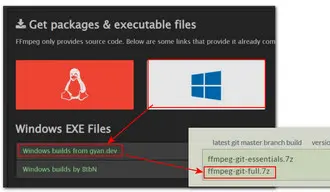
Hover your mouse over the Windows logo and select ‘Windows builds from gyan.dev’.
Then locate the up-to-date FFmpeg build and click to download the full build.
You’ll get a zip file. Right-click the zip and choose ‘Extract Here’.
Rename the extracted folder to ‘ffmpeg’ and move the entire folder to the location where you normally install software. For example, put it into the local disk C drive.

In the Windows search bar, input ‘system variables’.
Head to ‘System Properties’ > ‘Environment Variables’.
Hit ‘Path’ > ‘Edit...’ in the ‘System variables’ section.

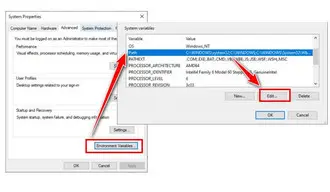
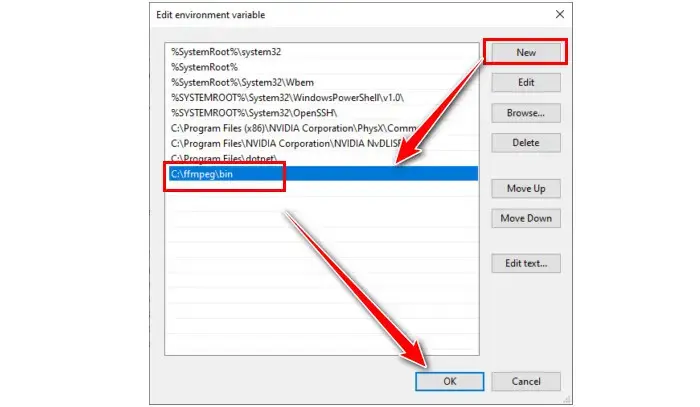
Then click ‘New’ to add your ffmpeg path to it. To get the full path, open the saved ‘ffmpeg’ folder and then the ‘bin’ folder. Directly copy the file path from the address bar and then paste it into the field (e.g., C:\ffmpeg\bin).
Click on the ‘OK’ button on all windows to save the setting.
Now, let’s start the FFmpeg video compression process.
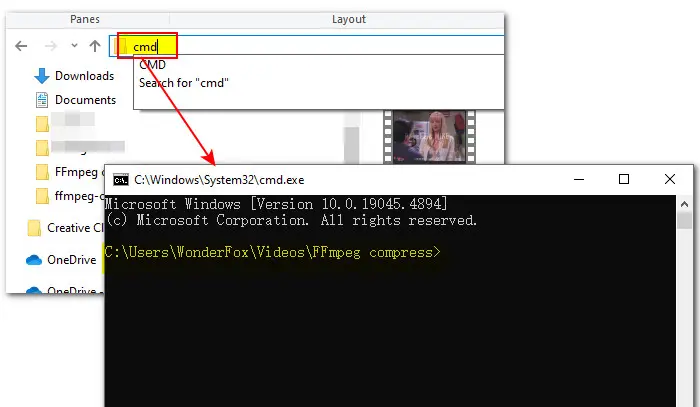
First, open the location of your video file.
Then, type in ‘cmd’ in the address bar and press ‘Enter’ to bring up the FFmpeg command window.
🔔 TIPS: Typically, you can reduce a video size using these video compression methods:
According to your specific needs, select the appropriate compression method and execute the corresponding FFmpeg command to compress the video.
🧐 About the test video:
File name: input.mp4
File size: 606MB
Video length:11min 37s
Resolution: 1920*1080
Video codec: H.264 (AVC)
Frame rate:23.976 fps (constant)
Bitrate: 7155kb/s
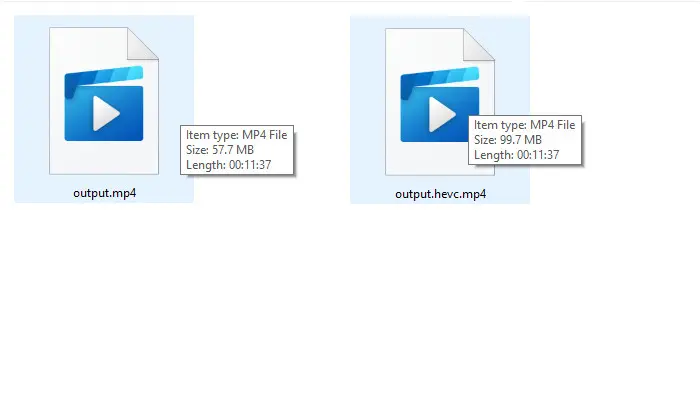
✅ Option 1: Make FFmpeg compress video by converting H.264 MP4 to HEVC MP4
Command:
ffmpeg -i input.mp4 -c:v libx265 -c:a copy output.mp4 (Basic command)
ffmpeg -i input.mp4 -c:v libx265 -preset medium -crf 23 -c:a copy output.hevc.mp4
Result size:

📚 Breakdown of the command:
ffmpeg: It tells the system to run the FFmpeg program.
-i input.mp4:This specifies the input video file. Please replace ‘input.mp4’ with your actual file name.
-c:v libx265: It sets the codec HEVC for your output file.
-crf 28: The Constant Rate Factor (CRF) controls the quality of the output video. Lower values mean better quality but larger file sizes. The CRF scale ranges from 0–51. (lossless: 0; default: 23; recommended: 24–28).
-preset medium: The preset options define the speed VS compression ratio. You can set it as ‘ultrafast’, ‘superfast', ‘veryfast’, fast’, ‘medium’, ‘slow’, etc. For superior quality, choose the slower options. The default is ‘medium’.
-c:a copy: This copies the audio stream without re-encoding it.
output.mp4: This is the name of your output file.
✅ Option 2: Make FFmpeg reduce video size by downscaling resolution
Command:
ffmpeg -i input.mp4 -vf scale=720:480 -c:a copy downscale.mp4
Result size: 46.4MB downscale.mp4
✅ Option 3: Make FFmpeg reduce file size by lowering the bitrate
Command:
ffmpeg -i input.mp4 -b:v 4000k -c:a copy bitrate.mp4 (Basic command)
ffmpeg -i input.mp4 -b:v 4000k -bufsize 8000k -maxrate 4500k -c:a copy bitrate_output.mp4
Alternatively, you can reduce the video file size by changing the mentioned CRF value, which dynamically adjusts the bitrate to maintain a balance between quality and compression. The default is 23. For lower quality and smaller file sizes, use CRF values between 28 and 32.
ffmpeg -i input.mp4 -crf 30 -c:a copy output.mp4
Result size:
346MB bitrate.mp4
343MB bitrate_output.mp4
📚 Breakdown of the command:
-b:v 4000k: Set the target video bitrate to 4000 kbps.
-bufsize 8000k: This option helps balance the rate at which data is encoded to achieve a smoother output the buffer size.
-maxrate 4500k: Set the maximum rate for any single segment of video.
✅ Option 4: FFmpeg compress MP4 by reducing the frame rate
For some videos with a high frame rate like 60fps or 120fps, you can decrease the frame rate to 24fps or 30fps for a smaller size while still preserving smooth quality.
Command:
ffmpeg -i input.mp4 -r 20 -preset medium -crf 23 -c:a copy fps.mp4
✅ Option 5. Let FFmpeg compress video by changing video format
You can also opt to convert MP4 to other formats such as WebM. The conversion command is straightforward, and you don’t even need to specify the output parameters as the FFmpeg video compressor will take care of that for you.
Command:
ffmpeg -i input.mp4 convert.webm
Result size: 79.2MB convert.webm
✅ Option 6. FFmpeg compress video by trimming video
Command:
ffmpeg -i input.mp4 -ss 00:05:10 -to 00:10:00 -c:v copy -c:a copy trim.mp4
Type the command and press ‘Enter’ to start the FFmpeg video compression immediately. Some command lines may take a while to process the compressed video, so please be patient.
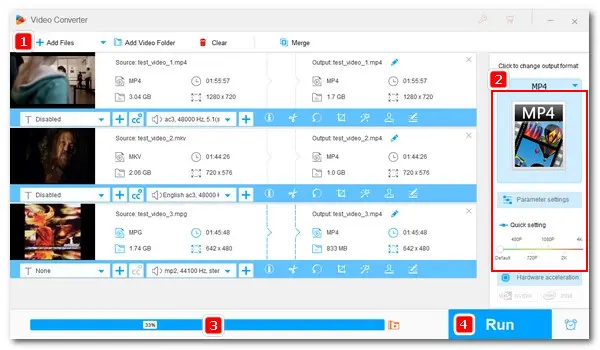
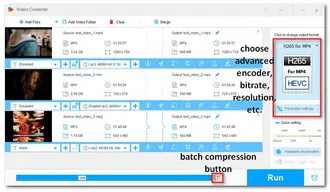
Confused by these complex command options in FFmpeg? Choose a simpler solution – WonderFox HD Video Converter Factory Pro – to compress your videos! No skills required! No limits on file sizes & formats!
As you can see, FFmpeg is a powerful tool, but its complexity can be daunting even for experienced users. Its command-line interface and a wide array of options might feel overwhelming at first. However, once you get a hang of the basics, it becomes an essential go-to for video professionals and enthusiasts alike.
That said, if you’re just starting out, you might find it easier to opt for an FFmpeg compressor alternative like WonderFox HD Video Converter Factory Pro. It lets you compress videos in any possible format by trimming or changing codec, resolution, bitrate, or frame rate. Best of all, it features a Batch compression button that allows you to shrink videos in bulk with just one click.
Quickly install it on your PC and see how to make this simpler alternative to FFmpeg compress MP4 videos effortlessly:

FFmpeg provides a versatile and powerful solution for video compression. With the detailed steps from installation to compression outlined in this guide, you can now effectively reduce file size while maintaining acceptable quality. FFmpeg has endless features and is worth further exploration whether you are a seasoned professional or a curious beginner.
However, if you prefer more user-friendly solutions and tools with a graphical user interface, we have also highlighted an intuitive alternative - WonderFox HD Video Converter Factory Pro - to simplify your video compression tasks. In addition, you can also use it to convert, edit, download, screen record, and more, making it a top choice for handling multimedia files on your PC.
If you have better compression tool suggestions or encountered any video or audio-related issues, please feel free to contact us on Facebook or X.
To compress a video, you can use FFmpeg to trim its length, change the format, adjust the resolution, bitrate, or modify the frame rate. In this article, we’ve provided a variety of compression commands that you can easily copy and execute to get started right away—just remember to change the file name to match your input and output files.
Use this command to lower your MP4 video’s resolution, such as from 4K to 1080p:
ffmpeg -i input.mp4 -vf scale=1920:1080 -c:a copy output.mp4
Yes! You can use the ‘-vf scale’ filter to adjust the width and height of your video.
FFmpeg can cut video. You can jump to the #Option 6 part and see how to use the ‘-ss’ and ‘-to’ options to specify the start and end timestamps of the desired segment.
Run this command:
ffmpeg -i input.mp4 -vf scale=-1:720 -aspect 4:3 output.mp4
It can help resize the video to a height of 720 pixels while preserving the original aspect ratio. The ‘-1’ for the width ensures that the width is calculated automatically to maintain the aspect ratio.
You can replace 720 with your desired height and adjust the -aspect ratio to match your needs such as 16:9 for widescreen.
Terms and Conditions | Privacy Policy | License Agreement | Copyright ? 2009-2026 WonderFox Soft, Inc.All Rights Reserved