


Are you finding it difficult to share or upload your content?
Uncompressed, raw digital video files are the highest quality, but the tradeoff is massive file size. Even if you have lots of space on your computer or portable device right now, the minute you go to email, send, or upload that video, you'll quickly run into file-size limits.
And when it comes to fixing this, common questions always pop up: How can I shrink a video to fit a platform's limits without losing clarity? Can I make the file size smaller and still keep the quality?
The answer is Yes!!! In this guide, you'll learn how to compress a video easily and efficiently and keep quality loss to an absolute minimum. Before we dive into the steps, let's take a look at a few foundational things you should know about video file sizes.
How do you effectively compress a video file or optimize its size? And why does a video sometimes come out much larger than expected after you convert it? To properly reduce video size without ruining the visual fidelity, you first need to understand the core components that determine the size of a video file.
The final file size of a video is mainly determined by 3 factors: Bitrate, Encoder (Codec), and Frame Rate (FPS).
Generally, the higher the bitrate, the larger the file (File Size = Bitrate x Time). At the same length, a higher bitrate means more data is squeezed into each second, hence a larger file.
The encoder decides how the video is compressed. The newer encoders (H.265/HEVC, VP9, AV1, etc.) are much more efficient than the old standards (MPEG-2, MPEG-4, DivX, etc.). They give the same (or better) picture quality at a much lower bitrate, which automatically makes your file size smaller.
Reference Chart: Encoder Efficiency Comparison
(Example based on a 100-minute source video)
| 4K Ultra HD | 1080P Full HD | 720P HD | 480P DVD | |
|---|---|---|---|---|
| Original Encoder | MPEG-4 | MPEG-4 | MPEG-4 | MPEG-2 |
| Original Size | 30 GB | 8 GB | 3 GB | 4.7 ~ 8.5 GB |
| H.264 Output Size | ~10 GB | ~2.6 GB | ~1.8 GB | ~1 GB |
| H.265 / VP9 Output Size | ~5 GB | ~1.3 GB | ~900 MB | ~500 MB |
| Compression Ratio | 3X~6X | |||
Resolution is the width and height of your video frame (e.g., 1080p vs. 4K). While file size is technically related to bitrate, a higher resolution also requires a higher bitrate to keep an image sharp, so the file size increases.
Frame rate means how many images are shown in a second. The higher the frame rate, the more images are presented, which naturally leads to a larger file size. Modern cameras often shoot at high frame rates like 60fps, 90fps, or 120fps, which will make the final video significantly bigger than normal videos with frame rates of 24fps, 25fps, or 30fps.
Obviously, a 2-hour movie will take up exponentially more space than a 30-second clip with the same bitrate settings.
Now you understand how video math works, you can lower your file size using these methods:
💡 Apart from shrinking the video file itself, another common way to compress the video is by making it into a zip file. This will retain the video quality as it is, but the problem is that you can't open the video file until it is decompressed. Plus, platforms like YouTube or Facebook won't accept ZIP files for playback.
Since manual calculations can be tricky, the easiest way to condense video to the size you want is to use a dedicated video compressor software or app. Next, let's look at how to compress video files across different devices while preserving maximum quality.
If you want to reduce video size without losing quality on Windows, the best tool to use is WonderFox HD Video Converter Factory Pro, a powerful desktop program that can convert videos to smaller sizes, even for large 4GB video files.
The software supports a variety of formats, including mainstream formats such as MP4, MKV, MOV, M4V, and WebM, as well as legacy ones like AVI, TS, WMV, FLV, and MPG. If you need to compress multiple files, you can use its built-in batch compression button to shrink an entire folder of videos in a single click. The software also allows customizable settings, so you can freely adjust the encoder, bitrate, resolution, and frame rate for more precise compression results.
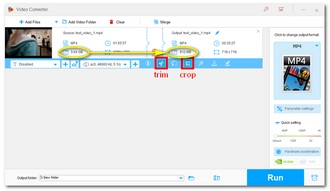
Additionally, the software can trim and crop videos to cut file sizes off.
Batch compress 8K, 4K, 1080p, and 720p videos to smaller size with a simple click. Make a perfect balance between video quality and size.
 Download for Free
Download for Free
Download for Free
To minimize video file size with this software, you need to download and install the software first. Here's the download button:
Download for Free
Download for Free
Run the software and open the Converter module. Next, click + Add Files to add the videos you want to compress to the program. You can also drag them into the interface to import.
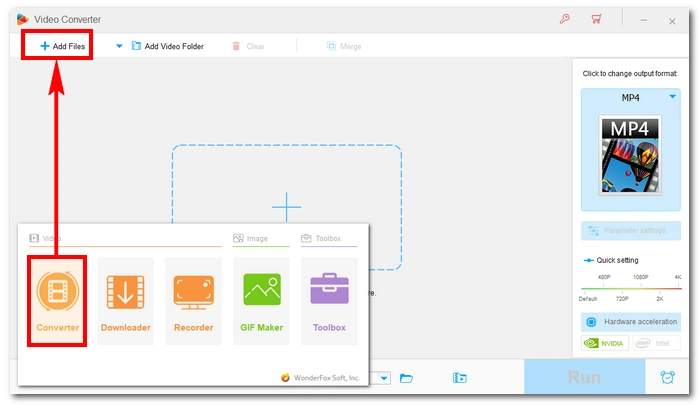
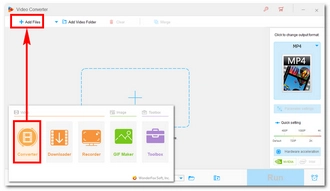
* Before compressing, you should choose an output format in advance. You can open the Output Format section on the right and select a video format under the Video tab. It's recommended to keep the original video format. But you can convert to a different format, the output size will increase or decrease based on the format you choose.
There are multiple ways to compress a video file in this program:
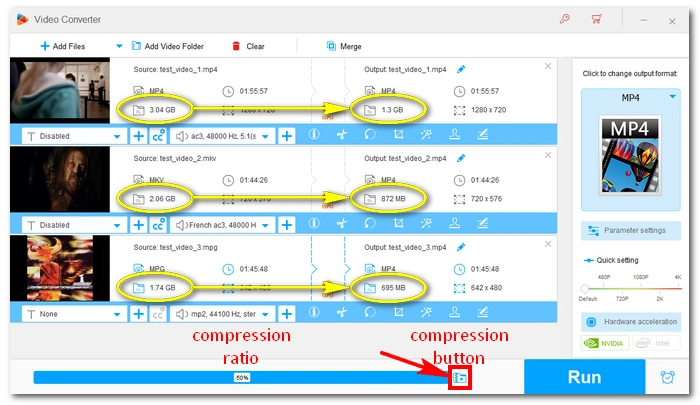
❶ Use the Compression button
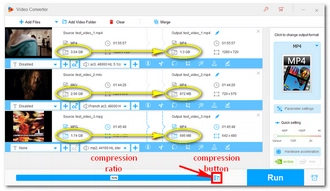
To quickly reduce the video size, you can use the Compression button. It will compress all the imported files instantly. Just click on it and then drag the slider to the right. You can see the compression ratio and the estimated output size. However, if the compression ratio is too high, the output video quality will likely become poor.
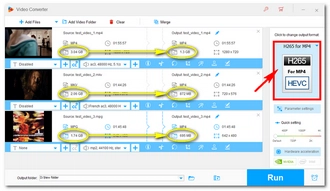
❷ Use H265, VP9, or AV1 encoders
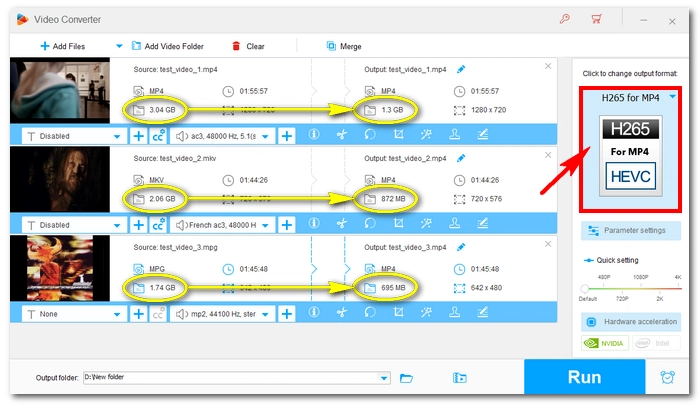
To reduce video file size without losing quality, it's recommended to use advanced encoders like H265, VP9, or AV1. You can open the Output Format section and select H265 for MP4, H265 for MKV, VP9, or AV1 as the export profile. These encoders will re-encode the video files to smaller sizes while keeping the original quality.
❸ Decrease bitrate, resolution and frame rate
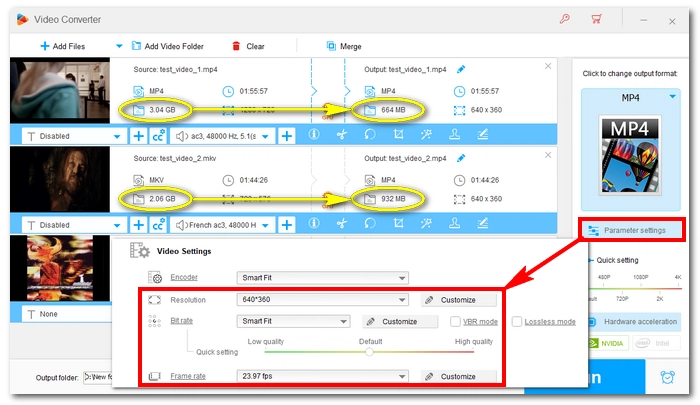
You can manually change the video settings to reduce the file size. The original video settings information can be obtained from the ⓘ button below the video file. Then, you can go to Parameter settings and lower the bitrate first.
If you're not sure what bitrate to use, you can just decrease the video resolution and frame rate. This program will Smart-Fit the optimal bitrate based on the settings you choose to reduce video size but not the quality.
❹ Trim and crop the video file
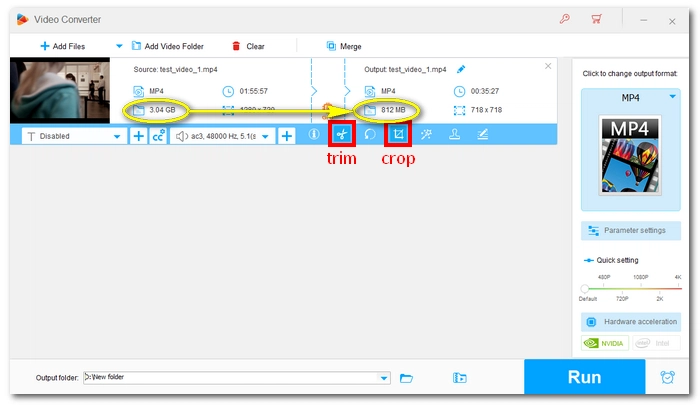
If your video includes unnecessary parts, you can also use the Trim and Crop tools to remove them. With this data gone, the file size will be reduced significantly. This is super useful if you need to compress videos for Shopify product pages or reduce video size for WhatsApp or Viber, as these platforms have strict limits on both file size and video length.
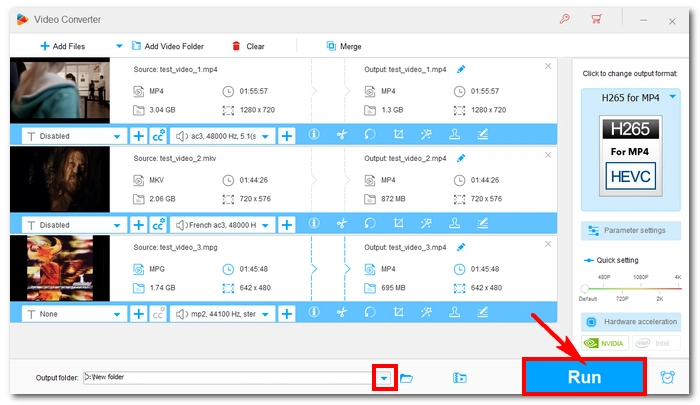
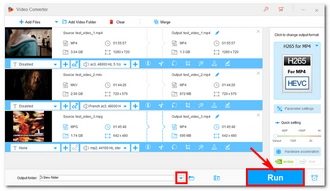
Click the ▼ icon from the Output Folder box and select a destination folder. Finally, press the Run button to export the final files.
🔔 Video compression is a CPU-intensive process. It's advisable to close any unimportant background apps and turn on hardware acceleration if it's available.
👉 Watch this video to learn how to compress large videos efficiently on Windows:
It's good news for Mac users that the built-in apps QuickTime and iMovie can also be used as video size reducers to reduce the size of your MOV and MP4 files. Additionally, there's also third-party software to handle video compression of more formats. Let's explore them one by one.
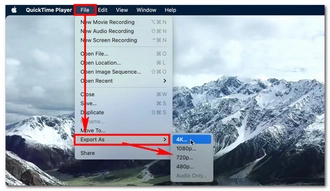
Besides being the primary media player on Mac, QuickTime can help you make a video smaller by reducing the video quality. If you have a 4K movie, you can reduce it to 1080p, and the output size will shrink to about 1/3 to 1/4 of the original video size. You can select even lower qualities to further shrink the file. However, if you want to compress the video while still maintaining the same visual quality, QuickTime also allows you to use the high-efficiency video codec (HEVC) to achieve that.
Step 1: Open the video file you want to compress in QuickTime.
Step 2: Go to the File menu, select Export As, and then choose a quality. Select a quality lower than the original to compress the file greater.
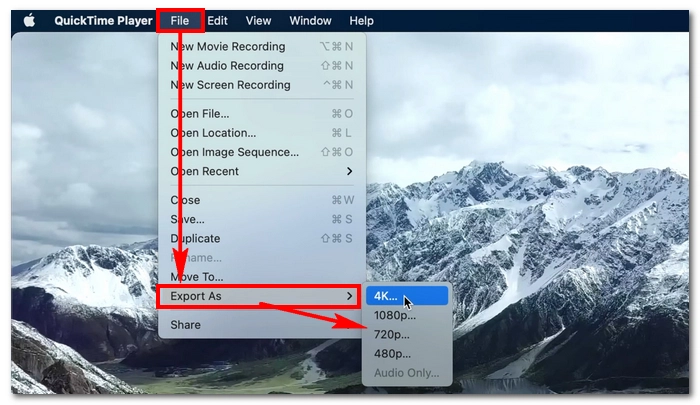
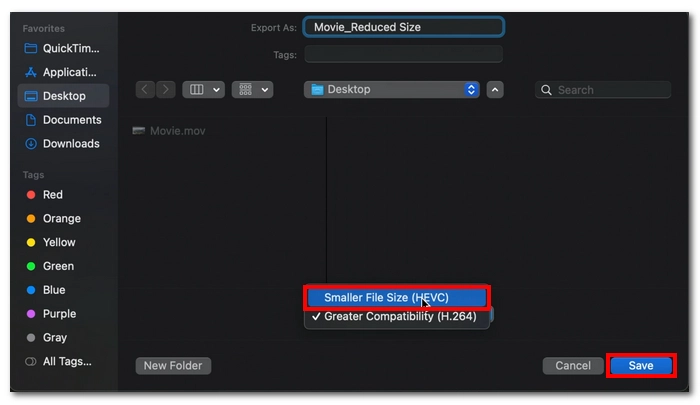
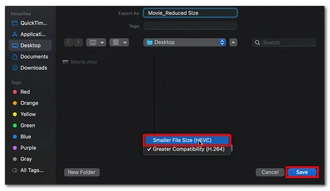
Step 3: In the export window, you can rename the file and select the output folder. Then open the drop-down box at the bottom and select Smaller File Size (HEVC).
Step 4: Click Save to export the file with a smaller size.
iMovie not only allows you to edit video files but also compress them through different means. Of course, you can trim and crop your video files in iMovie to delete the undesired parts and that would reduce the overall file size. In addition, iMovie also lets you export files with smaller sizes directly. It can even make files small enough to send through email. All it requires is a few extra steps.
Step 1: Launch iMovie and import a video into the timeline.
Step 2: Trim and crop the video as needed.
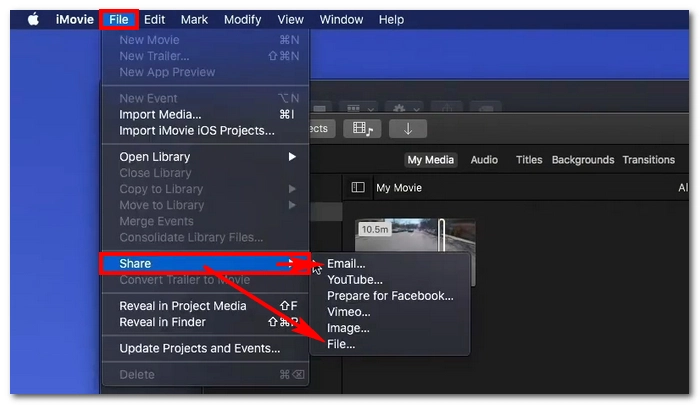
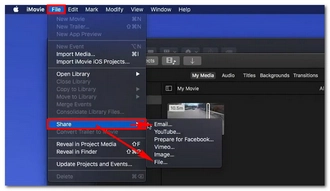
Step 3: Click File > Share. Now, you have two ways to compress your video.
❶ Compress file for Email
If you want to compress the video for sending via email, you can just select Email. Then in the export window, you can still select a resolution based on your needs. Click Share to bring up the mail app where you can compose and send the reduced-size video to your friends.
❷ Compress file with better quality
To retain most of the quality, you can select File. Then choose a Resolution and Quality you want. You can see the estimated output size at the lower left. When you have the wanted size, click Next to export the file.
Remember that QuickTime and iMovie can only handle MOV and some MP4 files. If you want to compress a video of another format, use a separate tool, such as HandBrake.
It's a free and open source video transcoder that changes not only the video formats but also the compression methods, including encoder and bitrate. For beginners, it also provides ready-made presets that allow you to convert your files to the desired quality quickly without messing up with the settings. If you need more control over the output quality and size, you can customize an array of video options it provides.
Step 1: Download HandBrake from https://handbrake.fr/downloads.php. Then install it on your Mac computer.
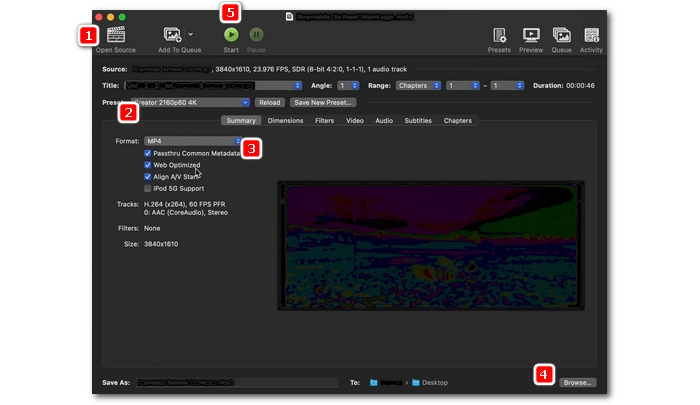
Step 2: Open the software and click Open Source to import the video you want to compress.
Step 3: Click the Preset drop-down box and select an output profile based on your needs. For example, you can choose a profile from the general section. It lists common video options varied by resolution, fps and encoder. Or if you don't know what to choose, you can choose a web format or a device if you want the video optimized for the chosen profile. You can hover your mouse over the profile to see its detailed info.
The principle here is to use a preset that has lower video values than the original.
Step 4: For advanced users, you can go on to alter the format. Then switch to the Video tab and customize the encoder, framerate, and quality/bitrate as you see fit.
Step 5: Specify an output path by clicking the Browse button at the bottom.
Step 6. Finally, click the Start button to begin the compression process.
iPhone can produce very high quality videos. But it's quite challenging to watch or transfer these videos due to their large file size. That's why you need to decrease the video size.
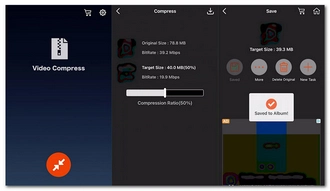
What's unfortunate is that iPhone does not come with a video compressor. But if you try to search for a video compressor in the App store, you can easily find many matching items. One app I'd recommend is Video Compress – Shrink Videos. It's a lite and simple app designed to compress video size, and with its "dummy" operations, you don't need to be an expert in compressing your video. Simply add the video, specify the target size and let the app do the rest.
💡 If you want to record small-sized videos, you can open Settings and click Camera. Go to Record Video and change the resolution to 1080p HD at 30 fps or 720p HD at 30 fps. This will reduce the file size significantly the next time you record a video.
Step 1: Open the App Store and search for Video Compress – Shrink Videos. Then install the app.
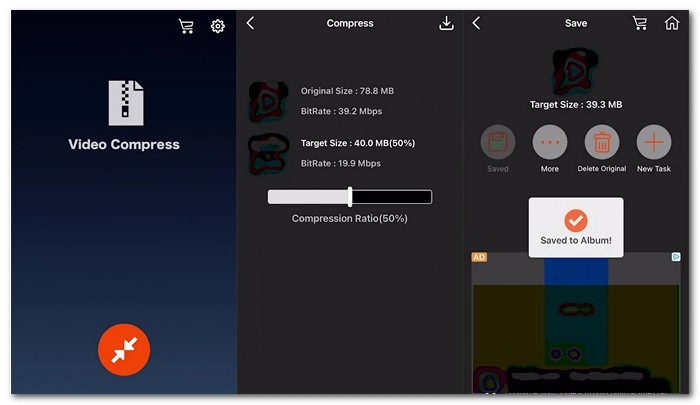
Step 2: Open the app and hit the compress button. Then select the video from your device and hit the ✓ button.
Step 3: In the Compress interface, you can change the compression ratio and you'll see the target size changes also. You can test different compression ratios until you get your wanted result.
Note, however, that the app compresses videos by reducing bitrate, so if the bitrate is set too low, the output quality won't be good.
Step 4: Finally, hit the download icon to start the compression process.
If you're using the free app, you'll see an ad after the compression. Just close it. Then hit Save to save the compressed file to your album.
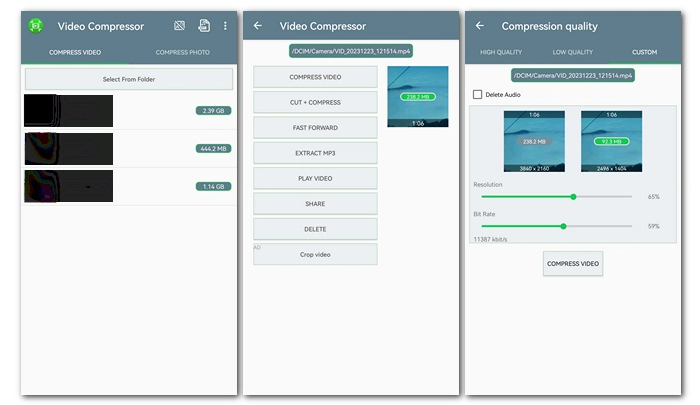
There are several excellent video compressor apps available for Android devices. One of the popular ones is Video Compressor & Video Cutter. It's a lightweight and simple app that makes shrinking video size on mobile phones super easy. It also cares for quality and you can compress videos with high quality preserved. To save most of your storage space, you can delete audio and cut video to further cut down the size.
Step 1: Search for Video Compressor & Video Cutter in the Play Store and download the app.
Step 2: Open the app and you'll see all the folders containing your videos. Open the folder where the source video is located and select the video.
Step 3: Click COMPRESS VIDEO.
Step 4: Next, you can select a compression option from the HIGH QUALITY or LOW QUALITY lists. Alternatively, you can use the CUSTOM option to compress the video manually. The app will show you the output size.
Step 5: Click COMPRESS VIDEO to start the process. The compressed video will be saved to the /IdeaVideoCompressor/ directory.
If you're running out of storage on your device, you'll benefit from an online video compressor that won't occupy your local space. The video compression will take place on the cloud so it also won't burden the CPU.
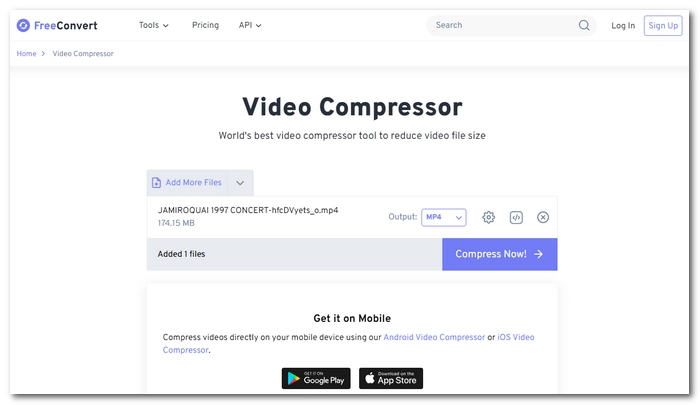
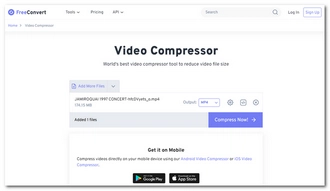
While most online services handle only small videos, FreeConvert offers a free video compressor that allows you to compress large videos up to 1GB. It has multiple compression methods where you can specify the target size, quality, resolution, and max bitrate. Additionally, it can also use H265 to reduce video size by 20-75% of your original video while still keeping the quality.
No registration is required and you can use the tool to convert 20 files per day absolutely free.
Step 1: Visit https://www.freeconvert.com/video-compressor on your browser.
Step 2: Click Choose Files and upload the video you want to compress onto the site. You can also load files from Dropbox, Google Drive, OneDrive, or url. Just make sure the file size does not exceed 1GB.
Step 3: The tool has a default compression option that will deduct the file size by 40%. However, you can select a different compression method to suit your specific needs. Just click the ⚙️ icon and adjust the settings. Then click Apply Settings.
Step 4: Click Compress Now to start the compression process. The compression may take long depending on the original file size and the compression method you chose.
Step 5: After compression, click Download to save the compressed file to your device.
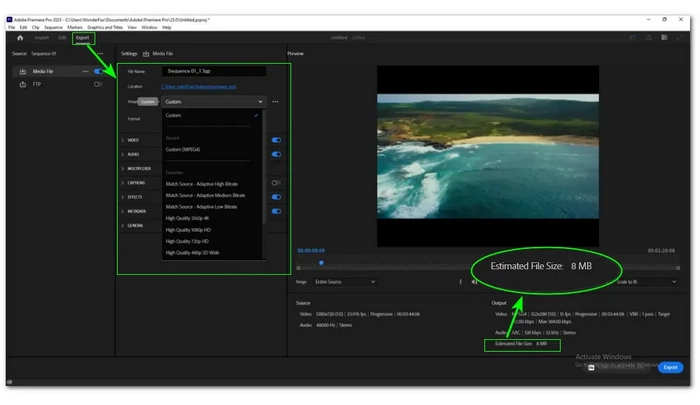
If you're already using video editing software like Adobe Premiere Pro or DaVinci Resolve, you don't necessarily need a third-party app to compress files.
Upon completing a project, Premiere Pro lets you select the export settings, where you can flexibly choose the encoder, bitrate, frame rate, and more to balance the final file size and quality. The best part is, you can see the estimated file size in the preview window, so you can experiment with different values till you get the desired size.
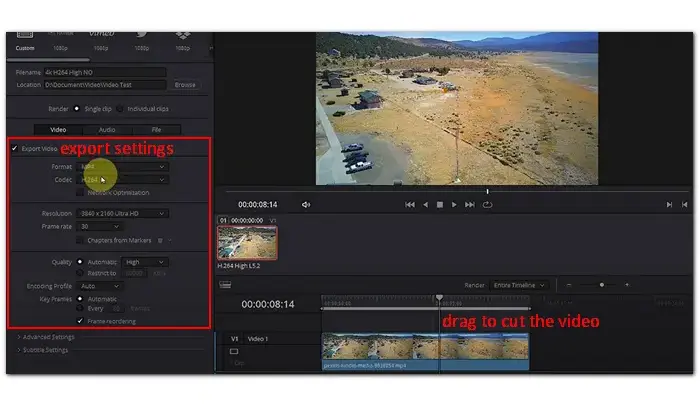
Similarly, DaVinci Resolve also offers adjustable output settings, including encoder, resolution, frame rate, and quality, which you can freely customize for your specific compression needs. In addition, you can select an export preset for YouTube, Vimeo, and more for smooth uploading.
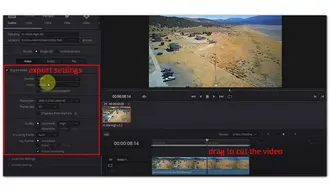
🔔 It's worth noting that if you simply want to quickly compress a completed video without making any edits, professional editing software like these two can be resource-intensive and slow.
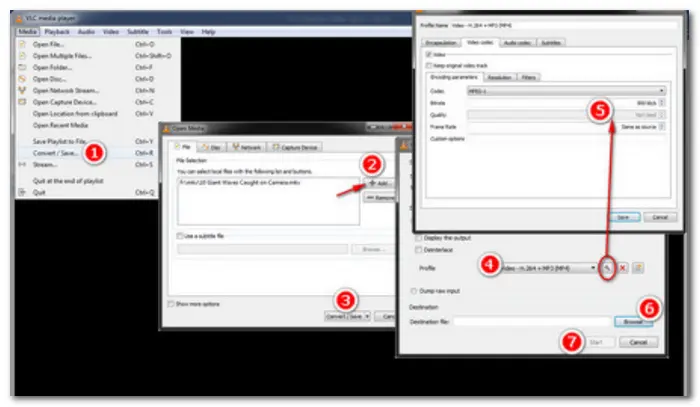
A media player such as VLC can also help you compress a video effectively. VLC does more than just play media files, it can convert files and adjust the encoding settings to reduce the file size of a video. If you've already installed VLC on your computer, you can give it a try. It's not as intuitive as other methods, but it gets the job done eventually.
The downside of it is that you won't know the final size until it's done compression.
Here are the general steps to compress a video in VLC:
Step 1: Open VLC and go to Media > Convert/Save.
Step 2: Click + Add to import your large videos. Then press Convert/Save at the bottom of the window.
Step 3: Select Video – H.265 + MP3 (MP4) as the output profile. H.265 gives higher efficiency than codecs like H.264 and MPEG-4. But if your original file already uses H.265 or an even more efficient codec like AV1, you can try to adjust the encoding parameters.
Simply click the Edit selected profile button, navigate to the Video tab, tick the Video box, and decrease the video bitrate, lower the frame rate, or downscale the resolution. Then, click Save to save the settings.
Step 4: Click Browse to specify an output path and click Start to start the compression.
For advanced users who are familiar with command lines, you can also use FFmpeg, the well-known free and open-source multimedia program to quickly compress video files.
For instance, you can compress a video in FFmpeg while keeping the quality by adjusting the Constant Rate Factor (CRF) and using the H.264 or H.265 codec:
ffmpeg -i input.mp4 -vcodec libx265 -crf 28 output.mp4
Instead of compressing the whole video, you can trim or crop the non-essential part at the beginning, the end, or around your video to reduce the file size.
You can find a video compressor that has a video cutter to do the job, such as WonderFox HD Video Converter Factory Pro mentioned here. But with most modern gadgets coming with built-in video editors, they are sufficient to trim and crop video files efficiently. These include:
Or you can try third-party video cutters.
The steps are pretty similar.
Step 1: Load a video file to one of the video editors.
Step 2: Use the Trim or Crop tool to remove parts you don't need in the video.
Step 3: Click Export or Share to save the final file. When exporting, you may also adjust the settings such as bitrate and encoder to shrink down the file size even more.
Zipping a file naturally comes to most people's minds to reduce the size of a file. When it comes to compressing video files, zipping can also be useful.
The best part of it is that the video can be downsized without losing quality. But keep in mind that the file won't be overly compressed this way. Therefore, zipping a large video file is not a recommended choice.
Windows and Mac have the capability to zip your files natively. Just follow these steps.
🔔 Zipped files can suffer from corruption. It's advisable to keep the original copy of the video file.
For some very large video files, compressing such files can greatly affect the output quality (unless you use a zip tool but the output size is still large). In this case, you can upload the video to YouTube or other sites such as Google Drive, etc., and then share the video link.
Compressing videos to reduce their file size is an important skill that everyone should master in this digital age. Luckily, the video compression tools come to our assistance and now we're able to store and share videos without worrying about the size. With the help of a powerful video compressor, we can also maintain the best output quality after video compression.
I hope this article really helps you and thank you for reading. Have a great day!

WonderFox DVD Video Converter
Download for Free
Download for Free
Video compression is the process of reducing the video file size by lowering the bitrate and resolution, changing the encoder, or trimming the length.
You can use the built-in video editor on your device to edit the length and adjust the export settings to make the video smaller for free.
Unfortunately, no. Codecs like FFV1, HuffYUV and Lagarith can do true lossless compression, but the compression ratios are much lower than lossy codecs like H.264 and H.265.
If you convert an already-compressed H.265 video to a lossless format, the resulting file will actually be much larger. Lossless codecs are only useful for compressing raw footage data for editing or archival purposes.
That said, modern codecs such as H.265 offer "visually lossless" compression for everyday video storage and sharing. They can reduce the file size considerably while maintaining the image quality that looks identical to the original to most people.
You need to compress the video small enough to email. The best way is to use a compression software that lets you set the target size so you can get your wanted size easily. Such a tool includes FreeConvert, a free online service that can be accessed as long as you have an internet connection. However, note that the video quality may downgrade if the video is compressed too hard.
No. Windows Media Player does not include any editing functions. You can refer to other methods in this article.

I write about multimedia topics, including video and audio conversion, compression, editing, and downloading. I joined WonderFox in 2020, and my goal is to help readers solve everyday tech problems more easily. In this ultimate guide, you can learn the fundamentals that make up the video size and efficient ways to compress your videos on any device. Hope you find it useful!


I write about multimedia topics, including video and audio conversion, compression, editing, and downloading. I joined WonderFox in 2020, and my goal is to help readers solve everyday tech problems more easily. In this ultimate guide, you can learn the fundamentals that make up the video size and efficient ways to compress your videos on any device. Hope you find it useful!

Terms and Conditions | Privacy Policy | License Agreement | Copyright © 2009-2026 WonderFox Soft, Inc.All Rights Reserved