Free Download
Open and Convert MVI Videos for Playback and Editing
AuthorRecommended by the author

SoftwareHow to & Tips

Video FormatsConvert Video

Resources

How to Open and Convert MVI Videos for Easy Playback

Author: Kevincy by Kevincy

Updated on Sep 23, 2026

Have a video named MVI_0001.MOV or MVI_0001.MP4 that your editor cannot open? Or is your file actually ending in .mvi? These are different cases, so identifying the real file type is the first step.

Below, you will find straightforward ways to convert compatible videos into a widely supported format, plus an alternative for uncommon legacy .mvi files.

First, Find Out What Kind of MVI Video You Have

Check the full filename and extension before choosing a converter. On many Canon cameras, MVI_ is simply the beginning of a movie's filename. For example, MVI_0001.MOV and MVI_0001.MP4 are camera videos, not files in a special MVI format. If they do not play or import, the video codec or your editor's format support may be the problem.

A file that actually ends in .mvi may instead contain the much older Motion Pixels video format found in some PC games. Related Motion Pixels video was also distributed in AVI containers. These rare files need a converter that can decode the original video, and support varies between tools.

Once you know which file you have, try the desktop method below. An online converter can be convenient for a small, compatible camera clip. If a genuine .mvi file is rejected, see the legacy-file solution further down. Simply renaming the extension will not convert the video.

Method 1: Convert Your Video on Windows

If your camera video will not open in a media player or video editor, converting it to a compatible format often solves the problem. MP4 with H.264 video and AAC audio is a practical choice for most modern devices. Use a different output, such as AVI, only when your editor or device requires it.

WonderFox HD Video Converter Factory Pro offers batch conversion, popular device presets, and basic editing tools, including trimming, cropping, rotating, and merging. It supports many common camera recordings; however, support for an uncommon Motion Pixels .mvi file is not guaranteed, so check that your source loads successfully before converting.


To try it, downloaddownload the Windows converter and follow these three steps.

Free Download Free Download

Convert a Supported MVI Video in Three Steps

Import Your Source Video

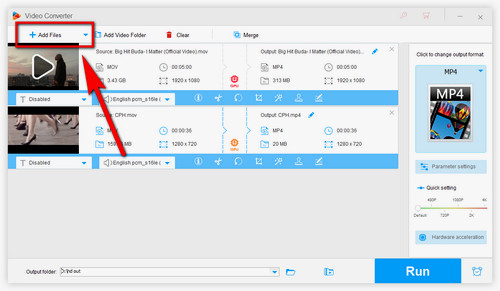
Step 1: Import Your Source Video

Launch the program and open the Converter module. Click Add Files or drag and drop your video into the window. You can add several clips for batch conversion. Make sure the files are recognized and, if possible, preview them before continuing.

Choose a Compatible Output

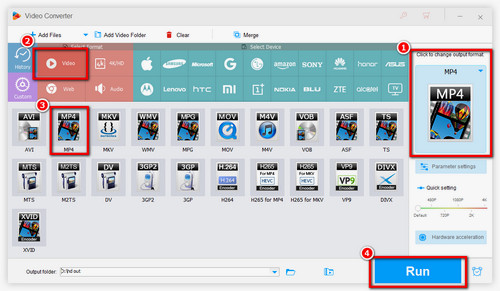
Step 2: Choose a Compatible Output

Click the Output Format panel on the right. Under Video, select MP4 for broad compatibility, or choose another format, such as AVI, MOV, or MKV, to suit your target editor or device. You can also open Parameter Settings to adjust the video codec, resolution, frame rate, or bitrate when needed. Avoid increasing the settings unnecessarily; conversion cannot restore details missing from the source.

Start Conversion

Step 3: Export and Check the Result

Use the folder button at the bottom to choose where to save the converted file, then click Run. When it finishes, play the new video and check both picture and sound before removing or archiving your original recording.

Tip: If the source cannot be imported or the output has no picture, check its actual extension and use the troubleshooting advice below instead of repeatedly trying different output presets.

Method 2: Convert a Small, Supported Clip Online

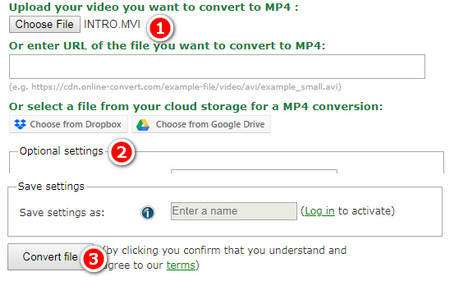
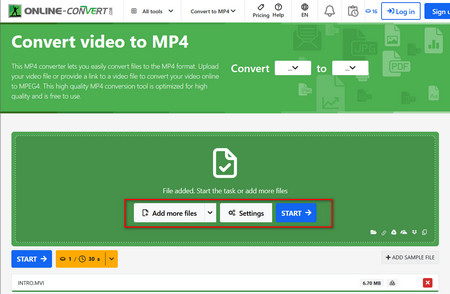
Online video conversion exampleOnline video conversion

If you only need to convert a short camera clip and prefer not to install software, try Online-Convert. It accepts many common video formats, but support for a genuine legacy .mvi file is not confirmed. Check whether the website accepts your file before relying on it.

Step 1: Open the online converter and click Choose File to upload your video.

Step 2: If necessary, use the optional settings to adjust the video codec, size, bitrate, or trim points. Leave these settings at their defaults if you are unsure.

Step 3: Click Start to begin processing. Download the finished file and test it in your usual player or editor.

Keep in mind: Online tools may have upload limits, slow transfers, or restricted input-format support. Avoid uploading private recordings unless you are comfortable with the service's privacy policy. For large batches or a file the website rejects, a desktop tool is more practical.

If Your MVI File Still Will Not Open

For a real .mvi file: The open-source FFmpeg includes a demuxer and decoder for Motion Pixels video. If the desktop or online tools reject your file, install FFmpeg and run the following command in the folder containing the source video:

ffmpeg -i input.mvi -c:v libx264 -pix_fmt yuv420p -c:a aac output.mp4

Replace input.mvi with your actual filename. This converts a supported source to a more widely playable video. If FFmpeg also cannot read it, verify that the file is complete and that it really is a Motion Pixels video. For details on the supported formats, see FFmpeg's documentation.

FAQs

Q1. Why can I play a camera video on the camera but not on my computer?

Your camera and computer may support different video codecs. Check the file's full extension and try an updated player such as VLC. If your editing software still cannot import it, convert the original to a format and codec your editor supports.


Q2. Can I just rename the file extension to MP4?

No. Renaming changes the filename, not the video data inside it. Use a converter that can read the source file.


Q3. Will conversion improve the original video quality?

Not by itself. Choose a suitable output codec and enough bitrate to avoid obvious additional quality loss, but increasing the resolution or bitrate will not recreate detail that was never captured.

Other Useful Tools for Your Video Projects

1. Convert supported videos and audio files in batches with presets for common formats and devices;

2. Download supported online videos for permitted offline use;

3. Extract audio from video when you only need the soundtrack;

4. Compress large files with adjustable settings to balance size and quality;

5. Trim, crop, rotate, add a watermark or filter, and merge compatible clips;

6. Record your screen, tutorials, or gameplay with audio.

Free Download Free Download


Kevincy

Kevincy Berel

Kevincy joined the WonderFox team in 2014 and has been a senior columnist ever since. With over two decades of experience in the video editing industry, he shares tutorials, tips, and how-to guides on video/audio processing and personal DVD backups. Family-oriented and passionate about helping others, he is dedicated to making video and audio processing easier for readers.

Email

Backup DVD to MP4, AVI, MKV, etc. Digital Video Formats

Backup DVD to MP4, AVI, MKV, etc. Digital Video Formats

WonderFox DVD Ripper Pro

WonderFox DVD Ripper Pro is a separate Windows tool for backing up and converting supported DVD-Video discs into digital files. It can preserve a full DVD copy or create a video suitable for playback on your computer or other devices.

Free Download DVD Ripper Pro Free Download DVD Ripper Pro

More Related Articles

ISO to MP4 - Simplest and Best Method to Convert ISO File to MP4 VPROJ to MP4 – How to Open and Convert VPROJ File to MP4 How Can I Convert VPJ to MP4 with VideoPad Video Editor
How to Play FBR File - A Fast Way to Convert FBR to MP4 How to Convert PRPROJ to MP4 with Adobe Premiere Pro How to Convert VEG to MP4 with Sony Vegas Pro