Sometimes, excessively loud audio in videos can detract from the overall viewing experience, make dialogue hard to follow, or even cause listening discomfort. Whether you have a finished video file, a batch of clips, or a project exported from Adobe Premiere Pro, lowering the video volume can help make the sound more balanced and comfortable.
In this guide, we’ll walk you through 4 practical ways to make a video less loud on Windows. We’ll also briefly explain how to lower volume in Premiere Pro if you are already editing your project there.
Lower the volume of those loud videos is necessary for several reasons:
If you're tired of having to turn down the volume on your speakers or media players every time you play a video with loud audio, this guide should be the savior, providing you with the right tools and techniques for lowering audio volume in a video.
HD Video Converter Factory Pro offers a straightforward way to make a video less loud. The batch processing mode even makes the job more efficient and time-saving. Get the handy tool here!
If you have a bunch of video files that need to make them less loud, WonderFox HD Video Converter Factory Pro is supposed to be your best bet. This user-friendly tool allows easy adjustment of video volume and supports batch processing for time efficiency.
💡 This method is also useful when you only need to reduce the volume of an already exported video without reopening a full video editor like Premiere Pro. For example, if the final MP4 exported from Premiere is louder than expected, or if your source file uses a format/codec that Premiere Pro cannot import smoothly, you can use this tool to adjust the volume directly and export a more compatible copy.
Download it below, and here's the walkthrough:
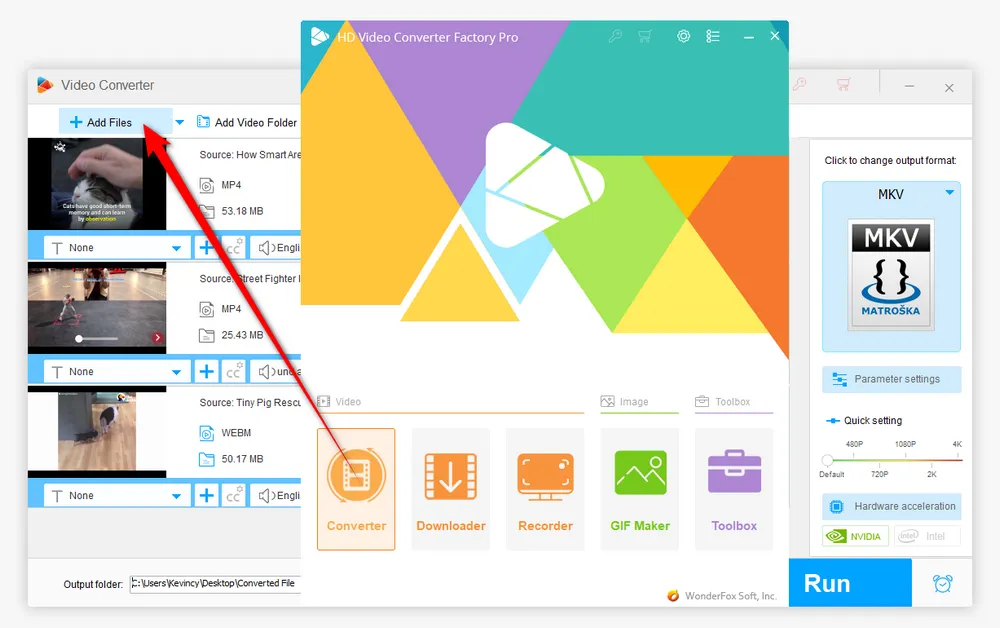
DownloadDownload, install, and run the application. Open "Converter" and click "Add Files" to import the video that is too loud. A quick drag-n-drop is also allowed.
💡 This software allows you to import multiple videos. The batch processing mode will save you a lot of time and effort.
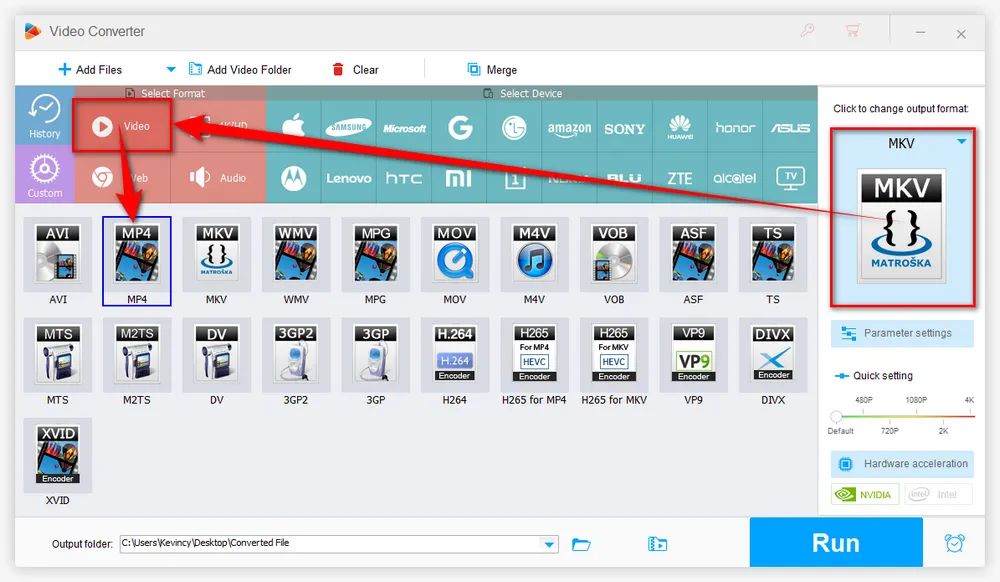
Click on the format image on the right side of the interface to expand a full list of output format library.
For the best compatibility, we recommend going to the "Video" category and choosing the "MP4" profile.
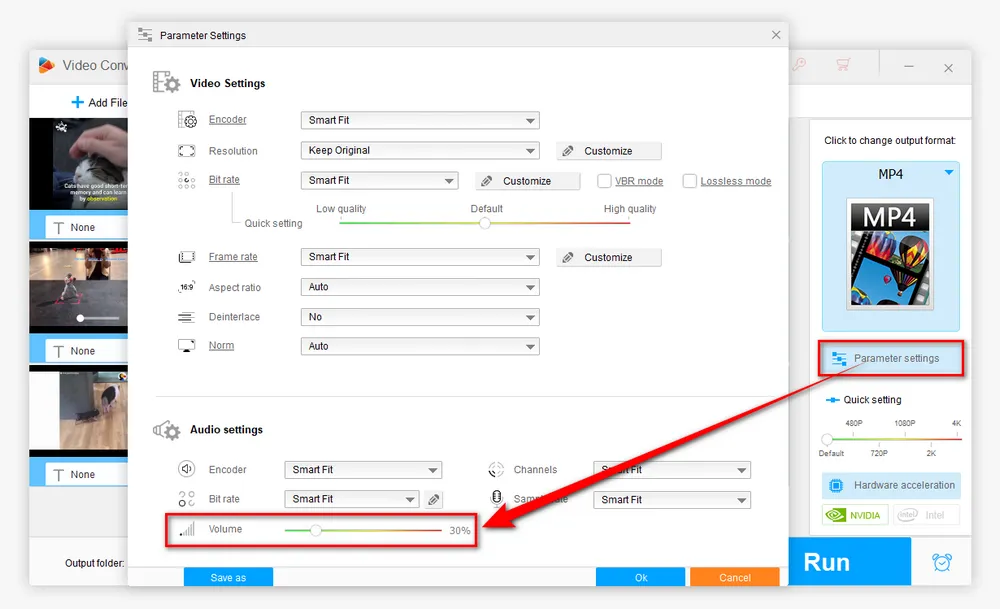
Click "Parameter settings", navigate to the "Audio settings" section and move the slider to the left to reduce video volume on a percentage basis.
💡 Tip: It will mute the video when it reaches at 0%. On the contrary, you can increase the volume up to 200% if you move the slider to the right. Click OK to save the changes. If you are not sure how much to reduce, start with a moderate value such as 60%–80%, preview the result, and then adjust again if needed.
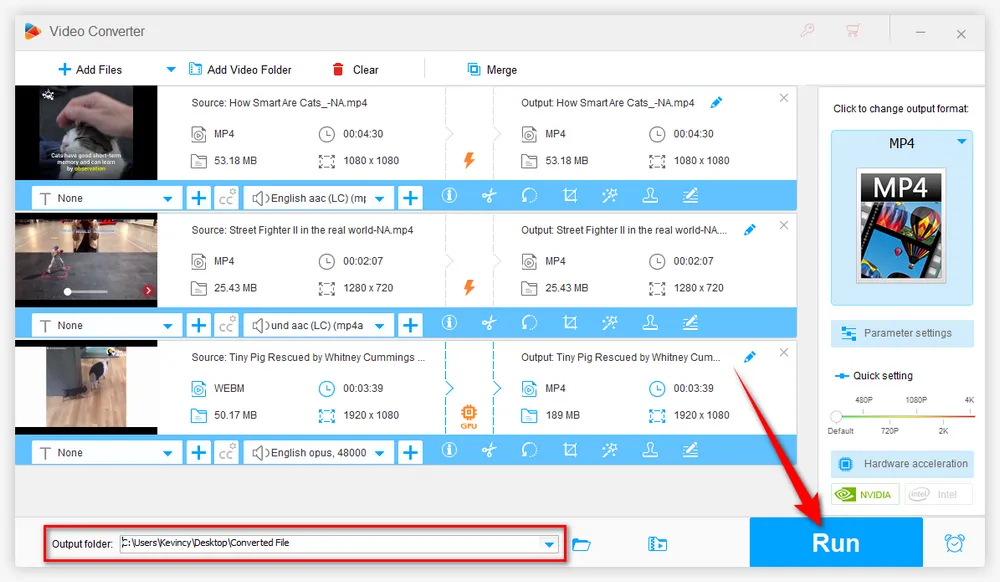
Almost there! Choose a location at the bottom, and lastly, hit the "Run" button to batch lower volume of video files with hardware acceleration.
Microsoft Photos app is a photo and video editor pre-installed on Windows 10 that allows users to manage, edit, and share their media files with ease. You can easily adjust the volume levels of your videos using the Microsoft Photos app without the need for any additional software. Next, we'll be showing you how to reduce the volume of your videos using the Microsoft Photos app in just a few simple steps.
💡 Update: Microsoft Photos used to include a simple Video Editor on Windows 10, which allowed users to lower video volume without installing third-party software. However, on newer Windows versions and updated Photos apps, the classic Video Editor may no longer be available directly. If you still want to use this method, you may need to open or install Photos Legacy. Otherwise, Microsoft Clipchamp is the recommended video editor for newer Windows systems.
👉 The following steps apply to the classic Video Editor in Photos Legacy:
Step 1. Open Photos app from Start Menu or Search Bar and switch to "Video Editor".
Step 2. Create a new project and give it a name as you wish.
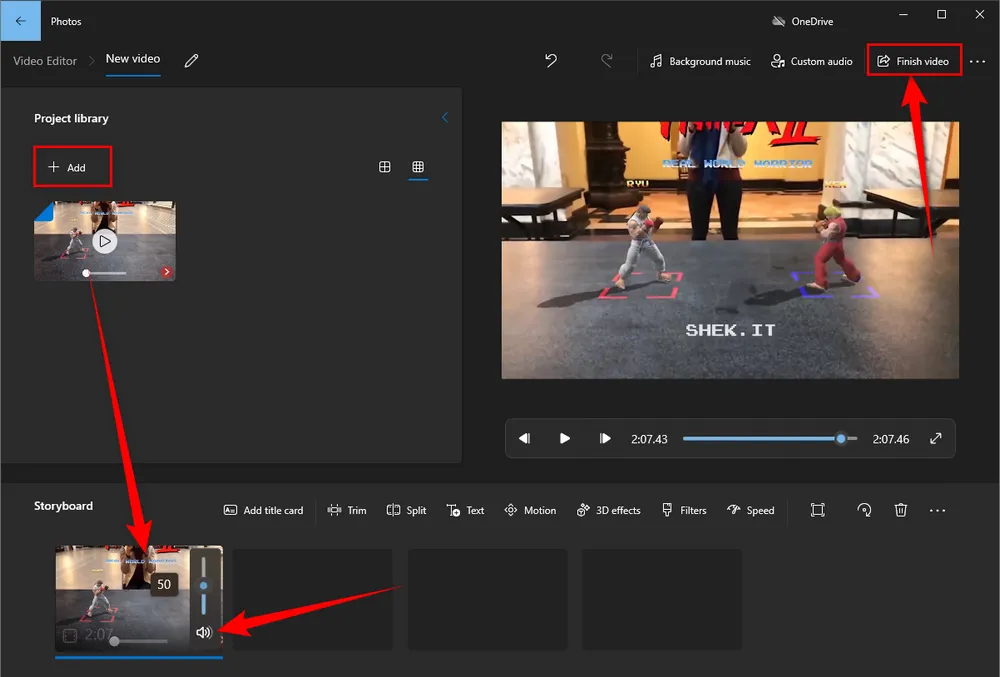
Step 3. In the new project window, press "+ Add" button to import your high-pitched video to the "Project library" section. Make sure it's a supported video format.
Step 4. Drag and drop the video file from the "Project library" to "Storyboard".
Step 5. Then you'll see a small speaker icon in the lower right corner of the video thumbnail. Click on it and move down the sider to make the video quieter, and you can preview your changes in the Preview window.
Step 6. When everything is all set, press "Finish video" button in the top-right corner and choose your preferred resolution. Click on "Export" button and choose an output folder.
Step 7. Finally, hit "Export" to start the process of lowering volume of video.
Note: MP4 is the only output format. You're not allowed to choose other format options.
On Windows 11, the Video Editor is no longer available in the new Microsoft Photos app. Instead, Clipchamp, an online video editing tool acquired by Microsoft, has been integrated as part of Windows 11 to work as the default Video Editor. With its user-friendly interface and intuitive tools, it provides a wide range of features for simple video editing. Whether you're looking to trim, crop, or just decrease the volume of video, Clipchamp has got you covered. Just follow these simple steps to get the job done.
Step 1. Open Clipchamp through Start Menu or Search Bar, and sign in with your Microsoft account if prompted.
Step 2. Click on the "Create your first video" button on the bottom to open the video editor.
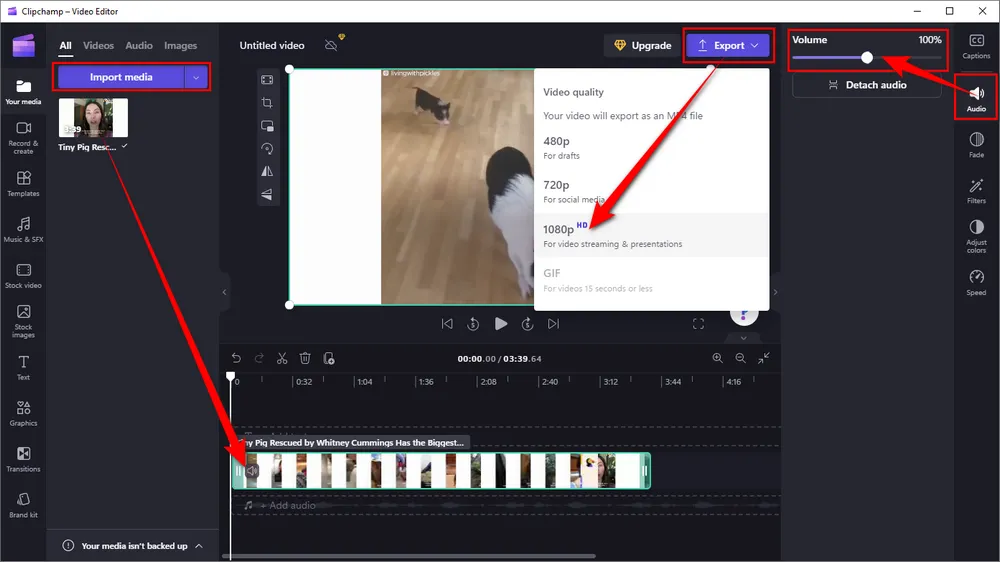
Step 3. Click on "Import media" button to add your video file, or just drag and drop it to the left column.
Step 4. Drag and drop the video from media library to the timeline below.
Step 5. Press "Audio" tab on the right sidebar, then you're able to adjust the volume. To lower volume of video, just move the slider to the left, and you can preview the result in the main media player till you're satisfied with the volume level.
Optional. If needed, you can even proceed to further editing work. Clipchamp allows you to cut, trim, crop, rotate, split, loop, zoom in and out, speed up or slow down, and even add filters and transitions to videos.
Step 6. When everything is ready, hit the top "Export" button to start making a video less loud and exporting a 480p, 720p, or 1080p MP4 file.
Step 7. After the processing, it will be automatically saved in your Downloads folder. You can also choose to save or upload it to YouTube, LinkedIn, TikTok, Pinterest, Google Drive, OneDrive, or TikTok.
Online-Video-Cutter is an online platform that provides a quick and easy way to change the volume of your video. The website is incredibly user-friendly and doesn't require any prior technical knowledge, enabling you to lower the volume if the original video was loud, or raise it if the original sound was quiet. Just follow these steps to get started.
Step 1. Visit 123apps' Online-Video-Cutter in your frequently used web browser: https://online-video-cutter.com/volume
Step 2. Click on "Open file" button to upload the video you want to lower the volume of. It may need a while based on the file size.
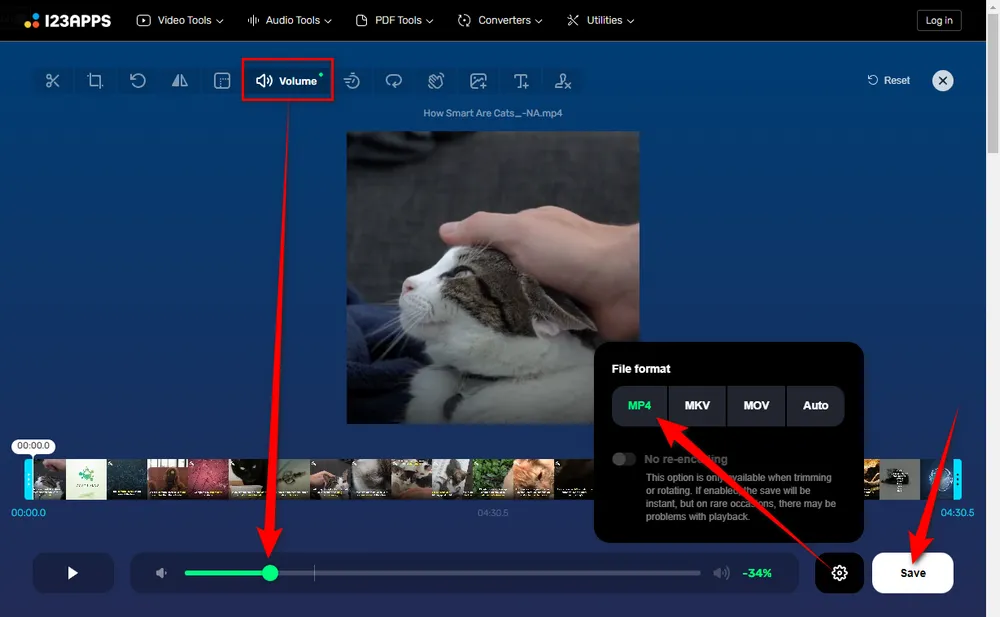
Step 3. After that, the slider will be set to 0 (the default volume). To decrease volume of video, drag the slider to the left, and the volume level will be shown on the right.
Step 4. You're able to press the Play button to preview the result till you've got the desired volume level.
Step 5. Before saving the final video with the proper volume, you can choose the video format in which you want to save the final file. MP4, MKV and MOV are available when you press the "Gear" button. If not, the clip will be saved in MP4 format by default.
Step 6. Finally, hit the "Save" button to start the process of decreasing volume of MP4.
Step 7. When it is complete, click on "Save" button to download it to your local drive.
| Method/Tool | Platform | Key Features | Pros | Cons |
|---|---|---|---|---|
| HD Video Converter Factory Pro | Windows | - Batch processing - Multiple format support - Audio normalization - Advanced settings |
- User-friendly interface - Handles large files - High-quality output |
- Requires installation - Paid software (trial available) |
| Microsoft Photos App | Windows 10 | - Pre-installed - Basic video editing - Audio adjustment slider |
- No download required - Easy to use - Free |
- Limited features - No batch processing |
| Clipchamp | Windows 11, Web | - Cloud-based editing - Volume control - Multi-track editing |
- Online access - Integration with Windows 11 - Free tier available |
- Limited free plan - Requires internet for processing |
| Online Video Cutter (123apps) | Web | - Simple audio adjustment - Cloud storage integration (e.g., Google Drive) |
- No installation required - Easy for quick edits - Free |
- File size limitations - Internet connection needed |
| Adobe Premiere Pro | Windows, macOS | - Timeline volume line - Audio Gain - Audio Clip Mixer - keyframes |
- precise clip - track volume changes - fade effects |
- editing knowledge - paid subscription required |
For Beginners: HD Video Converter Factory Pro is the best option for high-quality, batch video editing with detailed settings.
For Quick, Simple Edits on Windows 10: Microsoft Photos App is perfect for basic volume adjustments.
For Web-based Editing: Clipchamp and Online Video Cutter provide convenient online solutions.
For Premiere Pro Users: If the video is still in a Premiere project, adjust the volume directly in Premiere. If the video has already been exported and you only need to make it quieter, a simpler video volume reducer may be faster.
HD Video Converter Factory Pro, a great Swiss army knife of A/V processing, works as a novice-oriented video editor, converter, downloader, recorder, compressor, GIF maker. Get the all-in-one app here!
A: Lowering the volume itself does not affect video quality. However, re-encoding during the editing process can lead to slight quality changes if not done correctly. Always use high-quality settings to minimize this.
A: If you are already editing the video in Premiere Pro, you can lower the audio volume in several ways:
If the video has already been exported from Premiere Pro, you don’t have to reopen the whole project. You can use a simpler video volume reducer to lower the volume of the final video file directly.
A: Absolutely. Most video editors allow you to select specific segments where the video volume reducer can be applied, leaving the rest of the audio intact.
A: Yes, mobile apps like InShot, KineMaster, and iMovie allow users to edit and lower volume on video directly on smartphones.
That's all the 4 handy methods that I want to share with you how to make a video quieter permanently. It's a quite simple process that can be done by following those easy-to-operate steps, you can enjoy your videos without the sound being too loud.
For users who are working on a Premiere Pro project, adjusting the audio inside Premiere gives you more control over clips, tracks, and fade effects. But for finished videos, batch tasks, or quick volume fixes, a dedicated video volume reducer is usually more straightforward.
Whichever method you choose, the key is to take your time and experiment with different settings until you find the perfect balance between volume and audio quality. Cheers!

Kevincy joined the WonderFox team in 2014 and has been a senior columnist ever since. With over two decades of experience in the video editing industry, he shares tutorials, tips, and how-to guides on video/audio processing and personal DVD backups. Family-oriented and passionate about helping others, he is dedicated to making video and audio processing easier for readers.
![]()
![]()
![]()
![]()

WonderFox HD Video Converter Factory Pro
500+ optimized presets for fast conversion.
Compress large-sized videos with no quality loss.
Trim, merge, crop, rotate, flip, watermark video.
Download HD/FHD/2K/4K/8K videos from 1000+ sites.
Record live streams, gameplay, video call, tutorial...
Make animated GIFs from video or image sequence.
Make ringtones, extract subtitles & more...
Privacy Policy | Copyright © 2009-2026 WonderFox Soft, Inc. All Rights Reserved
