Own a powerful Asus laptop for gaming but have no idea how to enable its screen recording option to capture your best moments? No worries, because this article will discuss how to screen record on Asus laptops in different ways.
Tips: Want to record and edit in one tool, try this software: https://www.videoconverterfactory.com/download/hd-video-converter-pro.exehttps://www.videoconverterfactory.com/download/hd-video-converter-pro.exe
Xbox Game Bar, a gaming overlay pre-installed on Windows 10/11, is primarily designed for gamers and offers various widgets to help you take control of all your favorite gaming activities while playing on a computer. It comes with a Capture widget, allowing you to take screenshots, capture the last 30 seconds of your game, and record the screen with audio.
Note that Xbox Game Bar only supports recording one application at a time and it can’t record the entire desktop or File Explorer. Besides, to use the recording feature built into it, your PC needs to support AMD VCE, NVIDIA NVENC, the Intel Quick Sync H.264, or higher encoders.
First-time users need to enable Xbox Game Bar on their Asus laptop with the following steps:
Step 1. Go to the Windows Settings menu;
Step 2. Click Gaming and head to Game Bar;
Step 3. Tap on the slider below “Record game clips, screenshots, and broadcast using Game Bar” to activate the screen recording feature. Here, you can also change any of the keyboard shortcuts.
Select Captures listed on the left to customize more recording settings if needed.

Next, let’s see how to screen record on Asus laptop Windows 11/10 using Xbox Game Bar.
Step 1. Open the application or navigate to the screen you want to record and press the Windows key + G to bring up the Game Bar overlay. Several widgets will appear on the screen.
Step 2. You can see a dot button on the Capture widget. Hit it or use Windows key + Alt+ R to start recording.
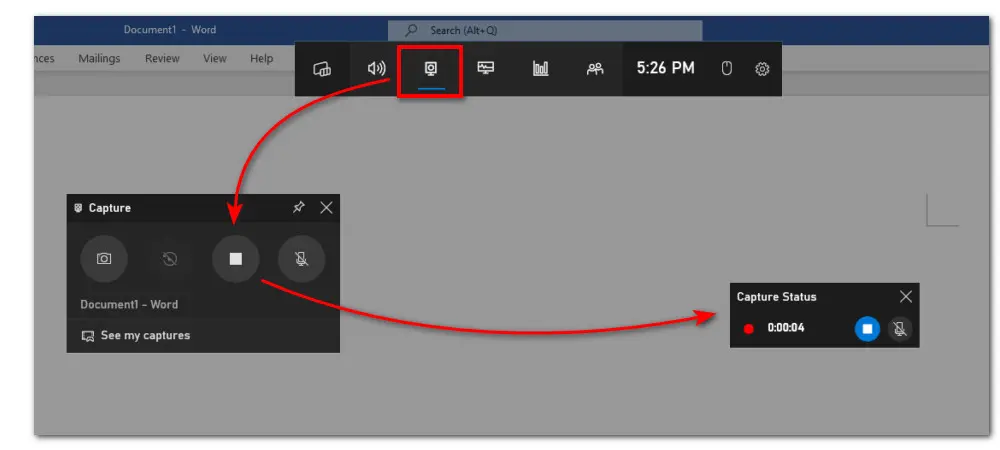
The Capture overlay should appear by default. If not, click the camera icon on the top menu bar to open it.
Step 3. A Capture Status overlay with a timer and two recording controls will appear. Click on the microphone button to toggle your external mic on and off.
Step 4. Click on the stop button on the bar to stop recording. Alternatively, you can press Windows key + Alt + R to end it. You can get the recording in Xbox Game Bar Gallery.
First, let me introduce you to WonderFox HD Video Converter Factory Pro. Whether you want to capture the full screen, a specific area of your screen, or the audio only, you can easily do it with this 4K screen recorder for Windows.
This program also gives you a suite of built-in editing tools so you can do more extensive editing to your recordings, like trimming and cutting out unnecessary fragments, assembling recording clips into longer, adding subtitles and new audio tracks, etc.
The self-explanatory interface makes it the easiest screen recorder for PC and perfect for quick screen recording tasks. Get it now and follow the simple guide to learn how to screen record on an Asus laptop.
Launch the screen recording software on the Asus laptop. Click on the Recorder to enter the recording window.

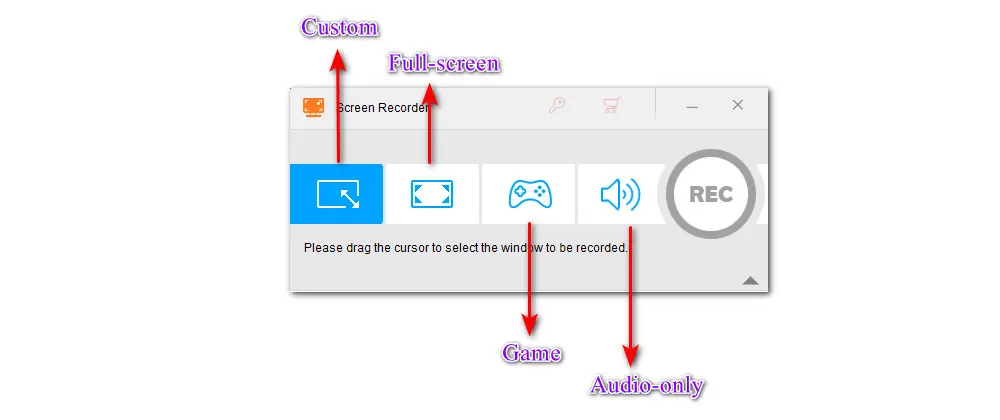
As you can see, there are four recording modes. Choose one and simply hit the button to activate the selected mode.
#Custom mode allows you to record part of your screen. Drag the edge of the rectangle until the square is the size you want.
#Full-screen mode is to record the whole screen of your computer.
#Game mode allows you to record CSGO, Genshin Impact, LOL, and any gameplay highlights without lagging.
#Audio-only mode lets you capture system sounds and microphone audio simultaneously, or separately.
Then press the OK button to confirm your choice.
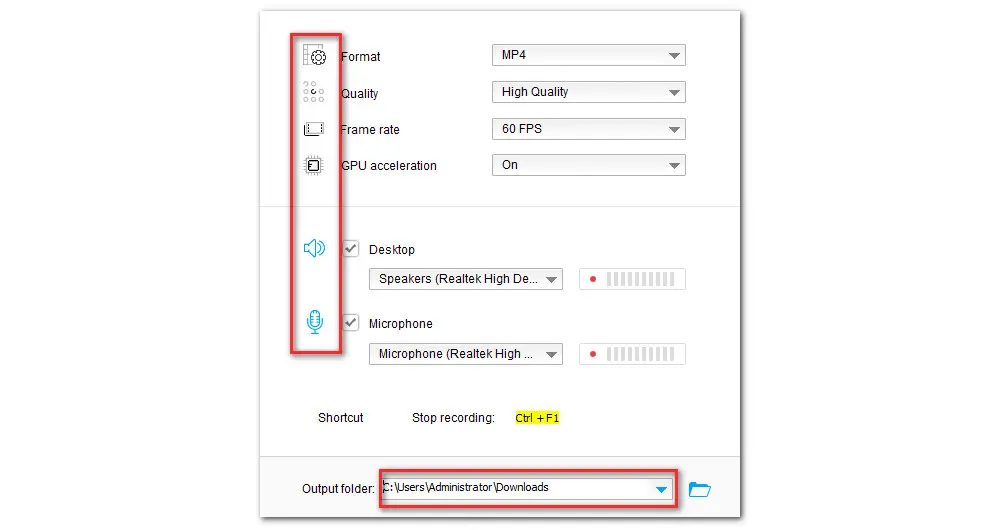
Preset a recording format, quality, and frame rate according to your actual needs. If your PC supports GPU acceleration, toggle it on for a more stable recording performance especially when you want to record gameplay highlights.
To record the screen on Asus laptop with internal and external audio, you need to activate both Desktop (internal sound) and Microphone (external voices).
Then click the inverted triangle button at the bottom and specify an output folder.
At last, hit the big REC button to start recording. You can use keyboard shortcuts Ctrl + F1 to stop at any time.

Convert all mainstream audio and video files;
Download movies and music from 1,000+ websites;
Batch processing and hardware acceleration;
Make ringtones, extract subtitles & more...
The last option for you is an open-source media player—VLC. Apart from being known as a popular media player, VLC has many hidden features and can also function as a screen recording program on your Asus laptop.
This free recorder is compatible with Windows, Mac, Linux, and even Mobile devices like iOS, and Android. With it, you can capture on-screen activities, webcam, or record audio only on your Asus laptop.
But the recording capability in VLC is not as straightforward as the first two recording programs. Follow the steps below to learn how to screen record on an Asus laptop with VLC.
Step 1. Download and install the VLC media player on your Asus laptop first.
Step 2. Launch the VLC screen recorder and hit View > Advanced Control to enable the recording bar like below.

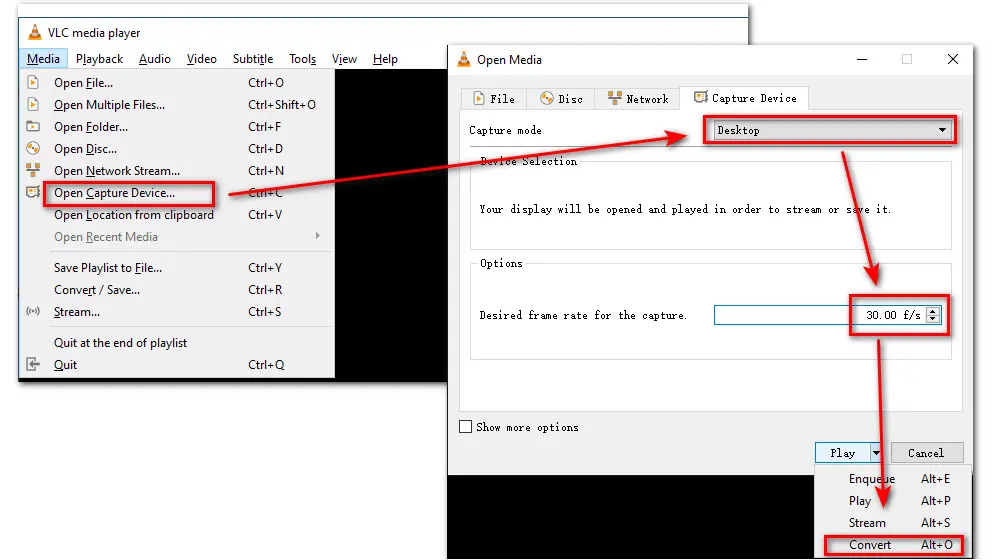
Step 3. Then hit Media on the menu bar at the top and select Open Capture Device.
Step 4. A new window called Open Media will appear. Select Desktop from the drop-down options of Capture mode. Then set the desired frame rate. 30 fps is good enough for most videos.
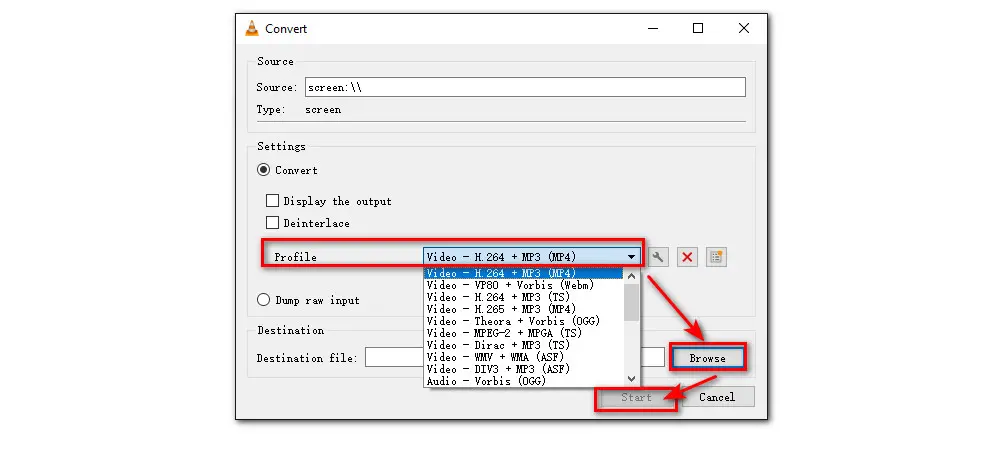
Step 5. Then click the triangle button next to the Play tab and select Convert.
Step 6. Next to the Profile tab, hit to choose a needed output format from the drop-down list. Click Browse to specify a new folder and create a name for your recording. At last, click on the Start button to begin recording.
Hit the Stop playback button (square icon) to end the recording on your Asus laptop.
Output format and editing options are very limited in Xbox Game Bar and VLC after recording. Thus, if you prefer an all-in-one screen recorder and editor, WonderFox HD Video Converter Factory Pro is a better option. It has no watermark and no time limit. GETGET this competent screen recorder here and follow the step-by-step guide on how to screen record on an Asus laptop shown above to start Asus screen recording effortlessly.

WonderFox DVD Ripper Pro
1. Digitize DVDs to MP4, MKV, MPG... with high quality;
2. Rip audio files from DVD to MP3, WAV, FLAC, etc.
3. Remove/bypass advanced DVD copy protection;
4. 1:1 quick copy to ISO image and DVD folder;
5. Edit DVD movies and customize output settings.
* Do Not use this software to rip any copy-protected DVD for commercial use.
Privacy Policy | Copyright © 2009-2026 WonderFox Soft, Inc.All Rights Reserved
