


Whether you want to record a software tutorial, capture an online meeting for later review, save gameplay highlights, or make a quick training video, a handy screen recorder can make the task much easier. The good news is that most laptops can record the screen with audio, but the best method depends more on the operating system, graphics card, and recording purpose than on the laptop brand itself.
This updated guide keeps the main Windows and Mac solutions while also folding in practical notes for HP, Dell, ASUS, Acer, MSI, Gateway, and other Windows laptops. Instead of repeating the same steps by brand, we’ll show the universal methods first, then explain when brand-related tools or NVIDIA recording features may help.
Wonder how to screen record with sound on a Windows laptop? The following methods work for most Windows laptops, including HP, Dell, ASUS, Acer, MSI, Gateway, Lenovo, Surface, and more. You can start with the built-in Xbox Game Bar on Windows 10/11, use WonderFox HD Video Converter Factory Pro for full-screen or selected-area recording, or try NVIDIA ShadowPlay if your laptop has a supported GeForce GPU.
Xbox Game Bar is included in Windows 10 and Windows 11. You can also get it from Microsoft Store. It is mainly designed for game capture, screenshots, and quick performance widgets, but it can also record many regular app windows.
Before using it, note its limits: Xbox Game Bar records one active app window rather than the whole desktop, and it usually cannot record the Windows desktop, File Explorer, or some protected/DRM video windows. It is a convenient choice for short app demos and gameplay clips, but not the best option for recording everything on your laptop screen.
Step 1. Press the keyboard shortcuts Windows key + G to open the Game Bar overlay. If the Xbox Game Bar overlay doesn’t appear, go to Windows Settings > Gaming > Xbox Game Bar and enable it. On some newer Windows builds, you can also search for Xbox Game Bar from the Start menu.
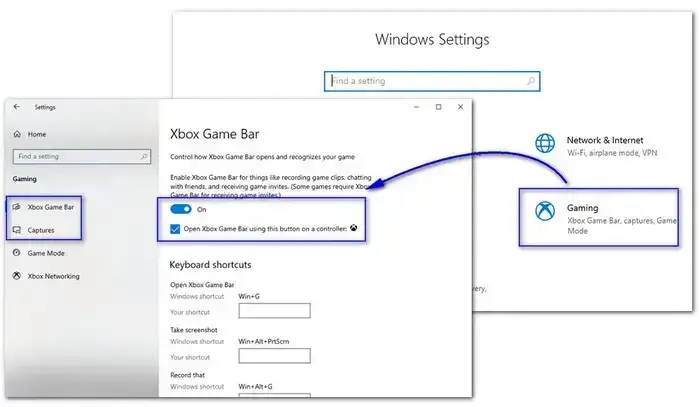

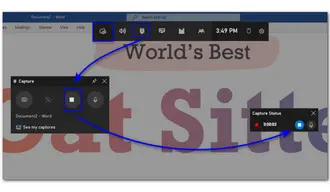
Step 2. The Capture widget will appear on the left by default and gives quick access to capture controls. Click the recording button (with a dot on it) or press Windows key + Alt + R to start recording. To adjust audio, open Settings > Gaming > Captures and check whether system audio and microphone capture are enabled as needed.
Step 3. Then a Capture Status overlay with a timer and two recording control buttons will appear. The mic symbol button allows you to mute or enable your external microphone while capturing.
Step 4. Hit the stop button on the bar to stop the recording. Alternatively, you can use the Windows key + Alt + R to end it. Go to Widget Menu > Gallery to preview the recorded video.

Xbox Game Bar is handy, but it is not enough when you need to record the full desktop, a selected area, File Explorer, an older Windows laptop, or a longer tutorial. In that case, a dedicated recorder is easier. Here we recommend WonderFox HD Video Converter Factory Pro, which works well with Windows 11/10/8.1/8/7.
This feature-packed screen recorder for Windows laptops supports full-screen recording, custom-area recording, game recording, and audio-only recording. It can capture system sound and microphone audio at the same time, and after recording, you can continue to trim, merge, compress, convert, or make GIFs in the same program. No technical setup is required.
DownloadDownload it first and follow the guide below to learn how to screen record on a laptop Windows using this robust recorder.
WonderFox HD Video Converter Factory Pro can record activities on a Windows laptop screen with system audio and microphone audio at the same time. It supports full-screen, custom-area, game, and audio-only recording, with no watermark. Download to take a shot now!
Launch the program on your laptop first. You’ll see five modules on the startup interface: Converter, Downloader, Recorder, GIF Maker, and Toolbox. Head to the Recorder module.
Tips: As you can see, besides screen recording, this all-in-one software also supports converting, editing, compressing, downloading, GIF making, etc., with no restrictions on the size or length of your files.
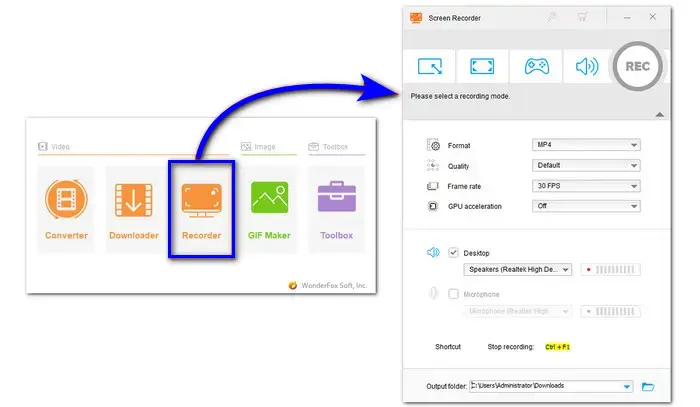
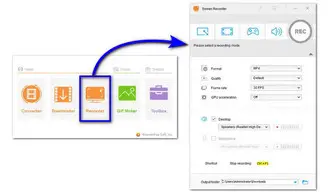
On the top of the Recording window, select a recording mode based on your actual needs.
# Full Screen Mode enables you to capture the entire laptop screen.
# Custom Mode allows you to select a specific part of the screen, which is useful for app demos or online classes.
# Game mode is designed for gameplay capture.
# Audio-only mode lets you capture sounds from the system and microphone simultaneously.


For recording screen with audio, you need to choose a video format (MP4/AVI/MOV/MKV) and select the needed quality and frame rates from the drop-down list. Then choose an audio source.
For recording audio only, choose an audio format (MP3/AAC/AC3/ WAV) first. Then tick off the Desktop option and it will function as an internal audio recorder. If you want to do a voice-over for Google Slides or other presentations, simply toggle on the Microphone option.
Note that GPU acceleration depends on the laptop hardware and driver support. On many modern laptops, it may use supported NVIDIA, Intel, or AMD hardware acceleration when available.
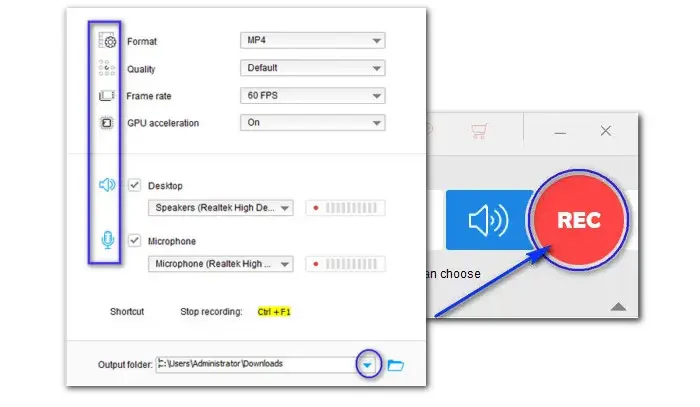

Before starting, you can click on the bottom inverted triangle button to set a new folder for the recording file so that you can easily locate and use them later.
At last, hit the red REC to start recording and press keyboard shortcuts Ctrl + F1 to stop. If you want to edit the recorded files, you can import the files into the Converter module where you can cut, merge, compress, and convert the file as you like.
Disclaimer: This video recorder is intended for personal use only. We do not encourage the recording of videos from websites and live TV shows that may include copyrighted content.
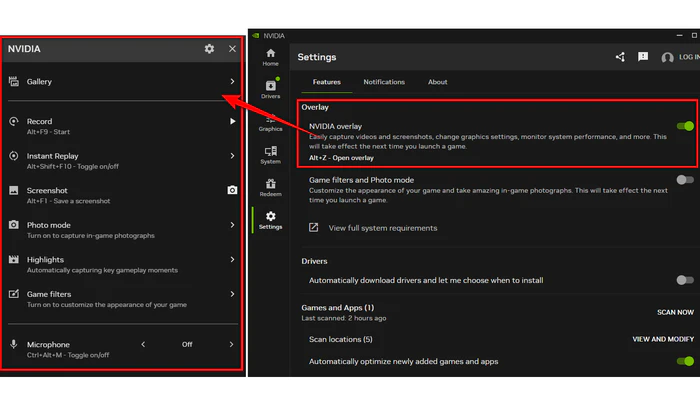
If your MSI, ASUS ROG/TUF, Acer Predator/Nitro, Dell Alienware/G Series, HP OMEN/Victus, or other Windows laptop comes with a supported NVIDIA GeForce GPU, you may also use ShadowPlay. It is now available through the NVIDIA App and may still appear in GeForce Experience on some older installations.
To use it, install or open the NVIDIA App, enable the in-game overlay, then press Alt + Z to open the overlay. Choose Record to start a manual recording, or enable Instant Replay to save recent gameplay moments. You can usually start or stop manual recording with Alt + F9.
ShadowPlay is especially useful for game recording because it uses GPU encoding and has low performance impact. However, it is not available on laptops without a supported NVIDIA GPU, and it may not record protected streaming videos, some browser windows, or certain desktop activities. For general tutorials, online meetings, or full-screen desktop recording, the methods above are usually easier.

For most screen recording tasks, the brand does not change the basic steps. HP, Dell, ASUS, Acer, MSI, Gateway, Lenovo, and Surface laptops can all use the same Windows methods above as long as the operating system and hardware support them. The differences are usually keyboard shortcuts, preinstalled utilities, and whether the laptop has a dedicated NVIDIA GPU.
If your laptop brand has its own control center, such as HP OMEN Gaming Hub, Dell Alienware Command Center, ASUS Armoury Crate, Acer NitroSense/PredatorSense, or MSI Center, it is usually for performance, fan, lighting, and game settings. These tools may help optimize recording performance, but they are not always full screen recorders themselves.
Similarly, we’re going to share with you two screen capturing apps for Mac. One is the built-in QuickTime Player, the other is paid recording software named Snagit. Read on to the following two parts where we demonstrate them in detail.
QuickTime Player is bundled software that comes with all Macs. In addition to serving as a media player, QuickTime Player also features a recording function, allowing you to record the activities happening on your Mac screen and capture external audio from the mic. The only downside is the inability to screen record with internal audio. To fix it, most people opt for a more competent 3rd-party recording tool, for example, Snagit (which we’ll discuss in the second part).
First, let’s see how to record on MacOS 13 laptop with sound using QuickTime Player:
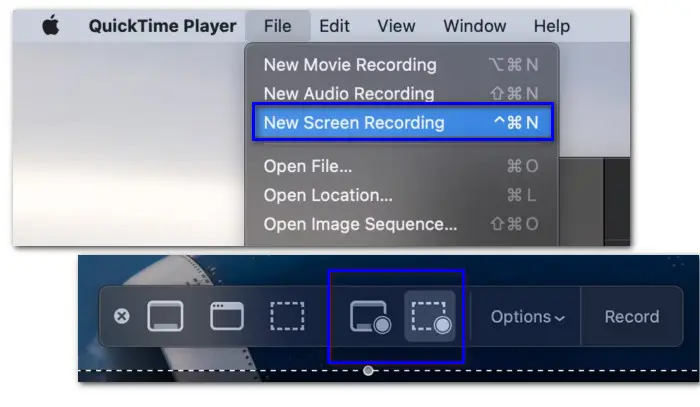
Step 1. Open QuickTime Player. Go to File > New Screen Recording.
Step 2. A recording control bar will appear at the bottom of your screen with options to record the screen as well as take a screenshot. You can choose to either record the entire screen or a specific portion.
Step 3. Hit the Options tab to enable the microphone, create a new output folder for recorded files, set a timer, and more.
Step 4. Click on the Record button to start. Press the stop button in the menu bar or press Command + Control + Esc to stop recording.

Note: An alternative method to record your Mac screen is to use Screenshot Utility. It uses the same screen-capturing tools as QuickTime Player, but Screenshot Utility is only available on Macs running macOS Mojave or newer versions.
Although QuickTime Player is a good choice for users who don’t want to download external apps or sign up. But some reported that the recording quality created by QuickTime Player doesn’t meet their expectations. Then you can try a great alternative to QuickTime Player—Snagit.
Snagit offers a one-time fee plan, along with a full-version free trial for 15 days. You can use it to screen record a video on a laptop or capture a screenshot. It enables you to capture the entire desktop or only a selection of your screen and save the recording as an MP4 file. It also provides you with options to record your webcam, system audio, and mic audio.
Here is how to record a video on laptop Mac using Snagit:
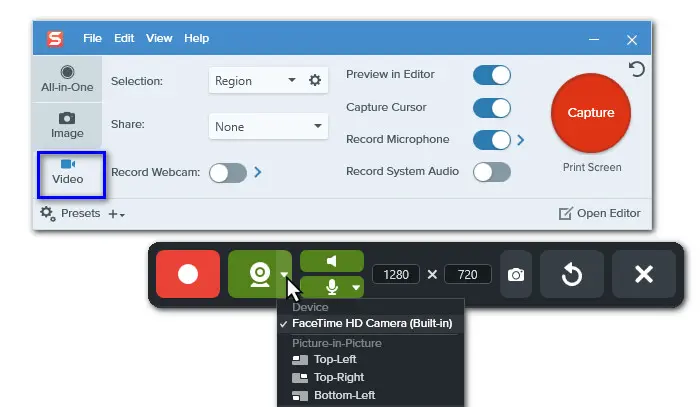
Step 1. Open Snagit and select the Video capture mode.
Step 2. When you’re ready, hit the big red Capture button.
Step 3. Then choose either the floating Fullscreen tab or draw to select the part of the screen you wish to record.
Step 4. Next, you can toggle the Webcam recording on or off to switch between the video from your webcam and the video on the desktop. Finally, hit the Record button to start recording your screen on a Mac laptop. If you are finished, click to stop.

1. How do I record my screen on a Windows 10 or Windows 11 laptop?
Press Windows + G to open Xbox Game Bar, then click the recording button or press Windows + Alt + R. It is good for recording one app or game window, but it cannot reliably record the desktop, File Explorer, or protected video windows.
2. Does my laptop have a built-in screen recorder?
Most Windows 10/11 laptops have Xbox Game Bar built in. Mac laptops include screen recording through Screenshot Toolbar and QuickTime Player. Windows 7/8/8.1 laptops do not have the same built-in Game Bar recorder, so a third-party recorder is usually needed.
3. How do I record full screen on my laptop?
Use a recorder with a dedicated full-screen mode, such as WonderFox HD Video Converter Factory Pro. Xbox Game Bar is not ideal for full-desktop recording because it focuses on a single app or game window.
4. How do I screen record on HP, Dell, ASUS, Acer, MSI, or Gateway laptops?
The steps are mostly the same across brands. Use Windows + G for Xbox Game Bar, WonderFox for full-screen or custom-area recording, or NVIDIA ShadowPlay if the laptop has a supported GeForce GPU. Brand utilities can help with performance settings, but they are not always screen recorders.
5. Can I record my laptop screen with internal audio and microphone?
Yes. In Xbox Game Bar, check the capture/audio settings before recording. In WonderFox HD Video Converter Factory Pro, enable both Desktop and Microphone when choosing the audio source.
6. Is ShadowPlay the same as GeForce Experience?
ShadowPlay is NVIDIA’s recording feature. It used to be commonly accessed through GeForce Experience, while newer systems may use the NVIDIA App. If your laptop has a supported GeForce GPU, press Alt + Z to check whether the NVIDIA overlay is available.
That’s all about how to screen record on a laptop. For Windows 10/11 users, Xbox Game Bar is quick for app and gameplay clips. For full-screen, selected-area, older Windows systems, or easier audio control, WonderFox HD Video Converter Factory Pro is a more flexible choice. If you use a gaming laptop with a supported NVIDIA GPU, ShadowPlay in the NVIDIA App is also worth trying for gameplay recording. Mac users can start with QuickTime Player or use Snagit for more editing and sharing features.

Kevincy joined the WonderFox team in 2014 and has been a senior columnist ever since. With over two decades of experience in the video editing industry, he shares tutorials, tips, and how-to guides on video/audio processing and personal DVD backups. Family-oriented and passionate about helping others, he is dedicated to making video and audio processing easier for readers.
![]()
![]()
![]()
![]()
Terms and Conditions | Privacy Policy | License Agreement | Copyright © 2009-2026 WonderFox Soft, Inc.All Rights Reserved