


It’s a pity that your best gaming moments are missed by everyone. But not anymore. With the right gameplay recording software, you can record gameplay without losing FPS, capture smooth performance even during intense matches, and save every highlight in real time. From casual play to competitive sessions, you can also record gaming videos for YouTube and build content for your audience like a YouTuber.
This article focuses on PC game recording and shows how to record any game on PC, including Steam games and Roblox, with simple steps. Please read on.
| Method | Best for | Key limitation |
|---|---|---|
| WonderFox HD Video Converter Factory Pro | Beginners who want recording plus editing in one tool | Windows only |
| Xbox Game Bar | Beginners who need quick, basic PC gameplay recording | No editing tools |
| GeForce Experience (ShadowPlay) | Intermediate users with NVIDIA GPUs who want low-impact recording | Requires NVIDIA GPU |
| Radeon ReLive | Intermediate users with AMD GPUs who want lightweight recording | Requires AMD GPU |
| FBX Game Recorder | Intermediate users who want background recording and quick highlight capture | Limited advanced features |
| OBS Studio | Advanced users who need streaming, recording, and full customization | Complex setup and learning curve |
| Fraps | Beginners who want simple, direct game recording | Large file size, outdated features |
Never dabbled in game recording before? Don't worry. An easy-to-use game recorder for beginner will help you.
WonderFox HD Video Converter Factory Pro is a comprehensive video software with a simple screen recorder that presents the easiest way to record gameplay on PC Windows. Its Game recording mode allows you to record high-fps video gameplay, and you can also select quality, format, and other settings for the recording. As a dedicated gameplay recorder, it can record 4K gameplay with frame rate up to 60 fps. Both the gameplay sound and your mic audio will be captured too.
Beyond a game recorder, it’s an all-around screen recorder that can record other activities on your screen, such as calls, meetings, webinars, streaming videos, radio, and so on. The cherry on top, it provides essential editing tools to let you cut, trim, crop, merge, rotate, add watermark, apply effects, compress and convert your recording videos for later sharing on social media.
🔔 WonderFox HD Video Converter Factory Pro is not free, but it offers a free trial during which you can try the screen recording tool with unlimited functions five times for free. You can decide whether to purchase the program when you reach the limit.
* Please free download free download the best app to record gameplay on PC.
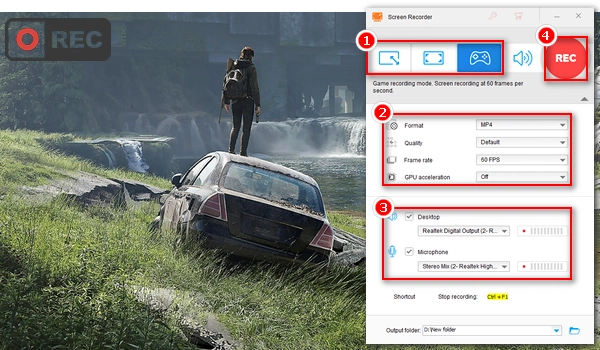
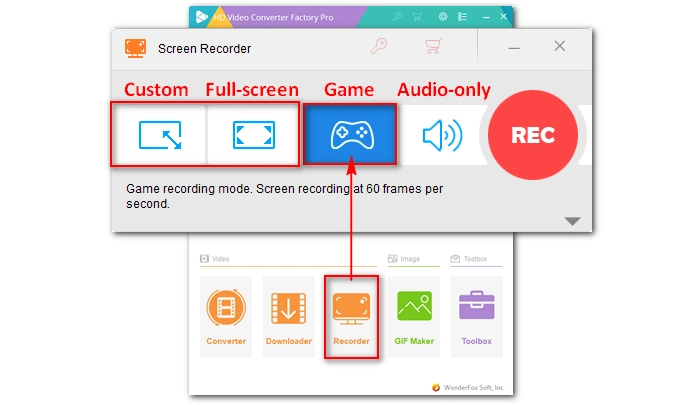
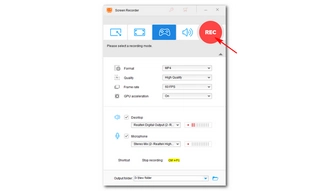
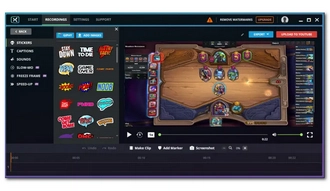
Launch WonderFox HD Video Converter Factory Pro on your PC and select the Recorder module. Next, choose the Game recording mode (as shown in the picture).
Then, set the recording area. You can select the Custom mode to capture a particular region or the Full-screen mode to record your entire screen.

Choose a Format and Quality for your recording depending on your preferences. The default recording frame rate for game recording is set to 60 fps. But you can manually change the frame rate to 30 fps or 10 fps if you want. If your computer supports GPU acceleration, you can turn on the GPU acceleration to boost the recording performance.


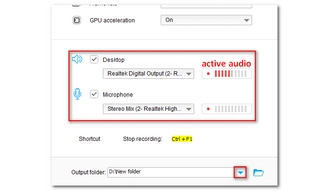
Now, make sure that you select the audio source so you can record gameplay and audio together. You can check Desktop to record gameplay with system audio or Microphone to capture your voice or both to record system sound and your voice at the same time. You’ll know the audio source is working if you see the audio volume is active.
Click the ▼ button in the Output folder section to choose an output path in advance.

When you are ready, press the big red REC button to start recording gameplay on PC after a five-second countdown. When the recording is complete, press hotkeys “Ctrl + F1” or click the recorder icon to stop the recording. The output folder will automatically pop up with the recorded game video. You can view the video or edit the video as you see fit.
💡 Import the recording file to the Converter module to further edit the screen recording with cut, crop, merge, rotate, watermark, add effects, compress, and convert.

Does Windows 10 have a screen recorder? Yes, it does. Xbox Game Bar is the default game recorder app built into Windows 10 and 11 to let users capture videos and screenshots while playing a game. It is a simple and basic game recording tool that can record HD video games at up to 60 fps. Unfortunately, there are no advanced features and no editing tools, either. But it is completely free. Continue reading to learn how to record gameplay on PC Windows 10 with Xbox Game Bar:
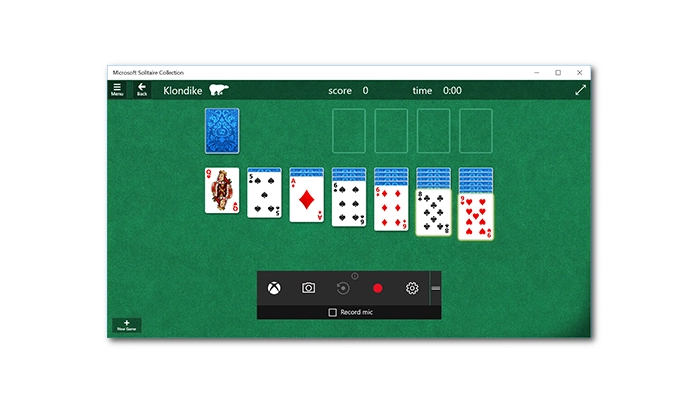
Step 1: Start your game on PC, then press the Windows key + G on your keyboard to open Xbox Game Bar.
Step 2: In the Capture widget menu, choose the red Start recording button to record your game clip. Click the same button again to stop recording.
💡 You can click Take screenshot to capture a game image or Record last 30 seconds (when background recording is tuned on) to record the recent moments of your gameplay.
Step 3: View the game clip in the Captures.
💡 If you are playing a game in full-screen mode, you can use the Windows key + Alt + R to start and stop recording.
Related Post: Xbox Game Bar Not Working
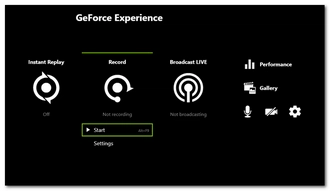
If your PC has an NVIDIA graphics card, you can make use of its companion application GeForce Experience to capture your game clips for free. While GeForce Experience can be used to update your drivers and optimize your game settings, its built-in NVIDIA ShadowPlay can help you record and capture your epic gaming moments for sharing with your friends. Moreover, since it relies on GPU, your CPU is free for other processes, hence improving your gaming performance.
ShadowPlay records your video gameplay at up to 8K HDR at 30 fps or up to 4K HDR at 60 fps. And it’ll be easy to record with GeForce Experience. Follow the steps below to learn how to record games on your computer:
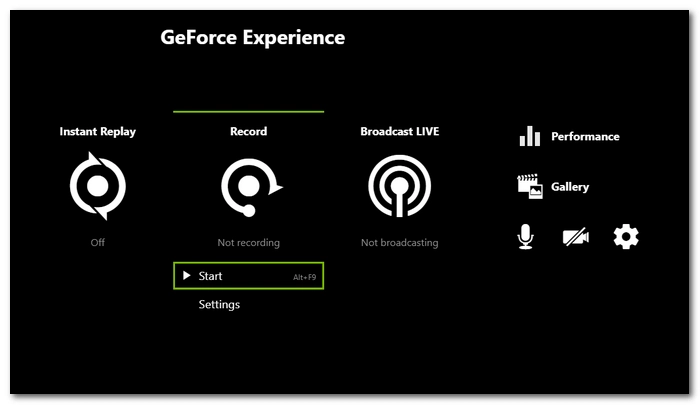
Step 1: Open NVIDIA GeForce Experience on your PC and log in with your account. If you haven’t installed the app, you can find and download this tool at https://www.nvidia.com/en-us/geforce/geforce-experience/.
Step 2: Click Settings in the top-right corner.
Step 3: In the GENERAL tab, turn on the IN-GAME OVERLAY option to make the menu visible while you’re gaming.
💡 You can go to the GAMES & APP section and scan and optimize your game settings.
Step 4: Start the game you want to record.
Step 5: Press the shortcut Alt + Z to open up the GeForce overlay.
Step 6: Click the Record button, then Start.
Step 7: When you finish gaming, press Alt + 9 to stop the recording.
💡 Click the Mic and Camera icons on the right-hand side of the overlay to turn them on and off.
Similar to NVIDIA, AMD has its own GPU-based game recording software that is both free and convenient to use. It’s called Radeon ReLive. And as long as you have an AMD graphics card, you can use Radeon ReLive to record game videos at up to 4K resolution, 60 FPS. But it lacks features you find in other regular game recorders, and you may have to look for somewhere else if you want more advanced functions for recording and post-production. But right now, look at the instructions and see how to screen record gameplay on PC with Radeon Relive:
Step 1: Download and install the latest Radeon Software Adrenalin Edition driver at https://www.amd.com/en/support.
Step 2: Run the installer and at the end of the installation, select Install Radeon ReLive.
Step 3: Restart the system.
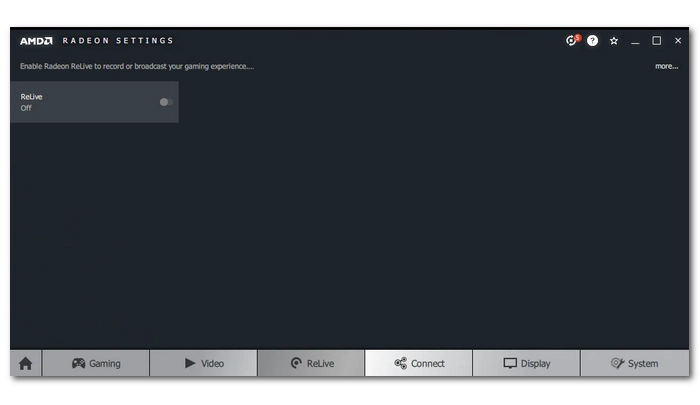
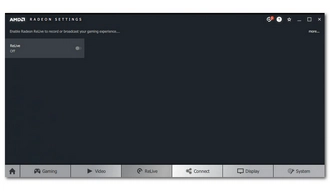
Step 4: Right-click on your desktop and click AMD Radeon Settings.
Step 5: Select ReLive and turn on the ReLive option.
Step 6: Now, right-click your mouse on your desktop and select AMD Radeon Software.
Step 7: Click Settings (Gear icon) and select the General option.
Step 8: Configure the recording settings as you see fit. You can adjust the recording resolution, FPS, video encoding type, video bit rate, audio bit rate, audio channels, microphone track, and more.
Step 9: Note that Radeon ReLive uses hotkeys to record screen activities. You can go to the Hotkeys tab and customize the hotkeys to suit your demands.
Step 10: Boot up your game and use the hotkeys to start and stop the gameplay recording.
FBX Game Recorder is a powerful Windows game recorder that records in the background without lagging the game using NVidia, AMD, or Intel hardware acceleration. With support for hotkeys, this recorder is highly recommended to capture your gaming highlight clips, without leaving the game. In addition to recording gameplay clips, it also can capture activities from other applications on a Windows desktop.
Step 1: Download and install FBX Game Recorder from its official website (https://fbx.gg/download/), and launch it.
Step 2: Click the SETTINGS tab and go to the CAPTURE section. Enable the Game capture mode.
Step 3: Continue to adjust other VIDEO, AUDIO, or the HOTKEY settings if needed.
Step 4: Then start the video game on your PC. Soon, you’ll see the FBX’s overlay appear on your screen.
Step 5: For a quick start, press the default hotkey Ctrl + F12.
Step 6: Once started, you can see a recording indicator appear in the overlay.
Step 7: Press Ctrl + F12 again to end the recording. Then you can click the RECORDING tab to preview the recorded gameplay.
OBS, short for Open Broadcaster Software, is a well-known and open-source video recording and streaming tool favored by many YouTubers and game streamers. It offers professional recording functions to bring the best out of your gameplay recording. At the same time, it comes with many advanced features that can be used for free. It also accepts plug-ins that can add more functionality to the program and boost your experience.
That said, this powerfulness comes at a price of a steep learning curve. First-timers are often overwhelmed by the interface, lots of options and features of the program. It’s a bit of a hassle to set up OBS before you can record gameplay properly. Let’s follow the tutorial below to set up OBS for recording gameplay on PC.
Step 1: Download and install OBS Studio (https://obsproject.com/) on your PC.
Step 2: Launch the software.
Step 3: If you want to record high-quality game videos, you are suggested to configure the recording options. Select Settings on the lower right side to open the Settings window.
Step 4: Go to the Output tab. You will see the default output mode, which optimizes the settings for common situations. If you want advanced settings, you can change the Output Mode to Advanced and alter the Recording parameters (format, encoder, audio track, etc.) as you see fit.
Step 5: Switch to the Video section and adjust the resolution and frame rate based on your needs.
Step 6: Open the Audio settings. Here, you can change the audio sample rate, channel, and bit rate to improve the recording audio quality.
Step 7: Return to the main interface and navigate to the Sources box.
Step 8: Click the + button and choose Game Capture. Then add a new source named after your game.
Step 9: Next, in the Properties window, choose a game capture mode among “Capture specific window”, “Capture any fullscreen application”, and “Capture foreground window with hotkey” according to your needs. Then save the changes.
Step 10: Now, when you are ready, click the Start Recording button to start recording your gameplay.
Fraps is one of the best screen recording utilities on Windows. It is a living legend that has stood the test of time. It can record PC games using DirectX or OpenGL graphic technology. However, it does not feature any advanced features. While Fraps records at extremely high quality, the output file is much bigger than files recorded by other programs due to its low compression encoder. Nevertheless, Fraps remains a popular choice for many gamers, and it is simple to use to capture PC games. Let’s see how to record a gaming video clip with Fraps below.
🔔 The free version of Fraps will output video with a watermark. Also, its recording time is limited.

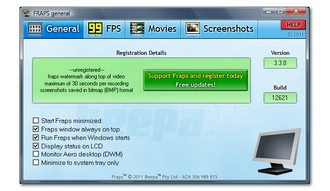
Step 1: Download and install Fraps from the Fraps official website https://fraps.com/.
Step 2: Open Fraps.
Step 3: Fraps sets F9 as the recording hotkey by default. If you want to change it to a hotkey that you are familiar with, you can set it in the Video Capture Hotkey box.
Step 4: Minimize Fraps.
Step 5: Start your PC game and you’ll see the current frame rate displayed in the corner of your game.
Step 6: Press F9 or the hotkey you set on your keyboard to capture a video game clip. The frame rate will turn red, which indicates that the recording is on. To stop the recording, press the hotkey again.
PC games still hold lots of loyal fans. Whether you are a novice or an avid gamer, you can choose the best game recorder here and follow the tutorial to record and capture your best gaming moments and share them with your friends.
That’s all for how to record gameplay on PC. We hope this article has been helpful to you. Thank you for reading. Have a great day!
Due to different recording purposes, YouTubers may use different gameplay recording software to record PC games. For example, OBS Studio is a hot choice for many YouTubers who want professional and high-quality game recording and streaming. If you need a simple recording tool with editing features, HD Video Converter Factory Pro may be the better option.
If you use ShadowPlay, you can capture what happened 5 minutes ago in your game using the Instant Replay function. You can enable the Instant Replay by clicking Instant Replay in the overlay or pressing the hotkeys “Alt + Shit + F10” on your keyboard. Then, use “Alt + F10” to save the last 5 minutes of your gameplay.
Game recording is resource-intensive and generally requires a high-end PC to ensure a smooth recording performance. You need to make sure there is enough RAM space for gaming. 8GB is a good starting point. Also, as games rely on the CPU heavily, you can use a decent GPU to unburden your CPU for other things. Even better, if you have a computer with NVIDIA or AMD graphics card, you can directly use its built-in recorder app to capture PC gameplay.
However, if your computer isn’t good enough for game recording, you can check out Screen Recorders for Low-end PCs.
Yes, OBS is good for recording gameplay because of its advanced features and the freedom it gives to users. But it is a bit complex to master the software.
Besides using the game recorders above, GTA 5 has a built-in camera called Rockstar Editor that can help you directly record GTA 5 on PC:
Step 1: Start playing GTA 5 on your PC. Push down Alt to turn on the “Manual Recording mode”;
Step 2: Press F1 to capture the game screen. Cancel or stop recording by hitting F2;
Step 3: Press Left Alt and F1 to save the recording. You can also edit the recording in Rockstar Editor, then export the video to your PC.
You can directly record a game in World of Tanks using the game Settings. Every war you participate in World of Tanks can be recorded to review later in this way. Here’s the how-to:
Step 1: Find the in-game “Settings” menu of World of Tanks and go to the “General” tab.
Step 2: Click “Enable Battle Recording” in the bottom right corner.
There are three options: None (never save a replay), Last (keep a record for the most recent battle), and All (record every game you play automatically). Select one of them and confirm with “Apply”.
Step 3: Then after a battle, you can close your game client and check the recording under Replays > C:\Games\World_of_Tanks here to see all recordings.

Record Console Gameplay
I write about multimedia topics, including video and audio conversion, compression, editing, and downloading. I joined WonderFox in 2020, and my goal is to help readers solve everyday tech problems more easily. In this guide, I have shown you seven ways to record gameplay on PC. Choose your preferred method and happy recording!
![]()
![]()
![]()
WonderFox DVD Ripper Pro
WonderFox DVD Ripper Pro is a professional DVD ripping program that can easily rip any DVD, be it homemade or commercial, to all popular formats including MP4, MKV, MP3, WAV, H264, H265, Android, iPhone, etc. without a hitch. It also lets you edit and compress DVD videos at high efficiency. Download it to enjoy a fast and trouble-free DVD-ripping experience.
Terms and Conditions | Privacy Policy | License Agreement | Copyright © 2009-2026 WonderFox Soft, Inc.All Rights Reserved
