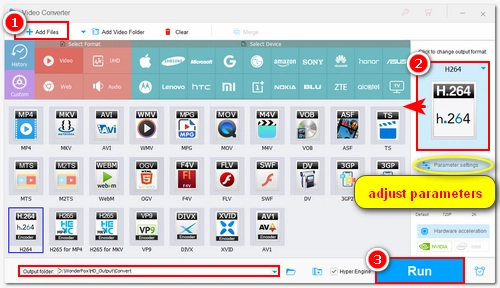
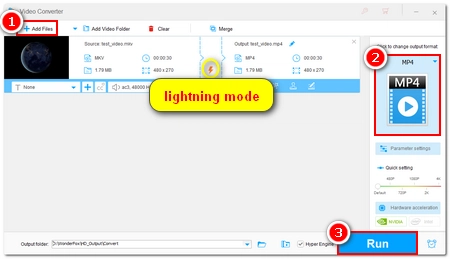
How to Change Video Container without Losing Quality?

Author: Michelle
Publish date
Updated on Sep 12, 2025
Change Video Container without Encoding
  • Download Download the best video container changer to change video container easily:
  • 1. Add your video files (bulk support).
  • 2. Choose an output container format.
  • 3. (Optional) Modify output settings.
  • 4. Change video container without losing quality.
Quick Navigation
Change Video Container without Re-encoding (For Beginners)
FFmpeg Change Container (For Advanced Users)
FAQs - About Changing Video Container
Wrap-up
Facebook
Twitter
Pinterest
Linkedin
Reddit

Want a better playback experience? Sometimes all you need is to change the video container format. In this article, we’ll show you two easy ways to change containers without any quality loss. Keep reading for the details.

How to Change Video Container without Re-encoding (For Beginners)

HD Video Converter Factory Pro is a powerful video converter that can handle all kinds of video and audio tasks, including changing video containers without re-encoding. It lets you rewrap videos into another container with zero quality loss.

The program has a clean, user-friendly interface, making it easy for anyone to use. Below, we’ll walk you through an example of how to remux MKV to MP4 with this tool. Before getting started, please download and install download and install the software on your PC.

HD Video Converter Factory Pro
Powerful Video Format Converter

HD Video Converter Factory Pro makes it easier than ever to change video file container at the fastest speed and without quality loss. Get it now to change between format containers handily and rapidly.

Free download Download for Free

Step 1: Import Video File(s)

Launch HD Video Converter Factory Pro and open the "Converter." Click "+ Add Files" to load your videos. You can also drag these files into the converter directly.

Import Files
Import Files

Step 2: Choose Output Format

Click the format image on the right to open the format list. Select a format that supports the same codec as your original video. For example, to remux an H.264 MKV file, you can choose MP4 or MOV.

Choose Output Format

Step 3: Maintain Parameters

The software will smart-fit similar settings automatically. But double-check the Parameter settings to ensure the codec, resolution, and other values match the source file. If you see the lightning icon ⚡, it means remuxing is ready.

Maintain Parameters
Maintain Parameters

Step 4: Change Video Container without Losing Quality

Click the ▼ button to set an output path. Then hit "Run" to start changing the video container without re-encoding.

Also Read: Change Video Codec | Change Video Format | Change Audio File Type | Change Audio Format of Video

Remux Video
Remux Video
HD Video Converter Factory Pro
HD Video Converter Factory
  • Convert all mainstream audio & video formats;
  • Batch compress large video/audio files;
  • Download HD/2K/4K/8K videos from YouTube and 1000+ sites;
  • Cut, join, crop, rotate, and improve quality of video.
  • Record screens, make ringtones, create GIFs, extract subtitles, and more practical tools.
Free download Download for Free

FFmpeg Change Container without Losing Quality (For Advanced Users)

FFmpeg is a powerful open-source, cross-platform tool for multimedia tasks like video conversion and editing. It can also change video containers without any quality loss. The only problem is that FFmpeg is command-line based, so beginners may find it a bit tricky. Still, for advanced users, it’s one of the best tools available for audio and video conversion.

Below, we’ll show you an example of how to use FFmpeg to remux MKV to MP4 without re-encoding. Keep reading to learn more.


Step 1: Go to the official FFmpeg website: https://ffmpeg.org/download.html and download the latest ZIP version for Windows.

Step 2: Extract the downloaded file, rename the folder to ffmpeg, and move it to your C: drive.

Step 3: In the Windows search bar, type system environment variables and open the best match. Click Environment Variables…, select Path under User variables, and then click Edit…. Add the FFmpeg binary directory, for example: C:\ffmpeg\bin. Click OK to save the changes.

FFmpeg Configuration

Step 4: Open the Windows search bar, type cmd to launch Command Prompt. Input ffmpeg -version and press Enter. If the setup is correct, you’ll see version information displayed.

FFmpeg Test
FFmpeg Test

Step 5: Copy the path of the source video file. In Command Prompt, type: cd *the copied source path*. Press Enter to navigate to the directory.

Step 6: Run the following command: ffmpeg -i *example*.mkv -c copy *example*.mp4 and press Enter to start the single file remuxing.

🔔 Replace example with your actual file name.

FFmpeg Change Container

💡 To remux multiple MKV files in the same folder at once, use this command:

for /R %f IN (*.mkv) DO ffmpeg -i "%f" -c copy "%~nf.mp4"

FAQs - About Changing Video Container

1. What is a video container?

A video container is a wrapper format used to store multimedia data, including video, audio streams, and sometimes subtitles. MP4, MKV, and AVI are the common video containers.

2. How do I change video containers?

By saying changing video container, most people mean changing from one container format to another while keeping the data intact. This process is called remuxing or repackaging, and it is a lossless conversion. You’ll get the original video and audio quality after the process. And since the data won’t be re-encoded, the conversion will be done at the fastest speed (compared with the CPU-intensive transcoding). These are the reasons why many people prefer to change video container format only.

For changing video container without encoding, some requirements are to meet, including:

  • Make sure the parameters, including codecs, bitrate, resolution, aspect ratio, etc., remain the same;
  • No video editing before conversion.

3. What is the difference between a video codec and a video container?

Video codecs and video containers are very different. A video codec is a piece of software to encode (compress) and decode (decompress) video data, while a video container is a package used to store video, audio, and text data. A video container can contain video encoded by different video codecs.

Wrap-up

We’ve just shown you how to change video container without encoding using two video container switchers. You can pick your preferred method based on your needs and start changing the format of a video right away. Hope you can find this article helpful. Thanks for reading. Have a good day!

Similar Articles
4K Video Converter

5 Best 4K Video Converters for PC

Batch Video Converter

Top 5 Batch Video Converters

Best YouTube to MP4 Converter

Best YouTube to MP4 Converter

Best MP4 to MP3 Converter

Best MP4 to MP3 Converter

Best DVD Ripper for Windows
  • Convert any DVDs to MP4, MKV, MPG, AVI, ISO, etc. without error;
  • No quality loss and fast conversion speed;
  • Extract soundtrack from DVD to MP3, WAV, M4A and so forth in high quality.
  • Edit and compress DVD videos before ripping;
  • Compatible with Windows 11/10/8/7 and lower;
Free download Download for Free
Specialized in multimedia software solutions.
Since 2009

Terms and Conditions | Privacy Policy | License Agreement | Copyright © 2009-2025 WonderFox Soft, Inc.All Rights Reserved

Back to Top