


If you wish to convert MKV files to the MP4 format without losing quality, the best approach is to use “remuxing”. Follow this article to learn more about remuxing, and how to remux your MKV files to MP4 step by step.
Before diving deep into the methods, understanding what is remuxing can help you decide whether this is really what you need.
To put it simply, remuxing means changing the video container only, where the original audio and video streams are kept untouched.
Keep in mind that a video is made of a video container and the video and audio codecs inside. You can think of the container (e.g. MKV) as a box, and the video and audio as the actual items. Remuxing simply takes the items out of the MKV box and places them into a different box like MP4. Since it only changes the “box”, the video and audio stay the same, so it’s a lossless process.
This is very different from the usual conversions we see, specifically, transcoding, which involves changing the codecs at the same time.
Many people choose to remux MKV to MP4 because
Because remuxing does not change the internal data, your MKV may not be qualified for remuxing to MP4 if the data inside of MKV is not compatible with MP4. In other words, the video codec, audio codec, and even subtitle in the MKV file must all be supported by the MP4 container, otherwise, transcoding is inevitable.
💡 Pro Tip: It’s safe to remux MKV to MP4 when the MKV uses the following codes:
- Video: HEVC (H.265), H.264, or AV1
- Audio: AAC, MP3, or AC3
- Subtitle: SRT
You can check your MKV file info with MediaInfo to see whether it can be remuxed to MP4 in advance.
If your MKV is qualified, keep reading to learn exactly how to remux MKV files to MP4 on your Windows PC. These methods cover from beginners to advanced.
To have the simplest and most direct workflow, WonderFox HD Video Converter Factory Pro is your top choice. It’s a powerful yet handy video remux software that simplifies the whole remuxing process down to just a few clicks.
Besides helping you remux MKV to MP4, it can also remux MKV to other formats like MOV or M4V, provided the codecs are compatible. Additionally, in case it’s useful, you can losslessly cut and merge videos using the software’s built-in video editor.
Now, free download free download the software and see how to remux an MKV to MP4 below.
WonderFox HD Video Converter Factory Pro makes it easier than ever to remux single or multiple videos to other formats without quality loss. Get it now to remux MKV handily and rapidly.
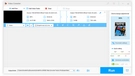
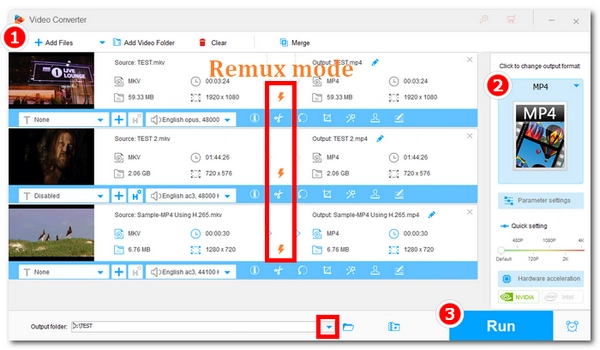
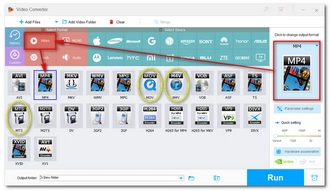
Launch WonderFox HD Video Converter Factory Pro and open the 'Converter.' Click '+ Add Files' to import the MKV video into the converter. You can also drag and drop the file directly into the program.


Click the format image on the right to open the format library. Choose MP4 under the Video tab.
💡 Besides MP4, you can also choose MOV, M4V, or MTS as long as the target container supports the codecs used in the MKV file.

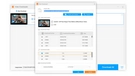
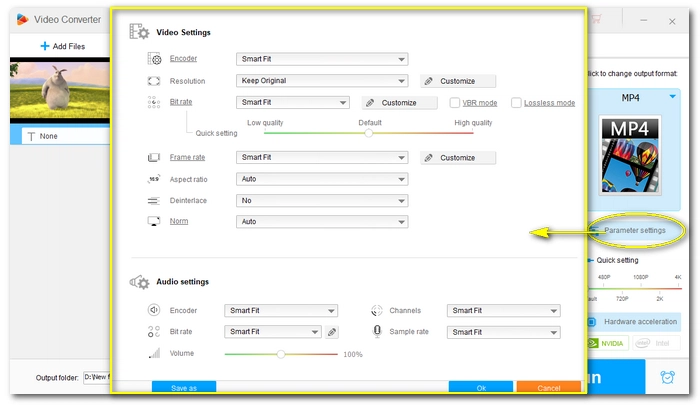
The program will "smart fit" the best settings for the selected format, trying to keep the encoder, resolution, bit rate, frame rate, etc. the same as the source file.
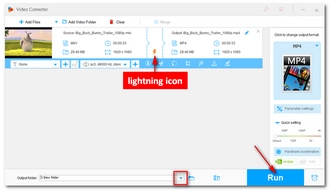
When "Remux Mode" is activated, a lightning bolt icon ⚡ will appear in the center of the video conversion list. If you do not see this icon, it indicates that "Remux Mode" is not applicable to the current conversion task.
Click the ▼ button at the bottom to specify an output path. When everything is ready, hit 'Run' to start remuxing MKV.

If you are familiar with some video fundamentals and want more control over the repackaging process, then XMedia Recode is a suitable choice.
This tool is designed for users who need to manipulate media files in detail, such as tracks, chapters, filters, and tags. Its interface layout is intuitive. Although there are many button, which may overwhelm beginners, the design is just right for intermediate users with some basic knowledge.
Now, please follow the steps below to learn how to remux MKV files into the MP4 format using XMedia Recode:
Step 1: Download XMedia Recode from its official website: https://www.xmedia-recode.de/en/
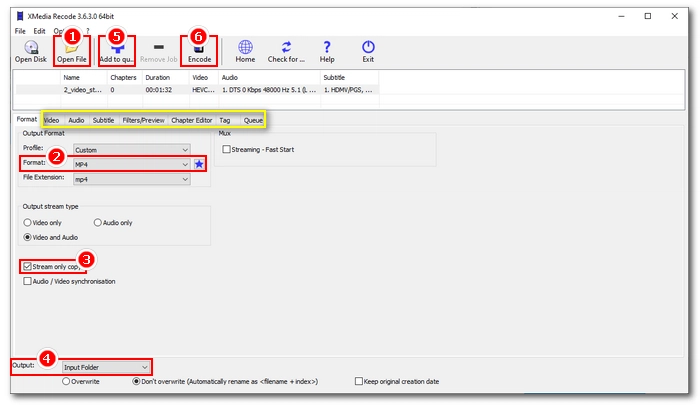
Step 2: Run XMedia Recode. Click Open File, select the MKV video and click Open to load it to the program.
Step 3: Select MP4 from the Format drop-down menu.
Step 4: Select the Stream only copy option.
💡 If your MKV contains multiple video and audio tracks, you can open the Video and Audio tabs, then make sure the tracks you want to keep are selected for the output. Furthermore, you can adjust the filters, chapters, and tag if needed.
Step 5: Specify where to save the converted file at the bottom.
Step 6: Click Add the queue at the top.
Step 7: Click Encode to start the remuxing process. It may take a few seconds to several minutes depending on the file size.
FFmpeg is a well-known audio and video processing tool. It offers the most flexible experience for manipulating multimedia content. This is thanks to its command-line based nature, meaning it doesn't have a graphical user interface (GUI) where you can complete tasks simply by clicking a button. Instead, you need to enter command-line instructions to complete each task.
In fact, its command for remuxing MKV to MP4 is not complicated, but it still takes a bit of time to get over the learning curve. So, this tool is better suited for advanced users.
Below, you can follow the steps outlined to use FFmpeg to remux an MKV file into the MP4 format.
Step 1: Download FFmpeg from https://ffmpeg.org/. Be sure to save the folder to the root directory of your C: drive and add it to the system’s PATH environment variable.
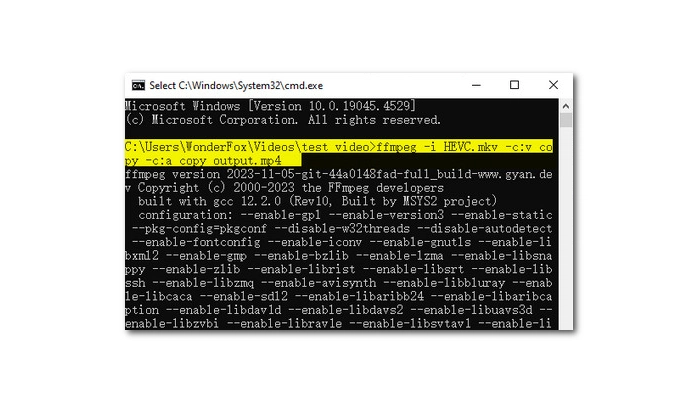
Step 2: Go to the folder where your MKV video is and click to select the full file path in the address bar. Then type in CMD and press Enter to bring up the command prompt window.
Step 3: Enter the following command and press Enter to start remuxing MKV to MP4.
ffmpeg -i input_filename.mkv -c:v copy -c:a copy output_filename.mp4
* Please replace “input_filename” with the actual MKV filename.
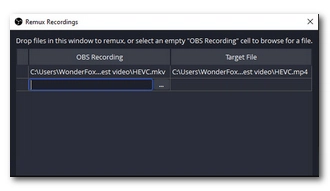
It’s super convenient for OBS users to remux their MKV recordings into MP4 format using the built-in Remuxing option in OBS. Here are the steps:
Step 1: Open OBS.
Step 2: Go to File > Remux Recordings.
Step 3: Click the three dots to import the MKV recording.
Step 4: Click Remux to begin the remuxing process.

Remuxing is a good skill to master if you want to convert MKV to MP4 without losing quality. With the methods introduced above, you should have no problem completing the task. Just a quick note, 🔔 If you want to change MKV to MP4 for broader device compatibility, remuxing may not be the optimal solution, as it does not change the codecs, which can still lead to playback failures if the codecs are not recognized by the target device. In this case, it’s best to transcode MKV to MP4 using a different codec. You may refer to our another article to learn how to transcode video files for better compatibility.
No, remuxing MKV to MP4 does not lose quality because it only changes the container, and the video and audio content inside are left untouched.
It usually takes from a few seconds to several minutes to remux an MKV to MP4, depending on the writing speed of your drive and the MKV file size.
Yes. You can remux MKV to MOV, provided the codecs inside the MKV file are also supported by MOV.
No, HandBrake can only transcode MKV files. It does not have a remux option.
I write about multimedia topics, including video and audio conversion, compression, editing, and downloading. I joined WonderFox in 2020, and my goal is to help readers solve everyday tech problems more easily. In this article, I have shown you various methods to remux MKV to MP4. Hope you can find the right solution for you!
![]()
![]()
![]()
WonderFox DVD Ripper Pro
WonderFox DVD Ripper Pro is a professional DVD ripping program that can easily rip any DVD, be it homemade or commercial, to all popular formats including MP4, MKV, MP3, WAV, H264, H265, Android, iPhone, etc. without a hitch. It also lets you edit and compress DVD videos at high efficiency. Download it to enjoy fast and trouble-free DVD ripping experience.
Terms and Conditions | Privacy Policy | License Agreement | Copyright © 2009-2026 WonderFox Soft, Inc.All Rights Reserved