

 Michelle | Updated on Jun 26, 2026
Before starting, download the latest version of Audacity from https://www.audacityteam.org/. Then install and launch it.
After launching Audacity, tap on “Audio Setup” > “Host” > “Windows WASAPI”. Re-click “Audio Setup” and choose the system’s default speakers and headphones under the “Recording Device” option.
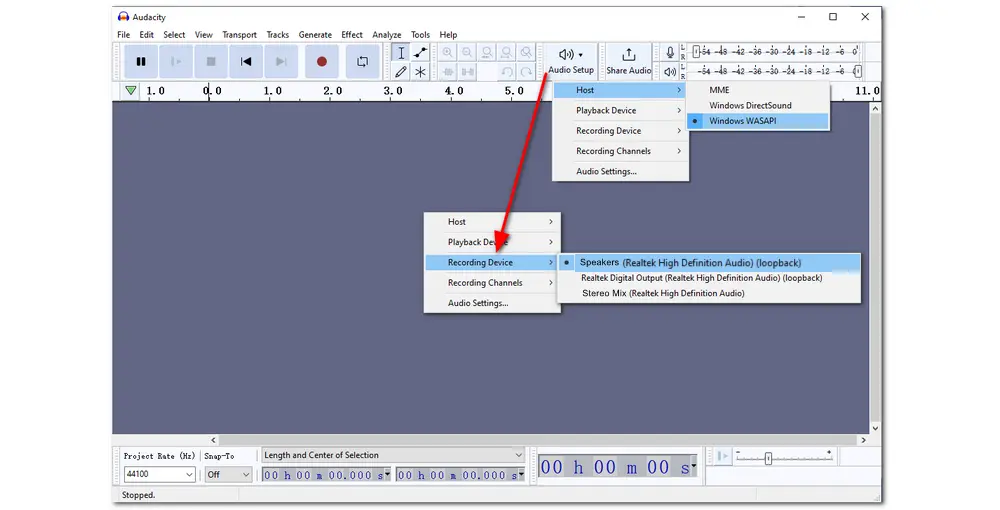
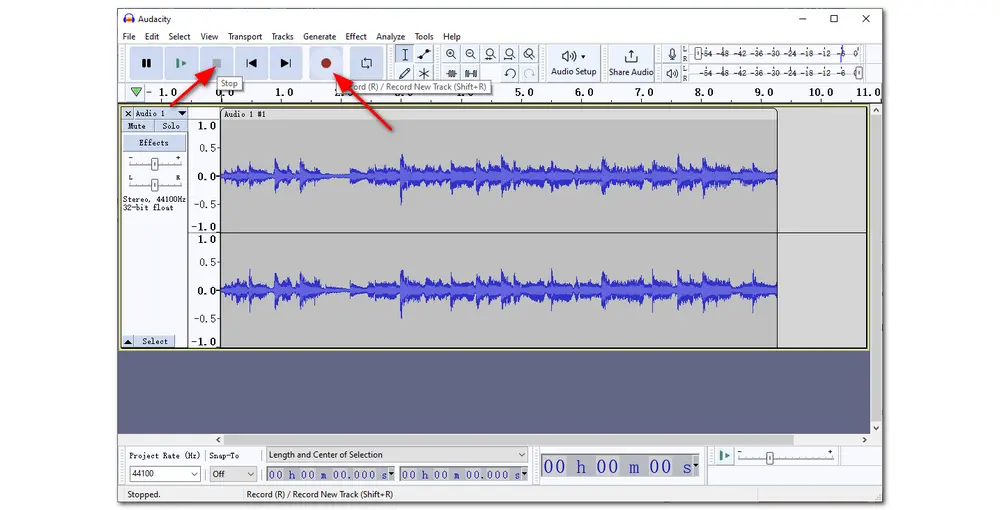
Once you have configured the recording settings, you can record desktop audio on Audacity now. Just click on the red recording button, and the program will start recording audio from your computer (during which you should be ready to play the audio material you want to record).
After finishing the recording, you can stop the recording process by pressing the stop (square-shaped) icon in the top menu bar. Note that it only stopped the recording but will not save the recorded file.
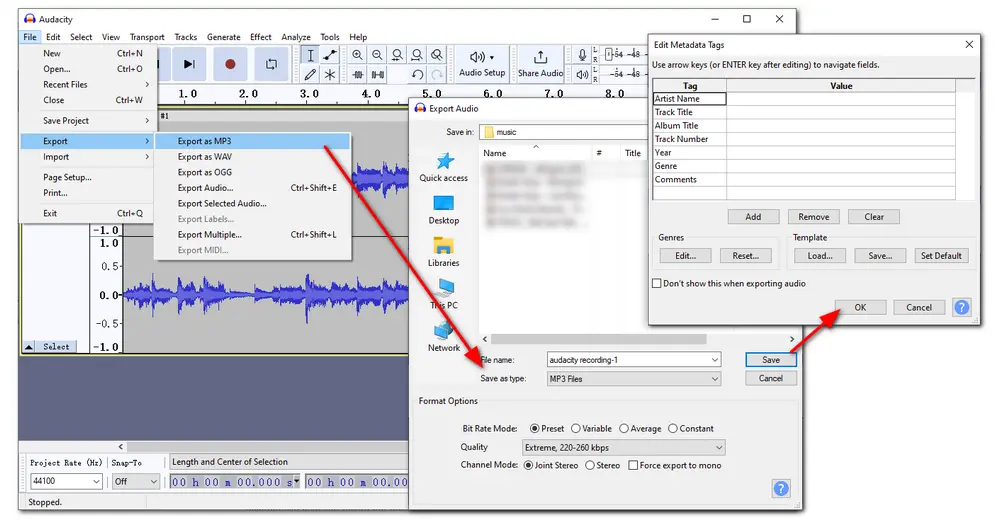
To save your recording, you can click “File” on the top menu bar and then choose “Export”. You can save the recording in MP3, WAV, OGG, etc. by selecting different exporting options. Then choose an output folder and name your recording. You can also choose the recording's Bit Rate Mode, Quality, and Channel Mode. Audacity even enables you to edit the recording metadata or you can skip this step and click OK. The recording is saved to your computer now, and you can enjoy or share it as you like.
For Mac users who want to record audio using Audacity, you need to download additional plugins like Soundflower for internal audio recording. It allows you to route sound to other apps rather than the default speakers. Read the following content to see how to record audio on a Mac using a combination of Audacity and Soundflower.
🐾 Step 1: Install both Audacity and Soundflower on your Mac.
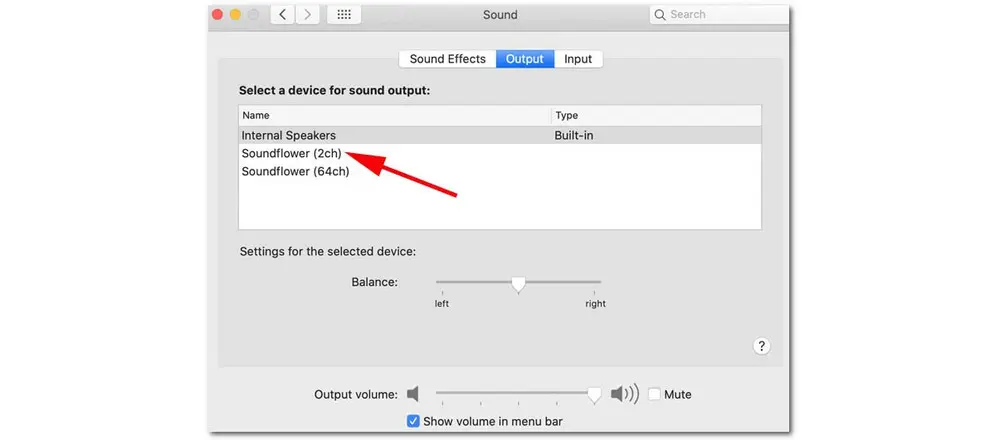
🐾 Step 2: Open the Soundflower app, go to “System Preferences” > “Sounds" > "Output" tab, and then select “Soundflower (2ch)" for sound output.
🐾 Step 3: Launch Audacity, and then choose “Soundflower (2ch)” under the “Audio Setup” > "Recording Device" section.
🐾 Step 4: Open the app whose audio you would like to record, and then click on the “Record” button in Audacity to start the recording. Once finished, click the square icon to stop recording.
You can then edit the recording and save it to your device.
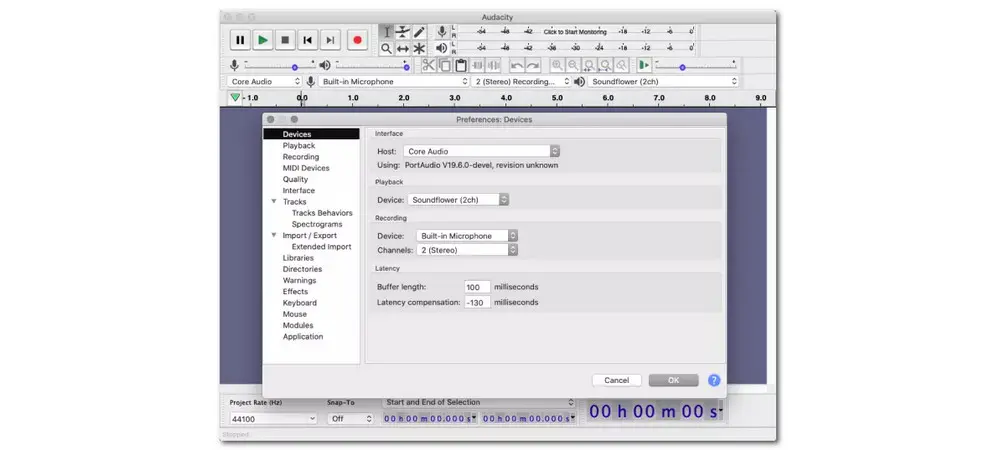
Although Audacity can record computer audio, however, when using this software, malfunctions, bugs, or wrong settings may cause Audacity not to pick up system sound. You can try the following fixes if you encounter such a problem.
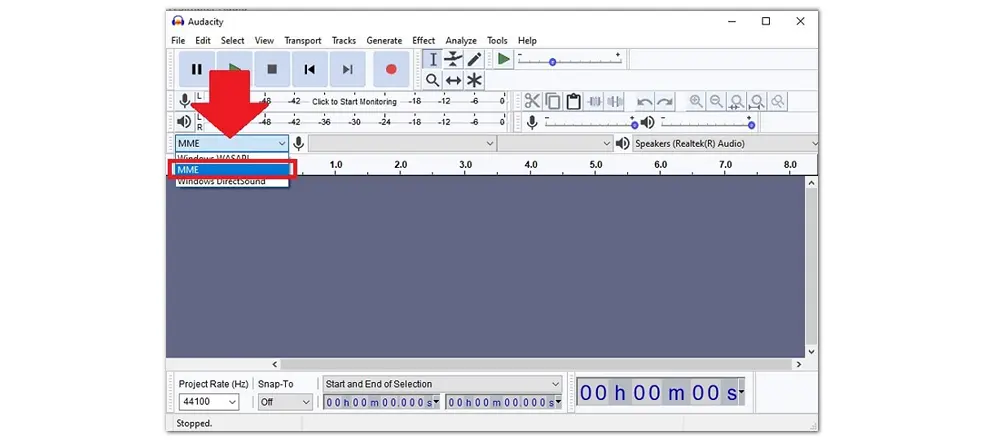
MME (Multimedia Extensions) is the default audio host for Audacity. It guarantees that any audio source on the computer can be input and recorded. So you can fix Audacity not picking up sound by changing the audio host:
Launch Audacity and click the “Audio host” dropdown box on the left side of the main interface. Then choose “MME” as the host. Record to see if there’s sound on your recording.
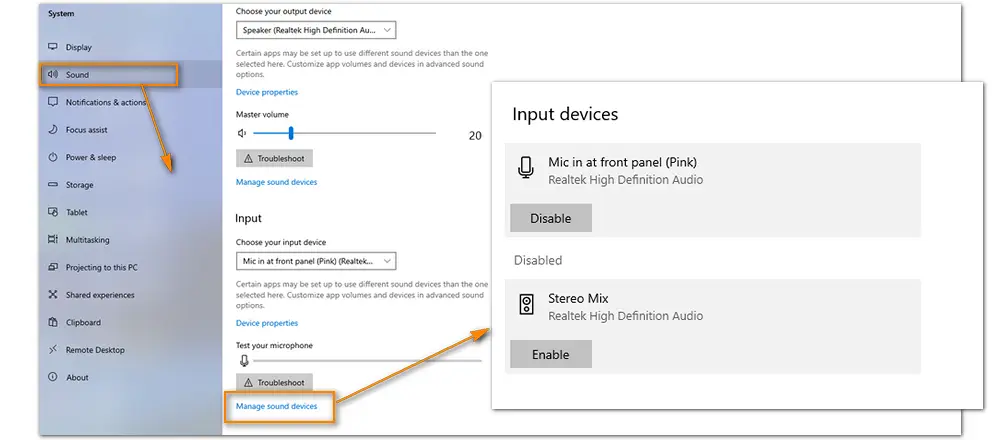
If the sound input devices are disabled on your computer, Audacity won’t record audio from any source. To fix the Audacity microphone not working problem, do the following:
Go to “Settings” on your PC. Select “System” and navigate to “Sound”. Then click “Manage sound devices” under “Input”. Enable all the disabled Input devices.
You also need to make sure of if the mic or system sound volume is enough. Low volume may result in unpleasant sounds or no sound at all.
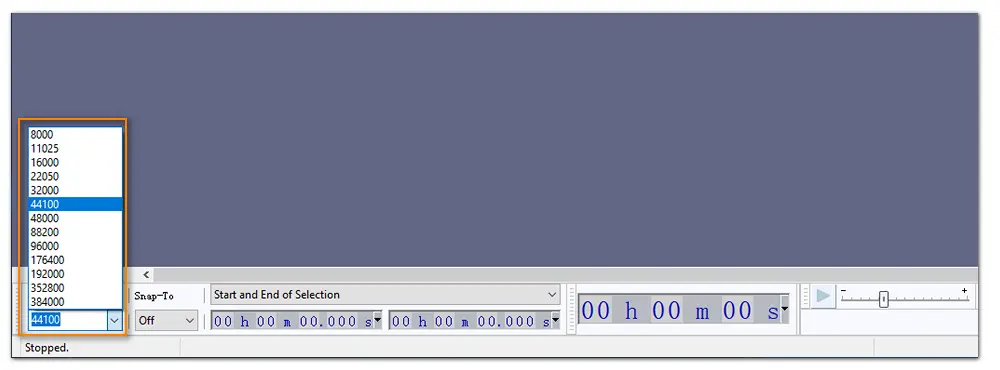
Unsuitable sample rates set in Audacity can also cause the problem of Audacity not picking up mic and system sound. Higher sample rates have more benefits for capturing sound. But 44.1kHz is regarded as the best sample rate setting for audio recording in Audacity. It’s very easy to change the sample rate – just pick 44100 as the Project Rate (Hz) in the bottom left corner of Audacity.
If you are looking for a more straightforward recording experience, it's better to use an Audacity alternative. I've shared two stable and reliable options below.
WonderFox HD Video Converter Factory Pro is one of the best alternatives to Audacity on Windows. It's an all-in-one audio and video processing program whose built-in screen recorder can help you record not only audio but also video on your computer. You can take it to record audio with system and microphone sounds, videos like gameplays, online meetings, websites, etc., with just a few simple clicks. The straightforward interface and intuitive recording process make it accessible to users at all levels.
Now, downloaddownload this software on your PC and start recording your desktop audio with the following guidance:
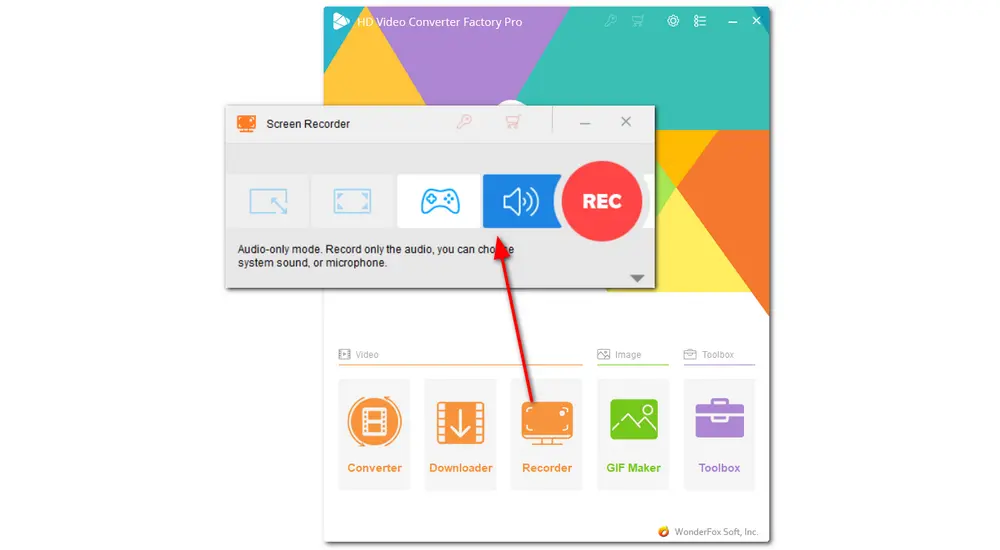
Run WonderFox HD Video Converter Factory Pro and then select Recorder from its initial interface. Click the audio-shaped icon to choose the “Audio-only” option.
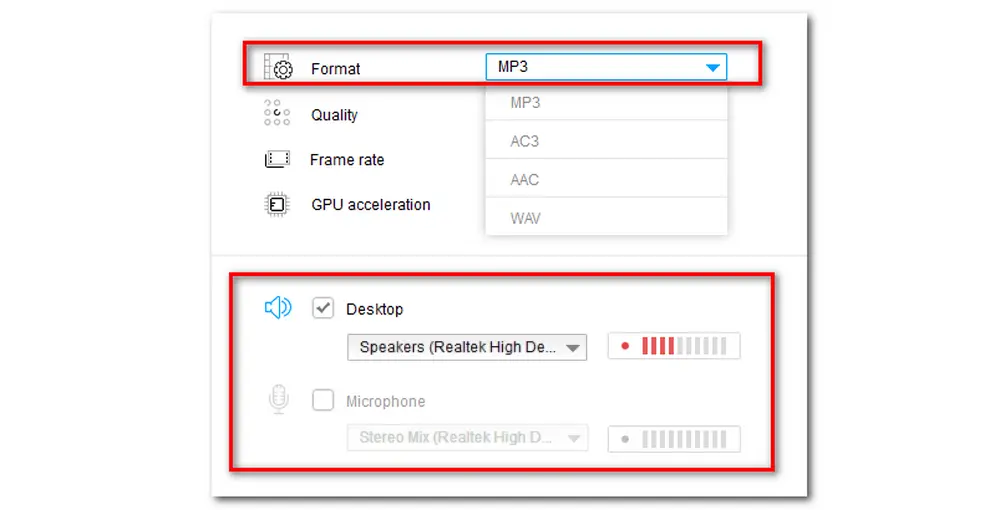
Move down to choose an audio recording format from the “Format” drop-down list. Here you can choose between MP3, AC3, AAC, and WAV. Then you can check “Desktop” to record system audio and “Microphone” to record external sound. You can also record the system and microphone simultaneously.
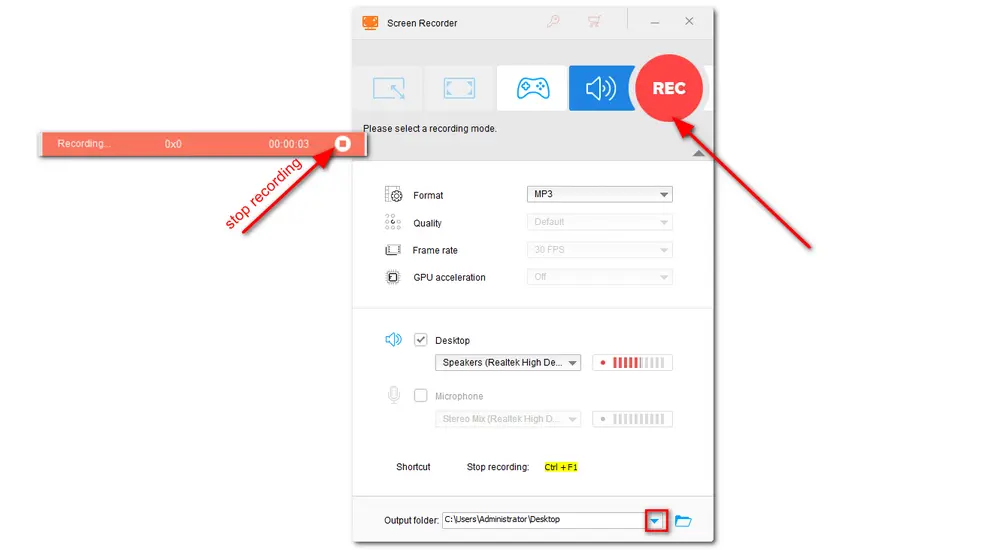
Finally, click the down arrow button at the bottom to set an output folder, and then hit the red “REC” button to start recording your PC audio after a five-second countdown. (Make sure the audio material you want to record is prepared.)
When the recording is over, click the stop button (square-shaped) or use the hotkey “Ctrl + F1” to stop the recording. The output folder will then pop up, and you can check the recording with your media player.
💡 After finishing the recording, you can take advantage of the “Converter” or other tools inside HD Video Converter Factory Pro to trim and merge audio, edit audio tags, compress audio files, and make stylish ringtones. You can also convert the recording to other audio formats, add the recordings to video, etc.
Just downloaddownload the software and give it a try now!
Mac users can also directly use QuickTime Player to capture the computer audio. QuickTime Player is a built-in tool for Mac that supports playing, managing, editing, and recording. But note that to record the internal audio on Mac with QuickTime Player, you also need to download the Soundflower app.
The following are the detailed steps.
Step 1. Download and open Soundflower. Go to "System Preferences" > "Sound" > "Output" and select "Soundflower 2ch".
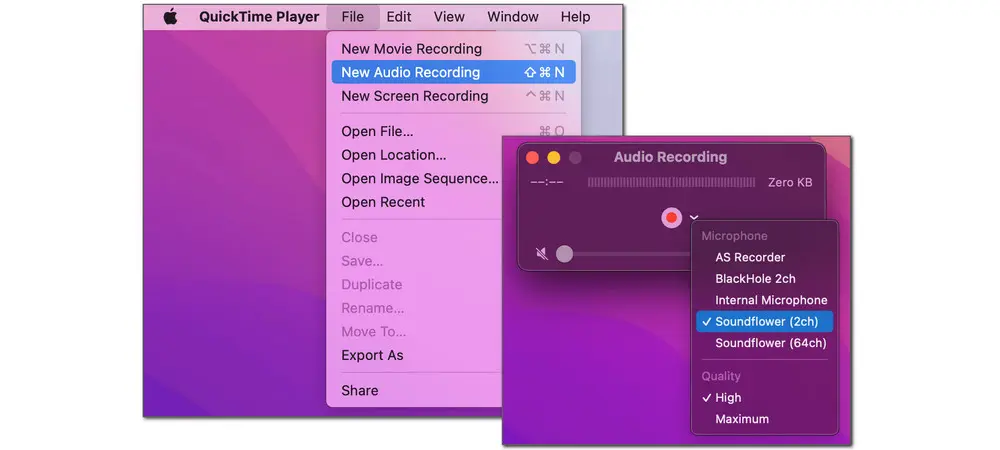
Step 2. Launch QuickTime Player and choose "File" > "New Audio Recording" from the top menu bar.
Step 3. Click the drop-down arrow near the record button and select "Soundflower (2ch)".
Step 4. Press the record button to start recording. Once finished recording, re-click the record button again to stop recording.
Now you know how to use Audacity to record computer audio on Windows and Mac. If you find it a little complex to use, WonderFox HD Video Converter Factory Pro is the tool to go for on Windows. Or you can try QuickTime Player on your Mac computer. Just feel free to choose one for your desktop audio recording! Thanks for reading!

I write about multimedia topics, including video and audio conversion, compression, editing, and downloading. I joined WonderFox in 2020, and my goal is to help readers solve everyday tech problems more easily. In this guide, I have demonstrated step-by-step how to use Audacity to record system audio on a Windows or Mac computer. If you find it a bit complex, just try the alternative I've prepared for you!


I write about multimedia topics, including video and audio conversion, compression, editing, and downloading. I joined WonderFox in 2020, and my goal is to help readers solve everyday tech problems more easily. In this guide, I have demonstrated step-by-step how to use Audacity to record system audio on a Windows or Mac computer. If you find it a bit complex, just try the alternative I've prepared for you!
WonderFox DVD Ripper Pro
WonderFox DVD Ripper Pro is a professional and outstanding DVD ripper. And it can help you remove different kinds of DVD encryptions like DVD CSS, Region Code, Multi-angle, Sony ARccOS, UOP, Disney X-Project DRM, Cinavia Protection, etc. You can use it to rip your DVD collections to ISO image/DVD folder for a better backup as well as to convert DVD discs to digital video and audio files for convenient playback. Time to download it! Just give it a try!
* Please DO NOT use it to rip any copy-protected DVDs for commercial use.

Privacy Policy | Copyright © 2009-2026 WonderFox Soft, Inc.All Rights Reserved
