

 Kevincy | Updated on Sep 1, 2026
Before opening an editor, locate the original recording and make a backup copy. Editing a duplicate protects the source video if you trim too much, replace the wrong audio track, or export with unsuitable settings. Also check that the recording has finished processing and plays normally from beginning to end.
Important: Record and edit only meetings, streams, videos, and conversations you own or are allowed to use. Follow the platform rules, organizational policies, and recording-consent laws that apply to you.
If you recorded the screen with a desktop recorder, the file is usually in the output folder selected before recording. For a YouTube project, you can record your own presentation, software demonstration, gameplay, webcam-free tutorial, or other authorized material and then edit it before uploading. Keep the original clip until the final video has been checked.
For a local Zoom recording, open the folder selected in Zoom after conversion finishes. For a cloud recording, sign in to the Zoom web portal and open “Recordings & Transcripts” to find it. Zoom can trim the playback range of a cloud recording online, but the built-in editor is mainly for removing material from the beginning, end, or middle. Download the MP4 when you need cropping, merging, subtitles, audio replacement, compression, or more control over the export.
Tip: Cloud trimming affects the associated audio and transcript files. Although Zoom allows the original to be restored, saving a local copy first is the safer workflow.
A Google Meet recording is saved to the meeting organizer’s “My Drive” > “Meet Recordings” folder after processing. Open Google Drive, select the recording, click the three-dot menu, and choose “Download.” You can then import the downloaded video into a desktop or mobile editor.
Current Webex cloud and local meeting recordings use MP4, so they can be opened directly in most modern video editors. ARF and WRF are legacy Webex recording formats. If you still have one of these older files, use the official Webex Recording Converter or Webex Recording Editor to convert it to MP4 or WMV first, and then perform the main edits in your preferred editor.
For a straightforward Windows workflow, try WonderFox HD Video Converter Factory Pro. It combines a screen recorder, basic video editor, converter, compressor, downloader, and other tools in one interface. You can trim or split a long recording, crop unwanted areas, merge several clips, rotate the picture, apply effects such as blur or mosaic, add a text or image watermark, attach subtitles, replace or add audio, and adjust common video parameters.
It supports 500+ output formats and device presets. This is useful when a Zoom, Google Meet, Webex, gameplay, or tutorial recording needs to be converted to MP4 for easier playback, sharing, or uploading.
⭐ Useful Features for Editing Screen Recordings
Now, downloaddownload the program on your Windows PC and follow these steps.
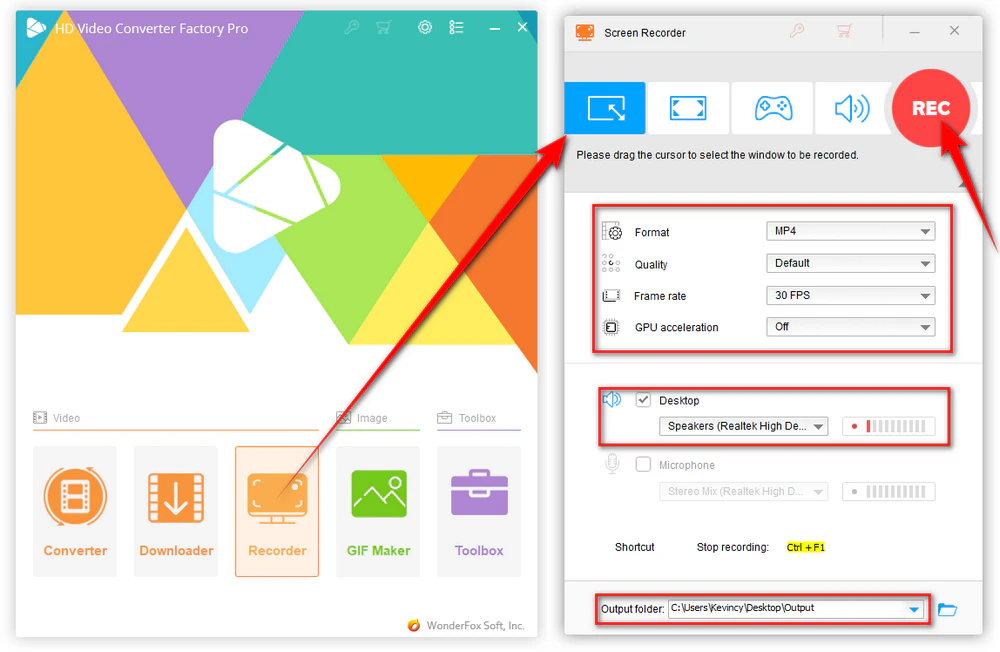
If you have not created the recording yet, run the software and open “Recorder.” Choose “Custom” to capture a selected area, “Full-screen” for the entire display, “Game” for gameplay, or “Audio-only” when you only need sound.
Select the recording format, quality, and frame rate. Turn “Desktop” and “Microphone” on or off according to what the video should contain, choose an output folder, and click “REC.” Press “Ctrl + F1” to stop. The finished file can then be imported into the Converter module for editing.
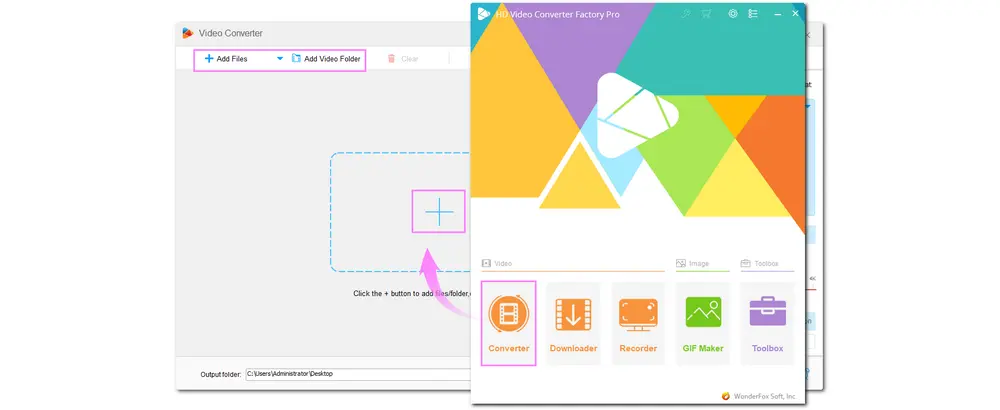
Step 1. Launch WonderFox HD Video Converter Factory Pro and enter the “Converter” module.
Step 2. Click “+ Add Files” to import one or more screen recordings. You can also drag and drop the source files into the interface.
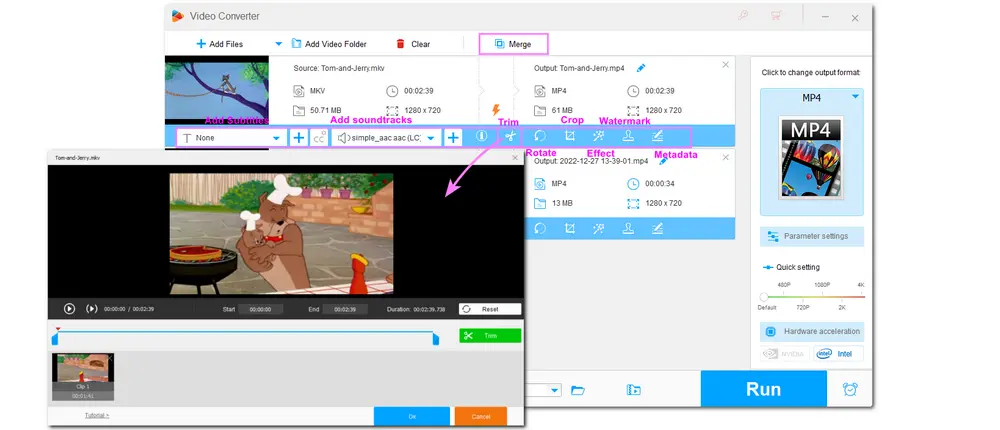
Step 3. Use the toolbar below each imported file. You can add subtitles or audio, trim and split the recording, rotate or flip it, crop the frame, apply an effect such as blur or mosaic, add a text or image watermark, and edit metadata. Click “Merge” at the top when you need to combine two or more screen recordings.
For meeting recordings, trimming can remove waiting time and off-topic discussion; cropping can hide unused screen areas; subtitles can improve accessibility; and audio replacement can add a clearer narration. Preview each change before returning to the main interface.
To blur sensitive information: click the “Effect” button and choose “Blur” or “Mosaic.” Resize and move the selection box in the “Original Preview” window until it covers the private area, then click “OK.” This is useful for an account name, email address, private chat, face, notification, or other information that stays in one place.
Tip: A fixed blur works best when the sensitive item does not move around the frame. For moving information, use an editor with keyframes or motion tracking, or split the recording into shorter sections and reposition the blur for each section. If cropping can remove the sensitive area entirely without hurting the video, cropping is usually the cleaner privacy option.
Also Read: Trim Video | Crop Video | Watermark Video
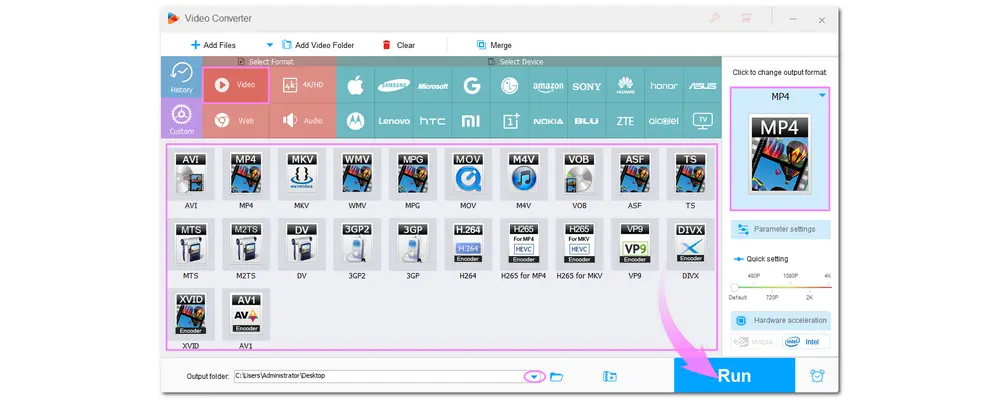
Step 4. Click the format image on the right to open the output list. Keeping the source format is fine when it already works on the target device. For broad compatibility, open the “Video” category and choose “MP4.”
Open “Parameter settings” only when you need to change the resolution, frame rate, bitrate, aspect ratio, audio channels, or volume. In most cases, keeping the original resolution and frame rate avoids unnecessary upscaling and helps the edited video look consistent with the source.
Step 5. Click the “▼” button to select an output folder. Press “Run” to export the edited recording. Play the result once before deleting the backup.
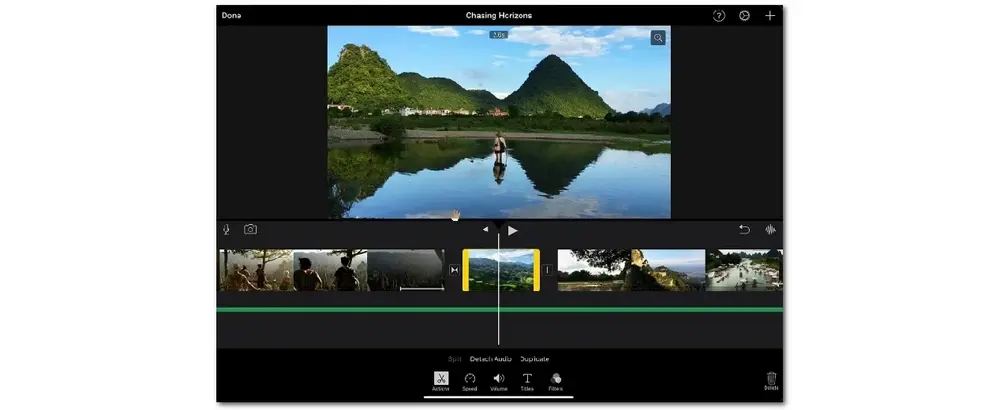
Mac users can handle quick changes with QuickTime Player or build a more complete project in iMovie. QuickTime Player is convenient for simple trimming and clip rearrangement. iMovie adds a timeline and tools for splitting, cropping, rotating, combining clips, adjusting audio, and adding titles, transitions, or background music.
If the source is a Zoom, Google Meet, or Webex cloud recording, download it to the Mac first. Then follow this basic iMovie workflow:
Step 1. Open iMovie. Click “File” > “Import Media,” or drag the screen recording into the media area.
Step 2. Drag the clip to the timeline. Move the playhead to split unwanted sections, drag clip edges to trim, and use the controls above the viewer to crop, rotate, adjust color, change speed, or modify audio. Add titles and transitions only where they help viewers follow the content.
Step 3. Click “Share” in the upper-right corner and choose “Export File.” Select a suitable resolution and quality, save the file, and check the exported result.
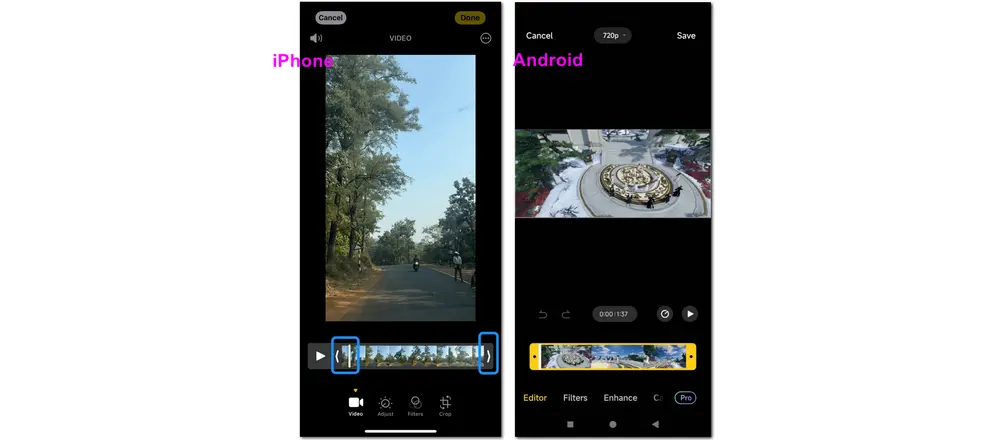
For a quick edit on a phone, start with the built-in Photos, Gallery, or Google Photos app. The available controls vary by device and operating-system version, but most phones can trim the beginning and end, crop or rotate the picture, adjust color, mute audio, and apply basic filters.
Step 1. Find the screen recording in “Photos,” “Gallery,” or “Google Photos.”
Step 2. Tap “Edit” and drag the timeline handles to remove unwanted footage.
Step 3. Use the crop, rotate, adjustment, filter, or audio controls that are available on the device.
Step 4. Tap “Save,” “Save copy,” or “Done.” Choose “Save copy” when possible so the original remains available.
Need to blur something on iPhone? iMovie does not include a dedicated regional blur tool, but you can cover a fixed area with a prepared blurred or mosaic image. Open the recording as an iMovie project, place the playhead where the cover should begin, tap “+ Add Media” and choose the image, tap the “More” button, and select “Picture in Picture.” Reposition and resize the overlay over the sensitive area, then adjust its duration on the timeline. This workaround is best for information that stays in the same position.
On Android, if the built-in Gallery or Google Photos editor does not provide a regional blur tool, use a reputable mobile editor with blur or mosaic overlays. For moving faces, names, or notifications, choose one that supports keyframes or motion tracking.
Tip: For multiple clips, titles, transitions, layered audio, or more precise timing, use iMovie on iPhone or a reputable mobile video editor. Long meeting recordings are usually easier to manage on a computer because a larger timeline gives you better control.
Yes. Download the recording and open it in a compatible video editor. Current Zoom, Google Meet, and Webex recordings are commonly available as MP4 files. Older Webex ARF or WRF files should be converted with the official Webex tools before they are edited in a general-purpose editor.
Zoom provides online trimming for cloud recordings, which is useful for changing the playback range. It does not replace a full editor. Download the recording when you need to crop the frame, merge clips, add subtitles or music, change the format, compress the file, or make detailed edits.
Use an editor that does not add a watermark during export. Built-in tools such as Photos, Gallery, QuickTime Player, and iMovie generally do not add one. The full version of WonderFox HD Video Converter Factory Pro can also record and edit videos without adding a watermark. Check the export limits of any third-party app before starting a long project.
Yes. Cropping removes an outer part of the frame, while blur or mosaic hides selected details and keeps the rest of the picture visible. Use cropping for black borders, unused desktop space, browser tabs, chat panels, or taskbars. Use blur or mosaic for a private name, email address, face, notification, or other detail that needs to remain inside the frame.
For highly sensitive material, review the exported video carefully and remove or mute private audio, subtitles, notifications, and metadata separately. A browser-based blur editor can be convenient for ordinary clips, but uploading a confidential meeting or account recording to a third-party service may create an additional privacy risk. Local editing is the safer choice for sensitive content.
MP4 with H.264 video and AAC audio is a practical choice for YouTube, online meetings, phones, browsers, and most media players. Keep the original resolution and frame rate unless the destination requires something different. A higher resolution or bitrate cannot restore detail that was not captured in the original recording.
A good screen-recording edit does not need to be complicated. First preserve the original, remove unnecessary footage, crop distractions, blur or cover private details, correct the audio, and export in a format that suits the destination.
Windows users can record and edit in one workflow with WonderFox HD Video Converter Factory Pro. Mac users can use QuickTime Player or iMovie, while iPhone and Android users can complete basic edits in their photo apps. Zoom’s online trimming tool is convenient for a quick cloud edit, but downloaded files provide much more flexibility. Google Meet and current Webex recordings can also be downloaded as standard video files and edited in the same way.

Kevincy joined the WonderFox team in 2014 and has been a senior columnist ever since. With over two decades of experience in the video editing industry, he shares tutorials, tips, and how-to guides on video/audio processing and personal DVD backups. Family-oriented and passionate about helping others, he is dedicated to making video and audio processing easier for readers.


Kevincy joined the WonderFox team in 2014 and has been a senior columnist ever since. With over two decades of experience in the video editing industry, he shares tutorials, tips, and how-to guides on video/audio processing and personal DVD backups. Family-oriented and passionate about helping others, he is dedicated to making video and audio processing easier for readers.
WonderFox HD Video Converter Factory Pro
1. Fix any unsupported format issue with 500+ presets.
2. Compress large files with imperceptible quality loss.
3. Save HD/FHD/2K/4K/8K videos from 1000+ sites.
4. Trim, merge, crop, rotate, flip, watermark video.
5. Record live streams, gameplay, webinar, video call.
6. Make animated GIFs from video or image sequence.
7. Ringtone Studio, Subtitle Extractor, and MORE...

Privacy Policy | Copyright © 2009-2026 WonderFox Soft, Inc. All Rights Reserved
