


Do you need to make a voice recording? What if the recording includes parts you don’t want?
The answer is simple – all you need to do is trim the audio.
Fortunately, there are plenty of applications on Windows that can help you achieve the goal easily and without any cost. If you’re looking for the best way to cut audio recording, don’t worry, you’re in the right place.
Below, I’ll provide five methods to help you effectively trim audio recordings, like WMA, MP3, WAV, etc. Continue reading.
A quick rundown:
| Method | Description | View Details |
|---|---|---|
| WonderFox Free Audio Trimmer (🔥) | - Quick cut audio files without losing quality - Support format conversion and audio joining |
>> View Details |
| Audacity | - Advanced and precise editing - More editing features |
>> View Details |
| Windows 10 Voice Recorder | - On-the-fly trimming of recordings you’ve just made in the app itself | >> View Details |
| Windows Media Player | - Trim audio with the help of a third-party plugin | >> View Details |
| Online MP3 Cutter | - No installation - Trim on any device |
>> View Details |
WonderFox Free HD Video Converter Factory is a free yet powerful program with a handy audio editor that allows you to easily cut different audio files, including WMA, MP3, etc. It can help you remove unwanted parts, shorten the length, or create multiple shorter clips. At the same time, you can also join audio clips together.
It’s only a couple of clicks to cut audio recordings without losing quality. Now, just download and install download and install the software and learn how to trim recorded audio on your PC.

Use the best free audio trimmer to trim your audio recordings simply, quickly, and efficiently. Try the software today!
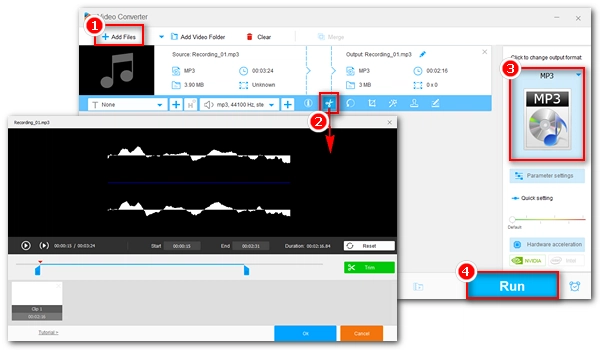
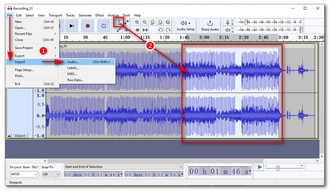
Run WonderFox Free HD Video Converter Factory and open the Converter program. Next, click + Add Files to import your audio recording into the conversion list. You can also drag your audio directly into the interface.
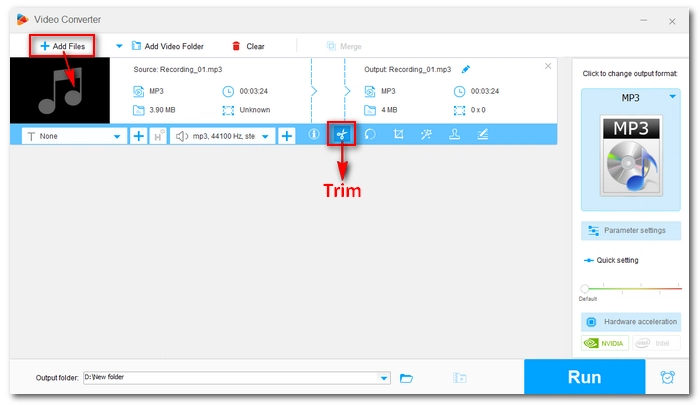

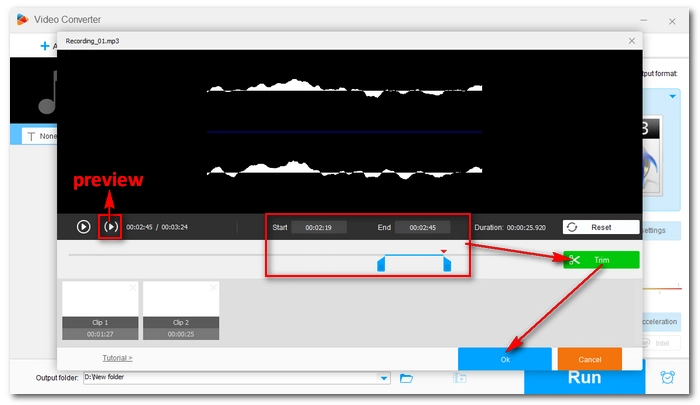
In the toolbar, select the scissor-shaped Trim button to open the audio trimmer. Then, drag the two knobs on the timeline to cut the audio. Alternatively, you can enter the Start and End time to pin down the audio clip you want to save.
Click the green Trim button to cut the clip. You can click the Play button to preview the trimmed audio. Repeat this step and you can create multiple audio clips if you want. When finished, press Ok to return to the main interface.

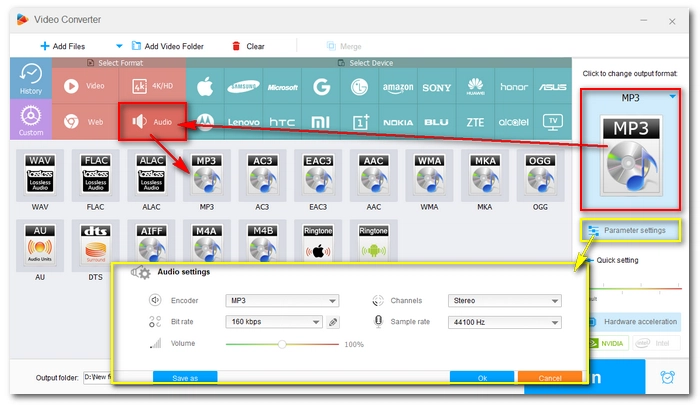
Expand the output format list and go to the Audio format section. Then select your preferred audio format from the profiles below. Keeping the same format is recommended.
💡 To preserve the original quality, you can open Parameter settings and adjust the audio settings to the same value as the original. You can click the ⓘ button under the task to check the original audio’s settings.
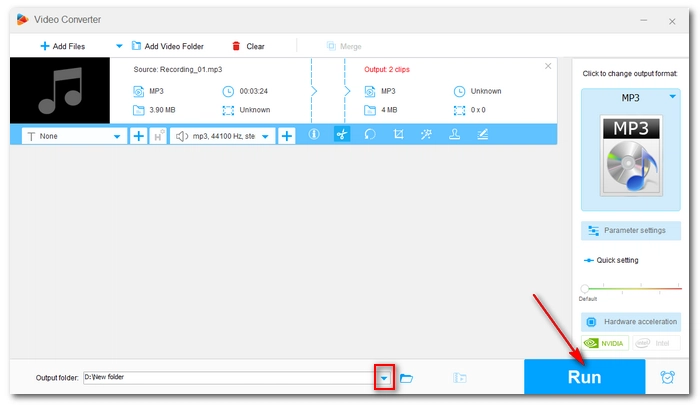
Finally, click the ▼ button to set an output folder and press Run to export the trimmed audio recording.
Hot Search: Cut Ogg | Cut MP3 | Cut WAV | Cut M4A | Cut FLAC | Cut AAC

Audacity is a renowned free and open source audio recording and editing program. While it's used by many audio engineers to create high-quality and professional music projects, it can also handle simple and quick audio tasks such as audio trimming.
Audacity enables you to trim voice recordings in many different ways. It can split your audio, cut the middle part of the audio, remove parts at the beginning or the end, and delete audio tracks. Apart from these, Audacity can help you join audio files too. It involves more steps to cut recorded audio than the previous program. But it's still relatively simple to use. Now, let’s see how to cut and edit audio in Audacity:
🔔 Audacity supports MP3, WAV, and AIFF audio files. If it cannot import your audio files, such as M4A (AAC), AC3, and WMA, you need to install the FFmpeg library to work with these files.
Step 1. Download the latest version of Audacity at https://www.audacityteam.org/.
Step 2. Open Audacity. Then click File > Import > Audio to add your audio recording to the workspace. A direct drag-and-drop is supported.
Step 3. Choose the Selection Tool (which is turned on by default) in the menu bar. Then go to the waveform and click to choose the start point and end point to select an audio clip. The selected audio clip will be highlighted in a brighter color. You can click the green Play button to preview the clip.

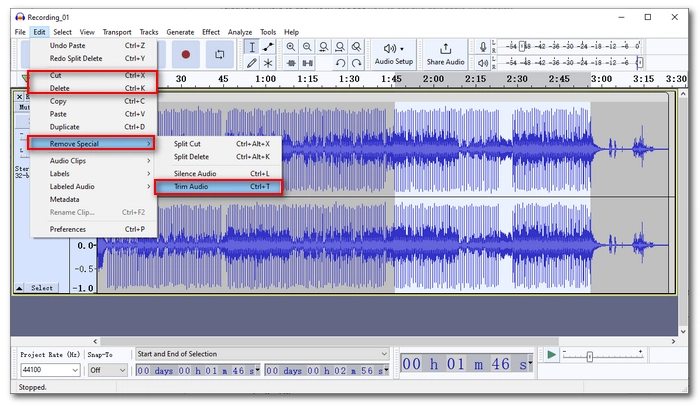
Step 4. Open the Edit menu. You can apply Cut or Delete to remove the selected audio part. If you want to save the selected part but remove the rest, you can select Remove Special > Trim Audio to keep the chosen part quickly.

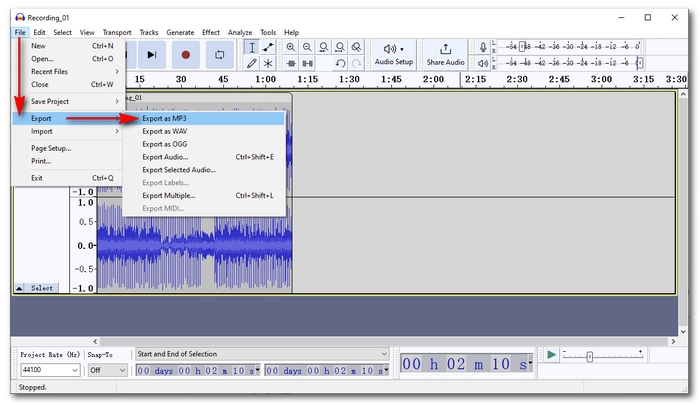
Step 5. When you have the trimmed audio, click File > Export > Export as MP3/WAV/OGG to save the final file.

💡 Audacity offers other settings to refine your audio. You can find many tutorials on how to edit an audio recording with Audacity on the Audacity manual webpage.
The Voice Recorder app pre-installed to Windows 10 can help you record and cut voice recordings in one stop. After you finished your recording with the app, you can use the Trim function to remove unwanted audio from the beginning or end of your recording. But remember that this app won’t trim audio recordings that aren’t created by the app itself. You can only start a recording first and then trim the audio recording.
Here are instructions on how to trim audio in Voice Recorder app:
Step 1. Connect your Microphone to your computer.
Step 2. Type "Voice Recorder" in your Windows 10 search box and open the Voice Recorder.
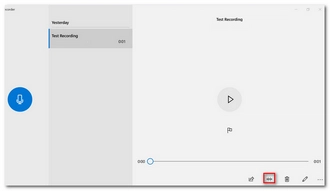
Step 3. Click the Mic button to start recording.
Step 4. Click the Stop button to stop recording.
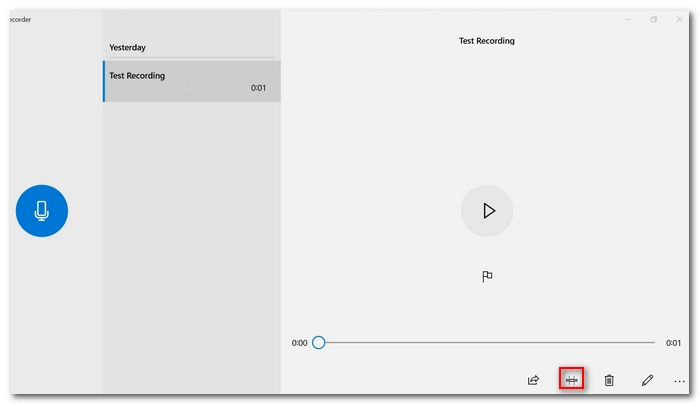
Step 5. Now, click the Trim icon to cut the audio recording as you like.
Step 6. When you save the trimmed recording, you can replace the old file with the new file or save the trimmed audio as a separate file.
Windows Media Player is a popular media player app to play various media files. Out of the box, it cannot trim audio files. But with the installation of a third-party plugin - SolveigMM WMP Trimmer, it can be turned into an awesome audio trimmer that can trim voice recordings effectively and without losing quality.
It's simple and fast to cut audio in Windows Media Player. Now, follow the steps below to learn how to crop recorded audio in Windows Media Player:
🔔 The free version of SolveigMM WMP Trimmer allows you to export audio with duration up to 10 minutes only.
Step 1. Go to https://www.solveigmm.com/en/products/wmp-trimmer-plugin/ and download the WMP Trimmer Plugin. Then install the plugin on your PC.
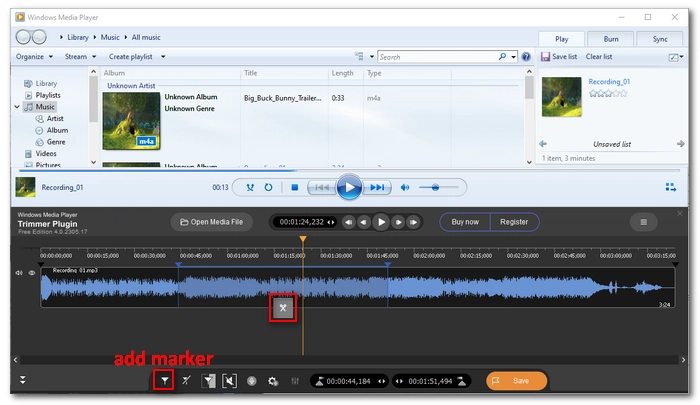
Step 2. Now, start your Windows Media Player. If everything went well, you should see the Trimmer Plugin at the bottom of the player. Sign up and log in with your Trimmer Plugin account.
Step 3. Click Open Media File and select the audio recording you want to edit. Then click Edit this file.
Step 4. You will see the waveform of this audio recording. Drag the orange slider to the point where you want your audio clip to start, then click the Marker icon below to add a marker. Next, choose an end point on the waveform and click the Marker icon to add another marker. Now, move your cursor between the part you want to trim, then click the Trim button.
Step 5. When you get your trimmed audio recording, click Save to save the audio clip.

In addition to the desktop audio trimming tools, many audio cutters online can crop voice recordings efficiently. Without the need to install the tool on your PC, you’ll find it most convenient to use when you are on your mobile phone or tablet. But keep in mind that since the audio editing is handled online, you’ll need a strong network.
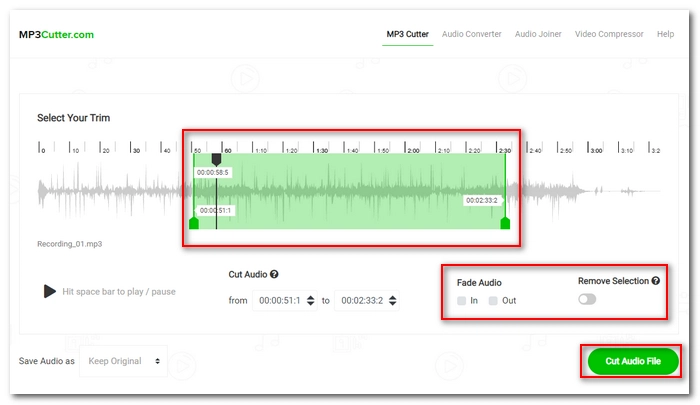
MP3Cutter.com is one of the leading audio trimmers online that makes it easy to cut MP3 or other audio files accurately. It allows you to cut out any part of your audio, like the beginning, the end, or the middle, and save the file to MP3, AAC, WAV, AMR, and iPhone ringtone. What’s more, MP3Cutter.com provides fade-in and fade-out effects that can make your trimmed audio sound as natural as possible, giving it an edge over others.
It is extremely easy to use this app. Here is how to cut voice recording online with Online MP3 Cutter:
Step 1. Open MP3Cutter at https://mp3cut.net/.
Step 2. Click Choose File to upload your audio recording or directly drop files here.
Step 3. Adjust the sliders on the waveform to select the part you want to trim. You can click the Play button to preview the selected part.
Step 4. Now, you can turn on the Remove Selection to remove the selected part and keep the rest. Skip this step if you want to keep the selected section.
Step 5. You can also turn on the fade-in and fade-out sound effects if you want.
Step 6. When everything is ready, click Cut Audio File to trim your audio recording and download the file.
💡 You can adjust the output format by clicking the lower-left Save Audio As option and choosing your preferred audio format.

Congrats! Now you knew at least five ways to cut audio recordings. Based on your specific needs, just choose your favorite method and start cutting your voice recordings now.
By the way, if you have no editing experience before, you are recommended to try the first audio editor program, which offers simplified steps to cut any audio file in just a few clicks. No restrictions and always free. Download Download the free program and have a try!
I hope this article was useful to you. Thank you for reading. Have a good day!
WonderFox DVD Ripper Pro
WonderFox DVD Ripper Pro is a professional DVD ripping program that can easily rip any DVD (whether homemade or commercial) to all popular formats including MP4, MKV, MP3, WAV, H264, H265, Android, iPhone, and so on. It also lets you edit and compress DVD-Video efficiently. Download it to enjoy a fast and trouble-free DVD ripping experience.
Many smart Android phones allow you to cut your audio right after your recording. You can tap the audio recording in your Recorder app and check if there is any edit option available. Or you can go to the App Store and search for keywords like audio trimmer, MP3 cutter, etc. to find a proper tool to cut recorded audio in your Android phone.
Similar to Android, iOS phones also give you options to trim your recorded audio. Just open the Voice Memo app on your iPhone and click your voice recording. Then select the three-dot option menu and tab Edit. Now, you can select the upper-right Crop button and start trimming your audio recording.
You can combine multiple audio recordings into one and save it as a complete audio file. All you need is an audio merger. Check this article to learn more: Best Way to Merge MP3 Files in Windows 10/11.
Terms and Conditions | Privacy Policy | License Agreement | Copyright © 2009-2026 WonderFox Soft, Inc.All Rights Reserved