Let’s started with an inbuilt voice recording tool that comes with Windows. This free program offers an easy, quick way to record and edit audio recordings on PC. But the editing feature is limited and it only allows trimming. Moreover, you can only trim the audio file recorded within it.
Here is a brief guide on how to trim audio recordings using it.
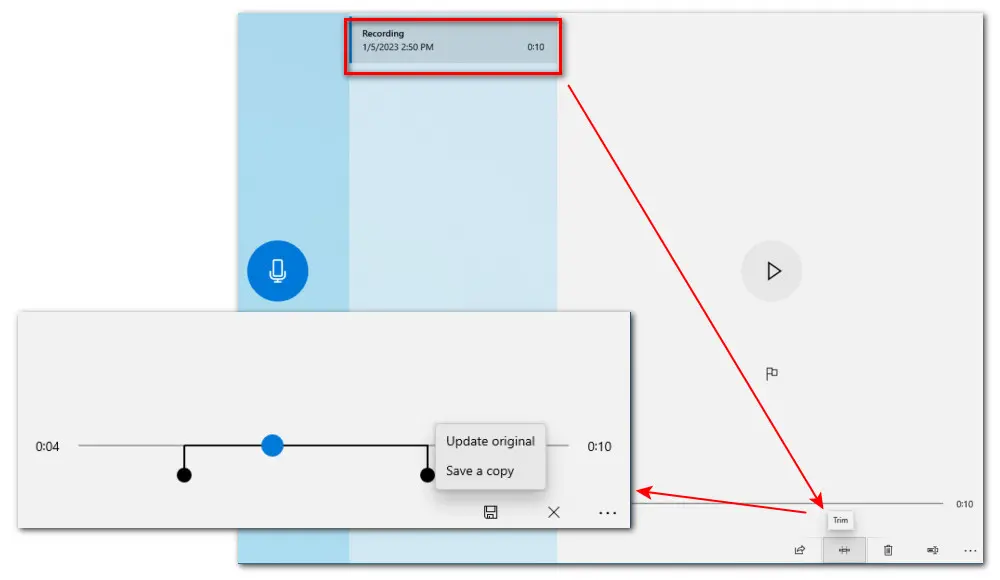
Step 1. Once you complete a recording, the file will be saved automatically in M4A format. You can see the recorded audio file in a sidebar on the left.
Step 2. Select the file you want to trim and click on the Trim button in the bottom right.
Step 3. Then two pins, named “Start of trimmed section” and “End of trimmed section”, will appear on the play bar. Drag them to trim out the unnecessary beginning and end of your recording.
Hit the Play button on the bar at any time while trimming to make sure your selection is accurate. At last, tap Save at the bottom of the window.
Step 4. Two options are available. One is Update original, the other is Save a copy. The first option is to replace the original version with the new one, while the second one is to create a new recording in the list.
But if you’ve already had a bunch of audio recordings locally and hope to find a free audio editor, you can go with WonderFox Free HD Video Converter Factory. With it, you can trim, split, compress, and merge audio files with ease. Enhance audio quality by adjusting parameters, like audio bitrate, sample rate, channels, and volume. Also, you can change a stereo track to mono, and vice versa. In addition, this tool allows you to convert your audio to all mainstream audio formats including MP3, WAV, OGG, AAC, and more. Then you can play the edited audio recordings on various devices without hassle. Next, let’s walk through the steps on how to edit audio recordings with it on Windows.
Step 1. Click on the Download button below to download and install Free HD Video Converter Factory on your PC first.
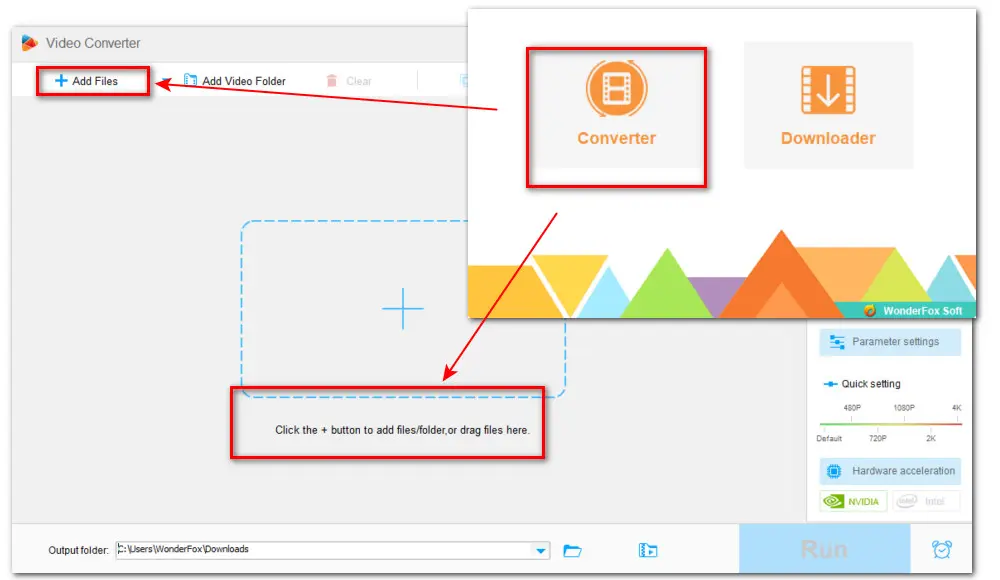
Step 2. Then launch the program and open Converter. Hit the + Add Files button to add your source recording file, or you can drag and drop them into the software screen interface.
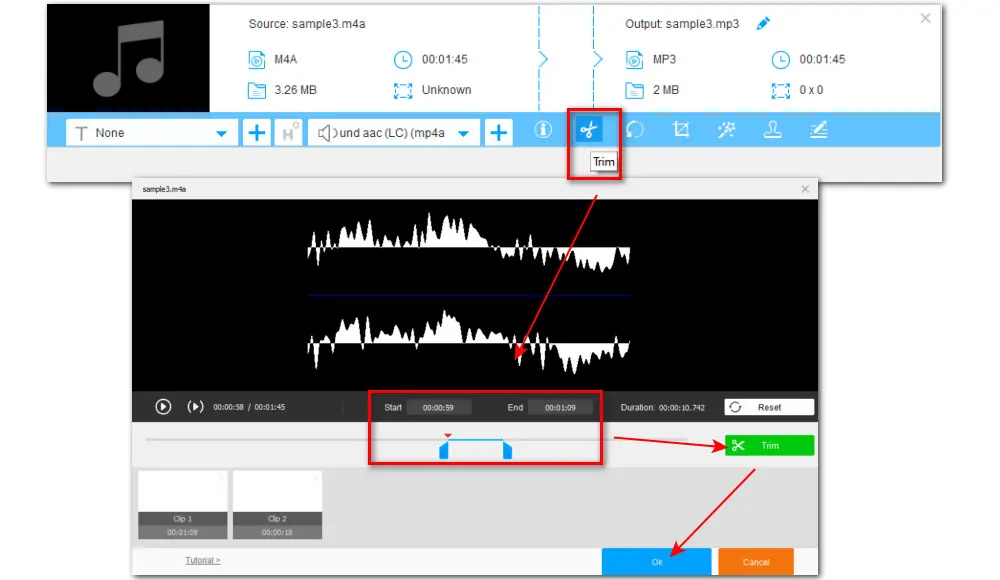
Step 3. Then hit the scissor icon below the imported audio file to open the Trimmer window. Then drag the sliders and press the Trim button to keep the parts you want. You can repeat the step to create more clips. Finally, click OK to return to the main interface. At the top-right of the window, you can also hit Merge to combine multiple recordings into one.
(Optional) Go to Parameter settings to modify the audio bitrate, channel, sample rate, and change the volume.
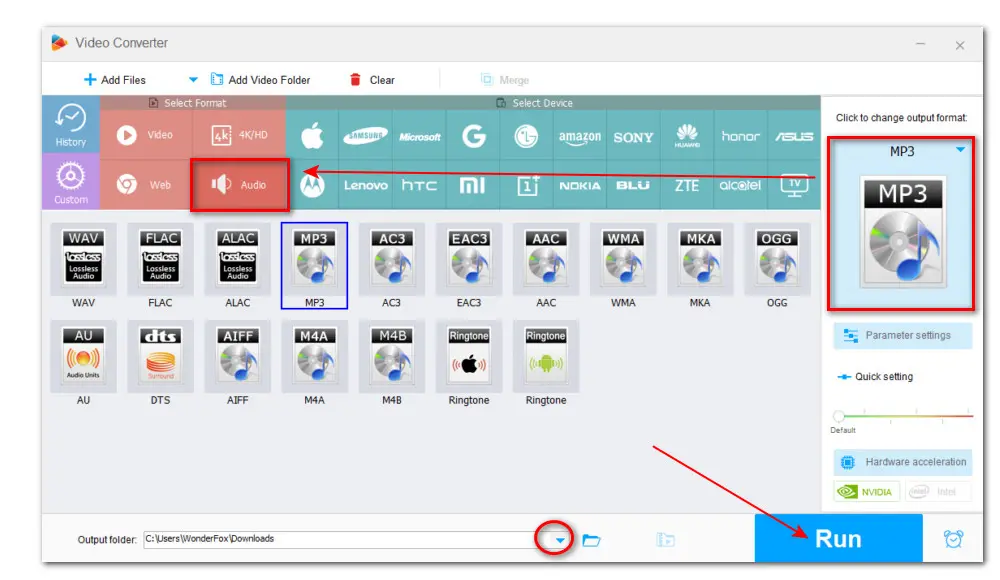
Step 4. Click on the right-side format image to open the format library and go to the Audio section. Then choose your preferred format below. You can choose the same format as the original or use a different format.
Step 5. Hit the bottom triangle button to specify an output path or leave it as default. Finally, hit Run to start to initiate the editing process.
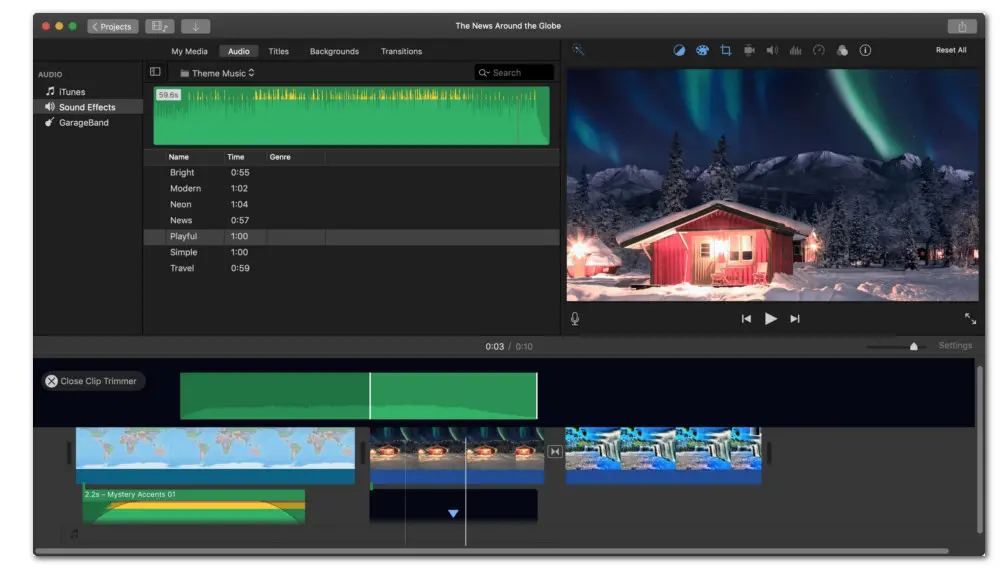
iMovie is a native video editor pre-installed on Mac and is available for free on the App store. It offers some basic audio editing features and is best for beginners to start with. You can trim, change the speed, and adjust the volume.
This tutorial will show you the basics of how to edit a voice recording on Mac.
Step 1. Open the iMovie on your device. Then import the recorded audio clip you want to edit.
Step 2. Drag the file into the timeline. Then simply click and drag from the edges of the selected clip to remove any unnecessary parts from the beginning or the end.
Step 3. To cut out some long silences or some ramblings, you can click to select the timeline and place the Playhead (vertical marker) at the start of what you want to chop out. Then go to Modify > Split Clip. You now have two clips. Repeat the step to get the clip you want to delete.
Step 4. At last, merge the two clips you want to keep in the timeline. You are also allowed to boost the volume. When you are done, click on the share button at the upper-right of the window to save the edited audio recording file.
Voice Memos is a default app on your iPhone and iPad. It helps easily capture and share personal notes or song ideas. After recording, you can also make a simple trimming to remove unnecessary parts. Here is how:
This tutorial will show you the basics of how to edit a voice recording on Mac.
Step 1. Start the Voice Memos app.
Step 2. Open the voice recording you want to edit, tap ‘More Actions’ (three dots icon)> ‘Edit Recording’.
Step 3. Tap the trim icon at the top right, then drag the yellow trim handles to select the section you want to keep or delete.
Step 4. For more precise editing, pinch open to zoom in on the waveform.
Step 5. To keep the selection, tap ‘Trim’, or to delete the selection, tap ‘Delete’.
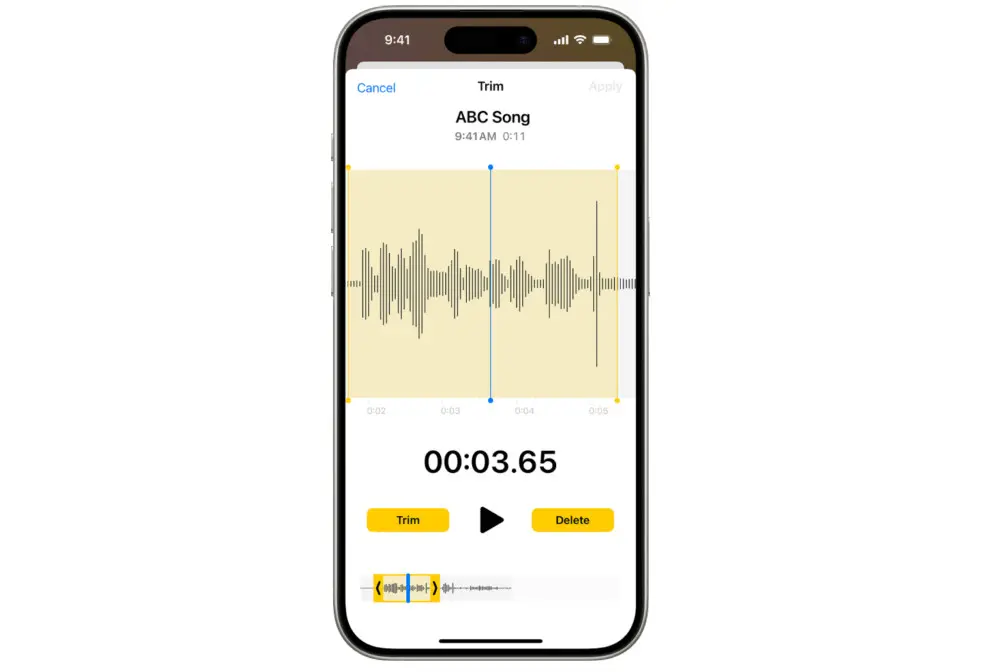
Step 6. Next, tap ‘Apply’> ‘Done’.
Step 7. At last, you can tap ‘Save Recording’ to overwrite the original recording, or tap ‘Save as New Recording’ to save the edited version as a new recording without affecting the original one.
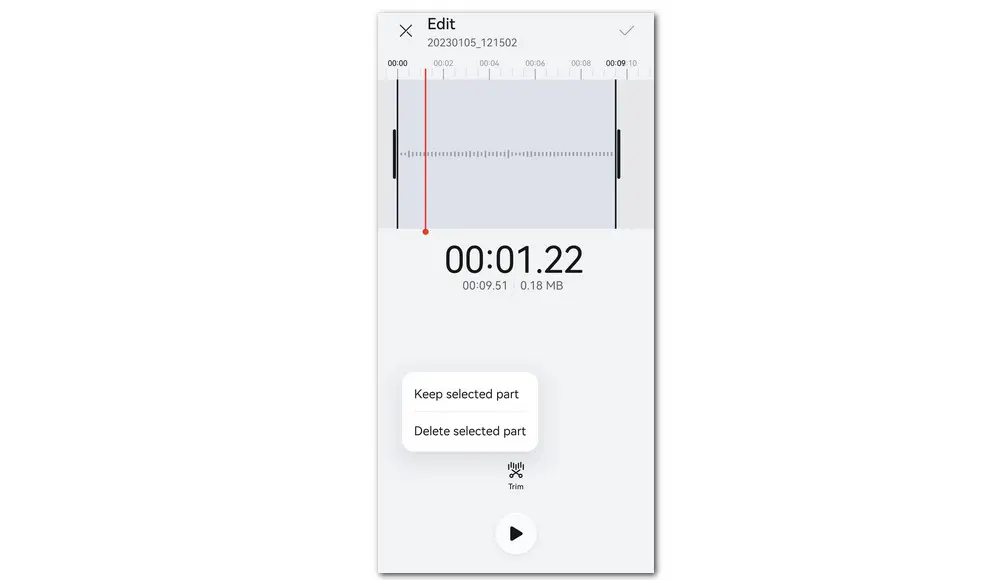
Almost all phones have a built-in audio recording app, and Android is no exception. Though the layout and quality may vary depending on the model and the version you’re using, they generally come with other basic functions, such as turning audio into text or trimming.
Next, let’s see how to trim audio recording in Android:
Step 1. Open the default recorder on your Android phone. Select the file you want to edit.
Step 2. Below the audio file, you can choose to convert your audio recording to text. You can also choose to cut out the unwanted part.
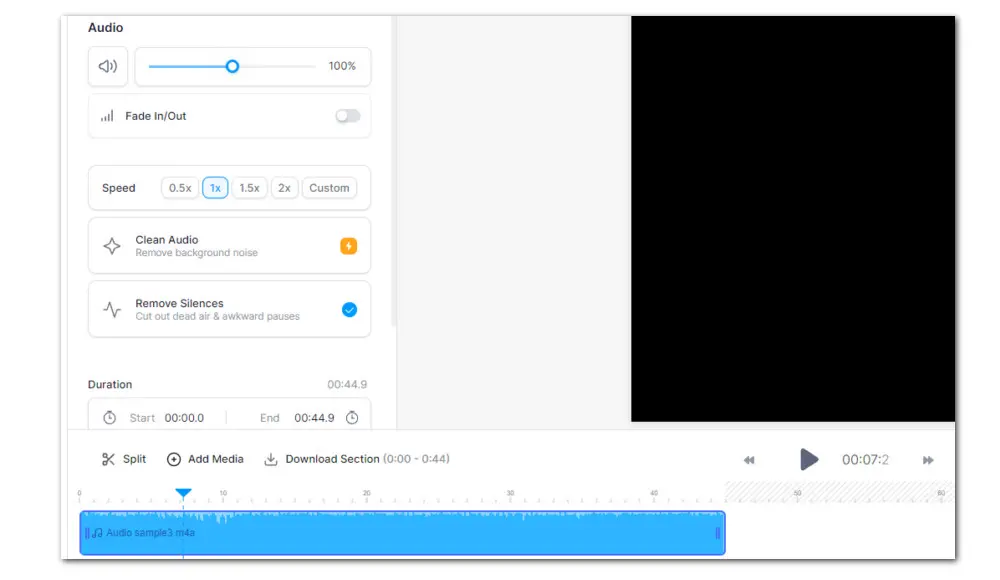
Of course, you can use an online audio editor if you don’t want to download any software onto your device. No need to worry about compatibility issues. There are many web-based audio editors available over the internet. For example, veed.io. It is accessible from Windows, Mac, Linux, and all mobile devices. You can edit your audio—split, trim, and rearrange audio clips—in only a few clicks.
Follow the instructions below:
Step 1. Visit https://www.veed.io/tools/audio-editor. Then click on or press the Choose Audio button on your screen.
Step 2. Then upload your audio recording by hitting the Upload a File. Or, you can drag and drop your files into it.
Step 3. Hit the editing tool above the timeline. You can split, add video track, fade in and fade out, etc. After that, click on the Export button to get the edited audio file.
That’s all I want to share with you how to edit audio recordings on various devices. No matter what device you’re using, whether it is a Windows laptop or an iPhone, I sincerely hope this post can be helpful. Thanks for reading till the end. Have a nice day!
Privacy Policy | Copyright © 2009-2026 WonderFox Soft, Inc.All Rights Reserved
