Audio trimming skills are increasingly important these days, as in many cases, you need to trim an audio file, such as deleting the beginning or the end parts of a voice recording, cutting an audiobook by chapters, shortening the length of a music file, etc. The good news is that it’s not difficult to master audio trimming, as long as you know what tool to use.
Below, we’ll show you 5 free and simple ways to trim an audio file on Windows 10, and you’ll become skilled in trimming any audio by the end of this article. Let’s start!
Tip: Want to try the best tool to trim audio? Here’s the download link to the best free audio trimmer: https://www.videoconverterfactory.com/download/hd-video-converter.exe hd-video-converter.exe
| Best for | Tutorial | |
|---|---|---|
| WonderFox Free HD Video Converter Factory | Quickly trim unwanted parts and cut clips from any audio format and export with high-quality |
|
| Windows Media Player | Losslessly trim audio files with the SolveigMM WMP Trimmer Plugin installed |
|
| Audacity | Edit and trim audio with advanced controls |
|
| VLC | Trim to keep only the desired audio by recording |
|
| Clipchamp | Trim, cut, and merge audio seamlessly |
The easiest way to trim audio files on Windows 10 is to use a program designed specifically for this purpose.
WonderFox Free HD Video Converter Factory is one such program. Although versatile, it offers a simple audio trimmer that allows you to quickly trim unnecessary parts of the audio, shorten the length, and cut clips from the audio file by dragging the trimmer to any desired point you want to keep. It supports almost all audios and offers popular output options, including MP3, WAV, iPhone, Android, and more. At the same time, it keeps the audio resolution as high as possible.
The program is completely free and you can download download it right now to try it out:
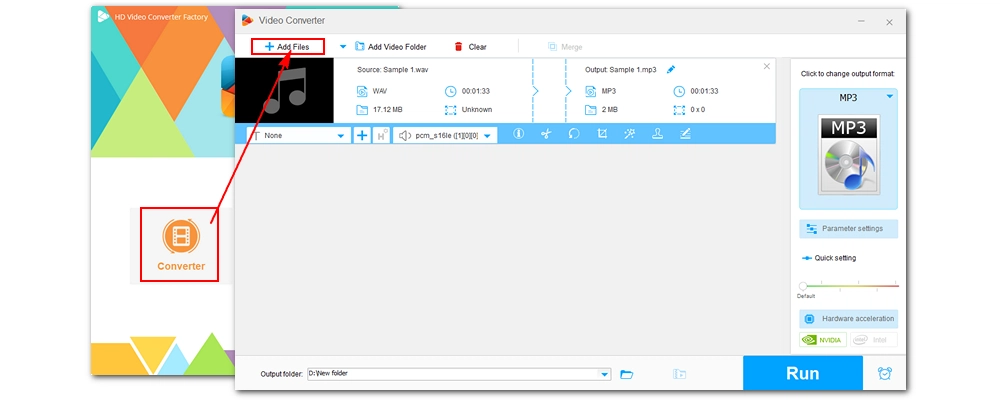
Launch WonderFox Free HD Video Converter Factory and enter the Converter module. Next, click the Add Files button in the upper left corner to import an audio file into the converter. You can also drag and drop the file directly into the program.
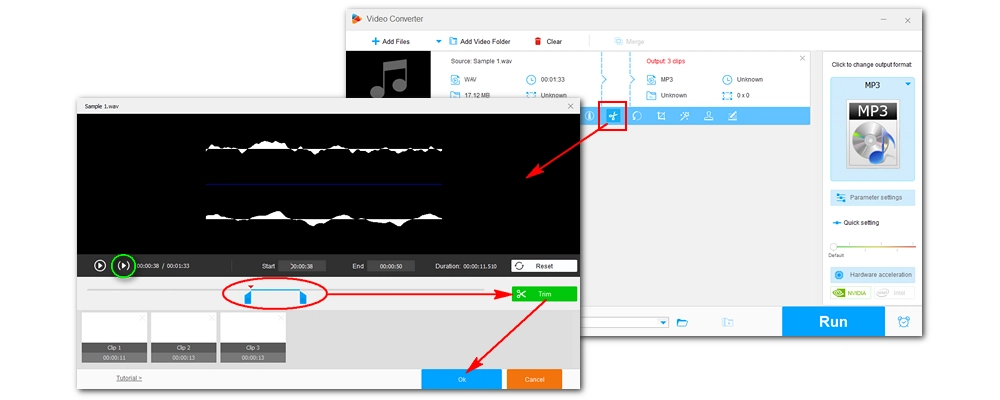
In the editing toolbar, click the Trim button (scissors icon) to open the Trim window. Then, drag the sliders on both sides to select the desired part and click Trim to create an audio clip. Alternatively, you can enter the exact start and end time of the audio clip to cut the audio precisely. You can repeat this step to split the audio into multiple clips. When you are happy with the results, click OK to save the changes.
Tip: Click the Play button to listen to the selected section.
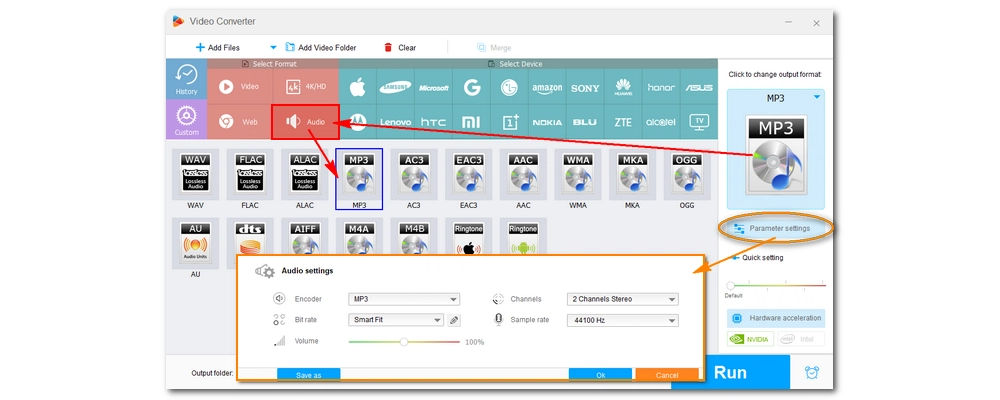
Open the output format list on the right and click the Audio tab to select the desired output format. You can also browse the Device categories to export audio to your device.
For advanced users, you can open the Parameter settings and adjust the audio bitrate, codec, sample rate, channel, and volume as needed.
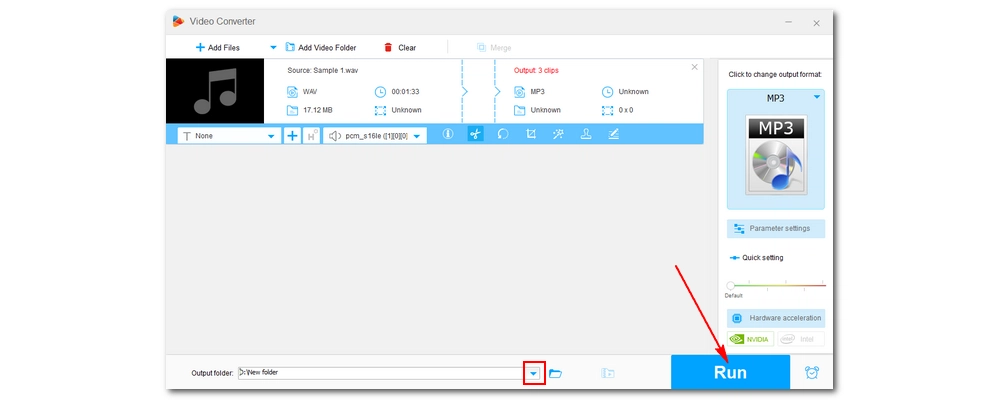
Click the down-pointing triangle icon at the bottom to set the output folder. Finally, click Run to export the trimmed audio file.
Watch this video to learn how to trim audio in Windows 10:
To the surprise of many Windows users, Windows Media Player is not only a media player program. With the help of the SolveigMM WMP Trimmer Plugin, it becomes a multimedia editor, which can also help you easily and losslessly cut audio files and delete unimportant parts.
It can cut WAV and MPEG audio (such as .mp1, .mp2, .mp3 and .mpa). Here is a simple tutorial on how to trim MP3 in Windows 10 using Windows Media Player.
NOTE: The SolveigMM WMP Trimmer Plugin offers a 21-day free trial and has a 10-minute output limit.
Step 1. Download the SolveigMM WMP Trimmer Plugin from https://www.solveigmm.com/en/products/wmp-trimmer-plugin/.
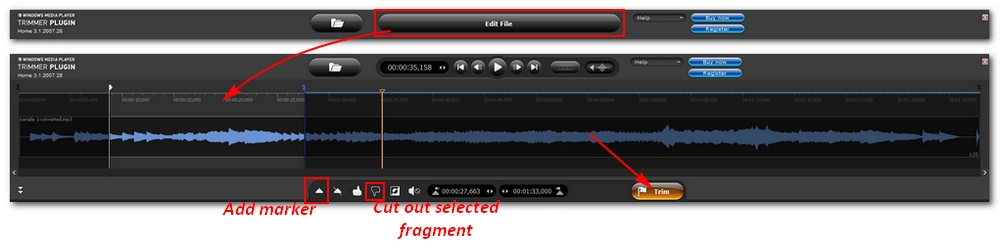
Step 2. Open Windows Media Player. You should see the plugin integrated into the player and appears at the bottom. Open an MP3 file in Windows Media Player and click Edit File.
Step 3. Drag the slider on the waveform to the beginning point of the audio part you want to save, and click Add marker in the lower left corner to set the start point. After that, set the and end point in the same way.
Step 4. Move the slider to the unwanted sections and click the thumbs down button to leave them out. The remaining highlighted portions are the desired audio portions.
Update: In the latest version, there is no thumbs down option, but a trim button will appear on the waveform. You can click the "Trim" button to remove the unwanted parts and keep the rest.
Step 5. Finally, click the Trim button to trim the audio file.
If you’re looking beyond just trimming the audio, Audacity may be the answer for you.
It’s a powerful open source audio recording and editing software, with tons of features that not only help you record audio but also edit audio files like a pro. With this tool, you can start by recording a voice recording and then trimming the file as you like. Additionally, it accepts editing local audio files, such as MP3, WAV, AIFF, OGG, FLAC, MP2, and more audio formats with ffmpeg installed.
Follow these steps to learn how to trim audio files in Windows 10 using Audacity:
Step 1. Download the latest version of Audacity from https://www.audacityteam.org/.
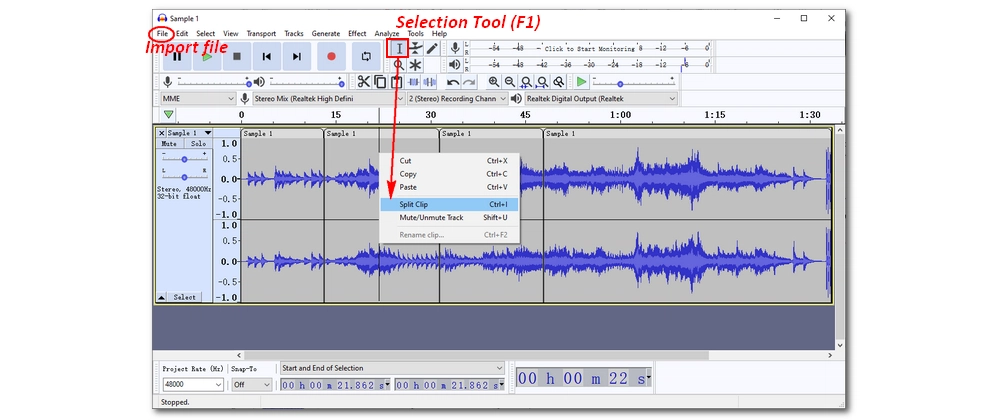
Step 2. On the top menu bar, click File > Open (hotkey “Ctrl + O”) to add an audio file. Alternatively, you can drop the file directly into the program.
Step 3. Enable the Selection Tool (F1) on the toolbar. Next, locate the start position of the wanted audio part on the waveform, then right-click on it and select Split Clip. Set the end position in the same way.
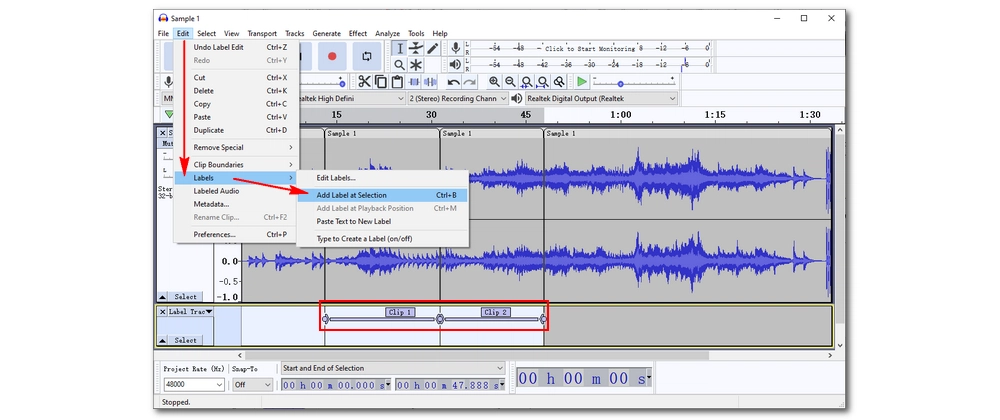
Step 4. Double-click to select the wanted clip and open Edit > Labels > Add Label at Selection (hotkey “Ctrl + B”). Name the clip.
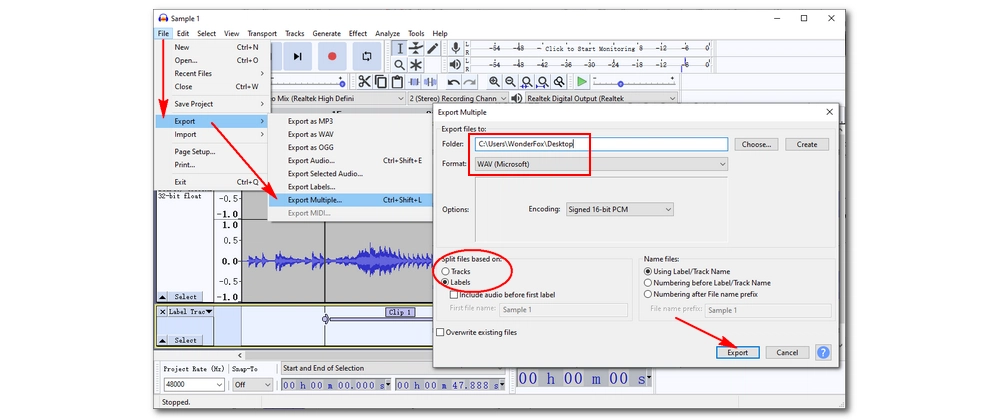
Step 5. Now, open File > Export > Export Multiple (hotkey “Ctrl + Shift + L”).
Step 6. In the Export Multiple window, first select the output folder and an output format. Then, make sure the split file is based on Labels. Click Export.
Step 7. Click OK to output the audio clips.
In addition to being a media player, VLC can be used for a variety of other media solutions, including audio editing. For example, it also allows you to cut the desired audio or video files through recording. Here's how to use it to trim audio in Windows 10:
Step 1. Open VLC. If you don't have VLC installed yet, get the latest version from https://www.videolan.org/.
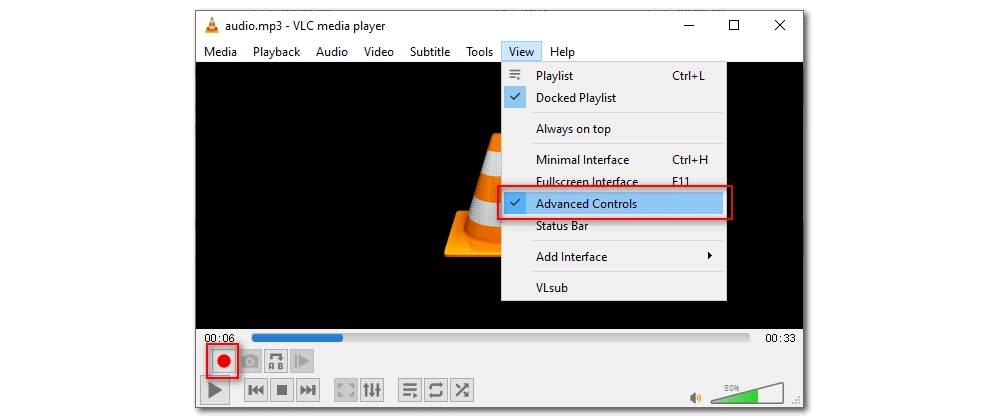
Step 2. Click View > Advanced Controls. You'll see a new row of recording controls appear above the row of playback controls.
Step 3. Play the audio file you want to trim in VLC, and when you reach the starting point you want to trim, click the Record button.
Step 4. Continue playing the audio until you reach the endpoint where you want the audio to stop and click the Record button again.
The trimmed audio clip will be automatically saved to the Music folder in your Windows 10 computer.
Clipchamp has now been acquired by Microsoft to replace the Video Editor app in Windows 11. However, you can still access the Clipchamp website to edit audio files in Windows 10. With it, you can quickly cut and join audio files as needed. To trim an audio file, just follow these steps:
Step 1. Open your browser and visit https://clipchamp.com/en/. Sign in to your Microsoft account.
Step 2. Click Create a new video.
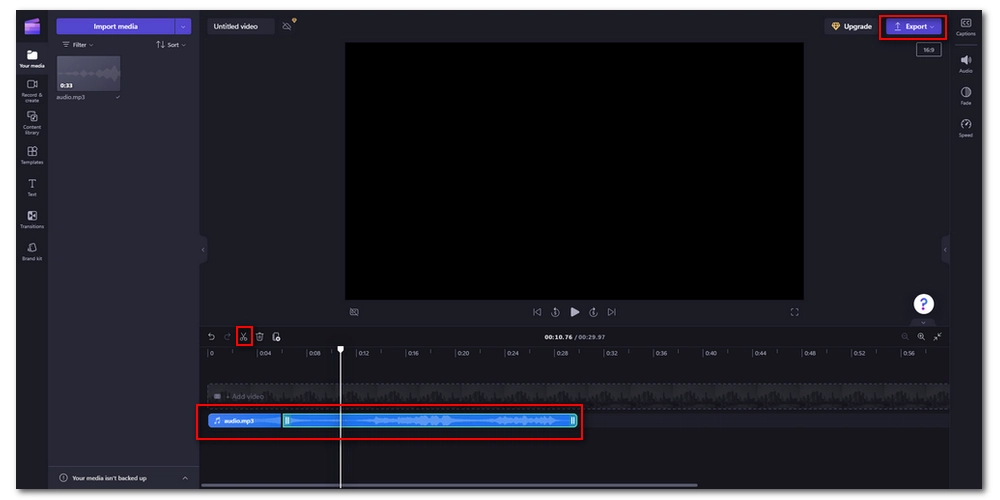
Step 3. Click Import media to upload the audio you want to edit. Or you can drag the audio directly onto the timeline.
Step 4. Move the slider to the starting point where you want to cut the audio and click Split (scissors). Cut the audio at the endpoint in the same way.
Step 5. Right-click on the unwanted section and select Delete. Don't forget to drag the audio track to the far left to avoid empty spaces.
Step 6. When you are happy with the results, click the Export button to export the final file.
Note: Clipchamp only supports exporting files as MP4 videos. You need an audio converter to convert them to audio files.
Among the five ways to trim audio files in Windows 10, for a beginner, it is recommended that you try the first method as it is the simplest and fastest program to crop any audio file [Quick download the software Quick download the software]. For advanced users, Audacity and VLC can handle more of your audio editing needs. However, if you don't trust third-party software, using Windows Media Player or Clipchamp is a better option.
That’s all I wanted to share about how to trim audio in Windows 10. I hope this article was helpful to you. Thanks for reading.
Audio trimming is the process of cutting out unwanted sections from an audio file, allowing you to keep only the parts you want. It's like trimming the edges of a picture to focus on the main subject.
Yes, Windows has several options for audio editing. While it doesn't come with a dedicated audio editor out of the box, you can use Windows Media Player with plugins to trim audio files. Also, starting with Windows 11, the built-in app Clipchamp can also work as an audio editor.
The best audio trimming tool depends on your needs and preferences. For beginners, WonderFox Free HD Video Converter Factory is recommended for its simplicity and ease of use. Advanced users might prefer Audacity or VLC for their extensive features and capabilities.
There are several methods to trim audio files on Windows 10. You can use WonderFox Free HD Video Converter Factory, Windows Media Player with the SolveigMM WMP Trimmer Plugin, Audacity, VLC, or Clipchamp. In this post, we’ve provides step-by-step guides on how to trim audio files using each of the programs. Hope you’ll find them helpful.

WonderFox DVD Ripper Pro
WonderFox DVD Ripper Pro is a professional DVD ripping program that can easily rip any DVD, be it homemade or commercial, to all popular formats including MP4, MKV, MP3, WAV, H264, H265, Android, iPhone, etc. without a hitch. It also lets you edit and compress DVD videos at high efficiency. Download it to enjoy fast and trouble-free DVD ripping experience.
Privacy Policy | Copyright © 2009-2026 WonderFox Soft, Inc.All Rights Reserved
