This article will introduce a simple screen recording cropper to easily crop a screen recording on Windows. After reading this article, you will know how to crop screen recorded videos to remove unwanted parts or change the aspect ratio for better sharing on social platforms. Please read for more details.
Tip: Download the screen recording cropper (watermark-free) to get started: https://www.videoconverterfactory.com/download/hd-video-converter-pro.exe hd-video-converter-pro.exe
WonderFox HD Video Converter Factory Pro is a feature-rich program with a handy and useful video cropper that can help you crop your screen recording video to any form you like. It can crop unwanted parts, such as black bars, from the recorded video as well as crop the video into square, landscape, portrait or any custom size. It can also convert screen recording to MP4 for widespread compatibility. As the cherry on top, it has no watermark and will output video in high quality.
Now, just free download free download this tool and see how to crop a screen recorded video below.
(Note: WonderFox HD Video Converter Factory Pro comes with a pratical screen recorder that can help you record your screen in the desired region. We will cover more details in the next part.)
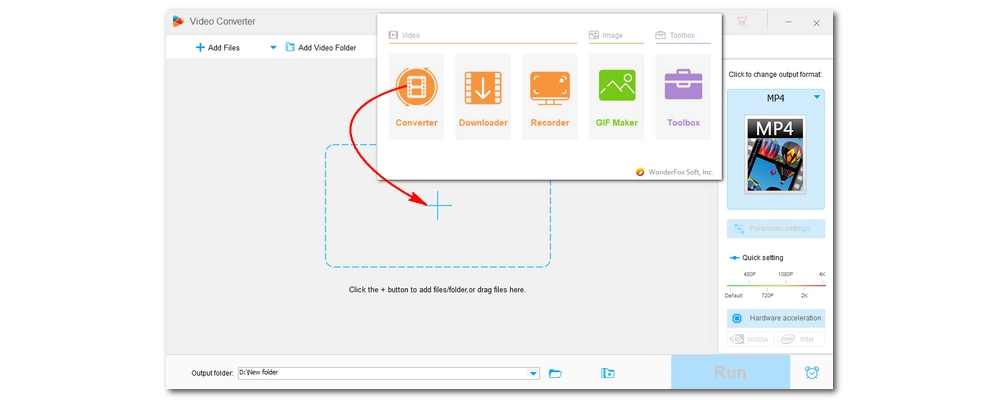
Launch WonderFox HD Video Converter Factory Pro and enter the Converter module. Click the center + button to import the screen recording into the program. You can also drag and drop the source file into the interface directly.
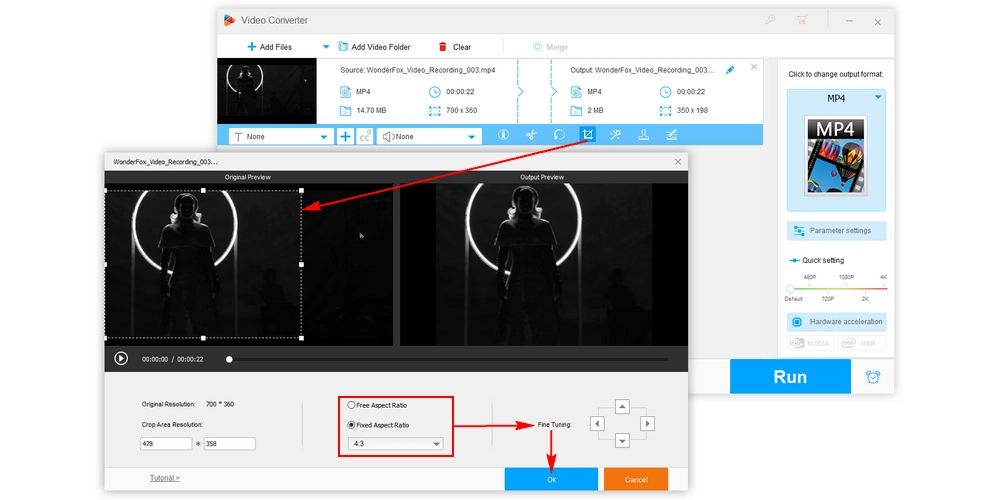
Go to the added video and click the middle Crop button to open the crop window. Then, customize the aspect ratio to remove the edges you don’t want. You can choose Free Aspect Ratio to crop only your desired area or use Fixed Aspect Ratio for a specific setting. You can also make use of Fine Tuning to adjust the area more accurately. When you finish the cropping, click OK to save the changes.
Tips. The program can also flexibly cut, splice, rotate, and add special effects to videos.
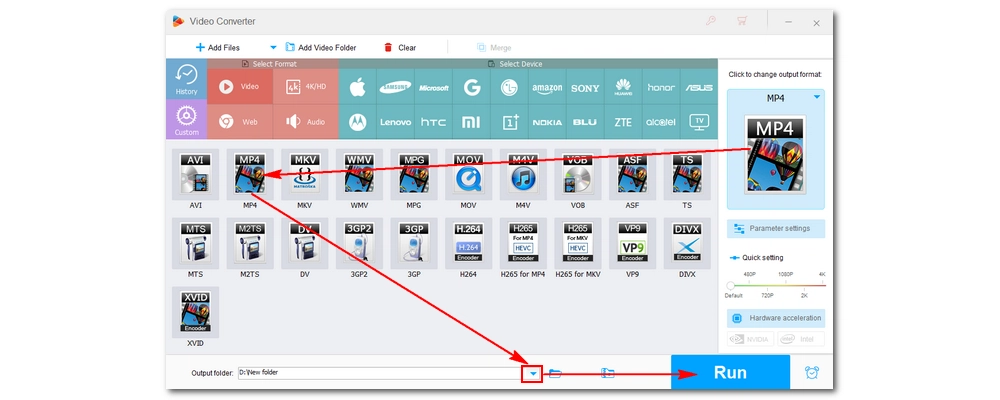
Now, click the right-side format image to choose an output profile. It supports 500+ formats and device presets. Finally, click the bottom ▼ button to set an output folder and hit Run to start outputting the cropped video.
If you don’t feel like cropping screen recording with a video editor, you can also try re-recording the screen in the area you want. As mentioned earlier, WonderFox HD Video Converter Factory Pro can also help you record screens with its built-in screen recorder. It can not only record a custom region on your screen but also capture the entire desktop in high quality. It’s pretty easy to use this screen recorder. Free download Free download the software and follow the instructions below.
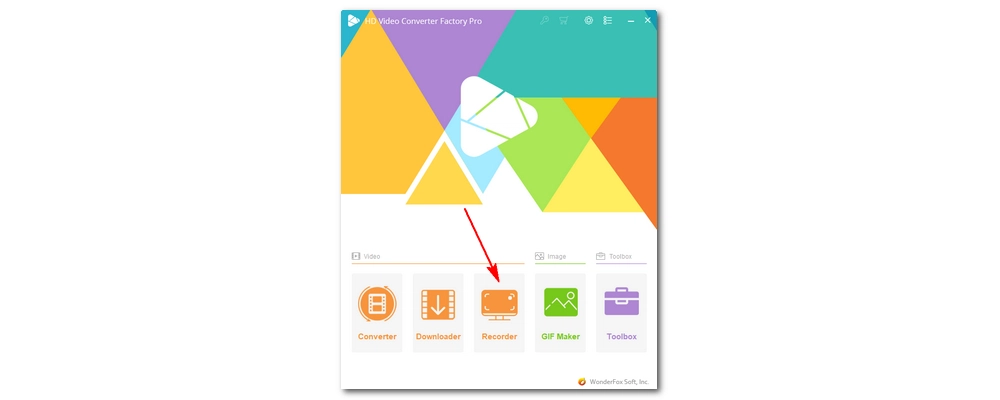
Run WonderFox HD Video Converter Factory Pro and select Recorder to open the screen recorder.
Click the left Custom mode and customize a region you want to record. After the area is selected, click OK and move to the next step.

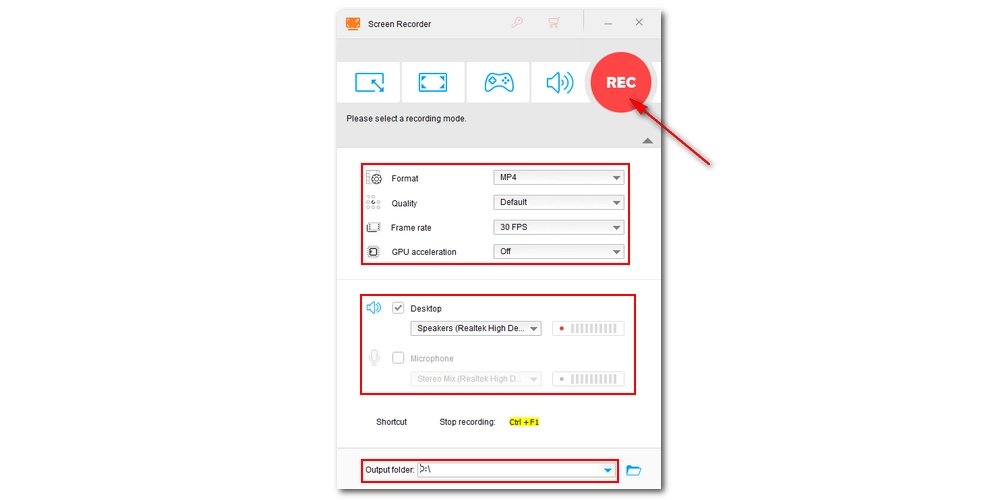
Now, click the bottom-right down arrow button to open the recording settings. Choose a recording format, quality, frame rate, and GPU acceleration based on your needs, or you can leave them as default. Next, check the “Desktop” audio source or “Microphone” or both to record video with audio. Then, set an output folder below.
Finally, click the “REC” button to start recording your wanted area. When you are done, press ‘Ctrl + F1’ on your keyboard to stop the recording. You can view the recorded video in the output folder you just set.
If you recorded some unwanted parts in your video, it's necessary to crop them to keep only what's important. Fortunately, you can use a video editor to effectively crop your recording or use a screen recorder to re-record your screen properly. Just follow the guide to crop screen recording on Windows.
That's all I want to share. I hope this article was helpful. Thanks for reading.

WonderFox DVD Ripper Pro
WonderFox DVD Ripper Pro offers the easiest and fastest way to rip DVD with original best quality. Meanwhile, it can also upscale DVD quality to HD to provide better visual experience. Get it to digitalize your DVDs to high-quality MP4, MKV, MPG, ISO, etc. now!
* Works with any DVD, be it homemade or commercial.
Privacy Policy | Copyright © 2009-2026 WonderFox Soft, Inc.All Rights Reserved
