

Want to save a great moment that just happened, or simply record a short clip from your PC screen? These are two slightly different tasks. Xbox Game Bar, NVIDIA ShadowPlay, AMD Software, and OBS can keep a replay buffer so you can save recent gameplay after it happens. WonderFox and Loom record from the moment you start them, which is better when you know what you want to capture. This guide covers both workflows and shows six practical ways to clip on a Windows PC.
Editor’s Pick: Easy all-in-one recorder and clip editor—record, trim, convert, and compress in one place https://www.videoconverterfactory.com/download/hd-video-converter-pro.exehttps://www.videoconverterfactory.com/download/hd-video-converter-pro.exe
 Kevincy | Updated on Aug 27, 2026
Table of Content
1. Xbox Game Bar: Save the Last 30 Seconds on Windows
2. NVIDIA ShadowPlay: Instant Replay for GeForce PCs
3. AMD Software: Instant Replay for Radeon PCs
4. WonderFox: Record and Trim a Short Clip
5. OBS: Save the Last 30 Seconds with Replay Buffer
Xbox Game Bar is the quickest built-in option for Windows 10/11 users who want to save a game or app moment that has already happened. Its background capture feature keeps a rolling buffer, so you can save the previous 30 seconds without manually starting a full recording first.
It can also record normally from the moment you press Record. However, Game Bar is designed around a single game or application window rather than unrestricted desktop capture.
Here are the steps to save the last 30 seconds on PC via Xbox Game Bar:
Step 1. Open Settings > Gaming > Captures and turn on Record what happened. On Windows 10, the same feature may appear as background recording. Keep the game or target app open before capturing.
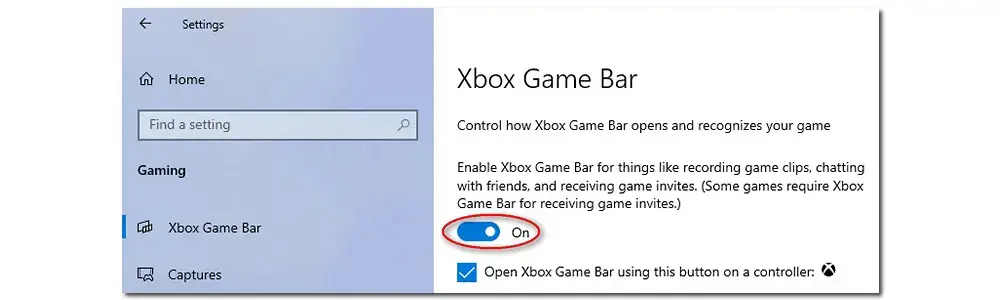
Step 2. Press Windows + G to open the Game Bar overlay.
Step 3. Find the Capture widget. If it is hidden, open it from the Widget Menu.
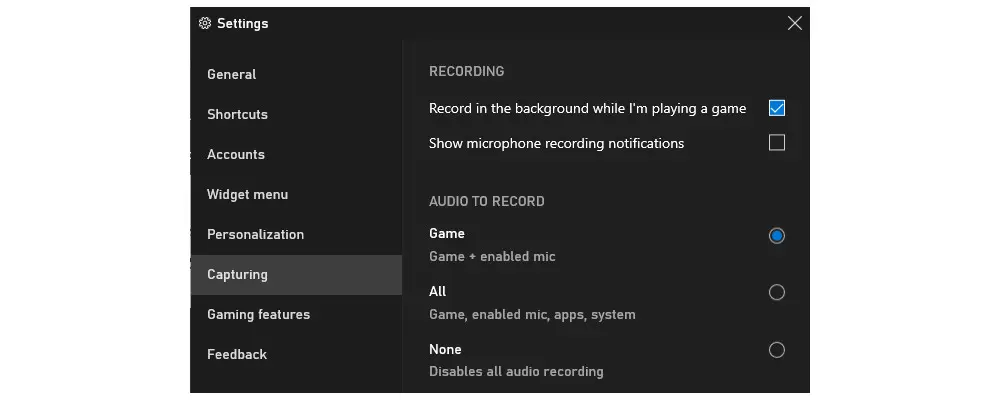
Step 4. Click Record last 30 seconds (also shown as Record what happened in newer Windows builds). If the button is greyed out, make sure background capture is enabled and that the current game or app supports Game Bar recording.
Step 5. For a faster workflow, press Windows + Alt + G immediately after the moment you want to keep. Windows saves the recent clip to your Captures folder.
Step 6. To record a new clip from now on instead, click the round recording button or press Windows + Alt + R. Press the shortcut again to stop.
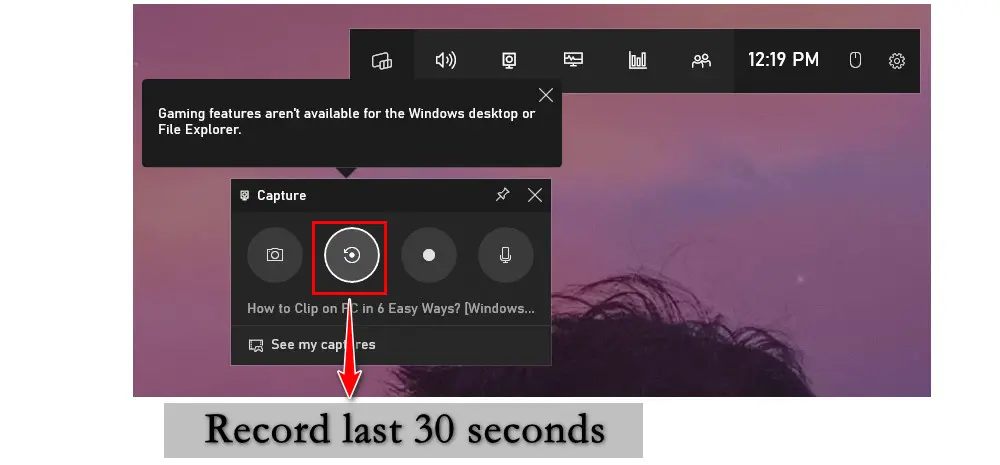
Game Bar can capture many non-game apps, too, but it does not record the Windows desktop or File Explorer and generally captures one application at a time. If you need unrestricted screen capture or more control over replay length and quality, use one of the alternatives below.
For PCs with a supported NVIDIA GPU, NVIDIA App includes ShadowPlay recording features such as Instant Replay, manual recording, screenshots, and Highlights. Available resolution, frame rate, codec, and HDR options depend on your GPU and driver.
Instant Replay works like a DVR buffer: leave it enabled while you play, then press a shortcut after something interesting happens to save the recent footage. This makes it a direct alternative to Game Bar for clipping the last 30 seconds or a longer custom interval.
Follow these steps to save recent gameplay with ShadowPlay:
Step 1. Install or open the current NVIDIA App, launch your game, and make sure the NVIDIA overlay/capture features are available for your system.
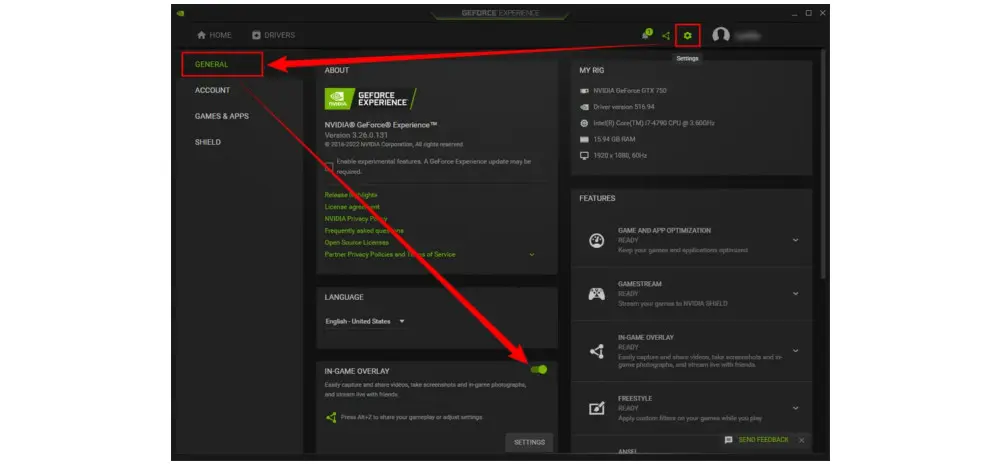
Step 2. Press Alt + Z to open the NVIDIA overlay.
Step 3. Turn on Instant Replay. Open Settings > Video Capture to adjust the replay length and available quality options. When the moment happens, press Alt + F10 to save the most recent buffered footage.
Step 4. For a normal clip that starts now, choose Record or press Alt + F9 to start and stop. In supported games, Highlights can automatically capture selected key moments.
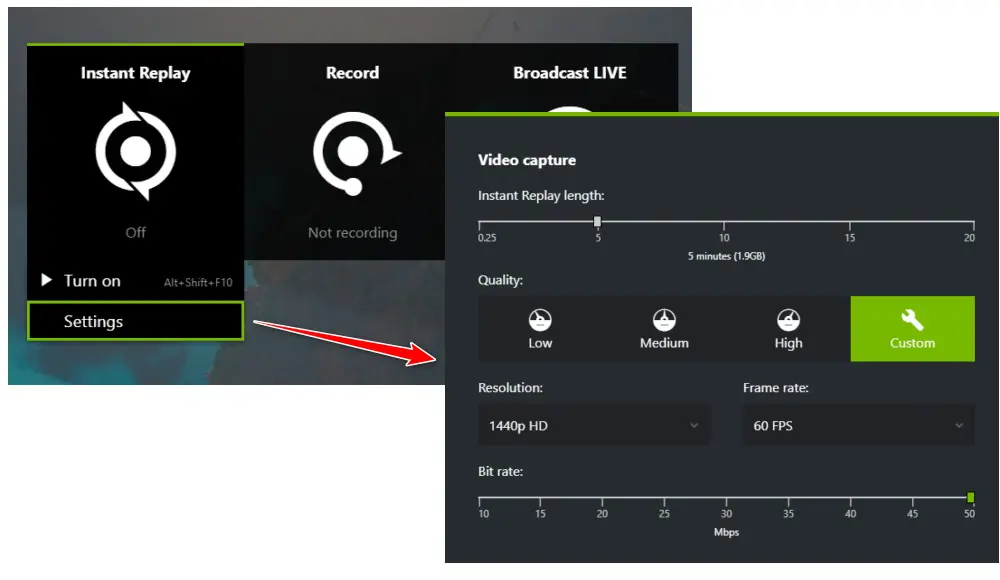
ShadowPlay requires a compatible NVIDIA GPU. GeForce Experience was the older entry point; current NVIDIA recording features are integrated into NVIDIA App. If you use an AMD GPU, the next method provides a similar Instant Replay workflow.
If your PC uses a supported AMD Radeon GPU, AMD Software: Adrenalin Edition provides recording and Instant Replay features similar to NVIDIA ShadowPlay. It can keep recent gameplay in a rolling buffer and save it only when you press the replay hotkey, which is useful for unexpected highlights.
Here is a simple AMD Instant Replay workflow:
Step 1. Open AMD Software: Adrenalin Edition. If recording options are missing, update AMD Software and make sure you installed the full package that includes capture features.
Step 2. Open Settings and find the Record & Stream or recording controls. Enable Instant Replay, then set the replay duration, quality, save folder, and other available options. Set the duration to 30 seconds if you want a quick highlight clip.
Step 3. Check or customize the Save Instant Replay hotkey. Keep Instant Replay running while you play.
Step 4. After the moment you want to keep, press the assigned replay hotkey. AMD Software saves the recent buffered segment. For a clip that starts from now, use its normal recording control instead.
Recording features depend on the Radeon hardware and software configuration, and protected content may not be capturable.
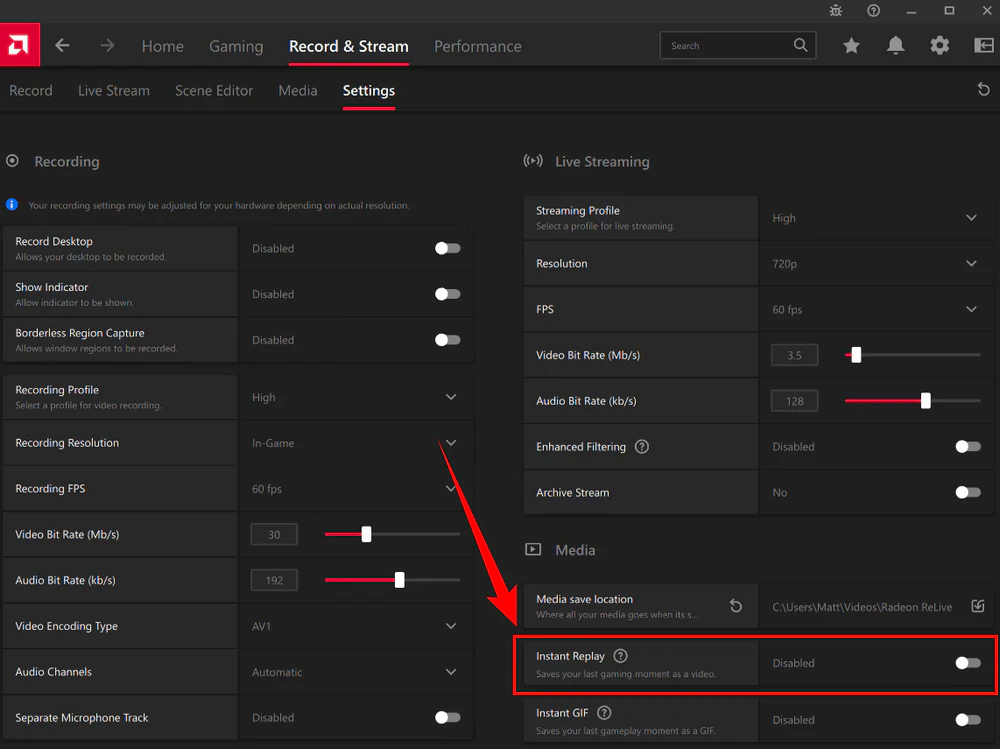
If you want an easy record-and-edit workflow, WonderFox HD Video Converter Factory Pro can capture games, applications, the full screen, a selected area, webcam-free tutorials, meetings, and audio on Windows. Unlike Game Bar, ShadowPlay, AMD Instant Replay, and OBS Replay Buffer, it does not retroactively save footage from before you press REC. Instead, you record from now and trim the result to the exact clip you need.
It provides Custom, Full-screen, Game, and Audio-only recording modes, along with format, quality, frame-rate, audio-source, and GPU-acceleration options. After recording, the built-in Converter can trim, split, crop, compress, and convert the clip without switching to a separate editor.
Here is how to record and make a short clip with HD Video Converter Factory Pro:
Step 1. Please download and install HD Video Converter Factory Pro on your PC first.
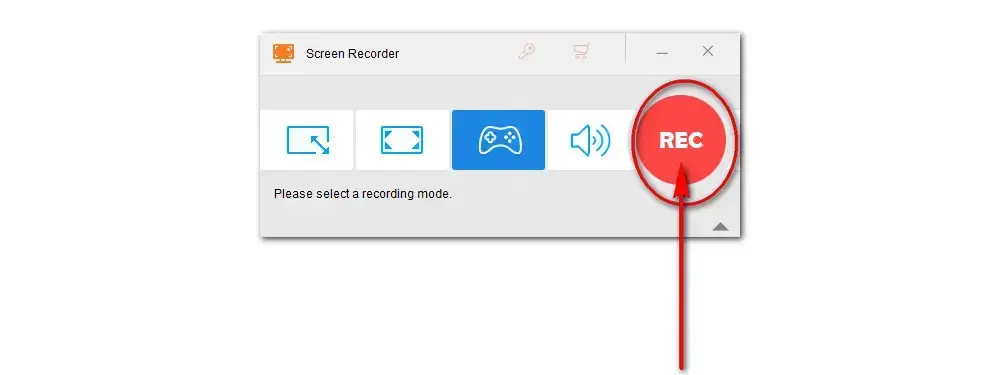
Then launch this video clipping software and open Recorder. Then choose a recording mode based on your needs.
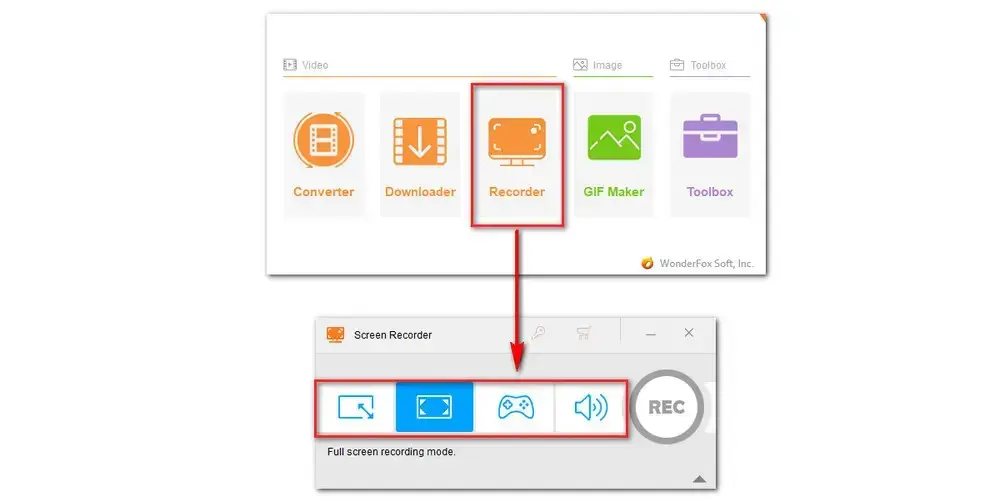
Step 2. Below the recording modes, you can choose a needed recording format (MP4/MKV/MOV/AVI), quality, and frame rate. If you have a powerful, stable GPU, switch on the hardware acceleration to allow a smoother recording experience.
Step 3. Then, check the audio source. You can choose to record from your Desktop or the Microphone, or both. Specify a new output folder for your recording.
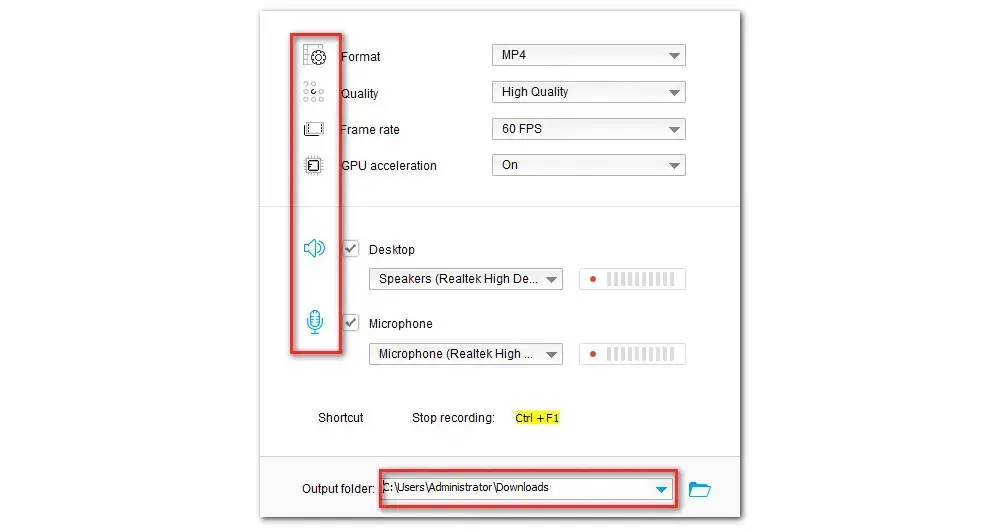
Step 4. Hit the big red REC to start recording after the countdown. When the target moment is over, click Stop or press Ctrl + F1.
WonderFox HD Video Converter Factory Pro puts no watermark and no preset recording-time limit on recordings. Once the recording is done, open the Converter, add the recording, and click the Scissors icon to set the start and end points. For an exact 30-second clip, trim the timeline to 00:00:30, click OK, choose an output format if needed, and press Run. You can also convert the recording to MP4 for easier sharing.
1. Record audio and video with no limit
2. Batch convert all a/v to 500+ presets
3. Compress/Trim/Split/Merge/Crop…
4. Download a/v from 1,000+ sites
Explore more practical features…
OBS Studio is a free, open-source recorder for Windows, macOS, and Linux. Besides normal recording and streaming, it has a Replay Buffer that can continuously keep the most recent footage in memory and save it only when you trigger a hotkey.
This makes OBS a genuine option for clipping the last 30 seconds after the action happens. It is more configurable than Game Bar, but setup is also more involved because you need to define sources, output settings, and replay hotkeys first.
Here is how to save the last 30 seconds with OBS Replay Buffer:
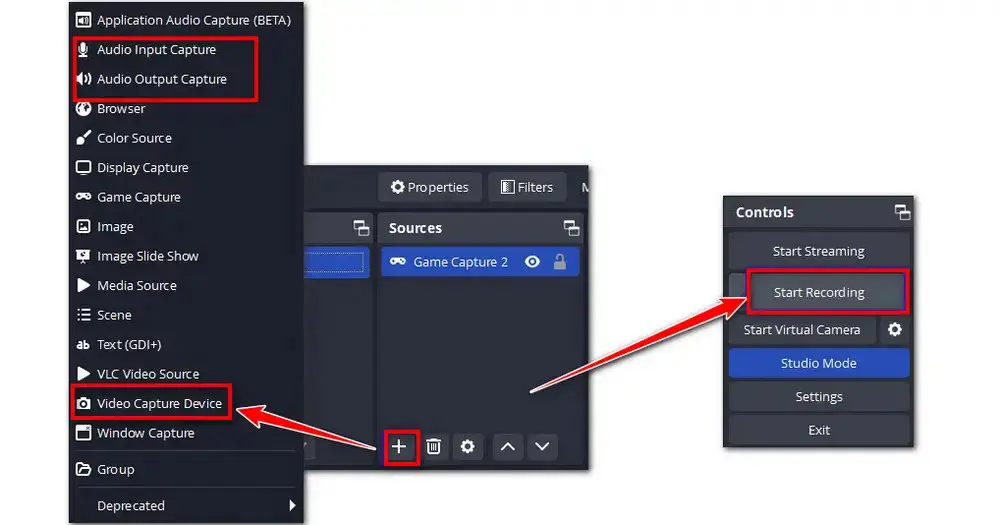
Step 1. Launch OBS Studio. In the Sources panel, add Game Capture, Window Capture, or Display Capture depending on what you want to clip. Add or confirm your desktop and microphone audio sources as needed.
Step 2. Open Settings > Output and enable Replay Buffer. Set the maximum replay time to 30 seconds if that is the clip length you want. You can also adjust the recording format, encoder, quality, and save path.
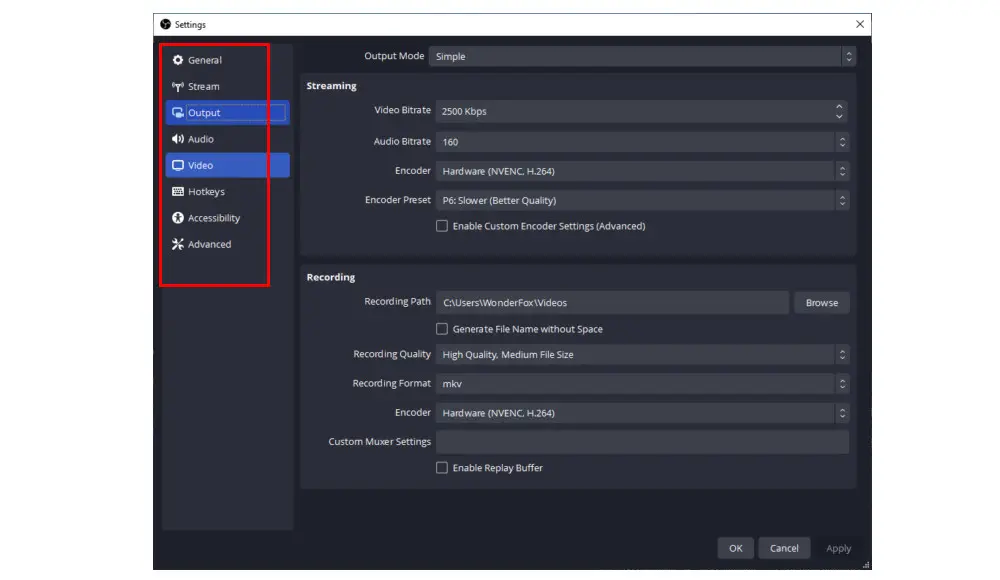
Step 3. Go to Settings > Hotkeys and assign convenient shortcuts for Start Replay Buffer and Save Replay. Click Apply > OK.
Step 4. Click Start Replay Buffer in the Controls panel before playing. OBS will keep a rolling segment in the background according to the replay time you set.
Step 5. When something worth keeping happens, press your Save Replay hotkey. OBS immediately writes the previous 30 seconds to a video file. If you want a normal clip that starts now, use Start Recording instead.
Tip: Replay Buffer uses system memory and encoding resources while it is active, so lower the output resolution, frame rate, or bitrate if your game performance drops.
If you only need to record a short browser or desktop clip from now on, a Chrome extension can be more convenient than a full desktop recorder. Browser recorders do not work like Instant Replay: they cannot recover the previous 30 seconds unless recording was already running. Loom is a simple example for quick screen-and-camera clips.
Loom is a popular Chrome screen recorder extension for recording the full screen, an application window, or a browser tab, with optional camera and microphone capture. It is designed for quick recording and sharing rather than retroactive gameplay clipping.
As of 2026, Loom’s free Starter plan allows up to 25 videos per person, with a 5-minute limit per screen recording and video quality up to 720p. More advanced editing and higher-quality recording depend on the paid plan.
Follow these steps to record a short clip with Loom:
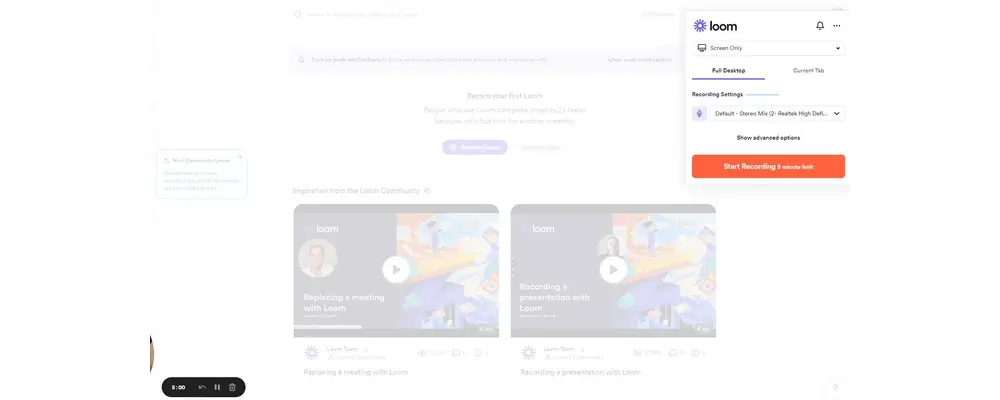
Step 1. Visit the Loom Chrome Web Store page and add the extension to Chrome.
Step 2. Open Loom from the Chrome toolbar and choose the available screen/camera recording mode that fits your task.
Step 3. Select the screen, window, or browser tab to share, then choose your camera and microphone options if needed.
Step 4. Click Start Recording. When the short clip is finished, stop the recording from Loom’s controls and use the generated share page or available editing options for your plan.
Q1. Can I clip the last 30 seconds after it already happened?
Yes, but a replay/background buffer must already be enabled. Xbox Game Bar, NVIDIA ShadowPlay, AMD Software, and OBS Replay Buffer can keep recent footage in the background and save it after the moment happens. WonderFox and Loom start recording only after you press Record.
Q2. How do I screen record with microphone audio on Windows?
Game Bar, NVIDIA ShadowPlay, AMD Software, WonderFox, OBS, and Loom can all include microphone audio when the mic source is enabled. If your voice is missing, check both the recorder’s audio settings and Windows microphone permission for that app.
Q3. How do I record audio only on Windows?
Windows Sound Recorder is suitable for microphone/input recording, but it is not a general system-audio recorder. For desktop sound, use the Audio-only mode in WonderFox, Audacity with a loopback/WASAPI setup, or another recorder that explicitly supports system audio. See also: How to Record Audio on Windows.
Q4. Is there a free PC screen recorder with no watermark and no preset time limit?
Yes. OBS Studio is free and open source, adds no watermark, supports regular recording, and includes Replay Buffer for recent clips. Xbox Game Bar is also free and simpler, but it has fewer capture and editing options.
This guide now covers six practical ways to clip on PC, including both instant-replay tools and normal record-from-now tools. The right choice depends mainly on whether the moment already happened and how much control you need.
For an unexpected gaming highlight, use Xbox Game Bar, NVIDIA ShadowPlay, AMD Instant Replay, or OBS Replay Buffer. For a planned recording that you want to trim, convert, compress, or edit afterward, WonderFox HD Video Converter Factory Pro offers an all-in-one solution to record, edit, and convert audio and video files.
Xbox Game Bar is the easiest built-in choice on Windows 10/11 for saving a recent game or app moment with minimal setup.
NVIDIA ShadowPlay and AMD Software are convenient if your PC already has the matching GPU. OBS is the most flexible free option and is especially useful when you want a configurable Replay Buffer.
WonderFox is better suited to planned recording plus post-editing, while Loom is convenient for short browser-based recordings and quick sharing. Neither is an instant-replay recorder, so start recording before the content you want to keep.
In short, use a replay buffer for moments you cannot predict and a normal recorder/editor for clips you can plan. Choose the workflow that matches how you actually capture videos on your PC.

Kevincy joined the WonderFox team in 2014 and has been a senior columnist ever since. With over two decades of experience in the video editing industry, he shares tutorials, tips, and how-to guides on video/audio processing and personal DVD backups. Family-oriented and passionate about helping others, he is dedicated to making video and audio processing easier for readers.


Kevincy joined the WonderFox team in 2014 and has been a senior columnist ever since. With over two decades of experience in the video editing industry, he shares tutorials, tips, and how-to guides on video/audio processing and personal DVD backups. Family-oriented and passionate about helping others, he is dedicated to making video and audio processing easier for readers.

WonderFox DVD Ripper Pro
1. Convert DVD to MP4, MKV, and other digital videos;
2. Rip audio files from DVD to MP3, WAV, FLAC, etc.
3. Bypass any kind of DVD copy protection;
4. 1:1 quick copy to ISO image and DVD folder;
5. Cut, rotate, add subtitles, add effects, and more...
* This software is designed for personal fair use only.

Privacy Policy | Copyright © 2009-2026 WonderFox Soft, Inc. All Rights Reserved