If you are new to Premiere Pro and want to know the steps of subtitling in Premiere Pro, you’re in the right place. In this guide, we’ll run through how to add subtitles in Premiere Pro step by step. Plus, we also get you an easier alternative to add subtitles more quickly. Check it out now!
If you’ve struggled to search for a beginner guide on how to add subtitles to a video in Premiere Pro, you’re in for a treat. In the following part, we’ll walk you through how to add subtitles in Premiere Pro step by step.
Premiere Pro offers various ways to add subtitles to a video. You can import a .srt caption file, use the Speech-to-Text feature to auto-transcribe your video or add captions manually.
To do captions in Premiere Pro, you need first to add your video to the software.
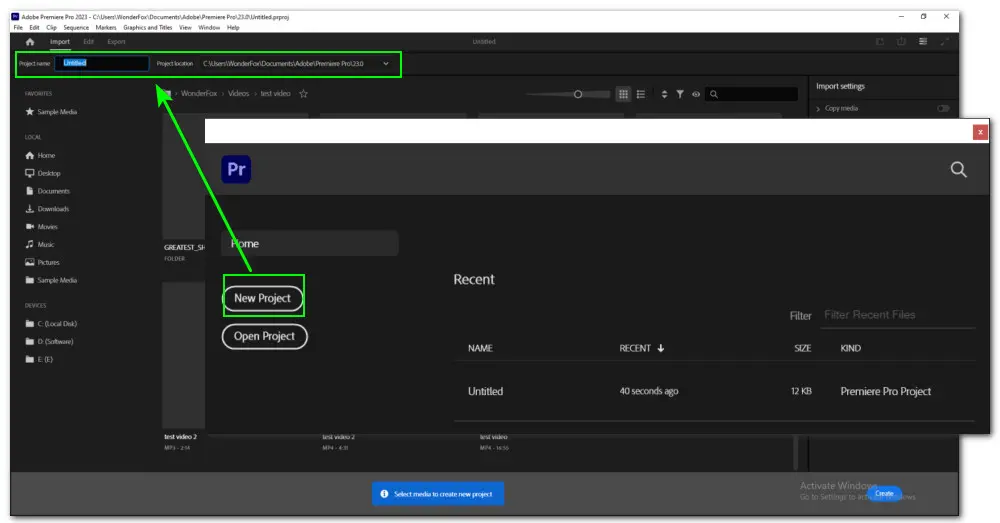
• Open Premiere Pro and click New Project. It will bring you to the new project box. On the upper-left of the window, you can set a new project name and location.
• Then click the folder on the left panel to locate your source video. Then select one or more files and click on the Create button.
Now, you can see the video you want to work with displayed in the project panel below. Next, let’s take a closer look at how to put subtitles in Premiere Pro using the 3 methods:
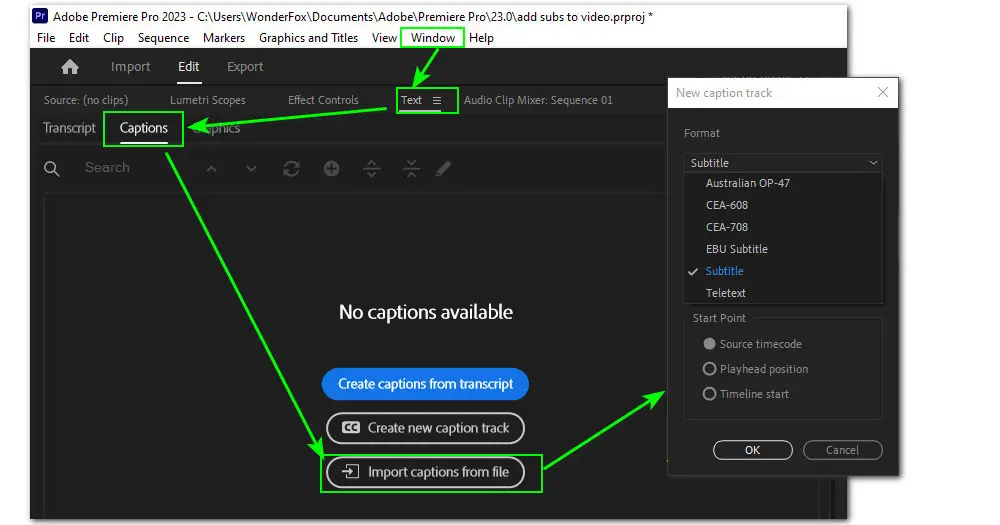
Premiere Pro supports .srt caption files. You can use a subs generator to create them. Then
• On the toolbar, go to Window > Text.
• Then click on Captions and choose Import captions from file to find the downloaded .srt file.
• Select the caption file and hit Open to import it into Premiere Pro.
• In the New caption track box, choose a preferred subtitle Format and Start Point. Hit OK to confirm.
Voilà, the caption track is on the timeline now! Here are a few options to let you change its position and font, and even correct its content.
Captions are a powerful way to add value to your video. That’s why many vloggers who want to get more engagement with their audience also use Premiere Pro to add attractive subtitles to their videos. For those self-made video content, this professional video editor has the ability to let users write captions by hand.
Next, we’ll run through how to add subtitles in Adobe Premiere Pro manually:
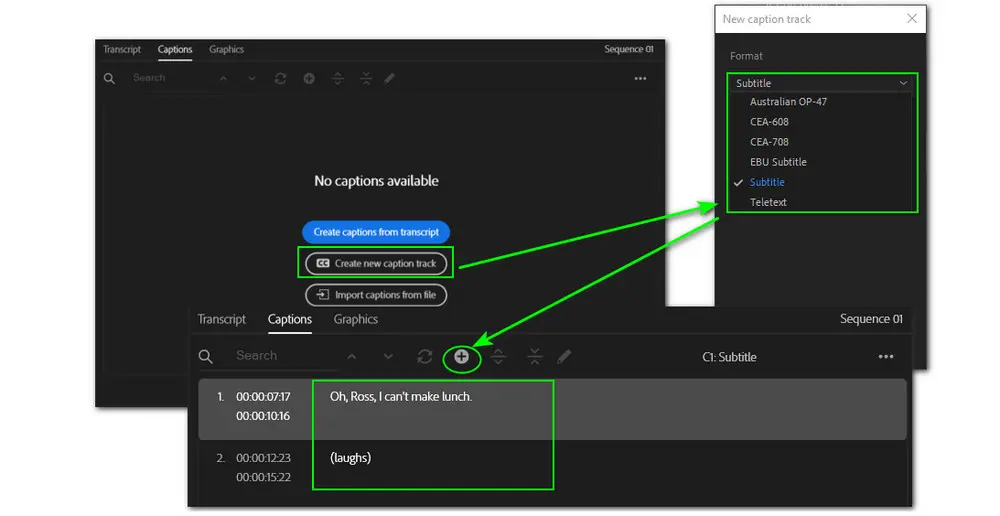
• Navigate to upper menu bar and click Window. Then scroll down to find the Text option.
• Head over to the Captions tab and click Create new caption track.
• It will bring up a new window to make you choose a track Format and Style that you prefer. Don’t forget to hit OK.
• Back in the timeline panel, a new Subtitle track will appear above the video track.
• Move the blue playhead to the point where you want to add subtitles.
• On the left-side Caption panel, hit the + icon to create a new caption. Then manually caption your video while playing it.
• You can edit the caption to make it fully sync with your video.
Adobe Premiere Pro also features speech-to-text tech. And working together with Method 2 enables you to caption hours of videos in a short time. All you need to do is to edit the auto-generated subs. Here are the detailed steps:
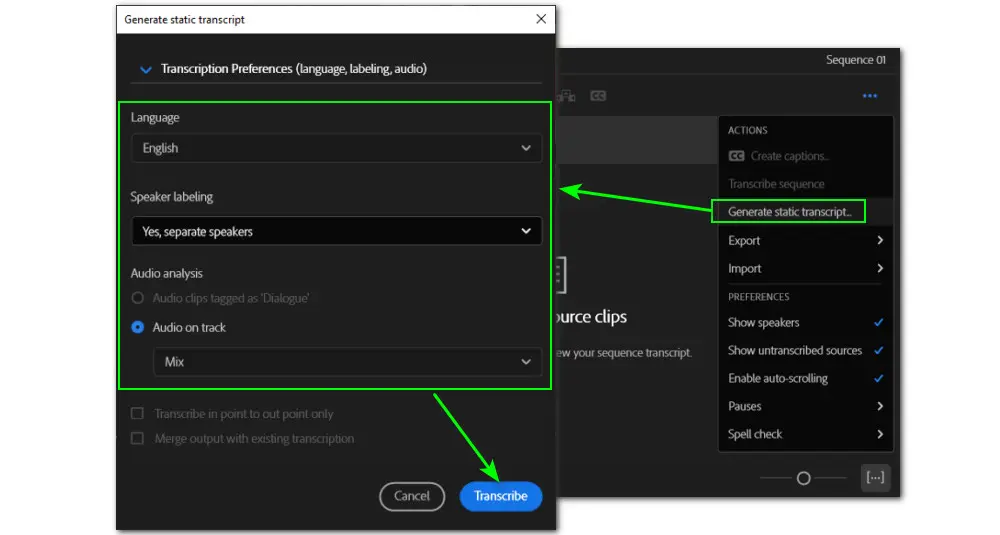
• Go to Window > Text.
• Under the Transcript tab, hit the three dots icon and select Generate static transcript.
Then you can set your transcription preferences. For example, if your video has several audio tracks, choose the needed speech track to transcribe.
• Next, hit Transcribe to start transcribing automatically.
This auto-transcription technology is far from perfect and therefore you need to further check and correct the mistakes in spelling, grammar, and sentence punctuation.
At last, go to the Export tab to configure the output settings for your resulting video file. You can check all settings in the Preview window.
Of course, after adding subtitles, you can continue to work with Premiere Pro and create a professional-look video by trimming, adding transitions, speeding up/slowing down, doing voiceovers, removing grain and noise, and many more.
But, if the ability to add subtitles for the ease of watching is the only function you care about most, Premiere Pro is not a prudent option. It is pricy. Additionally, many people have encountered video import failures in this software, such as:
>> Adobe Premiere Pro fails to import an AVI video file
>> Get an error message when importing MKV files to Premiere Pro
>> Premiere Pro only imports audio or only imports video
In such cases, you will need an easier and more economical program, for instance, WonderFox HD Video Converter Factory Pro, a top-quality conversion software along with a built-in feature for quick and easy captioning. Let’s dive into the details in the following part now!
Add hard/soft subtitles in clicks
Add multiple subs to MP4/MKV/MOV
Extract subtitles from a video
Download videos with subtitles
Featured with an intuitive interface, WonderFox HD Video Converter Factory Pro offers an easier and quicker way to add subtitles, making you enjoy foreign movies or TV shows with no hassle.
You can add hard-coded subtitles to any type of video or add multiple soft-coded subs to MKV, MP4, and MOV. The MKV video also supports graphic substiles like PGS and VobSub.
100% clean and easy to use! Free download Free download this watermark-free app and give it a shot now!
To add subs to your video, you need to get your subtitle files prepared in advance. If you haven’t got it ready, don’t worry! We have curated 16 fantastic subtitles sites to help you get free subtitles for your movies and TV shows.
Open HD Video Converter Factory Pro and enter the “Converter” module. Simply drag your video into the program or hit “+ Add Files” to load the file.
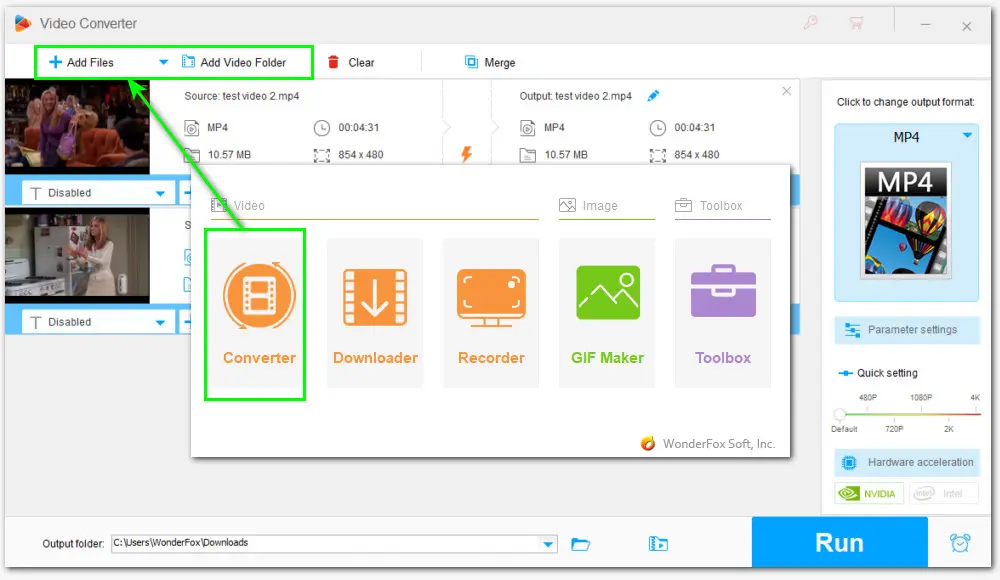
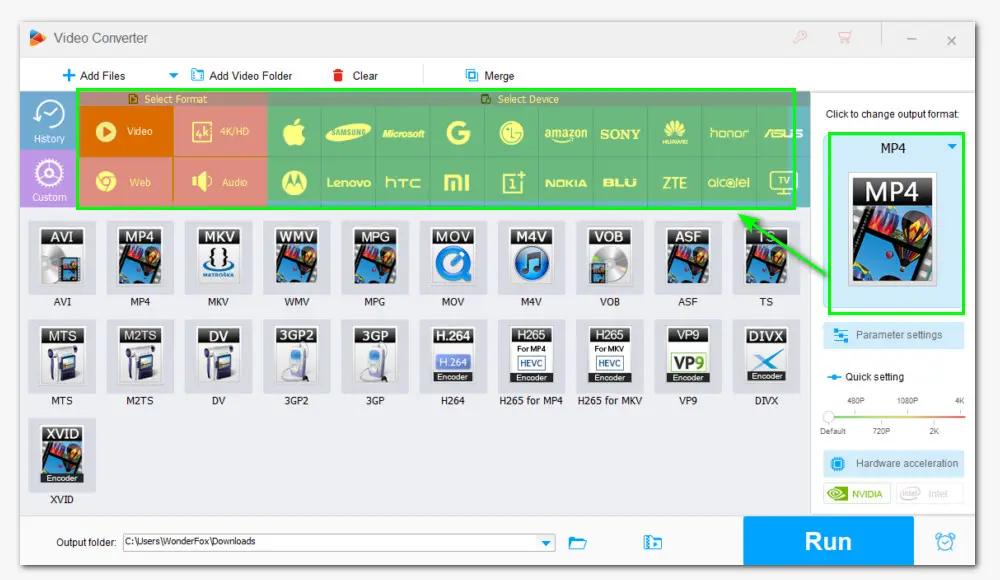
Click the right-side format profile to enter the output format library and choose a format that can be supported by your target player or device.
Also, you can directly choose the device you’re using from its built-in presets for TV, phone, and other tablets, saving you from the hassle of searching for the best video specifications for your device.
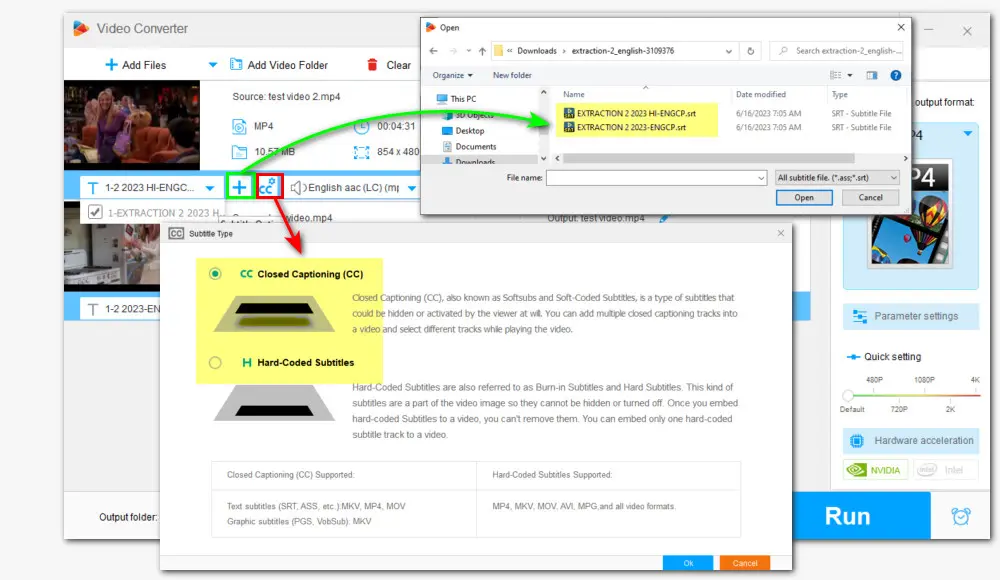
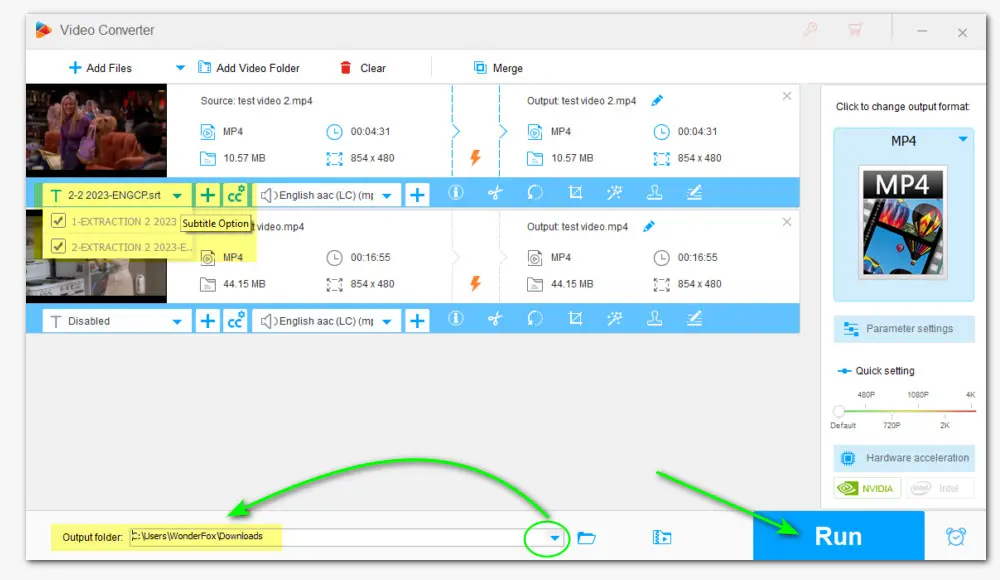
Next, click the plus sign icon beside the “Subtitle Option” box to import the needed subtitle file for your video. Then click the “CC” icon for Subtitle settings and choose to add either Closed Captioning or Hard-Coded Subtitles.
Tips: You can add multiple closed captioning (aka soft subs) to a video and choose to activate or hide it when watching the movie. While hard-coded subtitles are burnt into a video and you cannot turn it on/off or remove it.
Hit the triangle button in the Output folder box to set a file path. Then click “Run” to export videos with added subtitles.
This powerful program supports batch mode so you can process several videos in one go!
HD Video Converter Factory Pro is a full-featured program that also enables you to extract subs from videos, transcode to any format you need, do basic editing, screen record video with audio, enhance video quality, and download video or music from 1000+ sites.
That’s all about how to add subtitles in Premiere Pro and its alternative. Just follow the above steps and enjoy your movie without hassle now!
Privacy Policy | Copyright © 2009-2026 WonderFox Soft, Inc.All Rights Reserved
