

VLC Media Player is known for playing a wide range of media files without extra codec packs, but it can still run into trouble with a particular video, computer, or playback setting. If VLC refuses to open a video, plays only sound, shows a black screen, stutters, crashes, or reports a decoder error, use this guide to find the likely cause and fix it step by step.
 Kevincy | Aug 13, 2026
VLC includes support for most common media codecs, so a video extension alone usually does not explain a playback failure. A file ending in MP4, MKV, MOV, AVI, or another familiar extension is only a container; the video and audio streams inside may use different codecs, profiles, bit depths, frame rates, subtitle types, or other features.
In practice, VLC playback issues usually come from one of four places:
The fastest way to narrow it down is simple: play another known-good video in VLC, and open the problem file in another capable player. If all videos fail only in VLC, start with VLC settings. If only one file fails everywhere, inspect or replace the source file first.
VLC will not open the video at all: the file may be incomplete, damaged, protected, stored in an inaccessible location, or contain a stream VLC cannot decode correctly.
Audio plays but the video is black, green, or frozen: hardware decoding, the graphics driver, or VLC's video output module is often worth checking first. An unsupported or damaged video stream can cause the same symptom.
Video plays but there is no sound: confirm that VLC is not muted, select another audio track if the file contains several tracks, and check whether the audio stream itself can be decoded.
Playback is choppy, skips, or keeps buffering: the video may be too demanding for the current hardware path, the file may be on a slow drive or network share, or VLC may need a larger cache.
VLC freezes or crashes on one video: update VLC first. Then test hardware decoding and the source file. Crashes that happen with only one file often point to unusual or damaged media data rather than a general VLC failure.
Subtitles are missing or delayed: make sure the intended subtitle track is selected. For external subtitles, confirm that VLC can read the file and that the timing matches the video.
VLC reports an unidentified or unsupported codec: update VLC before installing anything else. VLC normally does not require third-party codec packs. If the stream still cannot be handled reliably, transcoding it to a more common codec is often cleaner than adding system-wide codec packs.
WonderFox HD Video Converter Factory Pro can transcode unusual or demanding video/audio streams to widely compatible formats and codecs, with batch conversion, parameter controls, and hardware acceleration on supported systems.
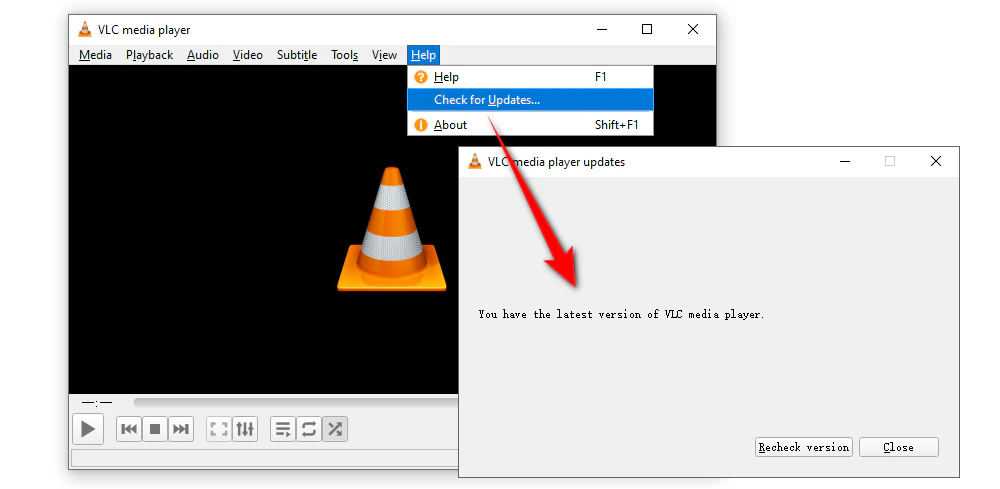
Start with the latest stable VLC release. An update can refresh decoders and fix playback, subtitle, output, crash, and security issues. In VLC for Windows, open Help > Check for Updates, or download the current version from the official VideoLAN website.
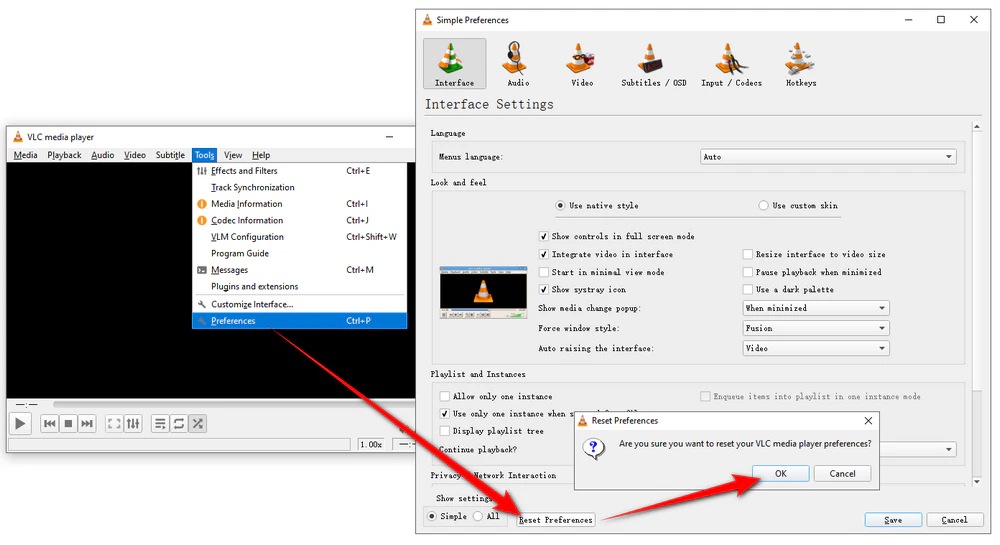
If the problem appeared after you changed settings, close VLC completely and reopen it. When several unrelated videos suddenly behave incorrectly, go to Tools > Preferences and use Reset Preferences. VLC will need to be restarted afterward.
Play a known-good video in VLC. Then try the problem file in another capable media player. This quick comparison tells you whether to focus on VLC or on the file itself. It also prevents unnecessary codec changes when the source is actually incomplete or corrupted.
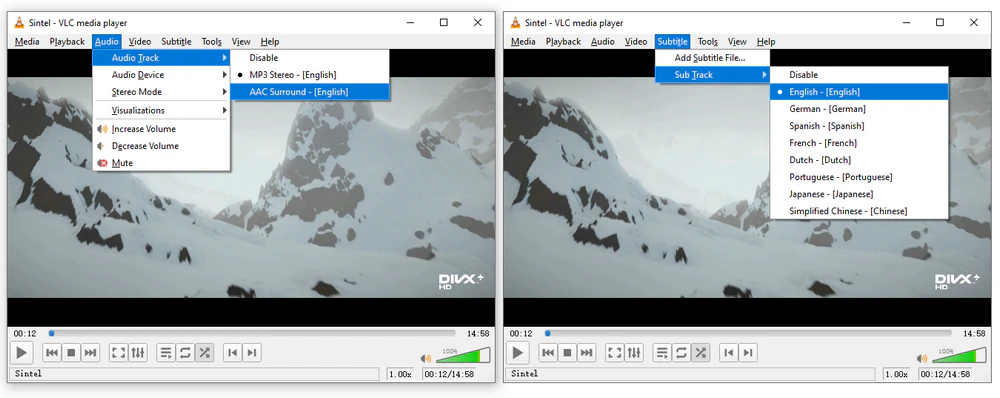
If you get picture but no sound, open the Audio menu and select another audio track when available. If subtitles do not appear, use the Subtitle menu to select the correct track or add the external subtitle file manually. A multi-track container may simply have the wrong stream selected.
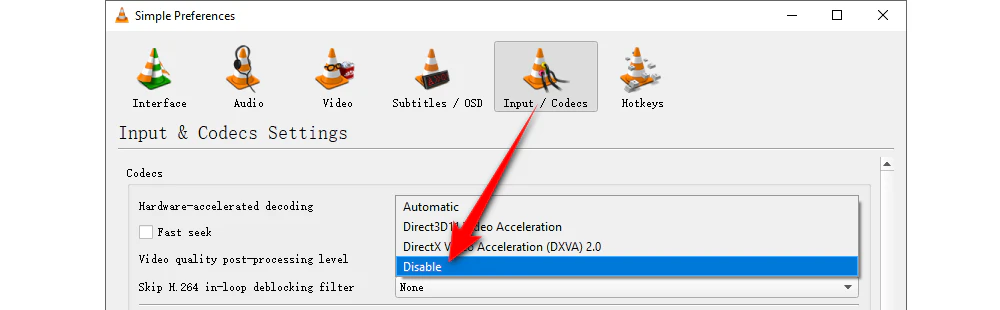
VLC can use the GPU to decode video, which normally reduces CPU load and helps with high-resolution playback. But a specific GPU, driver, or video stream may behave better in software decoding.
Open Tools > Preferences > Input / Codecs. Change Hardware-accelerated decoding from Automatic to Disable, save the setting, and restart VLC. If it makes no difference, you can switch it back to Automatic later.
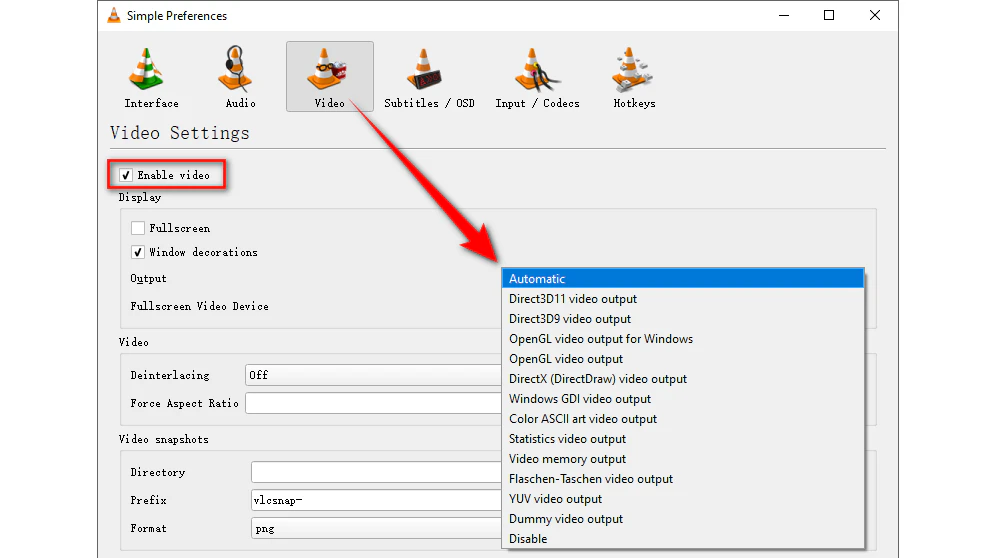
A black screen, frozen picture, odd colors, or a video window that does not render correctly can come from the output path rather than the media file itself. Go to Tools > Preferences > Video, keep Enable video checked, and try another option under Output. Save and restart VLC after each change.
Available output choices vary by operating system and VLC build, so there is no single module that is best for every computer. If the default output works normally with other videos, do not change it without a reason.
If the video pauses, skips, or buffers while playing from a USB drive, external disk, NAS, or network location, first copy it to a fast local drive and test again. If local playback is fine, storage or network throughput is likely involved.
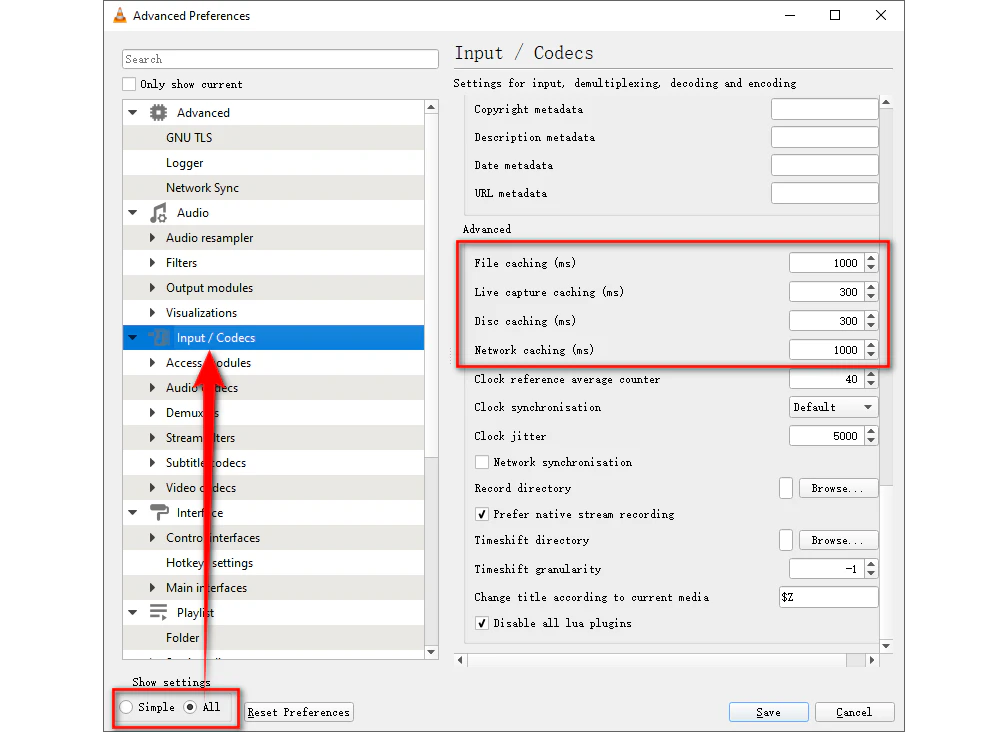
You can also open Tools > Preferences, select All under Show settings, and go to Input / Codecs > Advanced. Increasing the relevant file or network caching value can give VLC more data to work with before playback, but setting an unnecessarily large cache also increases delay when you seek or start a video.
If the same video also fails in other players, re-copy it from the original device or re-download it from the original source. Interrupted downloads, failed transfers, damaged storage, and incomplete screen/camera recordings can leave a file with missing or broken media data.
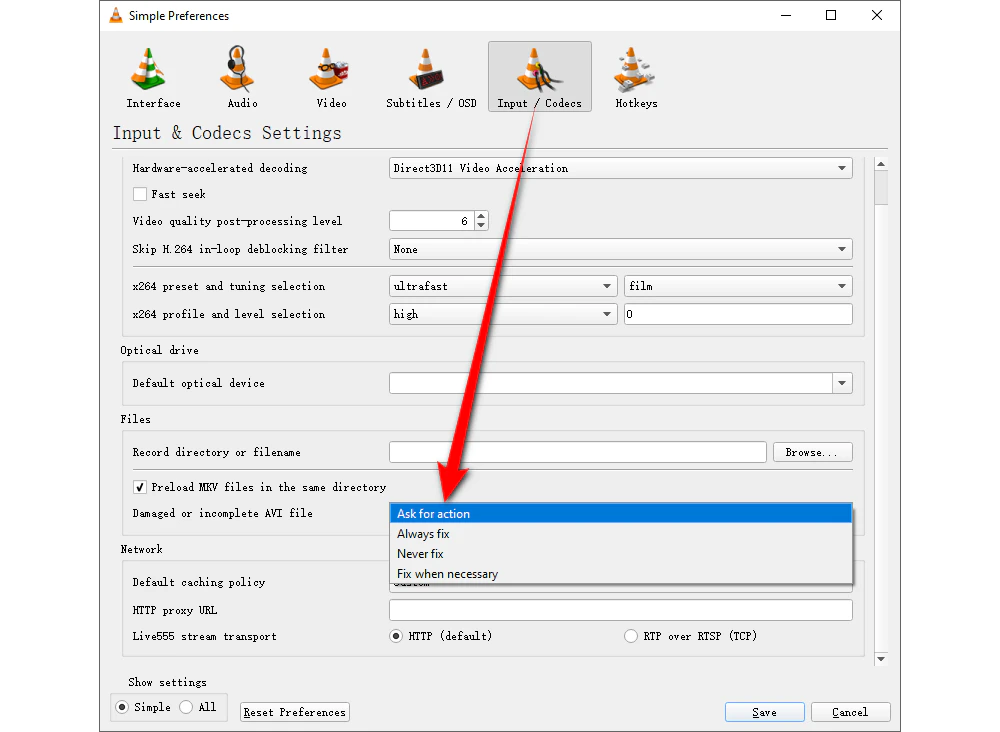
VLC has an option called Damaged or incomplete AVI file under Input / Codecs, but this is specifically for AVI index handling. It is not a general repair switch for MP4, MKV, MOV, or other containers. Severe corruption normally requires a valid replacement file or a dedicated repair workflow.
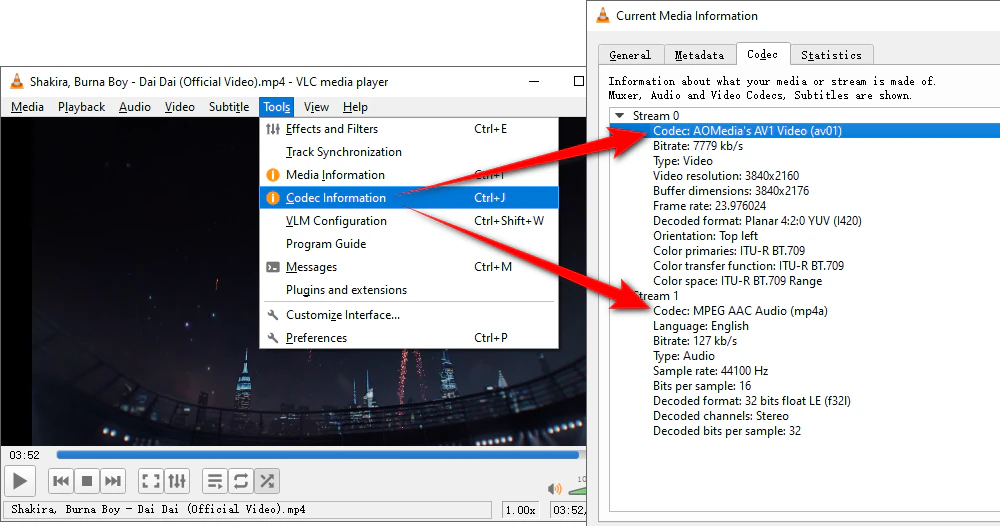
Do not judge compatibility only by the filename extension. In VLC, open Tools > Codec Information while the file is loaded to see the video codec, audio codec, resolution, frame rate, and other stream details. A familiar container can still hold an unusual codec or profile.
Installing a third-party codec pack should not be the first response to a VLC decoder error. VLC ships with support for most common codecs and normally does not need external codec packs. Updating VLC or converting the problem stream is a safer, more targeted approach.
Some protected or encrypted media is designed to play only in an authorized app or service. Changing VLC settings or normal transcoding will not make such content playable. Use the legitimate playback method provided with the media.
On the other hand, an unprotected video may simply be too demanding for the computer to decode smoothly. Very high resolution, bitrate, frame rate, 10-bit video, complex subtitles, or a difficult codec profile can expose hardware or driver limitations. In that case, converting to a lighter playback copy can help.
If VLC itself works but one or more videos still fail because of unusual codecs or demanding parameters, make a compatible playback copy instead of changing system-wide codec settings.
If the file is not DRM-protected and is readable enough to be decoded, transcoding can solve file-specific compatibility or performance problems. WonderFox HD Video Converter Factory Pro supports common video and audio formats, batch processing, hardware acceleration, and manual parameter changes.
For a general-purpose playback copy, H.264 video with AAC audio in MP4 is a safe starting point; you can also keep another container when your workflow requires it.
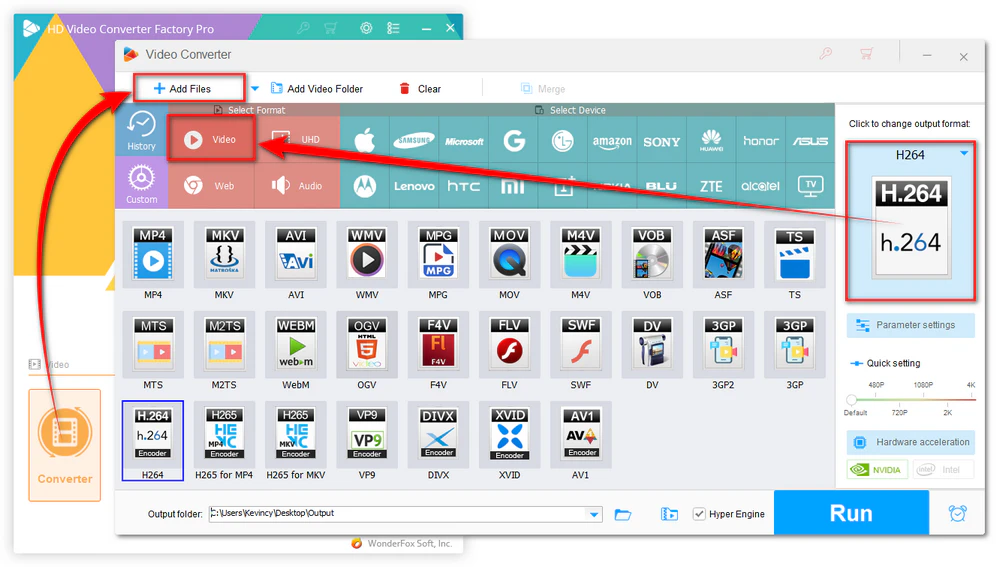
Step 1. Launch the program, open Converter, and click Add Files to load the video that VLC cannot play correctly.
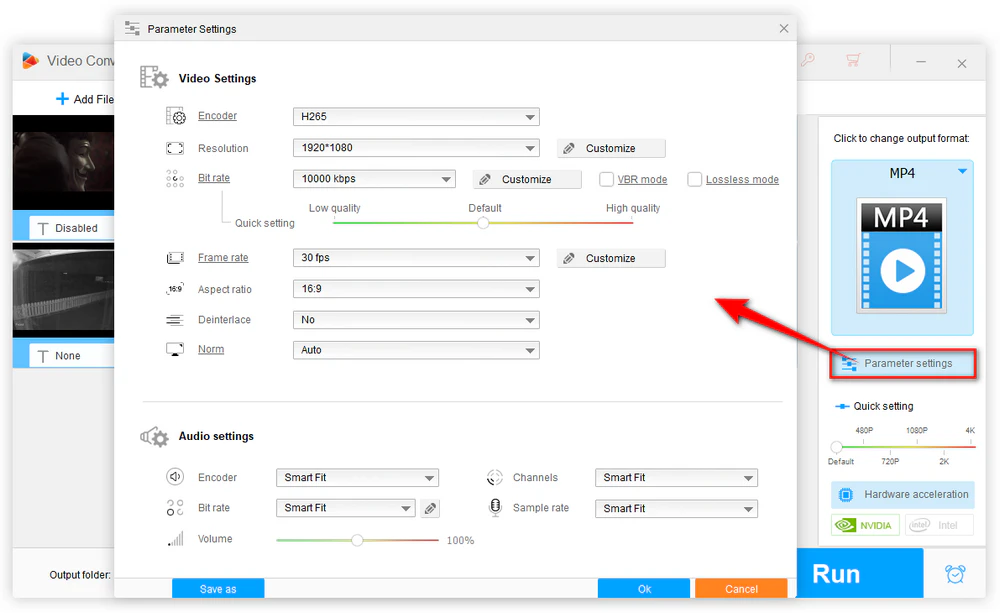
Step 2. Open the output format list. Choose a common video preset like H.264 or HEVC, or select an output container you want to keep and use Parameter settings to set a widely supported video/audio codec combination.
Step 3. Choose an output folder and click Run. When conversion finishes, open the new file in VLC and compare the result.
Optional. If the original video is too heavy for smooth playback, lower the bitrate, resolution, or frame rate only as much as necessary in Parameter settings. Keeping the source resolution and frame rate is better when performance is not the problem.
Note: Transcoding is useful for decodable files with compatibility or performance issues. It cannot reconstruct missing data from a severely corrupted file, and it is not a way to bypass DRM or access controls.
Start by disabling hardware-accelerated decoding and trying another video output module. If only one file has the problem, inspect its video codec and test the file in another player to rule out a damaged or unusual video stream.
A black screen is often related to the video output path, hardware decoding, or the graphics driver, but a damaged video stream can cause the same result. Try the VLC setting changes first, then test the source file elsewhere.
Usually, no. VLC includes support for most common codecs and is specifically designed to work without separate codec packs in normal use. Update VLC first. If a particular stream still causes trouble, converting that file is more targeted than installing a system-wide pack.
That usually points to the file rather than the player. The video may use an unusual codec/profile, be incomplete or damaged, contain problematic tracks, be protected, or simply require more decoding power than your current setup can provide.
It can help when the installation itself is damaged, but resetting VLC preferences is faster and should be tried first. If the same one file still fails after a clean VLC setup, focus on the source file or its codec/parameters.
VLC is still one of the most flexible media players, and most playback failures do not mean that a familiar file extension is inherently unsupported. Start by updating VLC and identifying whether the problem affects every video or only one. Then test hardware decoding, video output, and caching when the symptoms point to playback settings. If the source is damaged, incomplete, protected, or unusually encoded, deal with the file itself. And when a valid video is simply difficult for VLC or your computer to handle, creating a more compatible playback copy is often the cleanest solution.

Kevincy joined the WonderFox team in 2014 and has been a senior columnist ever since. With over two decades of experience in the video editing industry, he shares tutorials, tips, and how-to guides on video/audio processing and personal DVD backups. Family-oriented and passionate about helping others, he is dedicated to making video and audio processing easier for readers.


Kevincy joined the WonderFox team in 2014 and has been a senior columnist ever since. With over two decades of experience in the video editing industry, he shares tutorials, tips, and how-to guides on video/audio processing and personal DVD backups. Family-oriented and passionate about helping others, he is dedicated to making video and audio processing easier for readers.

WonderFox HD Video Converter Factory Pro
1. Convert video/audio to 500+ optimized presets.
2. Batch transcode unusual codecs for easier playback.
3. Adjust resolution, bitrate, frame rate, and codecs.
4. Compress large videos and process high-res files.
5. Trim, merge, crop, rotate, flip, and add subtitles.
6. Record screen, gameplay, webcam, and audio.
7. Download online media and use additional toolbox features.

Privacy Policy | Copyright © 2009-2026 WonderFox Soft, Inc. All Rights Reserved
