How to Enhance Video Quality and Sharpen Blurry Videos Easily
 Recommended by the authorRecommended by the author
 How to & Tips
 Convert Video

 by Kevincy
Updated on Jul 15, 2026
Want to make a soft, dark, low-resolution, or slightly blurry video look better? WonderFox HD Video Converter Factory Pro provides several practical options for Windows users. This guide explains when to use each method and how to get a cleaner result without over-processing the footage. Keep in mind that enhancement software can improve perceived clarity, but it cannot fully recreate detail that was never captured in a severely out-of-focus, motion-blurred, or heavily compressed source.
WonderFox HD Video Converter Factory Pro is an all-in-one Windows video processor with conversion and basic editing tools. For video enhancement, the most useful options are its Picture Enhancement technology, Sharpen filter, brightness/contrast/saturation/hue controls, deinterlacing support, and adjustable output settings such as resolution and bitrate. These tools can make slightly soft footage look crisper, improve a dark or flat-looking image, reduce interlacing artifacts, or upscale a video for a higher-resolution display. However, simply increasing resolution or bitrate does not restore missing source detail, and sharpening cannot completely fix severe focus blur or motion blur.


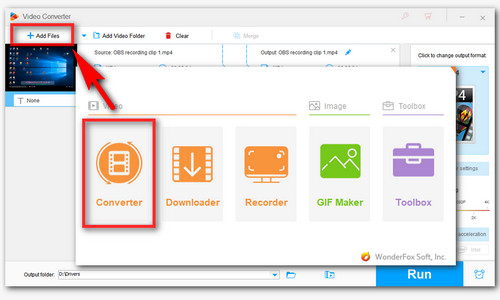
DownloadDownload the video enhancer and install it on your Windows PC.
Launch the software and open the Converter interface. Click Add Files or drag your source videos into the window.
You can import multiple files for batch processing when you want to apply similar output settings to several videos.
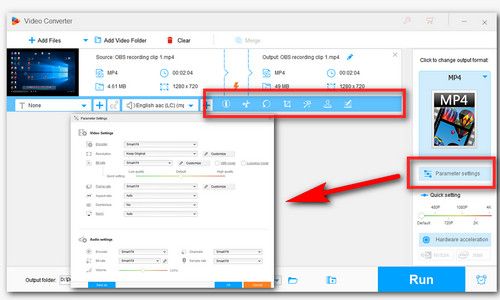
If the footage looks slightly soft, click the magic-wand Effect icon, choose Sharpen, and preview the result. In the same window, you can adjust brightness, contrast, saturation, and hue when needed. For output resolution, bitrate, codec, and frame rate, open Parameter settings. Use these settings to match your playback or sharing needs rather than increasing every value blindly.
Different quality problems need different fixes. For general enhancement during conversion, leave Picture Enhancement in its default Normal Mode. If the result is too subtle, you can go to the main interface, open Option > Picture Enhancement and try Force Mode for a stronger effect.
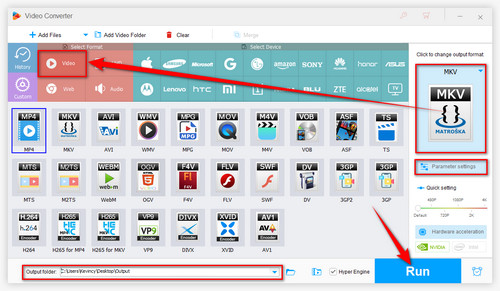
Choose a suitable output format from the format panel on the right side of the interface. MP4 is a practical choice for broad compatibility, while you can also keep another format that better fits your workflow.
Set an output folder with the triangle icon, preview your edits when applicable, and click the blue Run button to export the enhanced video.
 Video Quality Editor
Video enhancement is not a single switch that fixes every kind of poor footage. The best result usually comes from matching the tool to the problem:
Slight softness or hazy edges: Try the Sharpen filter and preview carefully. Too much sharpening can create halos, noise, and an unnatural look.
Dark, washed-out, or flat footage: Fine-tune brightness, contrast, saturation, and hue. Small adjustments are usually safer than aggressive changes.
Low-resolution video: You can upscale the resolution for a larger display or target format. Upscaling changes the output dimensions, but it cannot recreate all fine detail missing from the source.
Interlacing lines: Use deinterlacing instead of sharpening, since sharpening may make combing artifacts more visible.
Corrupted or incomplete video: Enhancement filters are not repair tools. A damaged file may need a separate video repair workflow before you enhance it.

Easy Video Enhancement for Windows
WonderFox HD Video Converter Factory Pro combines Picture Enhancement, a Sharpen filter, color controls, upscaling, deinterlacing, and adjustable output parameters in one beginner-friendly Windows program. Use only the adjustments your footage actually needs, preview the result, and avoid over-processing for a more natural-looking output.

Sharpening increases local edge contrast, which can make a slightly soft video appear crisper. It works best when the source still contains usable detail. It is much less effective for severe out-of-focus footage, strong camera shake, or motion blur, and excessive sharpening can exaggerate compression noise.
To sharpen a video in HD Video Converter Factory Pro, open Converter and add the source file. Click the magic-wand Effect icon on the editing toolbar, select Sharpen, and use the preview window to compare the result. If needed, make small brightness, contrast, saturation, or hue adjustments in the same window, then click OK to add effects to video. Choose the desired output format and click Run to export the processed video.
Tip: Start from the highest-quality source you have and judge sharpening at normal viewing size. If edges begin to glow, skin looks harsh, or noise becomes more obvious, the sharpening is too strong.
 Sharpen Soft Edges Around a Subject
 Improve Edge Definition Around Objects
 Use Sharpening Carefully on Fine Details
 Adjust Video Quality Settings
Besides sharpening, WonderFox HD Video Converter Factory Pro gives you several ways to optimize the output. Use Brightness and Contrast for footage that looks too dark or flat, and adjust Saturation and Hue only when the colors need correction. In Parameter settings, you can change resolution, bitrate, frame rate, and codec to match the target device or platform.
For better quality, avoid unnecessary conversions and keep the bitrate high enough for the chosen resolution and codec. Raising bitrate far beyond the source does not add lost detail; it mainly increases file size. Likewise, increasing frame rate does not make ordinary footage sharper unless you are using a dedicated frame-interpolation process. When upscaling, expect a larger frame size and potentially a cleaner viewing experience on high-resolution displays, but not the same detail as footage originally captured at that resolution.
 Software to Improve Video Quality
Picture Enhancement uses Normal Mode by default, which is the safer starting point for most videos. If the change is too subtle, open Option > Picture Enhancement and try Force Mode for a stronger enhancement. Check the result carefully, because stronger processing can make noise, halos, or other artifacts more noticeable in some footage. For a natural result, compare the preview or a short test export before processing a long video.
1. Use the best source available. Enhancement works with the information already present in the video. A cleaner source gives the software more useful detail to preserve.
2. Do not oversharpen. The Sharpen filter is most useful for mild softness. Preview the result and stop when edges look crisp but still natural.
3. Keep a sensible bitrate. When re-encoding, use enough bitrate for the target resolution and codec to avoid introducing extra compression artifacts. Simply setting an extremely high bitrate will not improve a poor source. See how to adjust video bitrate.
4. Upscale for display needs, not as a miracle fix. Converting SD to HD or 1080p to 4K increases the frame dimensions, but the output cannot become identical to native high-resolution footage. Learn more about converting SD video to HD.
5. Make a short test first. Strong enhancement, upscaling, or high-bitrate encoding can increase processing time and output size. Test a short clip before converting a long video.
Bottom line: Use Picture Enhancement for a quick overall improvement, the Sharpen filter for mild softness, color controls for dark or flat footage, and resolution/bitrate settings to match the output to your device or platform. No enhancer can perfectly restore detail lost to severe blur, low-quality recording, or heavy compression, so realistic expectations and careful previews matter.
Q1. Can sharpening make a blurry video completely clear?
No. Sharpening can improve the appearance of slightly soft edges, but it cannot fully recover detail lost because of severe defocus, motion blur, camera shake, or strong compression.
Q2. Does increasing video resolution improve quality?
It increases the output dimensions and may help the video fit a higher-resolution screen or workflow, but ordinary upscaling does not create the same native detail as footage originally recorded at the higher resolution.
Q3. Should I increase the bitrate when enhancing a video?
Use a bitrate appropriate for the target resolution and codec so the new encode does not add unnecessary compression. An excessively high bitrate usually increases file size without restoring missing source detail.
Q4. Which should I use first: Picture Enhancement or Sharpen?
For a general quality boost, start with Picture Enhancement in Normal Mode. For footage that mainly looks a little soft, try the Sharpen filter and preview it carefully. You do not need to apply every enhancement option at once.

Kevincy joined the WonderFox team in 2014 and has been a senior columnist ever since. With over two decades of experience in the video editing industry, he shares tutorials, tips, and how-to guides on video/audio processing and personal DVD backups. Family-oriented and passionate about helping others, he is dedicated to making video and audio processing easier for readers.


Kevincy joined the WonderFox team in 2014 and has been a senior columnist ever since. With over two decades of experience in the video editing industry, he shares tutorials, tips, and how-to guides on video/audio processing and personal DVD backups. Family-oriented and passionate about helping others, he is dedicated to making video and audio processing easier for readers.
Have the High Definition Version of Your DVD

WonderFox DVD Ripper Pro
Upscale DVD disc from SD to HD for better viewing
Back up DVD disc to digital file, ISO image file, VIDEO_TS file
Compress DVD video to a smaller size
Extract audio from DVD