When you have some complex problems with your computer and cannot describe the problem precisely, you can use a Windows built-in tool – Steps Recorder to record what you’ve done and the problematic steps. This post is here to explain the detailed steps on how to use Windows Steps Recorder.
Want to record the problems on your PC in a video? Download and try this recommended screen recorder now!
https://www.videoconverterfactory.com/download/hd-video-converter-pro.exe https://www.videoconverterfactory.com/download/hd-video-converter-pro.exe
Steps Recorder is a system built-in program for Windows 10/11 and is also called Problems Steps Recorder (PSR) on Windows 7/8/8.1. It can help you troubleshoot a problem on a Windows computer by recording the exact steps you took when the problem occurred. Then it will save the steps as a single MHT file with detailed information and screenshots of each step. You can later send the recorded file to a support professional to help diagnose the problem for you.
Unlike most screen recorders, Steps Recorder is specially designed for recording steps to troubleshoot problems. You need to add captions to explain since it only records your actions and not your voice.
Note: The Steps Recorder must be started and stopped manually by you. It doesn’t automatically gather or send information to anyone or run in the background.
After knowing what Steps Recorder is, this part will show you a detailed tutorial on how to use Steps Recorder step by step. Just read on to check it out!
First, open the Windows start menu, scroll down to “Windows Accessories” and click on it. Then find the Steps Recorder in the sub-menu and click to launch it. Windows 7/8/8.1 users can go to the “Win (Start)” menu > “Accessories” > “Problem Steps Recorder”.
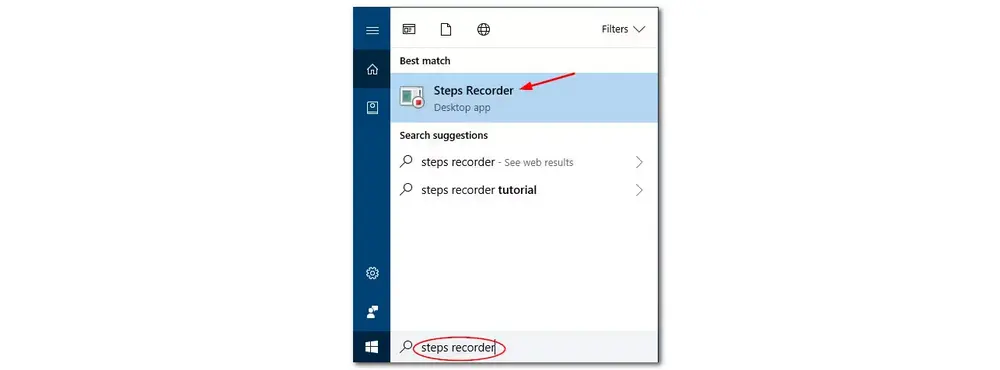
Or you can directly type “Steps Recorder" (in Windows 10/11), or “Problem Steps Recorder" (in Windows 7/8/8/1) in the search box on the taskbar. Then press “Open” in the right panel to start Steps Recorder.
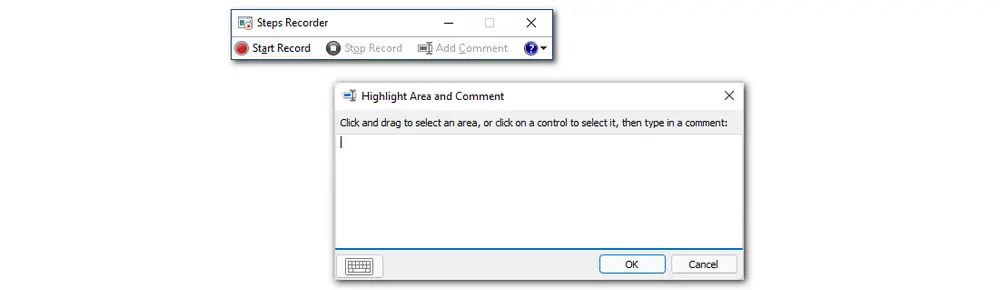
Now you will see a small window on your computer. Just click on the “Start Record” button and then carry out your task as before to record the problem you encountered. It will record and take a snapshot of each movement. After starting recording, you can also click “Pause Record” if you want to pause the process and then click “Resume Record” to continue.
During recording, you can use the “Add Comment” feature to add data about what you typed to the recording in the “Highlighted Area and Comment” box since Steps Recorder doesn’t record the text you typed. Then click “OK” to continue recording.
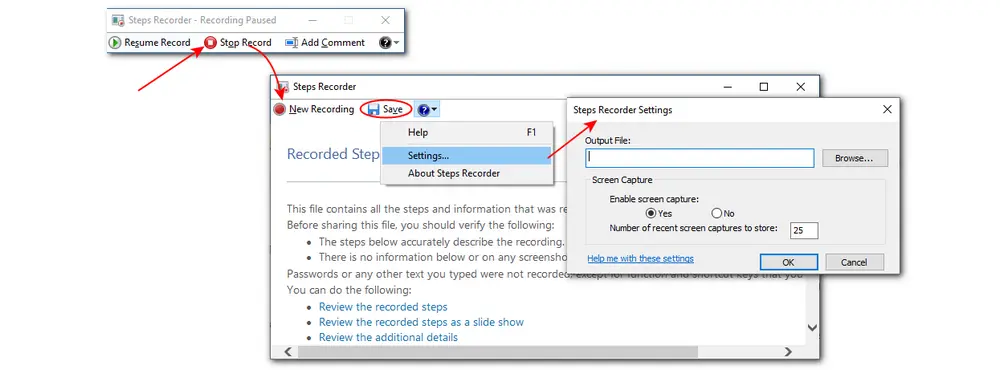
Once finished recording, press “Stop Record” and you will see a window with detailed recorded steps. Then click the “Save” button on the top bar. Name the recorded file and choose a file path for the recorded file.
You can also click the “?” icon and then select “Settings...” to open the Settings window. Here you can click “Browse...” to set an output path for the recorded file and name the file. You can then choose to enable or disable screen capture by clicking “Yes” or “No” and then change the number of recent screen capture to store.
Tips: Any settings you set for Steps Recorder are temporary. When you close and reopen the program, it will revert to the default settings.
After finishing the process, you can go to the file folder you set before to find the recorded file. It will be saved in a MHT file packed in a zip file. Just share or open the Steps Recorded zip file like any other zip file.
WonderFox HD Video Converter Factory Pro is built-in with a handy screen recorder that offers the most straightforward way to record all the screen activities with/without audio on Windows. The recorded files can be saved in various popular video/audio formats.
Although Steps Recorder is a handy tool that can efficiently record problematic steps, it also has some limitations. From the above content, you may know that Steps Recorder only takes screenshots and save the recordings as ZIP files. Furthermore, it cannot record videos, audio, gameplay, etc. as well. Thus, you may want to find an alternative for your Windows 11/10/8/7. So the next part introduces several Step Recorder alternatives for you. Read on and choose one if you’re interested.
Since Windows Steps Recorder only takes screenshots of what you’re doing and cannot capture all activities on the screen like large files or games, you can try some alternative programs to record problematic steps. So this part shares some alternative programs.
WonderFox HD Video Converter Factory Pro can act as the best Steps Recorder alternative for Windows 7/8/10/11. Its built-in screen recorder allows you to record all the screen activities with voice in full-screen or part-screen mode, such as gameplay, online meetings, streaming TV, tutorials, problem steps, and more. You can also use it to record audio-only files. Recording gameplay in 60 FPS high quality is also supported. The recording format, quality, and frame rate can be adjusted before starting recording. Moreover, HD Video Converter Factory Pro also supports editing, converting, and compressing recorded files.
Without further ado, the following shares the simple guide for recording screens with HD Video Converter Factory Pro. Just downloaddownload it and read the following to start recording.
Step 1. Open the Screen Recorder
After downloading and installing HD Video Converter Factory Pro on your computer, launch it and choose the “Recorder” module.

Step 2. Select Recording Area
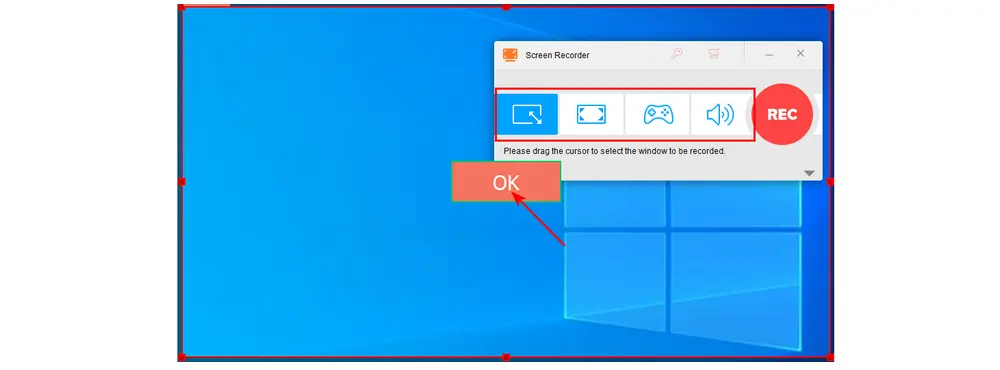
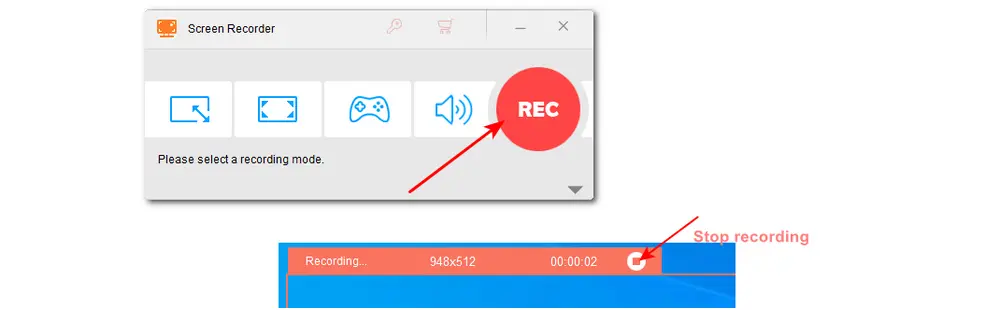
From the top of the Screen Recorder interface, you can see four different recording modes. Just select one according to your actual needs. If you choose the custom mode to record part of the screen, then drag the cursor to select the area you want to record and then click “OK” to save the change.
Step 3. Adjust Recording Settings
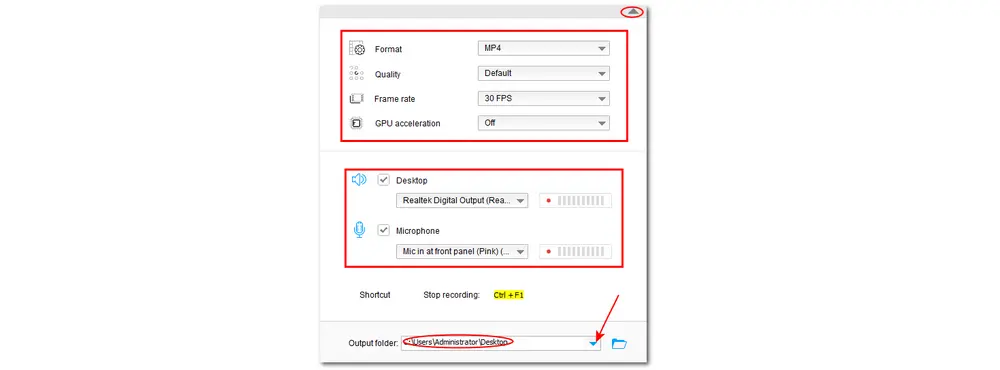
Now you can customize the recording format, quality, and frame rate, and turn on the GPU acceleration if your computer supports hardware acceleration. Or you can leave them as default. If you want to record the screen with audio, you can check the “Desktop” and “Microphone” boxes to enable the audio recording. If needed, you can click the down arrow button at the bottom of the interface to specify an output path for the recording.
Step 4. Start Recording
Once everything is ready, click the red “REC” button to start recording after a five-second countdown. After finishing recording, press “Ctrl + F1” to stop recording. The recorded file will be saved in the file folder you set before.
Tips. If you want to edit the recording, you can close the “Recorder” and enter the “Converter” module from the initial interface. Then drag and drop the recorded file into the workplace and start the editing process.
Besides HD Video Converter Factory Pro, there is a Windows default screen recorder – Xbox Game Bar, which is pre-installed on Windows 10/11. It is free to use and can be used to capture game clips, take screenshots, and broadcasts. If your computer is running Windows 10/11, you can also use it to record your problem. But you should know that it only allows you to capture the entire computer screen. You cannot change any recording configuration and there is no video editing feature.
Here is a simple guide for how to use it.
Step 1. Press “Win + G” on the keyboard to launch Xbox Game Bar.
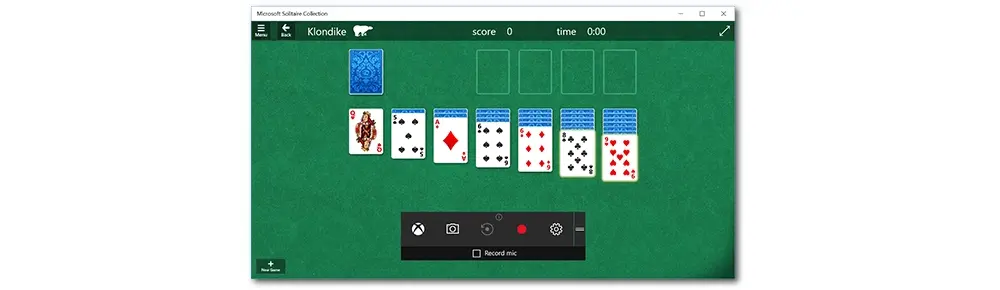
Step 2. Enter the “Capture” widget menu and then press the white “Start recording” button or directly press “Win + Alt + R” to start recording.
Tips. Before starting recording, you can turn on the mic while recording by pressing “Win + Alt + M”.
Step 3. When it is finished, click the same button again to stop recording.
Step 4. Now you can view the recorded clip in the Captures.
Instead of using desktop programs to record problems, you can also try some online screen recorders without downloading any software. And Screencastify is one of the web-based screen recorders. It is a Chrome extension recorder that enables you to capture various screen activities and save the recording in GIF, MP4, or MP3 format. Not only used for screen recording, but it also provides video editing features. However, its free plan only allows 10 minutes of recording, and the recorded videos will be watermarked.
The following is a simple guide.
Step 1: Enter Screencastify in the search box of Chrome Web Store. Click it to select Add to Chrome > Add extension.
Step 2: Once installed, you’ll see the Screencastify icon in your Chrome Extension list. Click the icon and sign in with your Google account to continue.
Step 3: Choose Enable mic and webcam to grant access to your microphone and webcam. Now, you can choose a recording mode from Browser Tab, Desktop, or Webcam Only.
Step 4: Turn on the Microphone and Embed Webcam if needed. Click Show more options to set additional parameters for your recording.
Step 5: Click the blue Record button to start your recording. To end a recording, click the extension icon again and hit the Stop button.
Step 6: Then you will be taken to a new page, where you can edit, save and share your recording.

The Windows Steps Recorder allows you to efficiently track and record what you are doing on your PC screen while automatically producing written instructions and screenshots. Users can use it to record the problems that occurred on the PC screen or the fixes with clear steps.
If you are using Steps Recorder to record the problem steps, it will ask for the location for saving the file when you finished the recording. The file will be saved in the folder of your choice and stored in MHT format within a Zip file. Moreover, it will ask for the location every time when you start a new recording.
Steps Recorder is a handy and built-in problem recorder for Windows users to record and share problematic steps on their computers. After reading this post, you should know how to use Steps Recorder. Also, this post shares some alternative recorders if you want to record the problematic steps in video format or demand more features other than recording.
That’s all. Thanks for reading till the end. Have a nice day!

HD Video Converter Factory Pro
1. Convert video/audio to 600+ formats and presets;
2. Download movies and music from 1000+ websites;
3. Record screen with audio in high quality;
4. Basic editing tools for making GIFs, slideshows, etc.;
5. Batch conversion mode and hardware acceleration;
Privacy Policy | Copyright © 2009-2026 WonderFox Soft, Inc.All Rights Reserved
