Here are some troubleshooting methods you can apply if you are experiencing issues when using Nvidia ShadowPlay on your Windows PC. Simply follow the fixing methods listed below if you encounter any issues:
When ShadowPlay not responding on your Windows PC, you can first check if you enabled the administrator permission for your NVIDIA Share. If not, then follow the simple steps below to enable the administrator permissions for ShadowPlay:
Step 1. Locate to C:\Program Files\NVIDIA Corporation\NVIDIA GeForce Experience.
Step 2. Find and right-click on the NVIDIA Share.exe application.
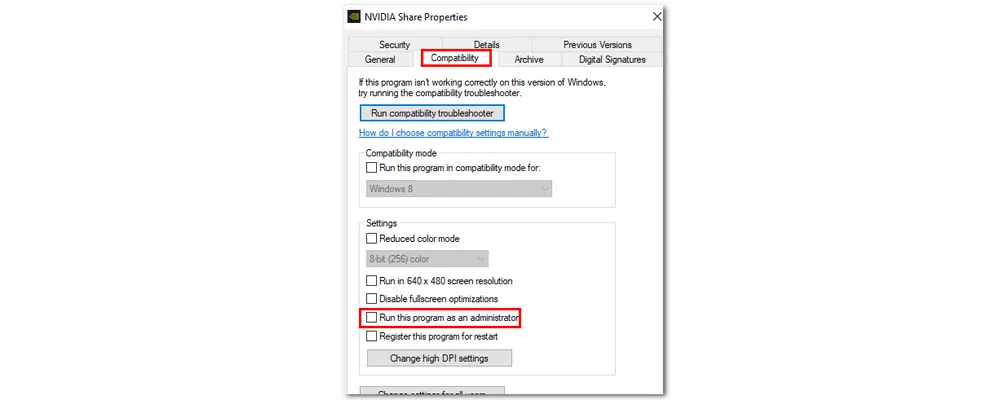
Step 3. Select the “Properties” option from the drop-down list and switch to the “Compatibility” tab.
Step 4. Check the box in front of the “Run this program as an administrator” option under the “Settings” section.
Step 5. Hit the “Apply” button and click “OK”.
If Solution 1 doesn’t work, you can also try to adjust your Windows PC for the best performance mode. Follow the steps below to perform the operation:
Step 1. Open “Settings” on your Windows PC.
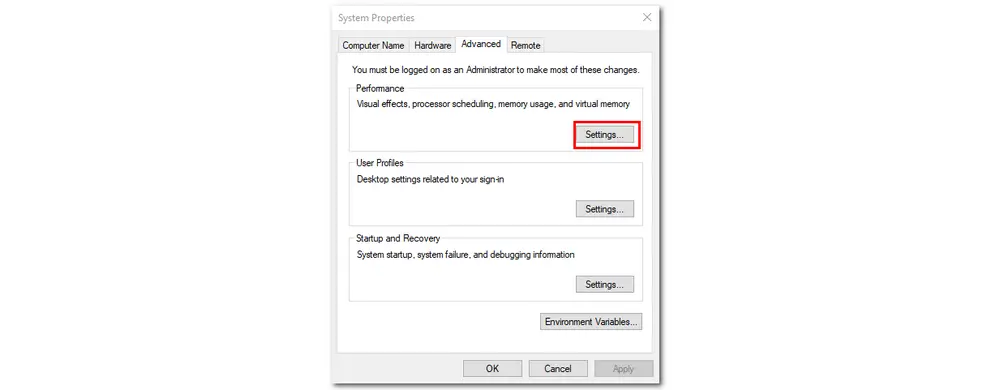
Step 2. Search for “Advanced System Settings” in the search bar and click “View advanced system settings” to bring up the “System Properties” window.
Step 3. Click the “Settings...” button under the “Performance” section to open the “Performance Options” window.
Step 4. Check the “Adjust for best performance” box.
Step 5. Hit “Apply”.
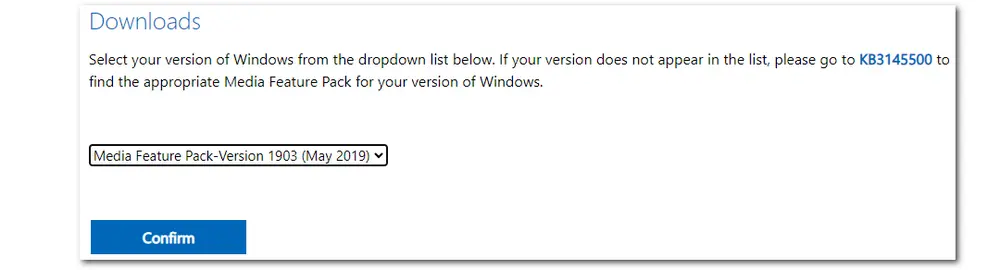
If you use a Windows N edition, ShadowPlay may fail because some media components are missing. In current Windows 10/11 N versions, Microsoft provides the Media Feature Pack as an Optional Feature rather than only as a standalone download.
Step 1. Press “Win + I” to open “Settings”.
Step 2. On Windows 11 N, go to “Apps” > “Optional features” > “View features”. On Windows 10 N, go to “Apps” > “Apps & features” > “Optional features” > “Add a feature”.
Step 3. Find and install “Media Feature Pack”. Restart your PC after installation, even if Windows does not prompt you to do so.
Step 4. If ShadowPlay still crashes or refuses to start, reinstall the latest NVIDIA app/GeForce Experience and update your graphics driver.
A broken app update or corrupted NVIDIA overlay files may also make ShadowPlay fail to open, crash, or stop recording. Since NVIDIA has been moving many GeForce Experience features into the newer NVIDIA app, you can reinstall the app you currently use, or switch to the latest NVIDIA app if GeForce Experience keeps acting up.
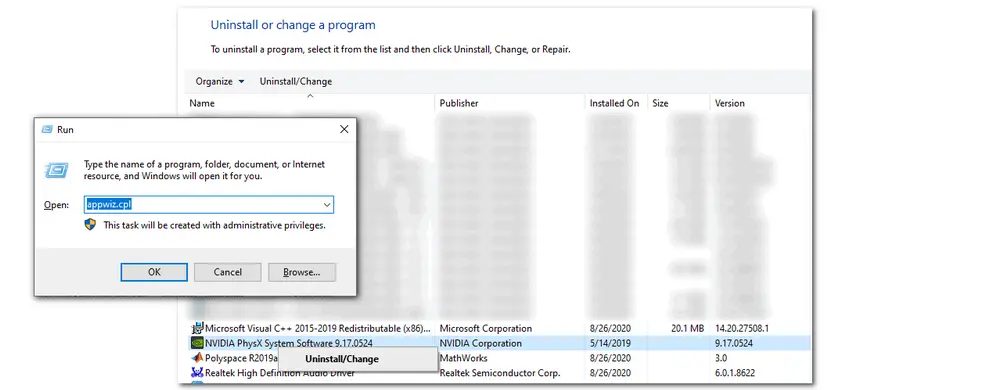
Step 1. Press “Win + R” to open the Run prompt and type in “Appwiz.cpl”. Click “OK”.
Step 2. Locate “NVIDIA app” or “NVIDIA GeForce Experience”.
Step 3. Select “Uninstall/Change” and follow the on-screen instructions to remove it.
Step 4. Restart your computer. If there are leftover folders under C:\Program Files\NVIDIA Corporation\, remove the related app folder only after making sure the NVIDIA app has been uninstalled.
Step 5. Download and install the latest NVIDIA app or GeForce Experience from NVIDIA’s official website. Then enable the NVIDIA overlay again and test ShadowPlay.
* If ShadowPlay still doesn’t work after a clean reinstall, temporarily close other recorders and overlay tools, such as Xbox Game Bar, Discord overlay, Steam overlay, OBS, MSI Afterburner/RivaTuner, or other capture programs, because they may conflict with NVIDIA’s overlay.
Besides the ShadowPlay not working issue, some users may find that ShadowPlay can open normally but won’t record gameplay, records only a black screen, or saves video clips without game sound or microphone audio. This part collects the most common recording and audio fixes in one place.
Enabling the overlay is a simple and widely accepted solution to fix the ShadowPlay not recording game issue since many GeForce Experience users have confirmed this way worked for them. Follow the steps below to enable it:
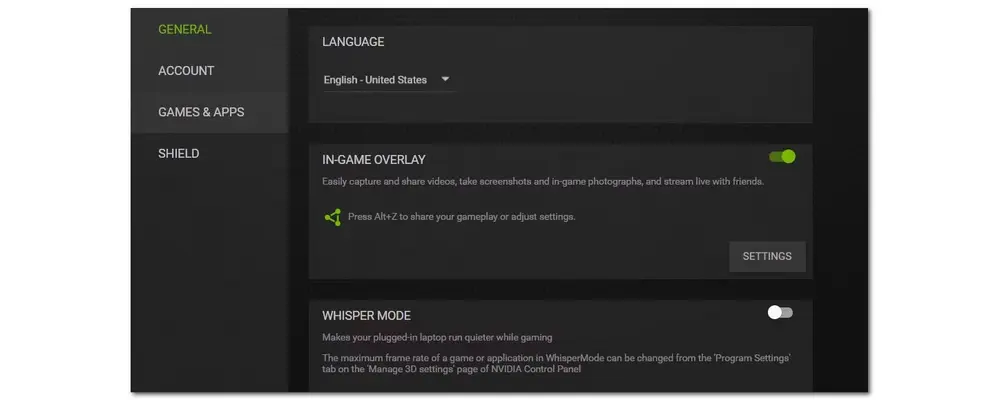
Step 1. Launch ShadowPlay and click “Settings”.
Step 2. Under the “General” tab, find “IN-GAME OVERLAY” and turn it on.
(If it is enabled, you can toggle off and then reactivate it.)
Now exit the GeForce Experience app, start a game, and open ShadowPlay again. Try to start recording with ShadowPlay to see if the issue is fixed. If not, go to the next solution.
Desktop capture is a setting that needs to be enabled if you want to make ShadowPlay record the desktop screen. So when ShadowPlay is not recording the gameplay, check if this option is on. Below is how to enable the Desktop Capture option:
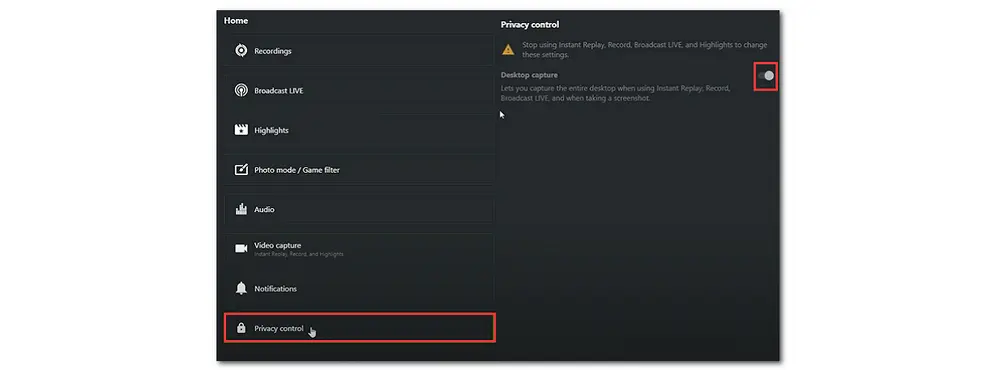
Step 1. Open ShadowPlay and go to “Settings”.
Step 2. Scroll down and select “Privacy control”.
Step 3. Turn on the “Desktop capture” option if it is disabled.
If this method still doesn’t work, you may need to check your system requirements specified on this site: https://www.nvidia.com/en-us/geforce/geforce-experience/system-requirements/. If your PC meets all the requirements for ShadowPlay to record but you still cannot record, then continue reading for other troubleshooting methods.
* Please keep in mind that the Desktop capture option is not accessible on Windows laptops with switchable dual GPUs (graphics processing units). So don't be surprised if you cannot find the option on your laptop with two graphic cards.
The Broadcast feature in the In-Game Overlay menu can also cause issues with the Instant Replay/Record feature and prevent ShadowPlay from recording smoothly. So it is recommended to disable the Broadcast feature when ShadowPlay won’t work well. Follow the steps below to disable the Broadcast feature:
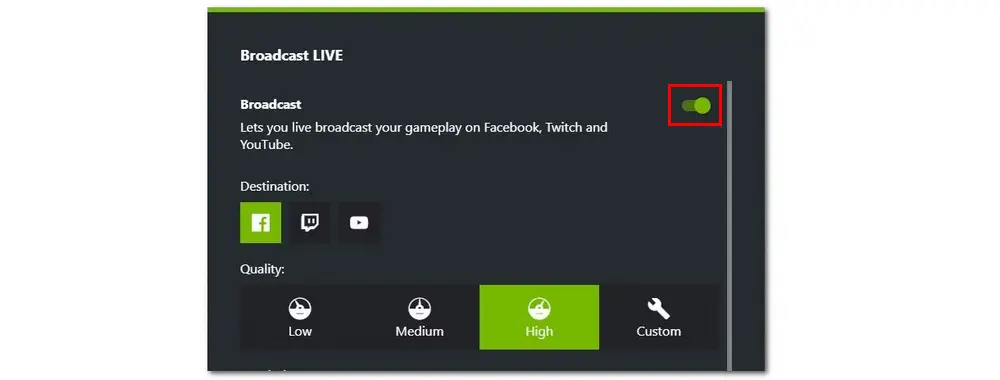
Step 1. Press “Alt + Z” to open the overlay and click its “Settings” button.
Step 2. Scroll down in the settings list and find the “Broadcast Live” option. Click it.
Step 3. Now turn off the “Broadcast” feature.
Now you can try to record a game with the Broadcast feature disabled. If ShadowPlay still won’t work, you may need to sign out of Twitch since some users reported that having a Twitch account linked to the NVIDIA app will prevent ShadowPlay from recording. Simple steps are given below:
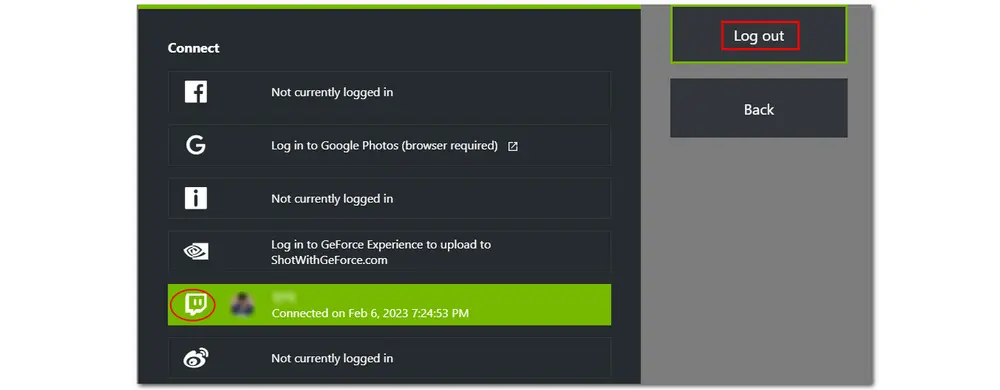
Step 1. Open ShadowPlay and click on the “Settings” button.
Step 2. Select the “Connect” option from the available settings.
Step 3. Find and click on the “Twitch” account. If you’ve connected, now click “Log out”.
If ShadowPlay still starts and then stops recording immediately, turns off Instant Replay by itself, or records only some games, restart the NVIDIA overlay, update your graphics driver, and make sure the game is not running with protected content or exclusive anti-cheat restrictions that block capture.
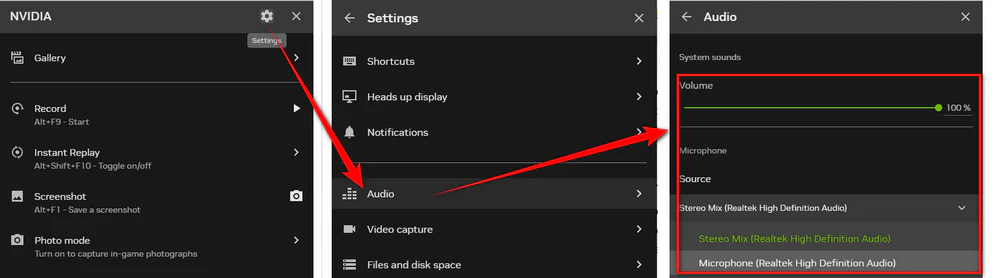
If ShadowPlay records video but no sound, the first place to check is the overlay audio setting. Press “Alt + Z” to open the NVIDIA overlay, click the “Settings” icon, and open “Audio”. Make sure the correct microphone is selected and the volume sliders are not muted or set too low.
If your recorded clip has game sound but no mic voice, check the microphone source. If the clip has your mic voice but no game sound, check the system sound/output device in Windows and make sure the game is actually playing through the same output device ShadowPlay is capturing.
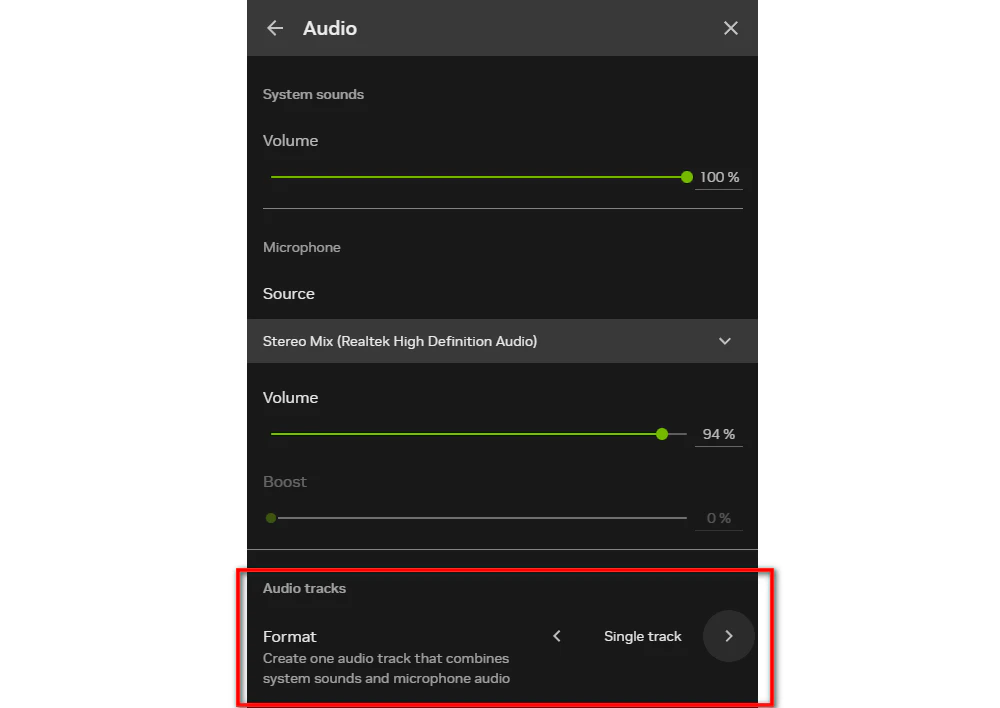
ShadowPlay can save system audio and microphone audio into a single mixed track or separate tracks. Separate tracks are useful for editing, but some media players and editors only play the first track by default, which makes the recording look like it has no audio.
Open the NVIDIA overlay with “Alt + Z” > “Settings” > “Audio”, then switch from “Separate both tracks” to “Create a single track” or “Single track”. If Instant Replay is on and the option is grayed out, turn Instant Replay off temporarily, change the audio track setting, and then turn it back on.
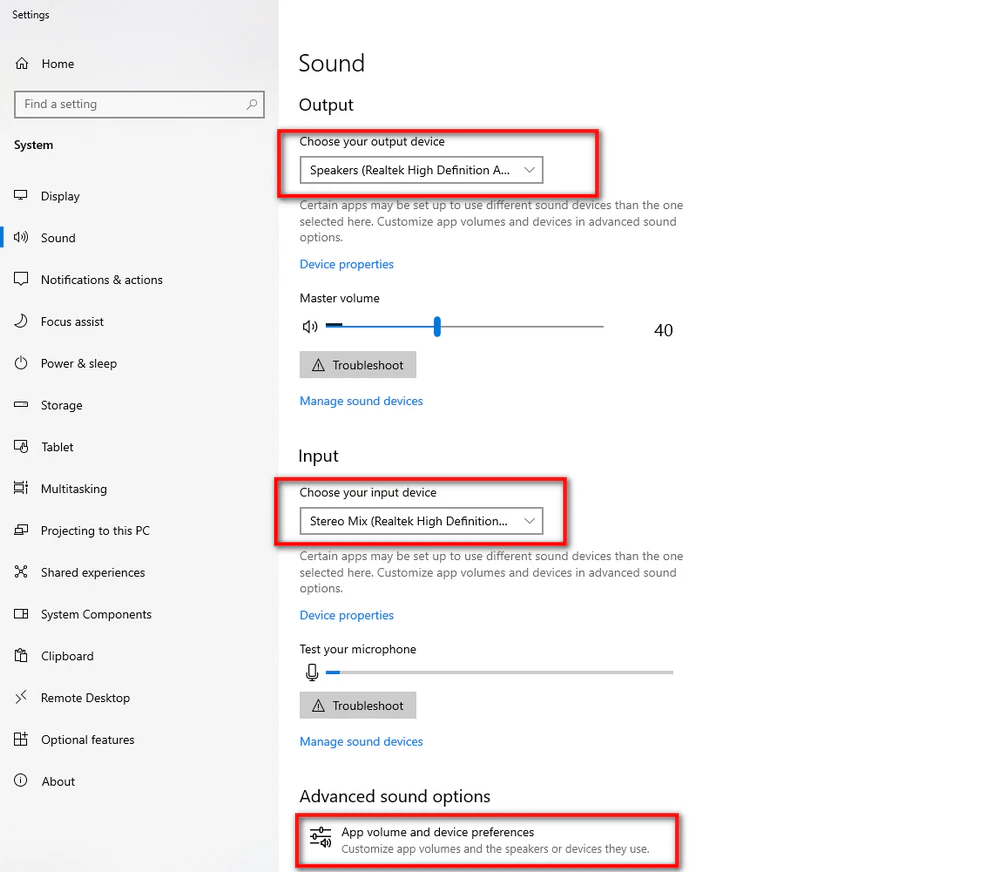
ShadowPlay may record the wrong device if Windows routes the game, headset, speakers, or NVIDIA Container to different audio outputs. Right-click the speaker icon on the taskbar and open “Sound settings”. Under “Output” and “Input”, select the devices you actually use for gameplay and voice recording.
Then scroll to “Volume mixer” or “App volume and device preferences” and check whether the game and NVIDIA Container are using the same output device. Also make sure the volume for the game, NVIDIA Container, and your microphone is not muted.
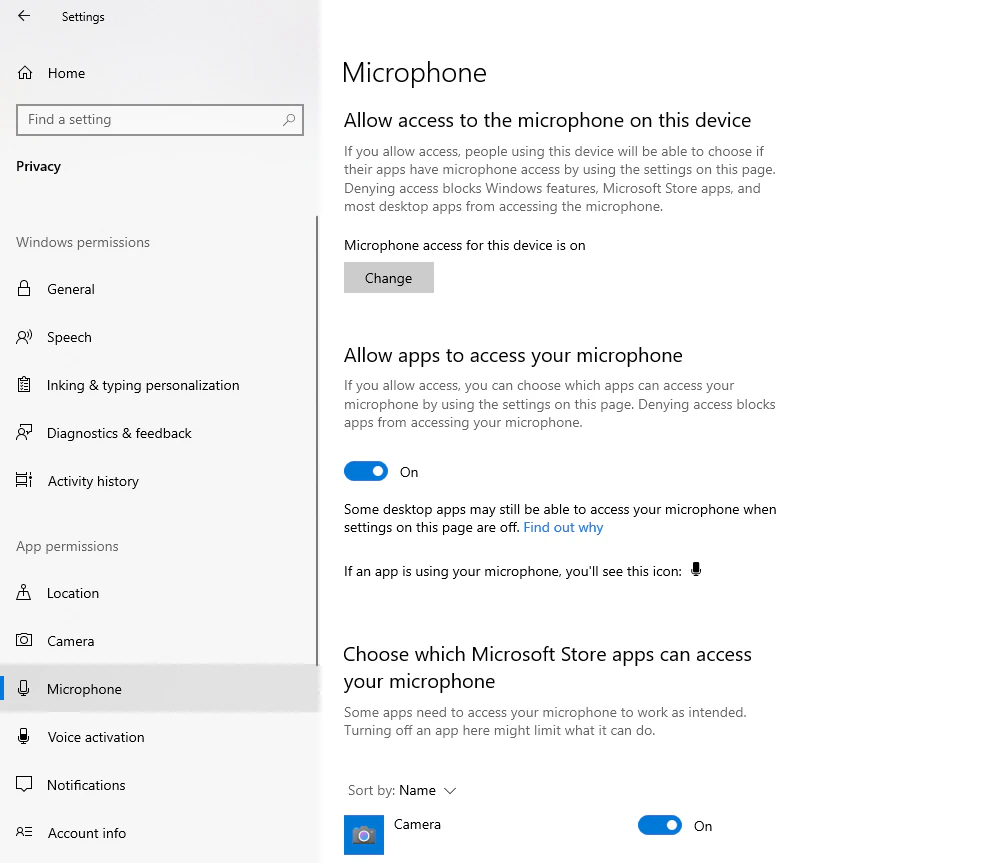
When ShadowPlay cannot capture microphone audio, Windows privacy settings may be blocking desktop apps from using the mic. Go to “Settings” > “Privacy & security” > “Microphone”, turn on microphone access, and allow desktop apps to access your microphone.
Also check third-party audio tools. Virtual audio cables, voice changers, noise suppression tools, Bluetooth headset hands-free mode, and apps like NVIDIA Broadcast or Discord may change the active input device. For testing, choose your real microphone directly, disable extra audio processing, and record a short clip again.
Feel it troublesome to fix the ShadowPlay not working or audio not recording issue and want to record gameplay more easily? Give WonderFox HD Video Converter Factory Pro a try. It is an all-in-one video processing tool that features a handy HD screen recorder. With it, you can capture gameplay fluently without lag in high quality up to 4K. You can capture system/game sound, microphone voice, or both with the screen.
More than recording, it provides essential editing tools to help you cut, crop, merge, attach a watermark, add a soundtrack, apply effects, convert, and compress your recordings for later sharing online.
Free downloadFree download this ShadowPlay alternative game recorder application and read the following to see how to make it record gameplay.
Step 1. Launch the game you want to record and HD Video Converter Factory Pro. Then open the “Recorder”.
Step 2. Select “Game recording mode” with the game icon and choose to capture a particular region (Custom mode) or the entire screen (Full-screen mode). Click “OK” to confirm the recording region.
Step 3. Choose a format and quality for your recording according to your needs. The frame rate is set to default 60 fps when you select the Game recording mode. But you can also change it to 30 fps if you want. You can turn on the GPU acceleration to boost the recording performance if your computer supports GPU acceleration.
Step 4. To record gameplay with audio, you need to check the related audio source. You can check “Desktop” to record gameplay with system sound, “Microphone” to capture your voice with the gameplay, or both of them.
Step 5. Click the bottom ▼ button to specify an output path for the recorded video. Then tap on the red “REC” button to start recording after a five-second countdown. When you finish recording, press “Ctrl + F1” to stop recording.

Tips. You can then enter the “Converter” and add the recorded files to further edit, compress, and convert the recordings.
Usually, it is because ShadowPlay is capturing the wrong output or input device, the mic/game volume is muted, Windows blocks microphone access, or the recording uses separate audio tracks that your player does not play by default. Check the overlay audio settings and Windows sound settings first.
Desktop Capture may be unavailable on some laptops with switchable graphics or certain display/GPU configurations. If you only need to capture a game, try running the game in full-screen or borderless windowed mode. If you need full desktop recording, use another screen recorder instead.
The newer NVIDIA app is the current direction for NVIDIA’s overlay, driver updates, and recording features. If GeForce Experience works fine on your PC, you do not have to change immediately. But if ShadowPlay keeps crashing or missing options, installing the latest NVIDIA app is worth trying.
ShadowPlay is still a handy option for NVIDIA GPU users who want to capture gameplay, Instant Replay clips, and screenshots. But when it stops working, refuses to record, or records videos without audio, the problem is usually related to the overlay, driver/app installation, capture permissions, audio track settings, or Windows sound devices.
Try the fixes above one by one. If you just want a simpler way to record gameplay with system sound and microphone audio, WonderFox HD Video Converter Factory Pro’s built-in recorder can also help you start recording quickly without spending too much time troubleshooting ShadowPlay.

Kevincy joined the WonderFox team in 2014 and has been a senior columnist ever since. With over two decades of experience in the video editing industry, he shares tutorials, tips, and how-to guides on video/audio processing and personal DVD backups. Family-oriented and passionate about helping others, he is dedicated to making video and audio processing easier for readers.
![]()
![]()
![]()
![]()

WonderFox DVD Ripper Pro
WonderFox DVD Ripper Pro is a professional DVD ripping program that can easily rip any DVD, be it homemade or commercial, to all popular formats, including MP4, MKV, MP3, WAV, H264, H265, Android, iPhone, etc. without a hitch. It also lets you edit and compress DVD videos with high efficiency. Download it to enjoy a fast and trouble-free DVD-ripping experience.
* Please DO NOT use it to rip any copy-protected DVDs for commercial purposes.
Privacy Policy | Copyright © 2009-2026 WonderFox Soft, Inc. All Rights Reserved
