

Want to save a Discord voice call, video call, Go Live stream, or just the audio? Discord does not provide one universal recording button for all of these situations. This guide shows practical ways to record Discord on Windows, Mac, Linux, iPhone, and Android, with separate instructions for screen-and-audio recording and audio-only capture.
 Kevincy | Sep 14, 2026
Discord does not currently provide a general-purpose recorder that saves any voice call, video call, or stream on demand. Its Clips feature is different: eligible users can save the recent part of their own game stream while streaming. According to Discord's current documentation, Clips is an Early Access feature for Nitro members on Windows and can save 30-second, 60-second, or 2-minute clips. You can check Discord's current Clips information here: Discord Clips.
So, if your goal is to save a complete Discord call, record someone else's stream that you are watching, make a long recording, or create an audio-only file, use a screen/audio recorder instead.
Before recording: tell the other participants and get permission when required. Recording-consent laws and workplace/school policies vary by location and situation.
Record a Discord call or stream with desktop sound and microphone, or switch to Audio-only mode when you only need the conversation. The same toolkit can trim, convert, or compress the finished recording.
If you mainly want to press Record and save what is happening in Discord, WonderFox HD Video Converter Factory Pro is the simplest option in this guide. Its Recorder module provides Custom, Full-screen, Game, and Audio-only modes. For a Discord video call or stream, use Custom or Full-screen and enable both desktop and microphone audio when you want to hear the other participants and your own voice in the recording.
Step 1. DownloadDownload, install, and launch HD Video Converter Factory Pro. Then open Recorder.
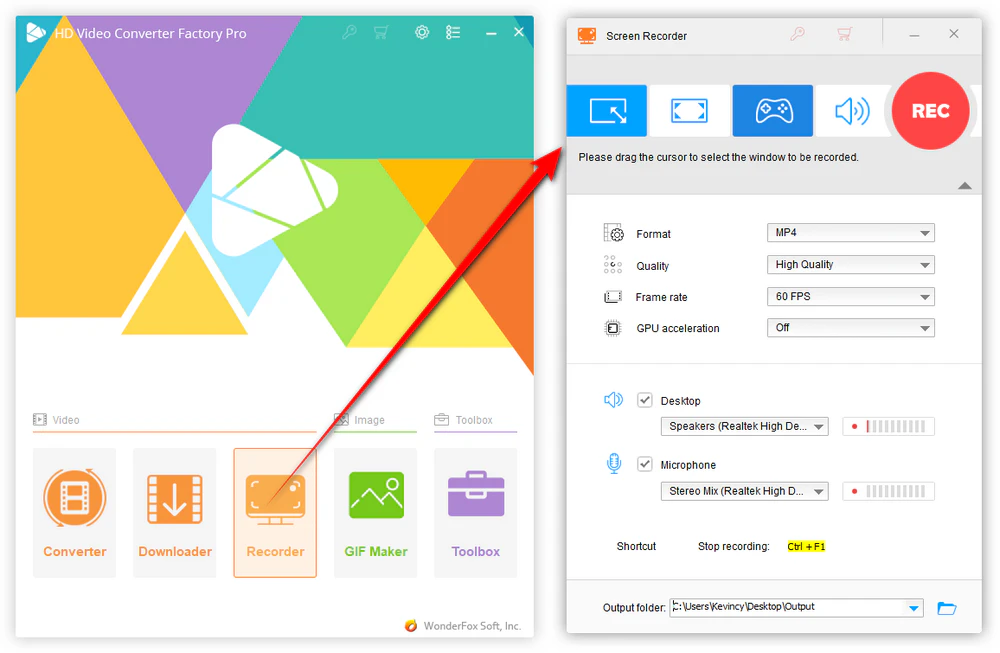
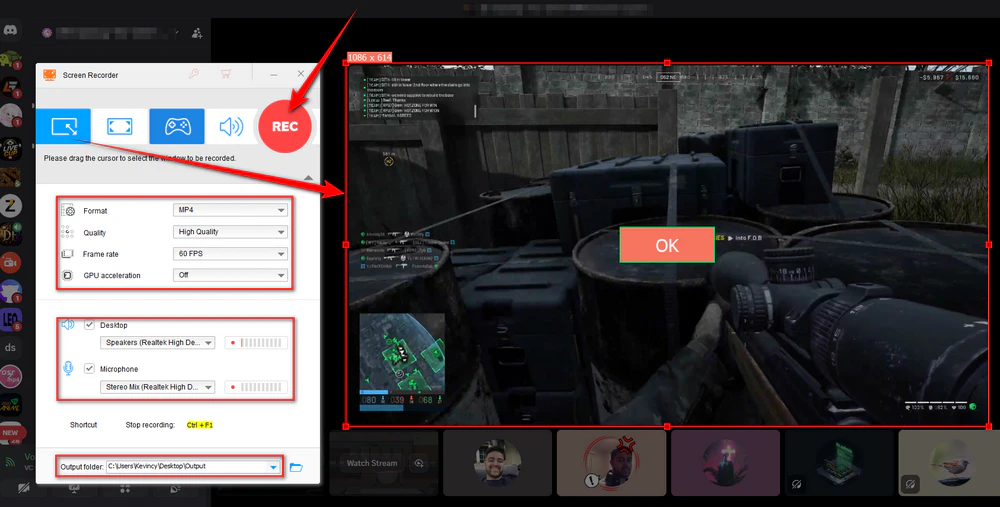
Step 2. Choose Custom to draw around the Discord window, or Full-screen to capture the whole display. Select a recording format, quality, and frame rate as needed.
Step 3. Turn on Desktop to capture Discord sound. Turn on Microphone as well if you want to record your own voice. Choose an output folder.
Step 4. Click REC, then start or return to the Discord call/stream after a five-second countdown.
Step 5. When finished, press Ctrl + F1 or use the stop control.
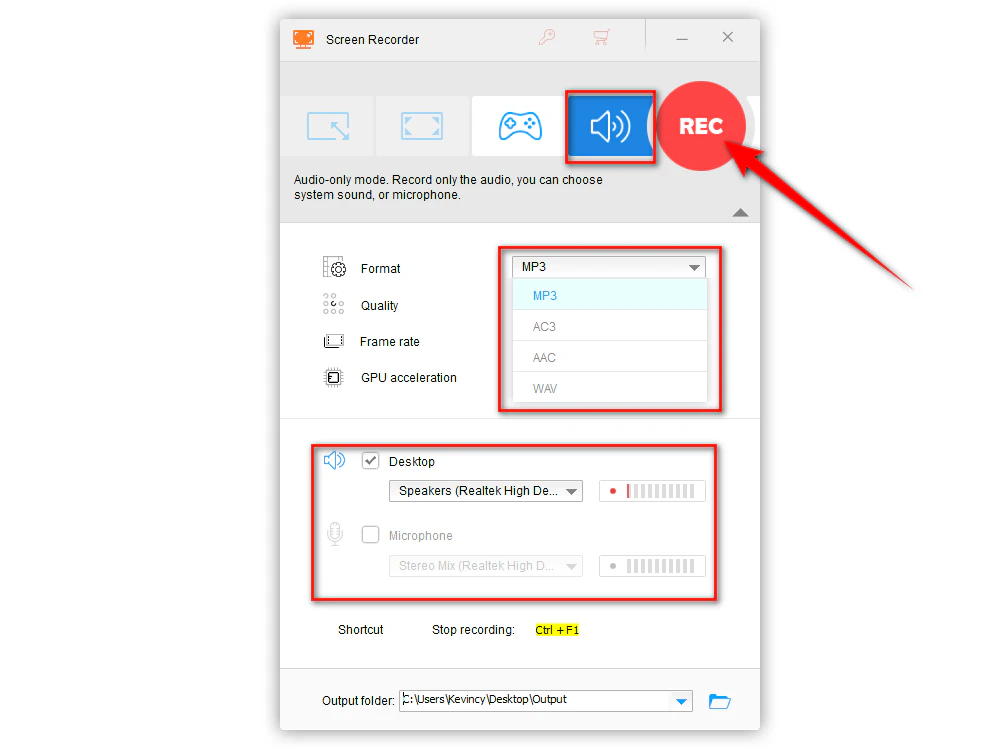
Open Recorder and choose Audio-only instead.
Enable Desktop for the Discord audio and Microphone for your own voice. You can record them together and save the result as an audio file without capturing the screen.
This is useful for voice chats, interviews, study groups, or other conversations where the picture is unnecessary.
💡 After recording, you can go to the Converter module to trim unwanted parts, join clips, convert the file, or compress it for easier sharing.
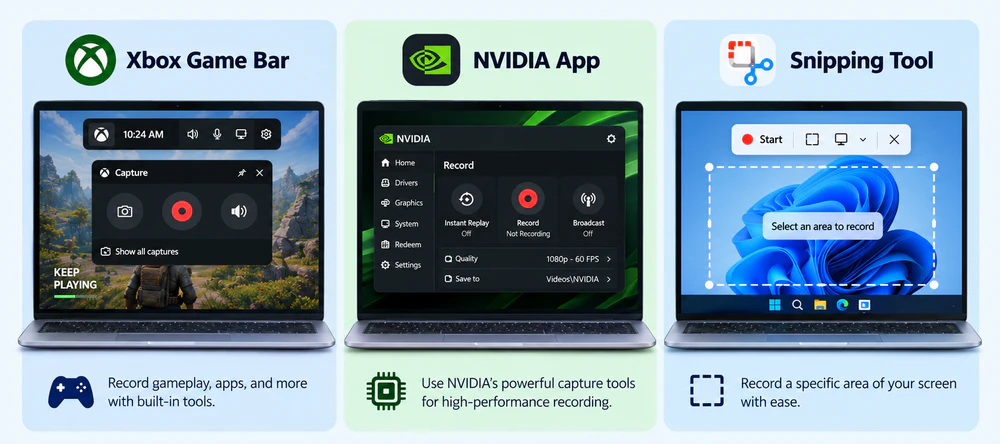
This built-in recorder - Xbox Game Bar works on Windows 10 and 11 and is handy when you want to capture the Discord app without installing another program. Open Discord, press Windows + G, and check Settings > Capturing. Choose All if you want system sounds included. Press Windows + Alt + R to start or stop recording, and Windows + Alt + M to turn the microphone on or off. Recordings are saved as MP4 files in the Videos\Captures folder.
If your PC has a supported GeForce GPU, press Alt + Z to open the NVIDIA overlay. You can start a manual recording or use Instant Replay. For recording non-game desktop content such as the Discord window, turn on Desktop capture under the overlay's video-capture settings when needed. NVIDIA notes that Desktop capture can conflict with Instant Replay in some Discord streaming situations, so make a short test first.
Press Windows + Shift + R, or open Snipping Tool and choose Record > New. Drag to select the Discord area you want, then click Start. Current Windows 11 versions support screen recording in Snipping Tool, and recent builds also provide PC-audio and microphone controls. If those audio buttons are available on your system, enable the sources you need before recording. This option is especially convenient when you only want a rectangular part of the Discord window.
OBS Studio is free and open source. It takes more setup than a basic recorder, but it is a good choice when you want to capture a specific Discord window, mix several sources, keep microphone and Discord audio on separate tracks, add a webcam, or record while streaming elsewhere.
Step 1. Download OBS Studio from obsproject.com, install it, and create or select a Scene.
Step 2. In Sources, click the + button. Add Window Capture when you want the Discord desktop window, or Display Capture when you need the whole screen. For a game stream, you can capture the window where the Discord stream is being viewed.
Step 3. Set up the audio. On Windows 10 version 2004+ and Windows 11, current OBS versions can capture audio from an individual application. Add Application Audio Capture, or use the Capture Audio option available with supported Window/Game Capture sources, then choose Discord. Add your microphone separately if needed.
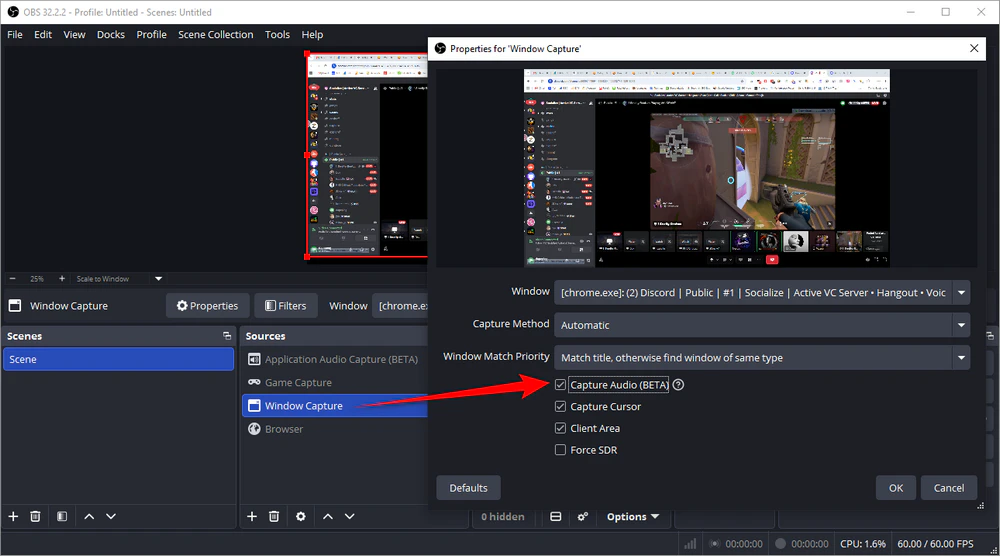
Step 4. On macOS 13 Ventura or later with OBS 30+, use macOS Audio Capture or the current macOS Screen Capture source to capture desktop audio or a particular app. Older macOS versions may still need a virtual audio-routing tool. On Linux, screen/video capture works well, but application-audio routing depends on your audio system and desktop setup.
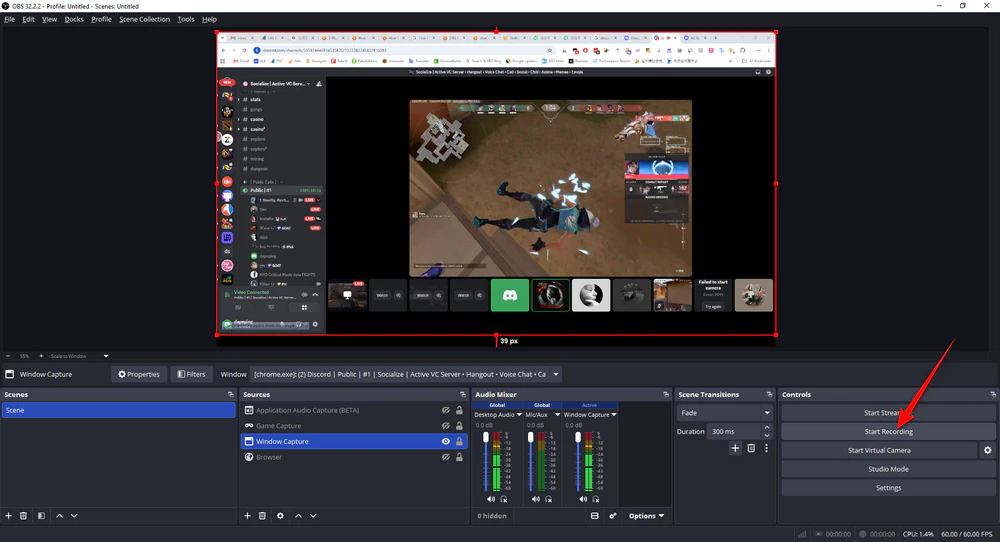
Step 5. Make a short test recording and watch the Audio Mixer meters. If both Discord and your microphone move as expected, click Start Recording. Stop when the call or stream ends.
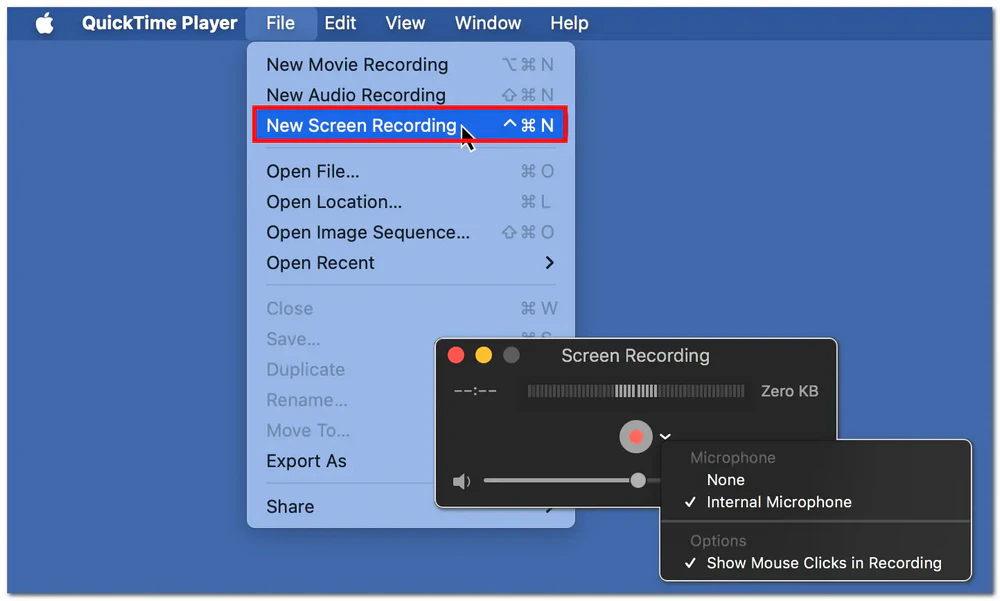
If you only need a simple built-in screen recorder on Mac, open QuickTime Player and choose File > New Screen Recording, or press Control + Command + N. On current macOS versions, this opens Apple's Screenshot controls. Choose the entire screen or a selected area, click Options to select a microphone and save location, and then click Record.
QuickTime Player is convenient for recording the Discord window together with your microphone, but Apple's built-in screen recorder normally lets you choose a microphone rather than directly selecting Discord's system audio as an input. If you need a dependable recording of the other participants' voices or a Discord stream's audio, OBS on macOS 13 or later is usually a better choice, or you can use a compatible virtual audio-routing device.
Tip: If you only want Discord sound in OBS, use application-level audio capture instead of recording all desktop audio. This helps keep notification sounds, music players, and other apps out of the recording.
Audacity is a good option when the screen does not matter and you mainly need an editable audio recording. The easiest setup is on Windows, where Audacity can use WASAPI loopback to record the sound being played through your speakers or headphones.
Step 1. Install the latest Audacity from audacityteam.org.
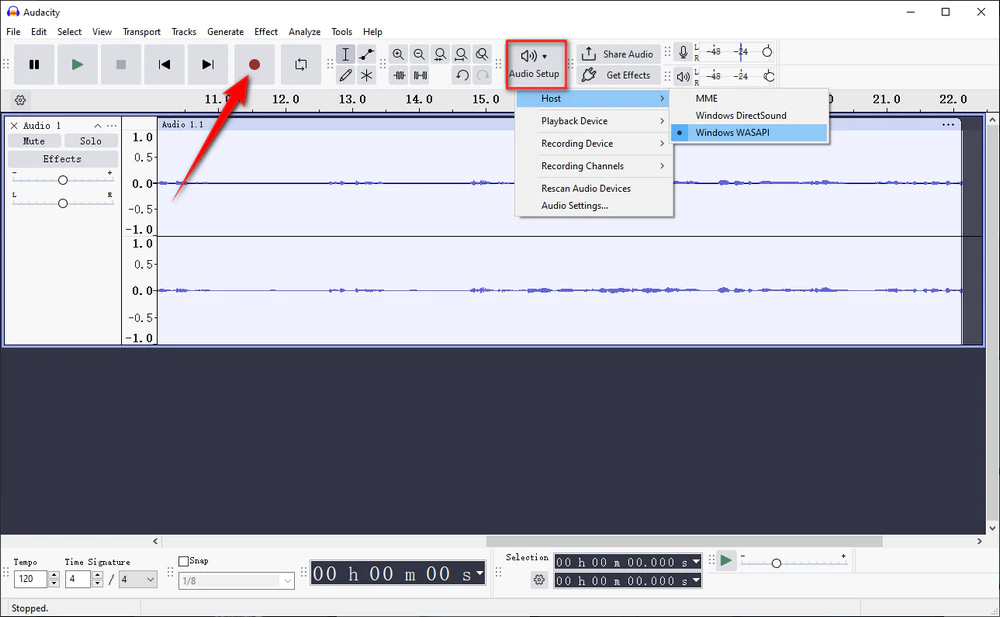
Step 2. Open Audio Setup and set Host to Windows WASAPI.
Step 3. For the recording device, select the output you are actually listening through and choose the version marked (loopback). Start a short Discord playback test and make sure the recording meter responds.
Step 4. Click the red Record button, then join or continue the Discord conversation. Click Stop when done. Trim the track if needed, then go to File > Export Audio to save it.
If you must record both the Discord audio and your microphone at the same time, OBS or WonderFox is usually easier. Audacity can handle more complex routing, but combining system loopback and mic input often requires extra device/routing configuration and can introduce echo if set up incorrectly.
Audacity cannot directly record normal macOS desktop audio by itself. To capture Discord output, you need an audio-routing device such as BlackHole or another compatible virtual audio driver, route Discord/system output through it, and then select that virtual device as Audacity's recording input. If you want an easier current macOS workflow, OBS 30+ on macOS 13 or later can capture app/desktop audio without the older Soundflower-style setup.
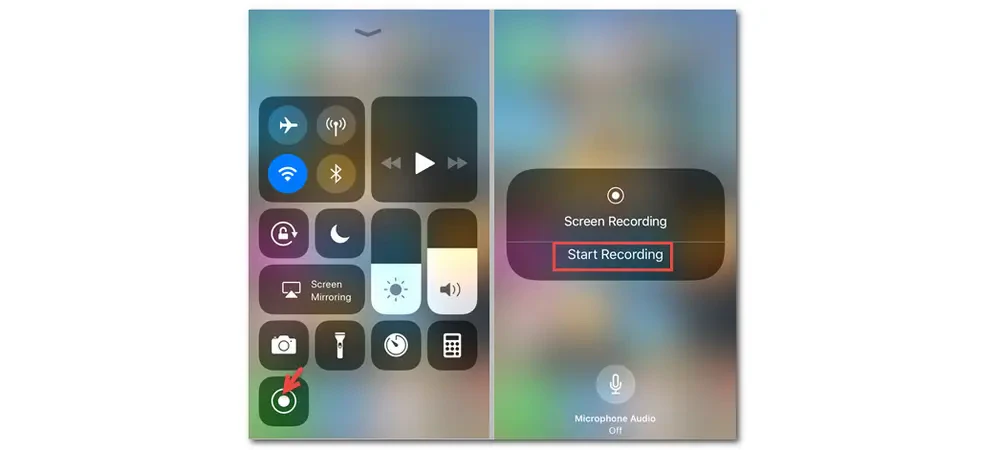
Open Control Center and use Apple's built-in Screen Recording. If you want your own voice, press and hold the Screen Recording control and turn the Microphone on before starting. Then return to Discord and record the call, video, or stream.
However, do a short test before an important session. Apple notes that some apps may not allow their audio or video to be recorded, and Discord call audio may not always appear in the saved screen recording even when microphone recording is enabled. If you need a reliable recording of both sides of a conversation, a desktop recorder is the safer choice.
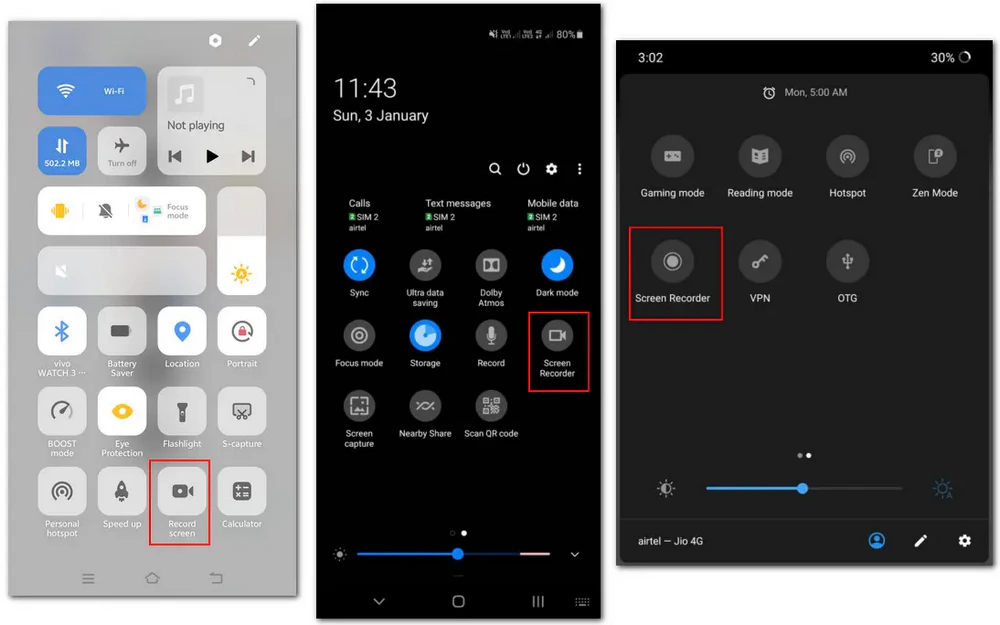
On many current Android phones, swipe down twice to open Quick Settings and tap Screen record/Screen recorder. Before starting, enable audio. On devices that provide the option, choose Device audio and microphone when you want both Discord sound and your own voice.
The exact names differ by phone maker, Android version, and model. Some apps or devices may restrict internal call audio, so record a 10- to 20-second sample first and play it back before committing to a long Discord session.
Check the recorder's audio meters before you begin. Make sure Discord is playing through the same output device the recorder is capturing. If you changed from speakers to Bluetooth headphones after opening the recorder, select the new device again. In OBS, application-level capture can also avoid grabbing the wrong desktop output.
Enable the microphone source and confirm the correct mic is selected. Also check operating-system microphone permissions for the recorder. A moving Discord mic indicator does not guarantee the recording software is using the same microphone.
A common cause is capturing the same sound twice, for example through both Desktop Audio and a second Audio Output Capture source in OBS. Monitor the mixer and mute duplicate sources. Headphones also help prevent speaker sound from feeding back into the microphone.
Try another capture source: switch between Window Capture and Display Capture, then recreate the source if needed. Also check Discord/OBS hardware acceleration and GPU assignments when the two apps are running on different graphics adapters.
This can be an OS or app restriction rather than a setting you missed. Turn on the available audio options, test again, and if the other participants still are not recorded, move the call to a desktop computer for dependable two-sided capture.
Mobile screen recording can be limited by the operating system, phone model, or the app itself. Make sure audio recording is enabled, but do not assume that every device can capture internal voice-call audio. Always test first.
Yes. Use Audio-only mode in HD Video Converter Factory Pro, Audacity, or an audio-focused OBS setup. This creates a smaller file and is better when the conversation is all you need.
It depends on the purpose and the laws that apply where the participants are located. Consent requirements vary. For private calls, meetings, classes, interviews, or workplace conversations, the safest practice is to tell everyone and obtain permission before recording.
There is no single best Discord recorder for every device. On Windows, HD Video Converter Factory Pro is an easy choice for calls, streams, and audio-only recording. OBS offers more control and works across desktop platforms, while Audacity is practical when you only need an audio track. On iPhone and Android, start with the built-in screen recorder, but test the call audio first because mobile capture restrictions vary. Whichever method you use, check the sound sources before a long session and make sure the people involved know they are being recorded.

Kevincy joined the WonderFox team in 2014 and has been a senior columnist ever since. With over two decades of experience in the video editing industry, he shares tutorials, tips, and how-to guides on video/audio processing and personal DVD backups. Family-oriented and passionate about helping others, he is dedicated to making video and audio processing easier for readers.


Kevincy joined the WonderFox team in 2014 and has been a senior columnist ever since. With over two decades of experience in the video editing industry, he shares tutorials, tips, and how-to guides on video/audio processing and personal DVD backups. Family-oriented and passionate about helping others, he is dedicated to making video and audio processing easier for readers.
WonderFox HD Video Converter Factory Pro
1. Record full screen/custom/gameplay/audio only.
2. Record desktop sound or microphone, or both.
3. Save Discord calls, streams, tutorials, and gameplay.
4. Trim/merge/crop/rotate/flip/watermark recordings.
5. Convert recordings with 500+ output presets.
6. Compress large recordings with ease.
7. Download videos, make GIFs, extract audio/subtitles & more...

Privacy Policy | Copyright © 2009-2026 WonderFox Soft, Inc. All Rights Reserved
