


Browser video recording is useful when you need to save a short clip from a webpage, capture a live stream, keep a personal copy of an online lecture, or record a video playing in Chrome, Edge, Firefox, Vimeo, or another site. However, different browser videos behave differently. Some offer an official download button, some only play in the page, and some protected videos may block recording altogether.
In this article, you will learn how to record browser video with audio on Windows and macOS, use built-in and free tools, try online recorders or browser extensions, and handle common cases like Vimeo videos, Chrome tabs, Firefox pages, online classes, website videos, and old Flash videos.
Note: The methods below are intended for personal, lawful, and non-commercial use only. Do not record copyrighted or copy-protected content without permission. If a site provides an official download or offline-viewing option, use that first.
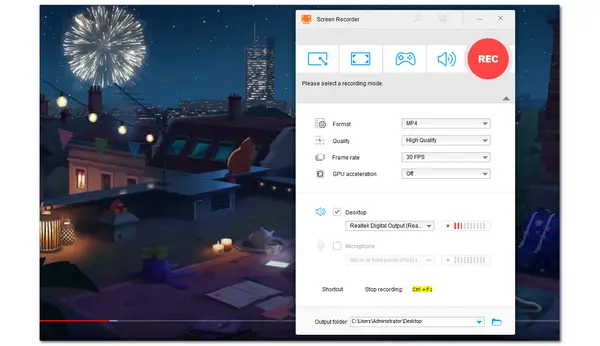
If you want a simple but stable way to record video from a browser on Windows, try WonderFox HD Video Converter Factory Pro. Its built-in Recorder can capture the full desktop or a selected area, so it works with nearly any browser page that can play normally on your screen, including online videos, webinars, Vimeo clips, live streams, online classes, and old embedded videos.
Compared with browser extensions or online recorders, a desktop recorder is usually better for longer recordings, higher quality, and cleaner system audio. After recording, you can also trim, compress, convert, merge, or edit the captured video in the same program.
Main features:
Download the software and follow the steps below to record video from a browser with sound.
 Download for Free
Download for Free
Download for Free
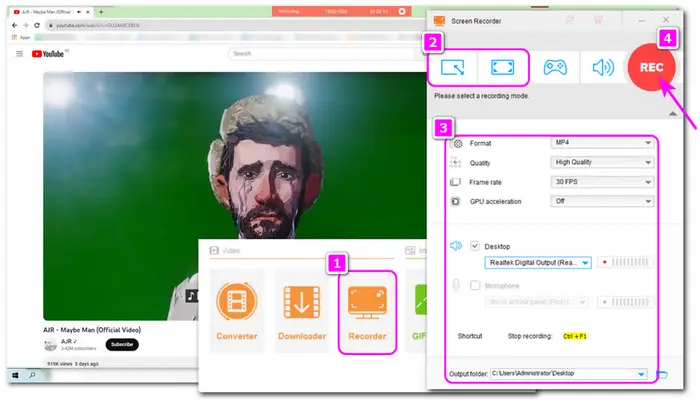
Step 1. Install and launch WonderFox HD Video Converter Factory Pro. On the startup interface, open the “Recorder” module.
Step 2. Open your browser, go to the video, class, meeting, or webpage you want to record, and let it buffer for a moment. For online classes or webinars, also check whether recording is allowed by the course or meeting policy.
Step 3. Return to the Recorder. Choose the first custom mode to select only the video player or browser area, or choose the second “Full-screen” mode to capture the whole screen. Custom mode is recommended to record a specific area if you do not want to show the address bar, bookmarks, or other private information.
Step 4. Choose a recording format, quality, frame rate, audio source, and output folder. To record website video with sound, check “Desktop”. To add your voice, also check “Microphone”. To keep a clean copy of the browser audio, turn off the microphone before recording. You can also enable GPU acceleration if it is available on your computer.
Step 5. Click the red “REC” button. The recording will begin after a five-second countdown. Play the browser video, and press “Ctrl + F1” when you are done. The recorded file will be saved to the output folder you set.
* Need to cut out the beginning or end? Close the Recorder, import the video to the “Converter” module, and trim or compress it there.
Troubleshooting tip: If the recording shows a black screen or has no sound on a streaming site, the content may be protected or the audio route may be blocked. Do not try to bypass copy protection. Use the platform’s download, offline-viewing, or replay feature when available.
Xbox Game Bar is built into Windows 10 and 11. It is mainly designed for recording games, but it can also capture a browser window. It is a good choice when you need a quick recording and do not want to install extra software.
However, Game Bar has some limits. It normally records one active app window, not a freely selected region. It may stop if the browser is minimized, closed, or switched in some situations. It is not ideal for recording only a small video player area, multiple windows, or long online courses.
Main features:
Follow the steps below to record browser video with Game Bar.
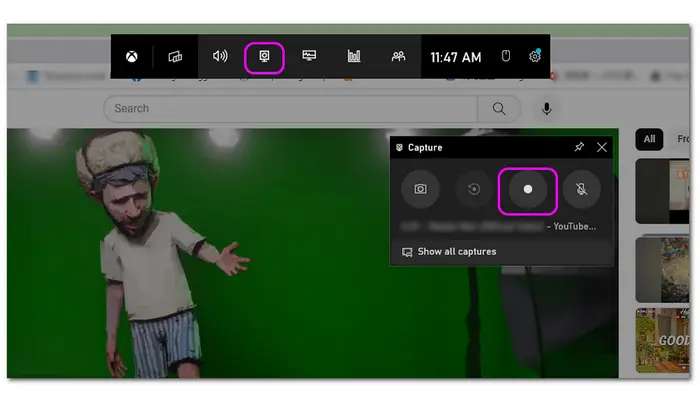
Step 1. Open the browser page you want to capture. Press “Windows + G” to open the Xbox Game Bar overlay.
Tips: If the overlay does not appear, open “Settings” > “Gaming” > “Xbox Game Bar” and make sure it is enabled.
Step 2. Open the “Capture” widget. If you want to record browser audio, make sure the browser is not muted and the system volume is turned on.
Step 3. Click “Start Recording” or press “Windows + Alt + R”. Then play the browser video.
Step 4. Click “Stop” or press “Windows + Alt + R” again when the recording is finished.
Step 5. Open “Gallery” in Game Bar or go to the Captures folder to preview the MP4 recording.
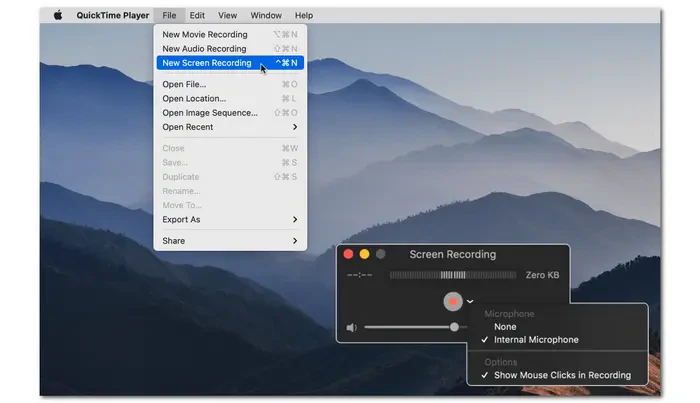
Firefox does not include a general-purpose screen recorder of its own, but macOS has built-in tools that can record Firefox, Chrome, Safari, or another browser without installing extra software. On macOS Mojave 10.14 or later, press “Shift + Command + 5” to open the Screenshot toolbar, then choose to record the entire screen or a selected portion. You can also open QuickTime Player and choose “File” > “New Screen Recording”.
For a browser video, select the browser window or video area, choose a microphone in “Options” if you need narration, and start recording. System-audio capture behavior can vary by macOS version and recording method, so make a short test first if the website sound is important.
OBS Studio is a free and open-source recorder for Windows, macOS, and Linux. It is powerful enough to record a browser window, an online class with webcam, a live stream, or multiple sources at the same time. It is also a good option for users who need advanced settings such as bitrate, resolution, hotkeys, audio tracks, and scene switching.
For beginners, OBS may feel complicated at first. But once you set up a scene, it can record browser videos with high flexibility. For normal webpage recording, use “Window Capture” or “Display Capture”. The “Browser” source in OBS is mainly used to add a webpage by URL as a source; it is not the best choice for capturing a browser tab that is already open.
Main features:
OBS is powerful, but recording issues like black screen, wrong audio source, or large output files may happen if the settings are not configured correctly.
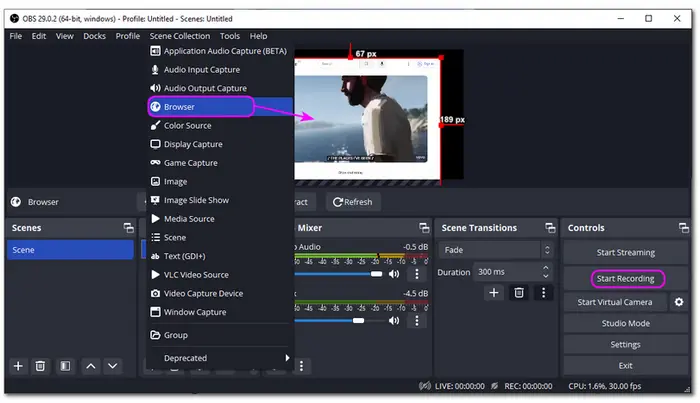
Step 1. Install and open OBS Studio. In the “Scenes” box, create a new scene for browser recording.
Step 2. In the “Sources” box, click “+” and choose “Window Capture” to capture a specific browser window. Choose “Display Capture” if you need to record the whole screen or if Window Capture does not work well.
Step 3. Select the target browser window and adjust the red border in the preview area. Add “Audio Output Capture” or check “Desktop Audio” if OBS does not capture the browser sound automatically.
Step 4. Click “Start Recording”, play the browser video, and click “Stop Recording” when finished.
OBS usually saves recordings to the Videos folder by default. You can check or change the folder in “Settings” > “Output”.
If you only need a quick, short recording and do not want to install software, an online recorder can help. Online recorders are convenient for simple browser tabs, short presentations, and quick shareable videos. But they often have limits on recording length, output format, resolution, system audio, editing, or account sign-in.
ScreenPal (formerly Screencast-O-Matic) is a browser-based screen recorder that can record the screen, webcam, and microphone. It is suitable for quick browser tutorials, online class notes, and short website recordings. You can choose a preset recording size or capture the active window/full screen.
Main features:
The free plan may limit recording length, editing, or computer audio capture. Check the current plan details before recording a long video.
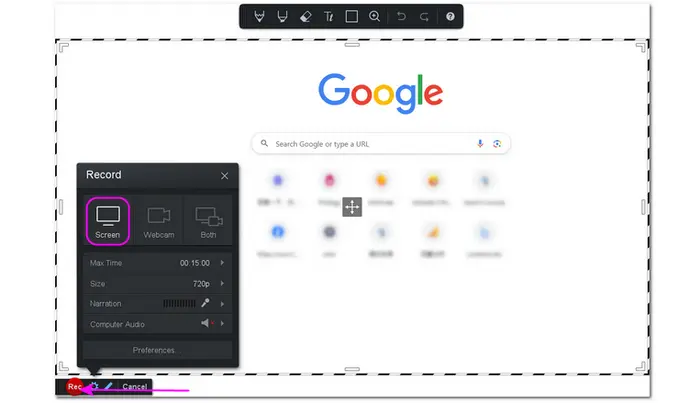
How to record browser screen with ScreenPal:
Step 1. Visit https://screenpal.com/screen-recorder and launch the recorder.
Step 2. Select the recording region, active window, or full screen.
Step 3. Choose whether to record microphone, webcam, or computer audio if the option is available.
Step 4. Click “Record” to start. When done, stop the recording and choose a save or upload option.
RecordScreen.io is a lightweight online recorder for Chrome, Edge, Firefox, and other modern browsers. It requires no installation and no sign-in. You can choose “Screen + Cam” or “Screen only”, then capture a browser tab, window, or the entire screen.
Main features:
It is simple, but it does not provide advanced editing or many format options. Some browsers may save recordings as WebM.
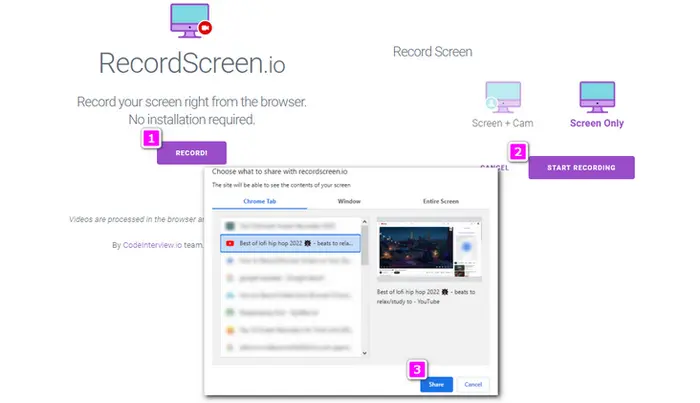
Step 1. Open https://recordscreen.io/ in your browser.
Step 2. Click “Record”, choose “Screen + Cam” or “Screen only”, and press “START RECORDING”.
Step 3. Select a browser tab, window, or the entire screen. If you need browser sound, choose the tab/window audio sharing option when your browser provides it.
Step 4. Click “Stop sharing” when finished, then preview and download the recording.
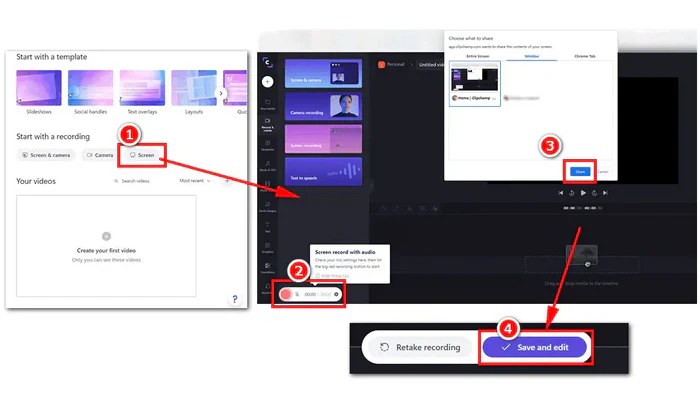
Clipchamp is another convenient choice for recording a browser window or tab online. It can record screen and webcam, and it also includes basic editing options after recording. It is especially useful if you want to trim the captured video before exporting it.
For example, when recording a Vimeo video, online lecture, or website tutorial, you can select the target browser window, enable system audio when prompted, start recording, then save and edit the result in the browser.
Note: Online recorders depend on browser permissions. Always allow screen and audio access only on trusted websites.
Browser extensions are handy when you record tabs often and prefer a button inside the browser. They are good for short tutorials, quick feedback videos, simple Chrome or Firefox recordings, or basic Vimeo/website captures. Firefox itself does not provide a general-purpose built-in screen recorder, so an add-on or an operating-system recorder is usually needed. Keep in mind that extension features can differ between Chrome and Firefox, especially for system-audio capture.
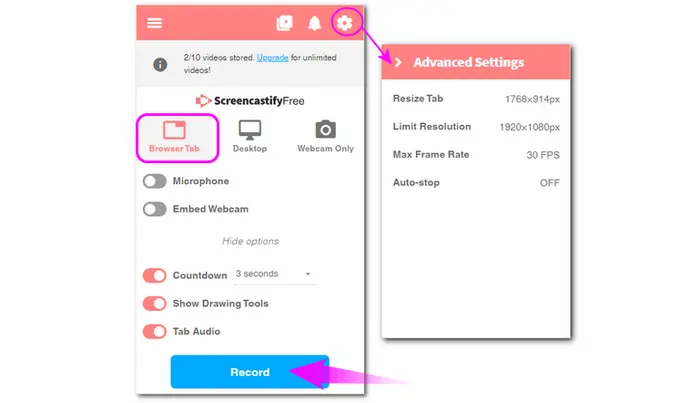
Screencastify is a popular Chrome screen recorder extension. It can record a browser tab, desktop, webcam, microphone, and tab audio. After recording, you can trim the video or export it according to the options available in your account.
Main features:
The free plan may limit the number, duration, or export options of recordings. It is better for short Chrome recordings than long online classes.
How to record with Screencastify:
Step 1. Add Screencastify from its official website or the Chrome Web Store.
Step 2. Open the browser tab you want to record. Click the Screencastify icon and choose “Browser Tab”, “Desktop”, or “Webcam Only”.
Step 3. Enable tab audio or microphone if needed, then click “Record”.
Step 4. Stop the recording, preview it, and trim or export the video.
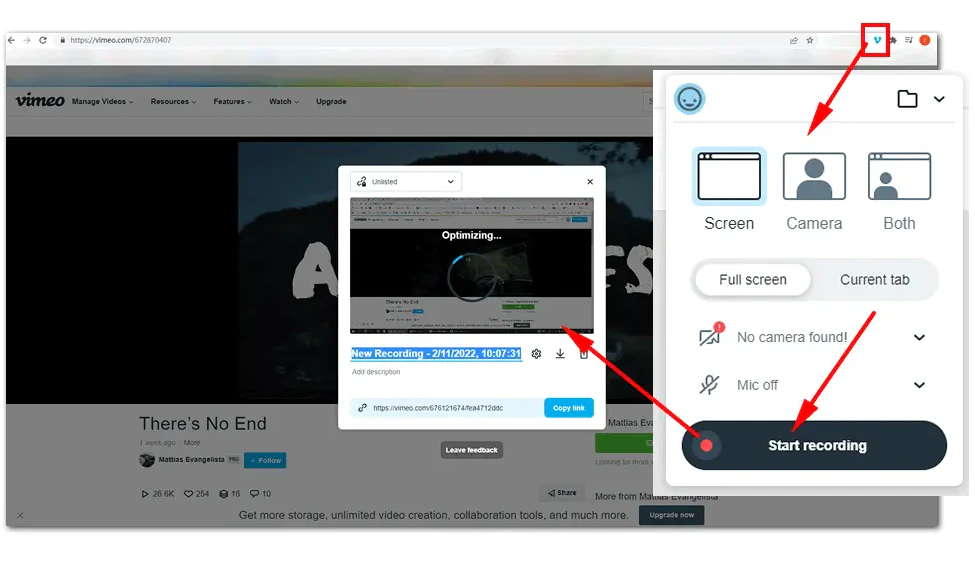
Vimeo Record is a Chrome extension designed for recording screen, webcam, or both. It is not only for Vimeo videos; it can also be used for presentations, quick messages, and browser-based tutorials. If you already use Vimeo to host or share videos, it may fit your workflow.
To use it, install the extension, click the Vimeo Record icon, choose what to capture, start recording, and then stop and save or share the video according to the available options.
Reminder: If a creator enables the official Vimeo download button, downloading is usually cleaner than screen recording. If downloading is not available, record only content you have the right to save.
Awesome Screenshot & Screen Recorder is available for Firefox as well as Chromium-based browsers and is one of the more established Firefox recording add-ons. It combines webpage screenshots with screen recording and can capture the screen, webcam, and microphone, then provide options to download, edit, or share the recorded video.
Main features:
Free-plan limits may change over time. Check its current limits before using it for long recordings.
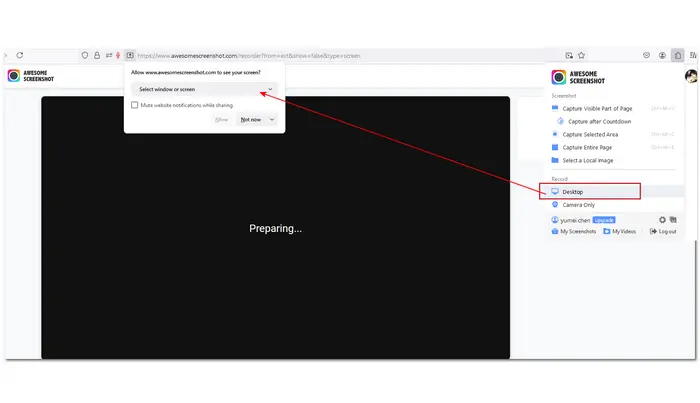
How to record with Awesome Screenshot & Screen Recorder:
Step 1. Add the extension from your browser’s official extension store.
Step 2. Open the extension, choose a recording mode, and decide whether to record microphone or webcam. If you need website sound in Firefox, check the audio choices shown for your current Firefox/macOS/Windows setup before starting.
Step 3. Select the tab, window, or screen you want to capture.
Step 4. Stop the recording when finished, then download, edit, or share the video.
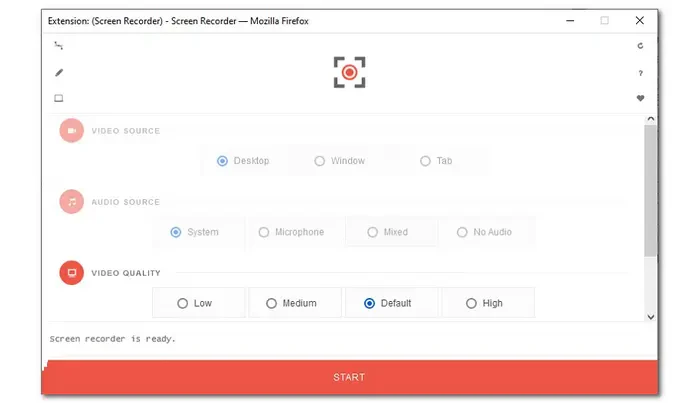
If you only need a simple Firefox add-on for recording the screen, a window, or a tab, Screen Recorder by Bernard is another option. It saves recordings locally in WebM and can start from the Firefox toolbar.
Important limitation: its current Mozilla Add-ons page states that audio recording is not supported in Firefox. Therefore, use it mainly for video-only captures. If you need Firefox video with website sound, a desktop recorder such as WonderFox or OBS is the safer choice.
To use it, add the extension, click its toolbar icon, choose the screen/window/tab to share, start recording, and stop it from the toolbar when finished. The WebM file is then downloaded to your default download folder.
Different browser videos require slightly different recording settings. The tips below cover the most common situations.
Record Vimeo videos: First check whether the video owner has enabled a download button. If yes, use the official download option. If not, use a desktop recorder, select only the video player area, enable Desktop audio, and start recording after the video has buffered.
Record videos in Chrome, Edge, or Firefox: For short clips, a browser extension or online recorder can be enough. Firefox users should test audio before a full recording because some Firefox add-ons can capture video but not system audio. For long videos, online classes, or HD recordings, use a desktop recorder so you are less affected by extension limits, audio restrictions, or browser crashes.
Record old Flash videos: Adobe Flash Player has been discontinued, and most modern websites use HTML5 video now. If you still have access to a legacy Flash video that plays in a browser or special environment, record the visible playback area like any other website video. Avoid installing unknown “Flash Player” packages from untrusted sites.
Record online classes: Make sure recording is allowed by the school, platform, or instructor. Use full-screen or custom-region recording, enable Desktop audio for the lecture sound, and enable Microphone only if you need to add your own voice. Close notifications, plug in your laptop, and test a short recording before the class starts.
Record website videos or live streams: Start recording a few seconds early, keep the browser window active, and avoid refreshing the page. For live streams, choose a stable output folder with enough disk space and stop the recording manually when the stream ends.
Q1. Can I record a video from a website?
Yes, if the video can play normally on your screen and you have the right to record it. A desktop screen recorder can capture the browser window or selected video area. However, do not record copyrighted or copy-protected content without permission.
Q2. How do I record a Chrome tab with audio?
You can use a desktop recorder, a Chrome extension, or an online recorder. With WonderFox HD Video Converter Factory Pro, open Recorder, select the Chrome area, choose a video format, check Desktop audio, and click REC. With an online recorder or extension, remember to choose the option that shares tab audio or system audio.
Q3. Why is there no sound in my browser recording?
Common causes include muted browser tabs, disabled system sound, wrong audio source, headphones or Bluetooth output changes, or missing browser audio permission. In WonderFox, check “Desktop” to record website sound. In online recorders, select the option to share tab audio/system audio when prompted.
Q4. Can I record protected streaming videos?
Many paid streaming platforms use content protection that may result in a black screen, no audio, or failed capture. This guide does not provide methods to bypass DRM or copy protection. Use the platform’s official download, offline mode, or replay option instead.
Q5. What format should I use for browser recordings?
MP4 is the safest choice for most users because it works well on Windows, macOS, phones, tablets, and most websites. If your recorder saves WebM or MKV, you can convert the file to MP4 later for easier playback or sharing.
Q6. Does Firefox have a built-in screen recorder?
No. Firefox does not provide a general-purpose built-in recorder for capturing browser video. You can use a Firefox recording add-on, a desktop recorder, Xbox Game Bar on Windows, or the Screenshot/QuickTime recording tools on Mac. If you need website audio, test the audio source first because not every Firefox add-on can capture system sound.
Recording video from a browser is not difficult once you choose the right tool for the job. For long, high-quality, or audio-sensitive recordings, WonderFox HD Video Converter Factory Pro is the easiest Windows option. For quick recordings, Xbox Game Bar, the macOS Screenshot/QuickTime tools, OBS Studio, online recorders, and browser extensions can also help.
Before recording, check whether the site offers an official download option, make sure you have the right to save the content, and test the audio source first. This way, you can avoid silent recordings, black screens, and unnecessary re-recording.

Kevincy joined the WonderFox team in 2014 and has been a senior columnist ever since. With over two decades of experience in the video editing industry, he shares tutorials, tips, and how-to guides on video/audio processing and personal DVD backups. Family-oriented and passionate about helping others, he is dedicated to making video and audio processing easier for readers.


Kevincy joined the WonderFox team in 2014 and has been a senior columnist ever since. With over two decades of experience in the video editing industry, he shares tutorials, tips, and how-to guides on video/audio processing and personal DVD backups. Family-oriented and passionate about helping others, he is dedicated to making video and audio processing easier for readers.

Terms and Conditions | Privacy Policy | License Agreement | Copyright © 2009-2026 WonderFox Soft, Inc. All Rights Reserved