Before starting the solutions to fix the Adobe Premiere Pro lagging issue, let's see how to check if the video is dropping frames, or the media files are corrupted.
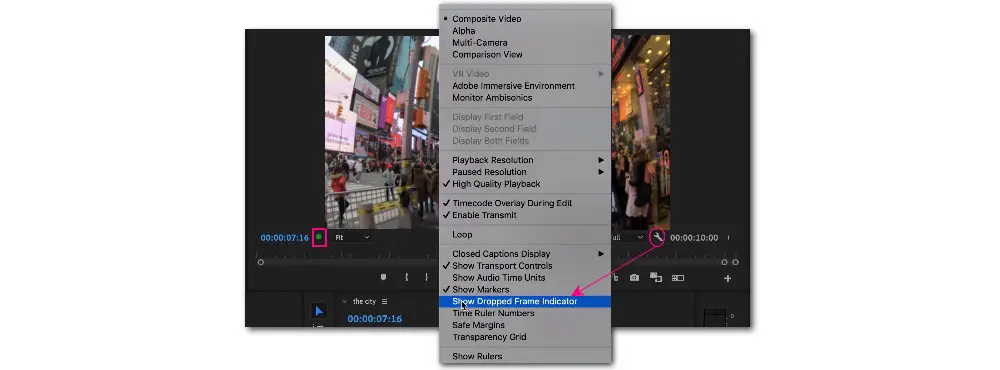
One of the most apparent signs of video playback lagging is when the play head jumps or skips instead of moving smoothly along the timeline. Additionally, you may also notice audio playback lag, which sounds similar to a faulty headphone connection causing the audio to cut in and out. However, sometimes dropped frames may not be so obvious. In such cases, you can activate the "Show Dropped Frames Indicator" option, which displays a green symbol. The symbol turns yellow when dropped frames are detected. Moreover, you can hover your cursor over the indicator to check the number of frames lost.
How to activate the dropped frames indicator:
1. Clicking the “wrench” icon below the video playback window after importing the video.
2. Select the “Show Dropped Frames Indicator” option.
As stated previously, the Adobe Premiere Pro lagging playback issue is usually caused by 3 main reasons: the video resource, hardware configuration, as well as the settings in Premiere Pro. So follow the solutions below to quickly get your Premiere Pro lag fixed now!
First of all, check if your video resource is natively damaged or corrupted. If yes, try some data repair tool to fix the video resource. And for high-resolution videos like 4K HEVC 60 FPS videos HDR 4K videos, etc., you are more likely to encounter Premiere Pro video not playing or lagging issues. Also, some videos with compressed codecs may also cause a laggy playback issue when editing.
The following are solutions to help you adjust problematic videos.
Solution 1. Change Video Encoder for Premiere Pro
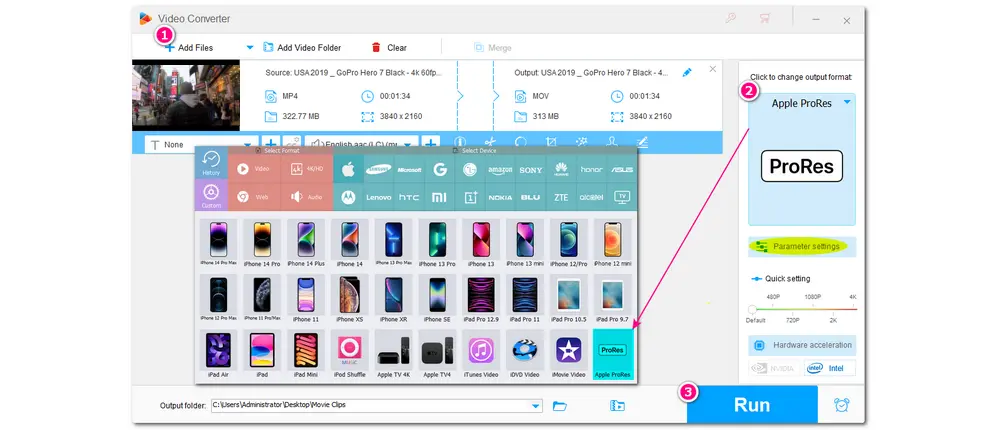
While compressed codecs behave well in video recording or uploading, they are not suitable for editing. Compressed codecs, like H.264 requires longer to decompress while editing, which may result in playback lagging issue. Changing the video codec to ProRes, Cineform, DNxHD, etc. is a good way since these codecs are ideal for editing. Here you can try WonderFox HD Video Converter Factory Pro. It is a professional video converter that supports all kinds of video inputs, including MP4, MKV, Xvid, H.265, etc., and can convert your videos to ProRes effortlessly with a few simple clicks. Get it here and follow the simple guide below to convert your videos to ProRes without any hiccups.
Step 1. Launch this program and open the “Converter”. Next, click “+ Add Files” or “Add Video Folder” to import the source video files into the program. (Batch conversion is supported in this program.)
Step 2. Click on the format image on the right side of the interface to enter the output format library. Then go to the “Apple” device section and choose the “ProRes” profile below. (By default, the codec is set to ProRes 422 HQ. If you want a specific ProRes codec, navigate to the “Parameter settings” window and switch to a new ProRes type under the “Encoder” drop-down list.)
Step 3. Specify an output path for the converted files by clicking the bottom triangle button. Finally, press “Run” to start the conversion.
Step 4. Import the converted file into Premiere Pro again and see if the video lagging in Premiere Pro goes away.
Solution 2. Downscale Resolution
A video’s computing load increases as its resolution increases. So lowering the high video resolution will assist in fixing the Premiere Pro video playback lag issue. And here you can adjust the video resolution in Premiere Pro while processing. This way will not change the resolution on the exported video, only the quality of the visual player window. And the process is quite simple.
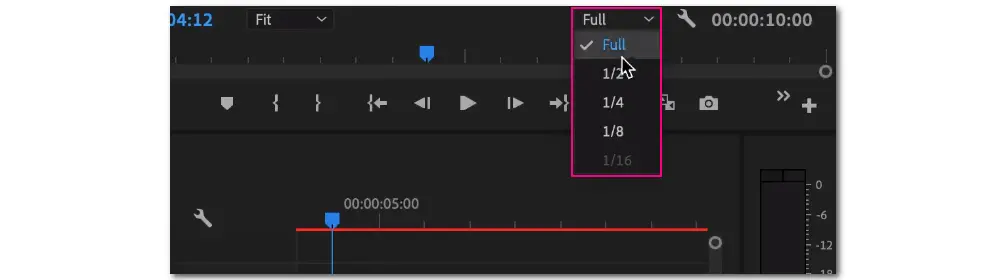
Step 1. Navigate to the video playback window.
Step 2. Click the playback resolution dropdown menu (the “Full” button).
Step 3. Now you can select any of the 4 options to reduce the playback resolution to 1/2, 1/4, 1/8, 1/16 of the native one.
Solution 3. Reduce Frame Rate
In most circumstances, Premiere Pro can smoothly play your recorded 4K 30 FPS videos. However, if your 4K recorded videos are up to 60 FPS or even higher 120FPS, then Premiere Pro software decoding would be ineffective in handling such highly computationally hard work. As a result, the video will become choppy or lag during the playback. To fix this, try to reduce the frame rate from 60 FPS to 30 FPS.
Here, WonderFox HD Video Converter Factory Pro can also help you adjust the video frame rate easily in its “Parameter setting” window.
Step 1. DownloadDownload and run WonderFox HD Video Converter Factory Pro.
Step 2. Enter the “Converter” and import the video. Choose a Premiere Pro-supported video format.
Step 3. Open the “Parameter settings” window and find “Frame rate”. Choose “30fps” from the frame rate drop-down list. Moreover, this way directly converts VFR videos to CFR which can avoid possible video lagging, audio out of sync, etc. issues.
Step 4. Click “Run” to start the conversion.
5. Check if it troubleshoots the issue.

Solution 4. Convert HDR to SDR
High Dynamic Range (HDR) videos are known for providing a more immersive and realistic viewing experience for users. However, not all displays or devices support HDR. So if your videos are HDR content, you’d better convert HDR to SDR and then import it to Premiere Pro for playback. This way may also help fix Premiere Pro playback lag issues.
And WonderFox HD Video Converter Factory Pro can still help easily finish the conversion task.
Step 1. Import the HDR videos into the converter.
Step 2. Select a Premiere Pro-supported output format. (Apple ProRes, or others)
Step 3. Press “Run” to start the conversion.
The computer settings are also important for video editing. So check if your computer supports Adobe Premiere Pro editing videos.
1. Check the Computer Hardware Configurations
Before start editing videos with Premiere Pro, it is necessary to check the computer configurations. Running Premiere Pro on your laptop or desktop needs to meet specific system requirements. You don’t need to worry about hardware when SD videos playback like 480p, 720p, or 1080p video. But for HD video playback, you need a computer with high-end hardware configurations (including RAM, CPU, GPU, solid state disk...) to playback 4K or 8K video, etc. encoded by HEVC or AV1 at a high frame rate like 60fps and 120 fps.
You can read the Adobe official system requirements list (https://helpx.adobe.com/premiere-pro/system-requirements.html) and check if your device is satisfied with it. If you are unable to upgrade your hardware configurations, change the video codec, resolution, and frame rate with a 4K video converter like HD Video Converter Factory Pro can also do you a favor.
2. Close Unnecessary Application in Your Computer
If your computer is running many programs, then it will affect the performance of Premiere Pro and result in the playback lagging issue. You can close unnecessary ones to increase the Premiere Pro's performance.
1. Open the “Task Manager” by right-clicking on the Windows startup and finding it in the drop-down list.
2. Find the programs unnecessary. Right-click on them and select “End task”.
After checking the video resource and the computer configurations, now you can make some changes in your Premiere Pro if the video lagging issue still exists.
But before starting, you can check for updates, which usually works with lots of editing-based problems. Close all the applications and check your system for updates. Don’t forget to make sure your Adobe products are up to date.
Solution 1. Turn Off High Quality Playback
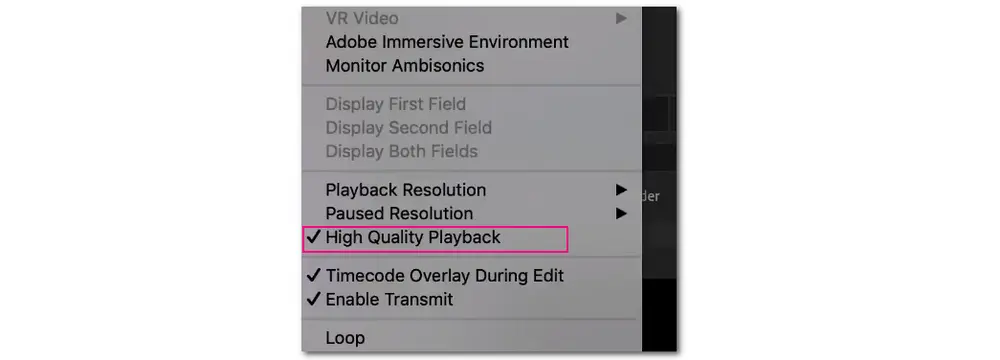
The High-Quality Playback option in Premiere Pro is enabled by default to let you view the video in a resolution closest to the exported video. But this option will reduce the performance of Premiere Pro. So if your Premiere Pro playback choppy or lagging, try to turn it off.
To turn off the High Quality Playback, you can:
1. Click the wrench “settings” icon under the video playback window.
2. Find and deselect the “High Quality Playback” option.
Solution 2. Use Proxy Videos in the Workflow
Proxy videos are low-resolution video copies of the original video files, which are supported by Premiere Pro. When you feel high-resolution video playback lagging in Premiere Pro, then create a proxy copy for the video.
How to Create a Proxy Copy:
1. Select your video in the project panel and right-click on it.
2. Choose "Proxy” > “Create Proxies”.
3. Select the media format and preset it with low resolution.
4. Click “OK”. Then it will open Adobe Media Encoder to automatically convert your footage to proxies.

Solution 3. Use Global FX Mute Button
The Global FX Mute button can handily toggle on or off your sequence effects. Visual and audio effects can significantly increase the working size of video files, thus leading to the lagging playback issue. So you can mute the effects to fix the Premiere Pro lag issue.
To add the Global FX Mute button:
1. Click the “+” button under the playback window.
2. Find the “fx” icon and drag it to your playback window menu bar.
3. Click the “fx” button to turn all the sequence effects on or off.

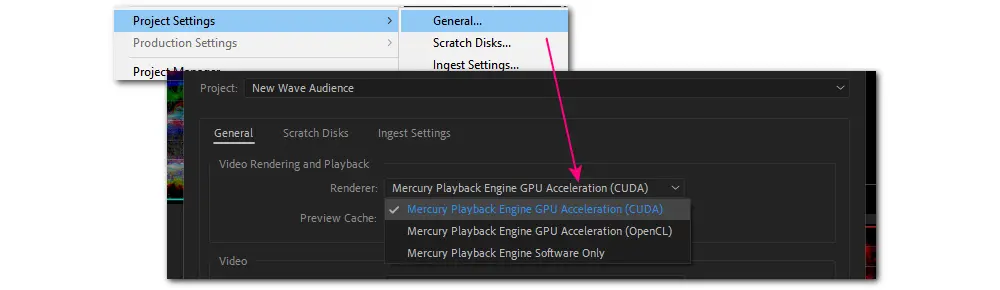
Solution 4. Use GPU Acceleration
Simply speaking, GPU acceleration is when the system divides the burden between your GPU and CPU after checking all the processes that a piece of software is currently running. Setting your project to GPU acceleration can help you enjoy smooth playback in Adobe Premiere Pro.
Detailed steps are:
1. Go to “File” > “Project settings” > “General”.
2. Check if the “Renderer” is set to “Mercury Playback Engine GPU Acceleration” under the “Video Renderer and Playback” section.
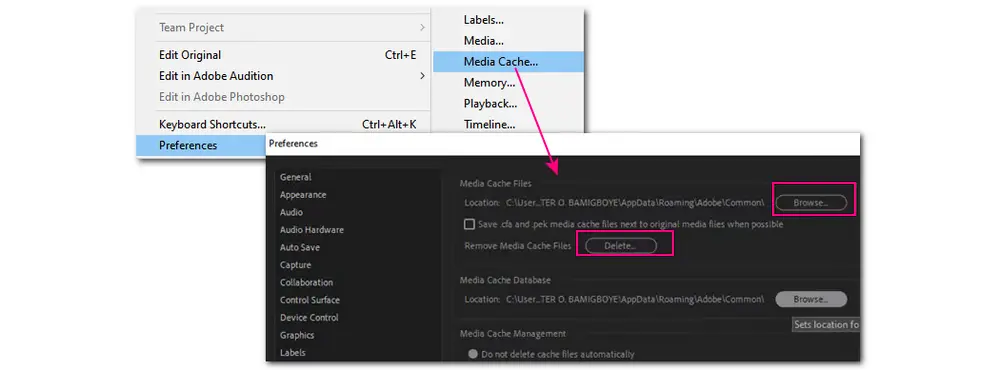
Solution 5. Clear Media Cache Files
The choppy or lagging video playback in Premiere Pro can also result from bad render files or cache files. The accumulated media cache files will take up a lot of space, which will hinder the performance of Premiere Pro. So removing media cache files can help improve the performance and fix the playback lagging issue.
To clear media cache files, you need to:
1. Close the project first. And go to “Edit” > “Preferences” > “Media Cache”.
2. Click “Delete” to remove media cache files.
3. Hit “OK“ and you’re done.
You can also select “Browse” to choose a new location.
Solution 6. Disable Auto Save
Premiere Pro regularly saves your progress when you are working on a project, which can also slow down your computer. And you can disable the auto-save option to improve the performance. But if you don’t want to lose any final edits, try this solution cautiously.
Simple steps are:
1. Go to “Edit” > “Preferences” > “Auto Save”.
2. Uncheck the “Automatically save projects” checkbox.

Solution 7. Increase Memory Allowance
RAM is needed for each application running on your machine. So having a lot of programs open while editing can reduce the speed of your system and then cause the playback choppy/lagging issue. When you find your video playback lagging in Premiere Pro, try to increase the memory allowance to fix the problem.
Simply go to “Edit” > “Preferences” > “Memory” and change the value of RAM reserved for other applications into a smaller number to increase available RAM for Premiere Pro and other Adobe products.

That’s all I want to share with you about how to fix the Premiere Pro playback lag issue. When your video playback is lagging or choppy in Premiere Pro, you can try the above solutions to fix it and improve the performance of Premiere Pro. I hope you can find this article helpful.
Thank you for reading till the end! Have a nice day!
Privacy Policy | Copyright © 2009-2026 WonderFox Soft, Inc.All Rights Reserved
