Free Download
How to Add Subtitles on Kodi Easily in 2024?
AuthorRecommended by the author
Free Download X

SoftwareHow to & Tips

Video FormatsConvert Video

Resources

How to Add Subtitles on Kodi Easily in 2024?

Author by Rocabella

Updated on Jan 23, 2024

Kodi is a free and open-source media streaming software application that has a default subtitle feature. It can allow you to download subtitles with just a few button presses on your remote. This article will show you simple methods of how to add subtitles on Kodi. Let’s take a look now.

Why Do We Need Kodi Subtitles? How to Add Subtitles on Kodi?

Kodi subtitles become essential sometimes, especially when audio quality is poor or when watching a video in a foreign language. Some popular video plugins for Kodi already have automatic subtitles capabilities, but sometimes you need more control over the selection process to get the subtitles that fit your video. Hence, this step-by-step tutorial will show you how to add subtitles to Kodi easily.

Hot search: Free Auto Subtitle Generators | Add Subtitle to MP4 | Download YouTube Subtitles

Part 1: How to Enable Automatic Subtitles on Kodi

Subtitles KodiSubtitles Kodi

Step 1. In order to get subtitles on Kodi, firstly, launch Kodi and go to Settings > System. Then click the Add-ons tab on the Home Screen.

Step 2. Select Add-ons by clicking the little box icon on the top left corner of the screen and select Install from the repository.

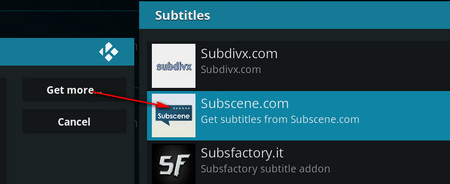
Step 3. Click on Subtitles and install some subtitles addons. There are many subtitles download providers, install the one that suits your language needs. OpenSubtitles offers subtitles in many languages and is highly recommended.

Best Subtitles for KodiBest Subtitles for Kodi

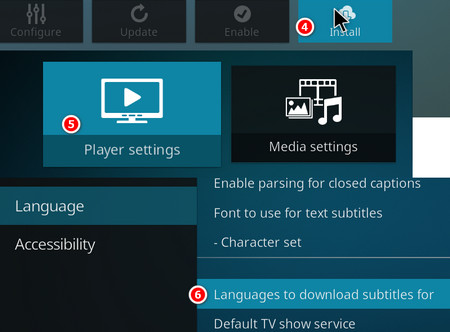
Step 4. Click on the Install button and now we are going to set up the preferred language for subtitles. Go back to the Home Screen and open Settings by clicking the gear icon near the bottom-left corner.

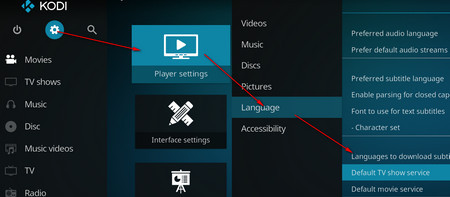
Step 5. Select Player Settings and then highlight the Language tab and click on Language to download subtitles for.

Step 6. Select your preferred languages and click OK to confirm. Next, set the Default TV show service and Default movie service to one of the subtitles addons installed earlier.

Step 7. After all settings are ready, you can get the available subtitles for your playing movie or show by tapping on the Subtitles icon in the bottom right corner.

Part 2: How to Get Kodi Subtitles Without Registration

Add/Download Subtitles Kodi Add/Download Subtitles Kodi

Step 1: Launch Kodi and click Settings on the top-right. Now, click Player Settings from the list of the options.

Step 2: Here select the Language option on the left panel and click Languages to download subtitles for under Download Services to change/select the desired language Kodi subtitles.

Step 3: Now click Default TV show service.

Best Subtitles for KodiBest Subtitles for Kodi

Step 4: Click Get more… button and download the Subscene.com subtitle service for Kodi. Once you have installed Subscene.com, it will also appear on your list.

Step 5: Then, click Subscene.com to make it your default Kodi subtitles service.

Step 6: Finally, click Default movie service and repeat Step 5. You have now successfully set up Subscene.com, which will provide you with Kodi available subtitles for the specific title being played.

Part 3: Add Subtitles to Your Videos with HD Video Converter Factory Pro

If there is no subtitles available for downloading on Kodi. You can add subtitles to your video and then directly play videos with subtitles. With WonderFox HD Video Converter Factory Pro, you can quickly add subtitles to your movie or show permanently. It allows you to embed hardcoded subtitles or soft subtitles to MP4, MKV, or MOV. Free download the tool and take the following steps to add compatible subtitles now.

Free Download Free Download

Tutorial on How to Add Subtitles to Videos for Playing on Kodi

How to Add Subtitles to Videos for Playing on Kodi

At first, please free downloadfree download the software and follow the steps.

Step 1: Load Videos into Subtitle Adder

Launch the program you just installed, and pick Converter icon and click on Add Files to load the videos you want to add subtitles to.

Tips: you can add video in batches here.

Step 2: Add Subtitles to Videos

Download needed subtitles from subtitle websites first. Next, click "T" sign and select "Add subtitle" to enter the “Open” window. Select the subtitle file you prepared earlier and then click "Open" to attach it to your video.

Step 3: Finish Subtitles Adding Process

Enter the right-side format library to choose a format compatible with Kodi, such as MP4, AVI, MPEG, WMV, ASF, etc. Then set an output path and finally, click Run button to export the video with subtitles.

Achieve More with WonderFox HD Video Converter Factory Pro

1. Remove subtitles from a video.

2. Extract subtitles from videos.

3. Download videos from YouTube, Facebook, Vimeo, and other video sharing sites, with subtitles.

4. Screen record movie or music on PC.

Free Download Free Download

How to Add Subtitles to DVD Movie

How to Add Subtitles to DVD Movie

WonderFox DVD Video Converter

With WonderFox DVD Video Converter, you can easily embed or hardcode subtitles into DVD movies with just a few clicks. The software also converts DVDs into a variety of video formats for playback on a variety of devices, anytime, anywhere.

More Related Articles

Two Methods of How to Solve Kodi ISO Playback Issue Easily and Effectively How to Watch DVD Movies in Kodi and Rip DVD Collections for Creating Library How to Make VLC Turn off Subtitles with 3 Simple Solutions
3 Free and Practical Methods of How to Hardcode Subtitles to Video Troubleshooting on Samsung TV Subtitles Problems [Solved] How to Fix VLC Subtitle Delay Issue Without Any Hassle