Q: How do I export Premiere Pro to MOV?
Q: So, my question is: how do I export H264 in .MOV QuickTime from Adobe Premiere Pro? Is there an easier way to do it?
Exporting a finished video correctly is also an essential element in the video editing process. If you want the final video look exactly the same as the one seen in the timeline, be careful with the export settings; otherwise, you’ll get a different result or get a file that cannot be opened with common players. Next, we’ll walk you through a step-by-step guide on how to export .mov in Premiere Pro. Let’s begin!
Exporting a video from Adobe Premiere Pro to MOV format is a simple process. Here’s how to do it:
Exporting an elaborate project from Premiere Pro can be time-consuming. So, to nail it on the first attempt, double-check your video in the timeline and make sure there are no editing mistakes before performing the export.
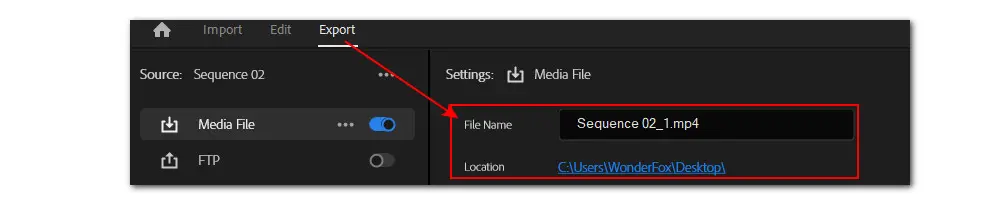
After ironing out any creases, it’s time to export. Head to the upper-left corner and click Export. The file export window will open. Hit Media File at the left panel. Below the Settings tab, you can give a filename and choose an output folder.
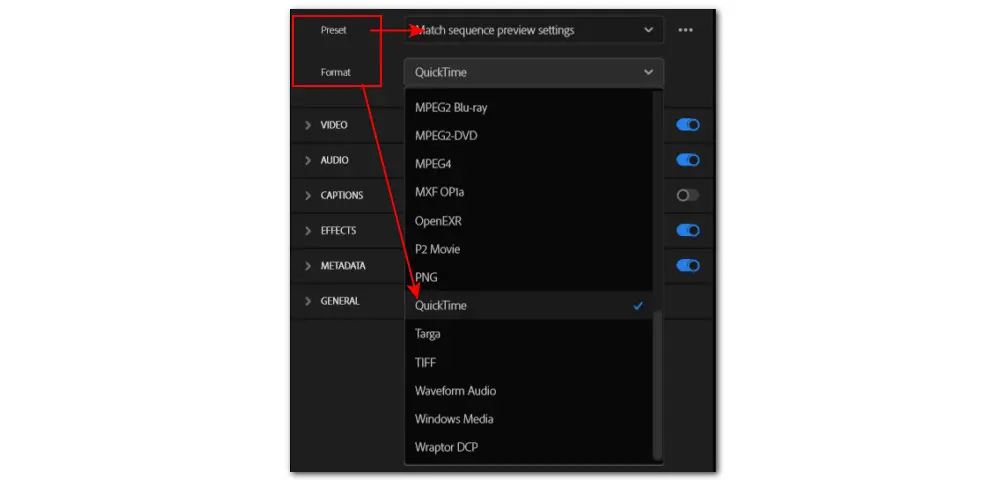
Hit the downward arrow to expand the Format dropdown list and find the QuickTime option. Its videos use the .mov file extension. Select it as the output format.
Then, in the Preset pop-up list, choose Match sequence preview settings. Also, you can manually select a needed Apple ProRes codecs for your MOV video it by hitting More presets.
Under the preview video, you can see the detailed info of this output MOV file, including video codec, resolution, sample, bitrate, video length, audio sample rate, audio channel, etc. Finally, hit Export to get the exported .mov video.
Et voilà! That’s how to save a Premiere Pro video as MOV. For exporting project files with the .prproj extension to MOV files, Premiere Pro is the only way. But if you just want to transcode a video to MOV format, Premiere Pro is not a prudent choice since it is intended for video editing instead of video transcoding. Next, we’re going to share with you an alternative to Premiere Pro for performing hassle-free MOV conversions on Windows.
WonderFox HD Video Converter Factory Pro is the tool we are going to introduce. This is a professional video converter that can not only convert any video to MOV but also transcode MOV to MP4, MKV, AVI, and 500+ presets (including standard formats, devices, and social platforms).
Besides, the software allows you to customize output parameters and offers six variants of ProRes codecs, including Apple ProRes 422 HQ, Apple ProRes 422, Apple ProRes 422 LT, Apple ProRes 422 Proxy, Apple ProRes 4444 XQ, and Apple ProRes 4444. So, you can choose any type of Apple ProRes codec based on your requirements.
It has an intuitive interface and straightforward workflow. Next, let’s see how to export MOV in Premiere Pro alternative.
Click the DOWNLOAD button below to install the simpler Premiere Pro alternative on your PC first.
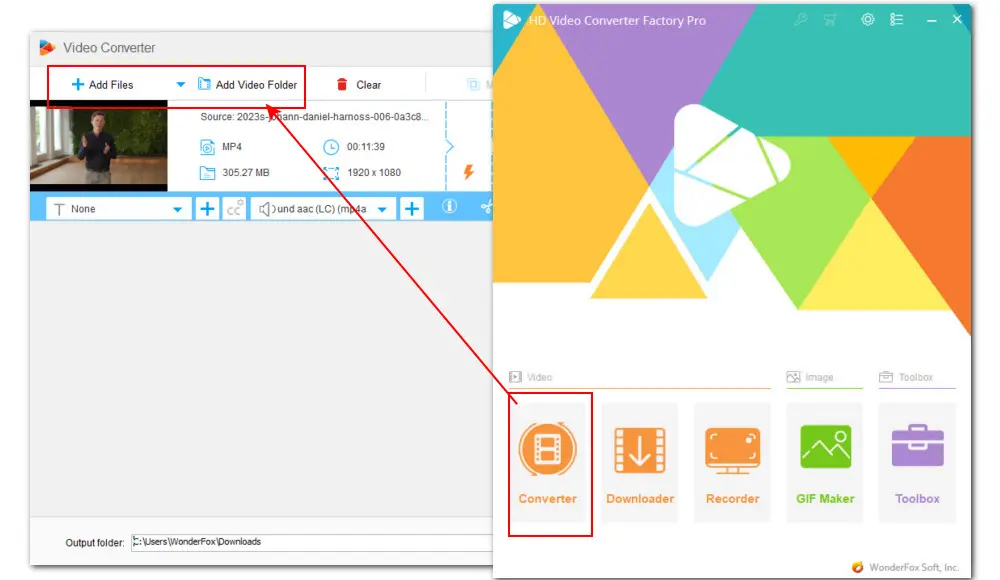
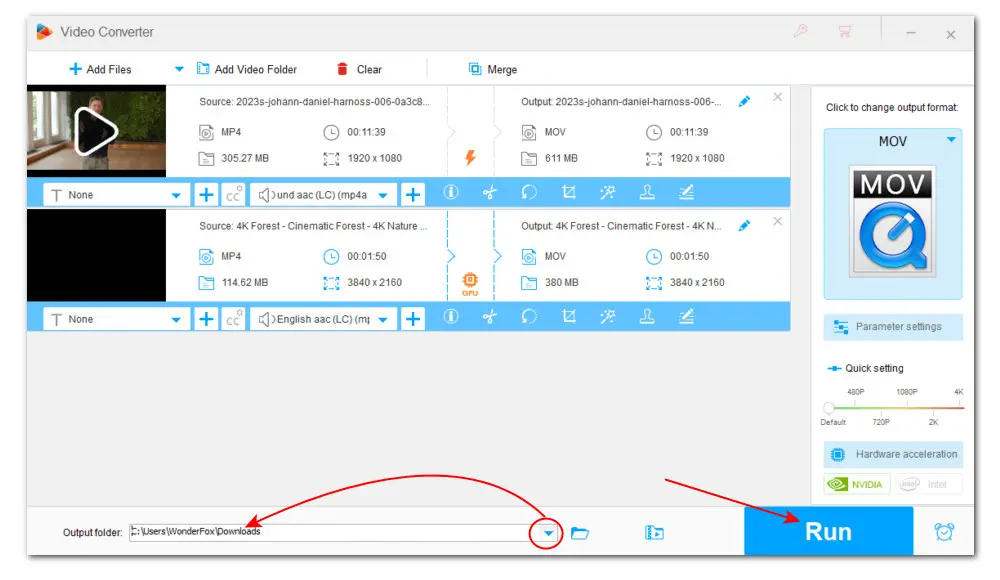
After installing, open the program and go to Converter. Drag and drop your source videos into the app.
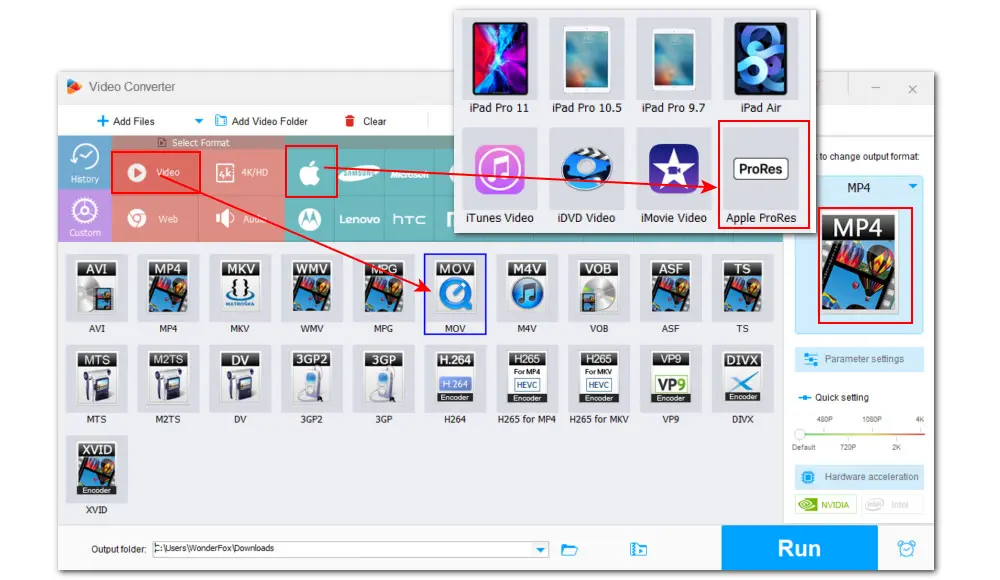
Tap on the right-side format image to enter the format library. Go to Video and select MOV as the output format. Also, you can head to the Device section and hit the iPhone symbol to choose Apple ProRes below.
As you can see, there are five categories of output presets for your choice. Enter the category and then simply tap on the profile you need.
This handy tool includes a set of editing tools that allows you to trim, merge, crop, rotate, add effects, attach subs, and more.
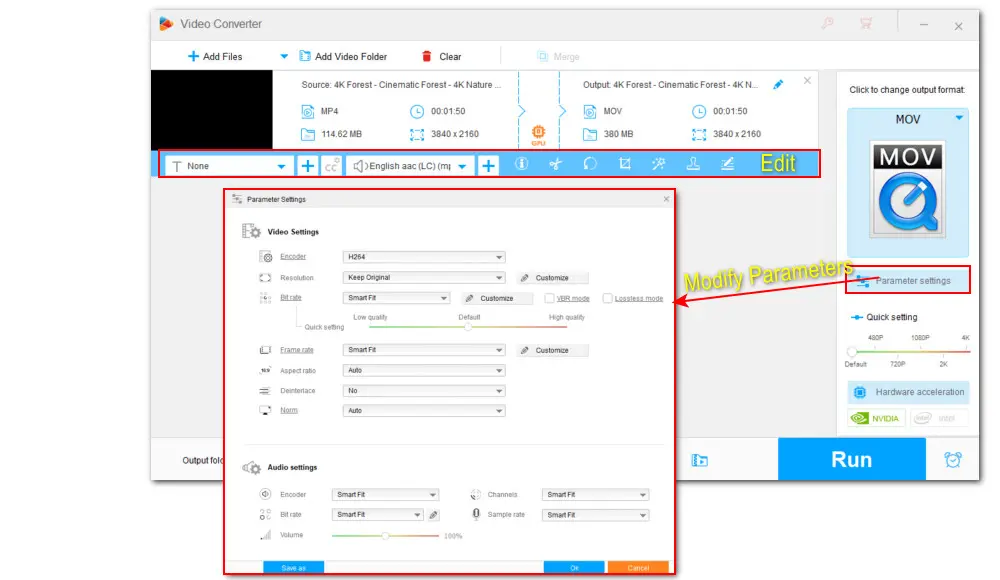
For people with some codec-related knowledge, they can go further with the Parameter settings to change video and audio codec, resolution, sample rate, bitrate, audio channel, etc.
Once all settings are ready, click the ▼ button to choose an output path or leave it as default. At last, hit Run to export the video to MOV file.
With support for Batch Mode, you can process multiple videos to MOV together at the same time, making it a real time-saver.
Well, that’s it. And I hope that this guide on how to export MOV in Premiere Pro will empower you to do and share your best work.
1. Where is the video I exported from Premiere Pro?
The default file destination for exported project files or videos is Documents > Adobe > Premiere Pro > Version Number (23.0). You can find your saved files here. You can also find your video by searching its filename in File Explorer.
If you have changed the file path but forget, you can open the project in Premiere Pro and go to Export > Media File > Location to check it out.
2. How to export a ProRes 422 HQ .mov from Premiere Pro?
To export a file in Premiere Pro to a MOV video encoded with Apple ProRes 422 HQ, you can go to Export > Media File. After selecting QuickTime from the Format menu, head to the VIDEO section and expand the Video Codec dropdown list to select Apple ProRes 422 HQ.
3. Why can’t I import MOV videos into Premiere Pro?
The reasons for MOV not importing into Premiere Pro can be various. There might be something wrong with your software, source MOV file, or running computer. Most frequently, the causes lie behind codec or format issues, which can be easily fixed by transcoding. And the above-mentioned WonderFox HD Video Converter Factory Pro is a well-regarded video and audio converter. It can help fix any import or playback issues resulting from incompatible format/codec or wrong video settings. If you are experiencing the same issues, try the app to fix it now:
Privacy Policy | Copyright © 2009-2026 WonderFox Soft, Inc.All Rights Reserved
