If DaVinci Resolve no audio during the playback or no sound after export, the possible reasons can be computer issues, the problematic file itself, or the wrong settings in DaVinci Resolve. This post provides detailed checking and troubleshooting methods for the DaVinci Resolve not playing audio issue. You can read the following content to check and fix the issue easily.
The volume setting is a basic setting, but many people may overlook it so that they can’t hear the audio in DaVinci Resolve. So make sure the computer’s volume is not muted and turn it up at a moderate level. If the no sound issue in DaVinci Resolve still exists after you adjust the computer’s volume setting, then go for the next solution.
Still can't hear the sound? Then you need to ensure the computer’s default output device is correctly set. Whether you are using headphones, internal speakers, or external monitors, set the default output device before launching DaVinci Resolve, or you may need to change the settings within DaVinci Resolve.
You can check if there are problems with the source files by playing them with the default media player or other programs on your computer. If these files can play well on your computer, they should also work in DaVinci Resolve. But if not, then your files may not have audio tracks or the audio may be corrupted. This can also help you check the computer’s audio playback capabilities.
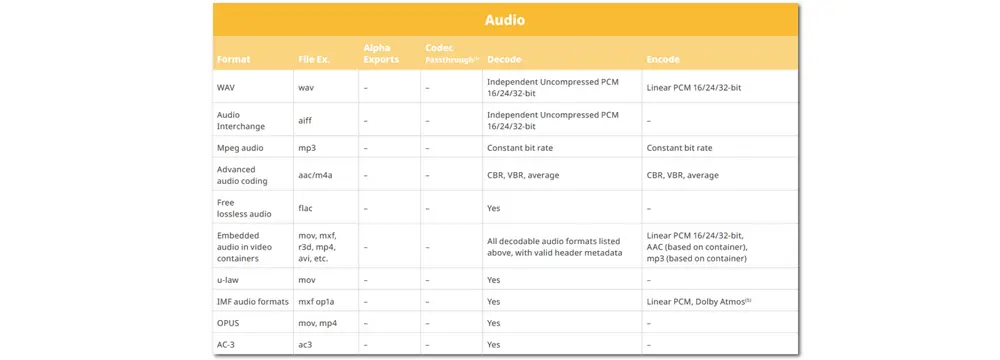
Also, you need to check if the audio format/codec is compatible with DaVinci Resolve. If you find that the source files work well with other devices or platforms, but once you import them to DaVinci Resolve, they won’t work, the most likely cause is that the files are not supported by DaVinci Resolve. The following gives the DaVinci Resolve supported audio formats for Windows. If you want to learn more, just click here to check the DaVinci Resolve 18 supported format and codec list.
If the audio codec/format is not compatible with DaVinci Resolve, then you can change the audio format or codec with a video converter program, like WonderFox HD Video Converter Factory Pro. It is an all-in-one video and audio converter that can easily change the audio codec and format with a few simple clicks. It also supports batch conversion and hardware acceleration to help you quickly finish the conversion process, even if you have multiple files to be converted. More than conversion, it also supports other handy and practical features.
The following is a simple guide for you to convert files to be supported in DaVinci Resolve.
Step 1. Download and installDownload and install HD Video Converter Factory Pro on your PC and then launch it.
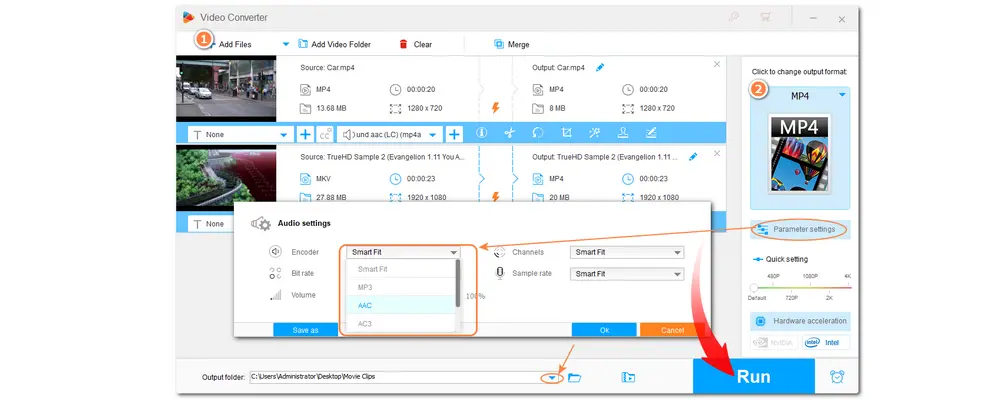
Step 2. Open the “Converter” and then click the upper-left “+ Add Files” button to import the unsupported source files.
Step 3. Click the format image on the right side to unfold the output format library. Here you can select a DaVinci Resolve supported video or audio format under the “Video” and “Audio” tabs. (If your source files are videos, then remember to open the “Parameter settings” window to adjust the audio codec as well as video codec to be compatible with DaVinci Resolve.)
Step 4. Specify an output path for the converted files by clicking the bottom inverted triangle button. Then press “Run” to start the conversion process.
Hot Search: Increase Video/Audio Volume | DaVinci Resolve HEVC | Video Editors for Windows 11| Fix Video no Sound When Playing
If you’re still facing the DaVinci Resolve no audio or no sound issue after importing the converted files as well as checking other things, then the cause can be the program itself. So it’s time to check and adjust the DaVinci Resolve settings.
If the issue still exists after checking the sound settings on your computer and the files, you can try the following methods to fix the DaVinci Resolve sound not working issue.
The first thing you need to check is the audio settings in DaVinci Resolve. After launching DaVinci Resolve, navigate to the “Edit” tab, click on the workspaces, and select “Reset UI Layout”. Then go to the audio volume section above the timeline.
Step 1. Make sure the “Mute” button is not enabled.
Step 2. Check the volume slider and drag it to set the appropriate level for you.
Step 3. If the volume slider is yellow, click on the “DIM” button to turn it off, as it will reduce the volume by about 50%.
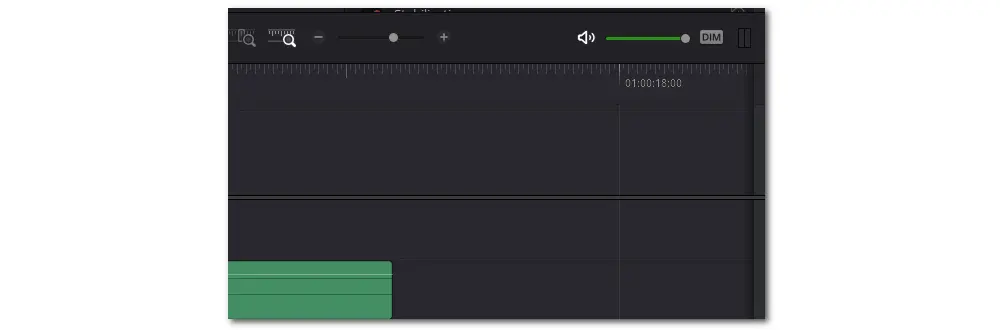
* To fix DaVinci Resolve no audio in the timeline, you can select the audio clip in the timeline and open “Inspector”. Then find the “Audio” tab and make sure it is not muted. If there is no waveform in the timeline, you can click the “Timeline View Options” button and then press the “Audio Waveforms” button to show it.
Audio is still not working in DaVinci Resolve after checking the audio settings? Then try to verify that the DaVinci Resolve is set to send audio to the right output device as follows:
Step 1. Select “DaVinci Resolve” from the top menu bar and choose “Preferences” from the drop-down menu.
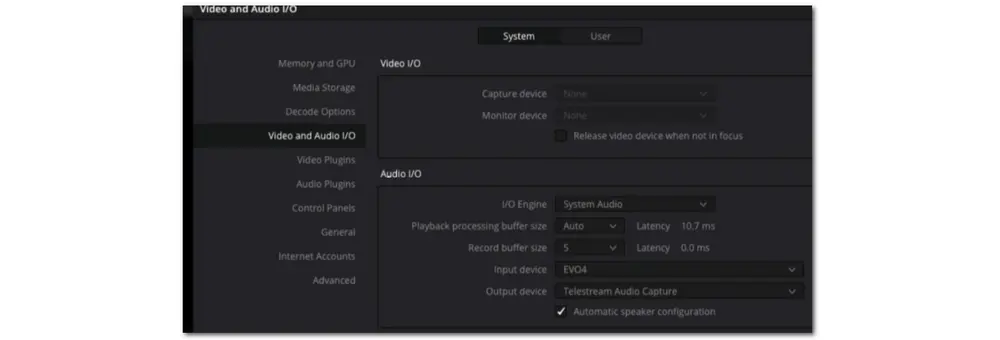
Step 2. In the “Preferences” window, click on “System” and then navigate to the “Video and Audio I/O” tab.
Step 3. In the “Audio” section, click the “Output Device” dropdown menu.
Step 4. Check if the correct output device is selected. If not, press the drop-down menu and choose the appropriate device for your setup and click “Save”.
Now, test if you can hear the audio in DaVinci Resolve.
Here is another setting you can change in the DaVinci Resolve’s “Preferences” tab, the “Monitor Speaker Configuration”. Follow the steps below to adjust it.
Step 1. Go back to the “Preferences” > “System” tab in DaVinci Resolve.
Step 2. Locate “Automatic Speaker Configuration” in the “Video and Audio I/O” section and uncheck it if it is enabled.
Step 3. Under “Monitor Speaker Configuration”, choose the correct output device after clicking on the “Output” drop-down menu. You can leave other settings as default.
This can help you ensure that the correct output device is being used for the audio playback.

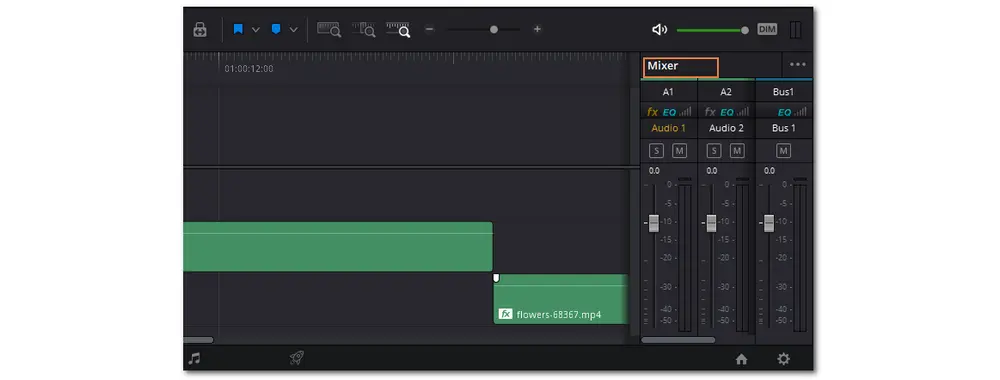
The faders can also affect the audio performance. So you can ensure the faders in the mixer are set correctly to eliminate possible volume-related problems. The following are the steps.
Step 1. Click the “Mixer” button at the top right corner of the screen and go to the “Mixer” section on the lower-right side.
Step 2. Check the fader sliders for each track and bus, ensuring they are set to 0 dB. If a fader is set to low, then you might not hear the audio.
Step 3. Double-click on it to reset a fader to 0 dB.
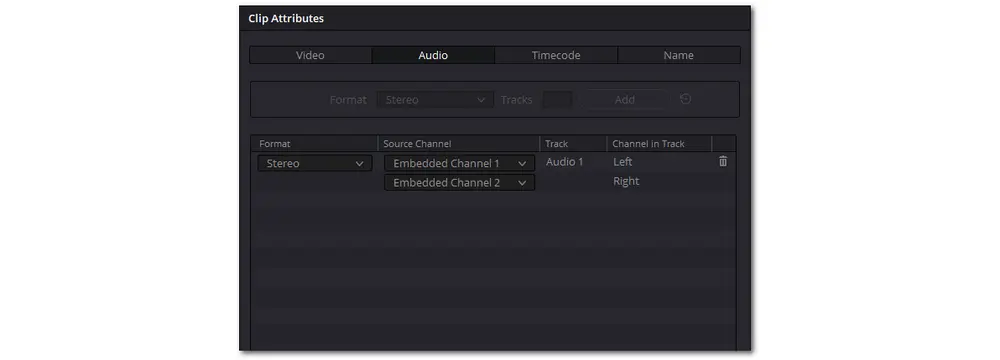
The DaVinci Resolve not playing audio issue can also occur if the source channel is set to be muted. So if you can’t hear any audio after trying all the previous fixes, then follow this tip to check and adjust the source channel settings.
Step 1. Right-click the clip in the timeline and choose “Clip Attributes” to open the window.
Step 2. Go to the “Audio” section and find the “Source Channel”.
Step 3. Check if the “Source Channel” is set to mute. If it is, then change it to the correct setting.
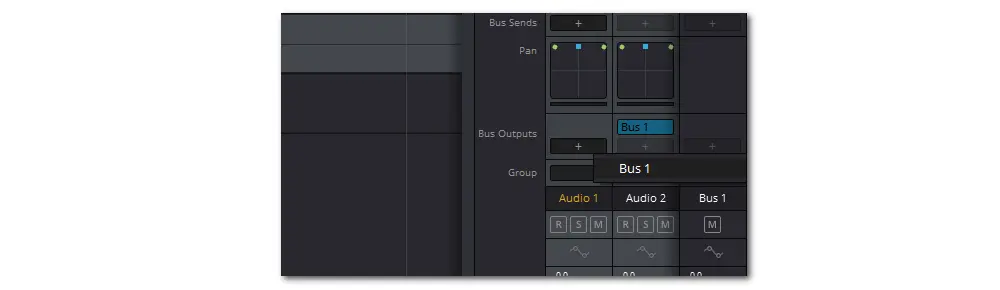
If your audio track is not allocated to “Bus 1” and you have sound while playing files in the “Media” tab, your audio track is most likely not assigned to the main bus output.
Check and adjust bus outputs as follows:
Step 1. Go to “Index” > “Tracks” > “Bus 1” in the “Edit” or “Fairlight” tab.
Step 2. Verify if “Bus 1” is listed under the “Bus Outputs” section. If not, click the “+” button to select “Bus 1” for your audio track. (If there is still no audio when the “Bus 1” is active, then delete and add the “Bus 1” again.)
Step 3. Check if your “Bus Outputs” have been assigned correctly.
Step 4. Go to “Bus Assign” and verify the “Available Tracks” > “Audio 1” is set to B1. And the meter under “Bus 1” should be moving when you play the audio.
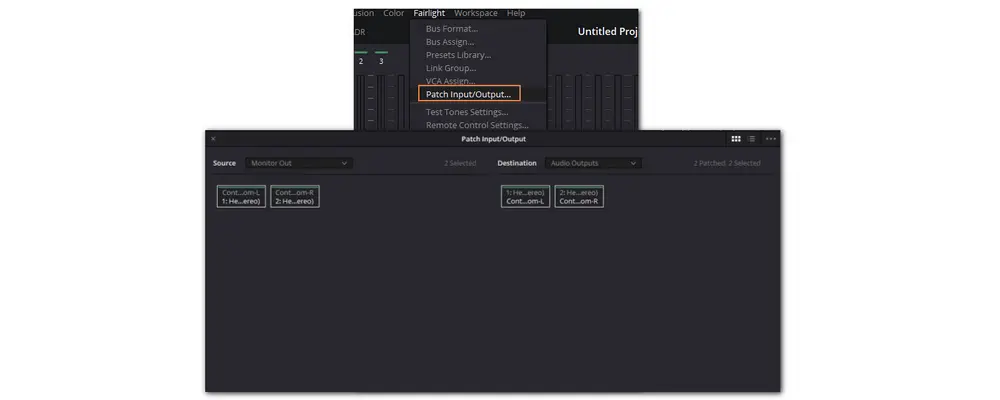
The patch settings in DaVinci Resolve will determine how the audio is routed from the program to your output device. If there is no sound in DaVinci Resolve, it is also important to ensure the patch settings are correctly configured. Check and adjust the patch settings as follows:
Step 1. Choose “Fairlight” at the top of the interface and then select the “Patch Input/Output...” option from the drop-down menu.
Step 2. In the “Patch Input/Output” window, select “Monitor Out” under the “Source” section and “Audio Output” under the “Destination” section.
Step 3. Ensure the Control Room channels are patched to the correct output device.
If you’ve tried all the fixes and the audio is still not working in DaVinci Resolve, moving the audio clip to a new track may work for you. The following is how to do it:
Step 1. Right-click in the track area and select “Add New Track”. Then choose “Stereo Track” from the options.
Step 2. Drag the audio clip from the original track to the new track.
Step 3. Test the audio playback. If the issue is solved, you can right-click on the track header and select “Delete Track” to remove the original track.
To make audio work well in DaVinci Resolve, it is essential to match the sample rate on your computer with the settings in DaVinci Resolve. And we recommend using a sample rate of 48 kHz, which is the most commonly used rate for video and audio. Here is how to ensure they are matched:
Step 1. First, check if the sample rate of your devices is set to 48 kHz on your computer. (Right-click on the speaker icon and select “Sounds”. Switch to the “Playback” section, choose the output device in use, and click “Properties”. Under the “Advanced” tab, set the sample rate to 48,000 Hz.)
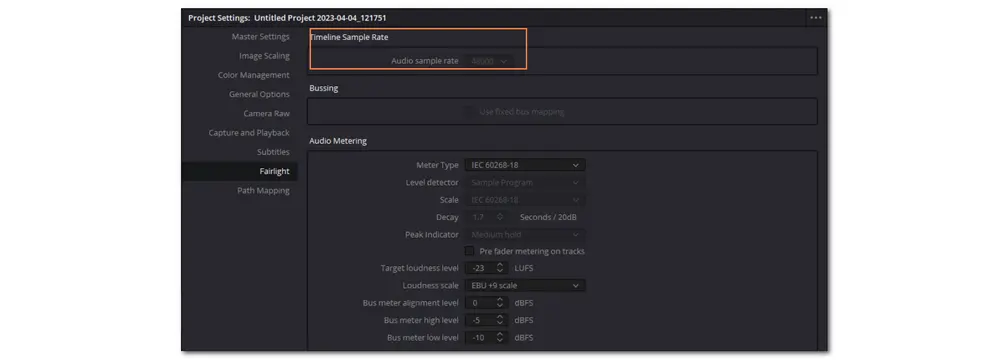
Step 2. Check the Timeline sample rate in DaVinci Resolve by clicking on the gear icon at the bottom of the interface to go to “Project Settings” and select “Fairlight”.
Step 3. Ensure the sample rate is set to 48,000. If it doesn’t match the computer settings, then create a new project with the correct sample rate and copy & paste the previous project into the new one.
If the DaVinci Resolve sound not working issue occurs with you, follow the methods provided in this post to check the sound settings and your files to see if there is something wrong with the device or the media file. Then you can also change some settings in DaVinci Resolve.
If none of the above solutions do the trick, then call Blackmagic support for more help.
That’s all for how to fix DaVinci Resolve not playing audio issue. Thank you for reading till the end. Have a nice day!

WonderFox DVD Ripper Pro
WonderFox DVD Ripper Pro is a professional DVD ripping program that can easily remove all sorts of DRM from DVDs and rip DVDs to 300+ presets like MP4, MOV, AVI, MKV, MP3, WAV, H264, H265, Android, iPhone, and so on. It also supports compressing and editing DVD videos efficiently with high-quality preserved. Get it here to enjoy the fast and trouble-free DVD ripping experience with DVD Ripper Pro.
* Please DO NOT use it to rip any copy-protected DVDs for commercial purposes.
Privacy Policy | Copyright © 2009-2026 WonderFox Soft, Inc.All Rights Reserved
