

Need AAC audio from a music file, recording, or video? This guide shows a simple way to convert common audio and video files to AAC or AAC-encoded M4A, extract an audio-only AAC track from video, and keep the video while changing its audio codec to AAC when needed.
 Kevincy | Jul 29, 2026
Before converting anything, it helps to separate the AAC codec from the file extension. A file ending in .aac is commonly an ADTS file carrying AAC audio, while .m4a is an audio-only MPEG-4 container that often stores AAC-encoded audio. In everyday use, many people say “AAC file” when they actually mean an M4A file encoded with AAC.
For music libraries, phones, general playback, and sharing, AAC-encoded M4A is usually the more practical choice. Choose a standalone .aac file when a device, app, streaming workflow, or other specific requirement explicitly asks for it.
If your source is a video, there are two different goals. You can extract the audio only and save it as AAC/M4A, or keep the video and encode its audio track with AAC for better compatibility with the target player, editor, or device. The steps below cover both cases.
One converter handles the three common AAC tasks without making you repeat a different workflow for every source format.
WonderFox HD Video Converter Factory Pro provides one workflow for both audio and video sources. You can batch convert common audio files to AAC or M4A, extract AAC audio from video, or choose a video output and set AAC as its audio encoder. This avoids having to use a different tool for each source format.
The program also lets you trim unwanted sections, merge files, choose the source audio track when a video contains more than one, and adjust audio bitrate, sample rate, channels, encoder, and volume. It is available for Windows and is designed around presets, so most conversions do not require technical codec settings.
The same steps work for common audio files and for videos when you only want the sound. You can add different source formats to the conversion list and process them together when they share the same output settings.
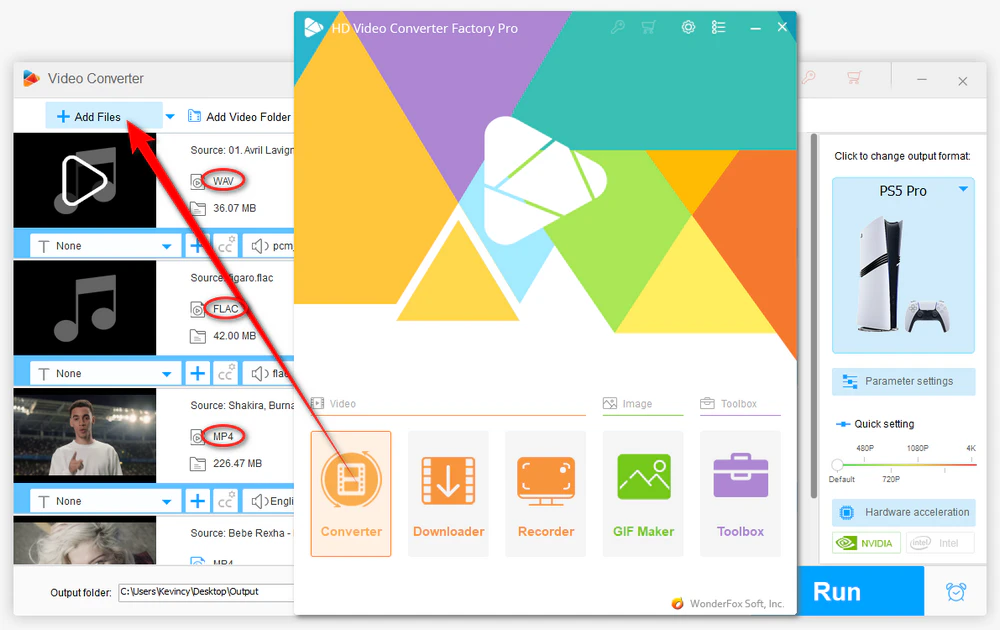
Launch HD Video Converter Factory Pro and open the “Converter” module. Click “Add Files” or “Add Video Folder” to import the source files. You can also drag and drop files directly into the workspace.
When a video contains multiple audio tracks, check the audio-track selector under the task and choose the track you actually want to convert or extract.
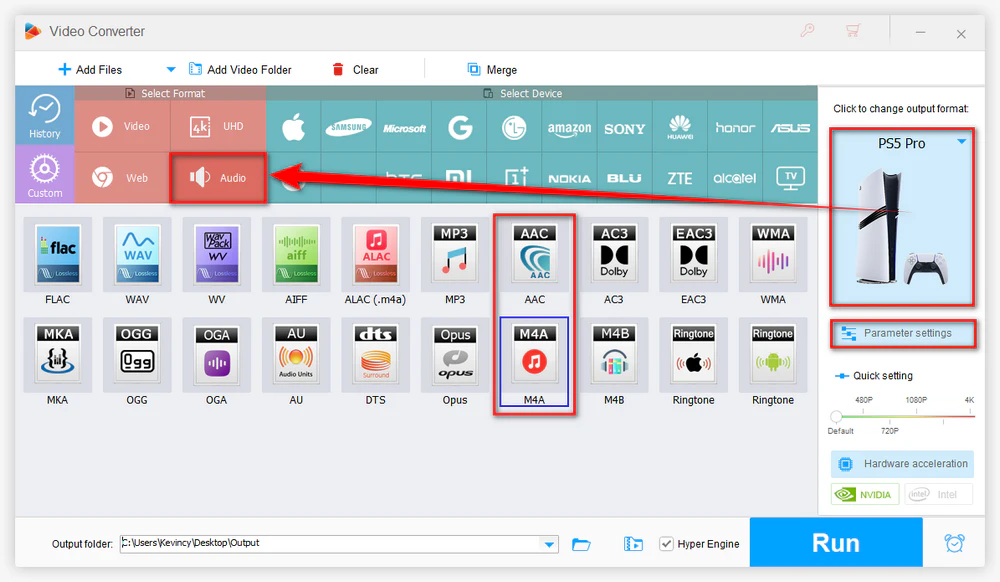
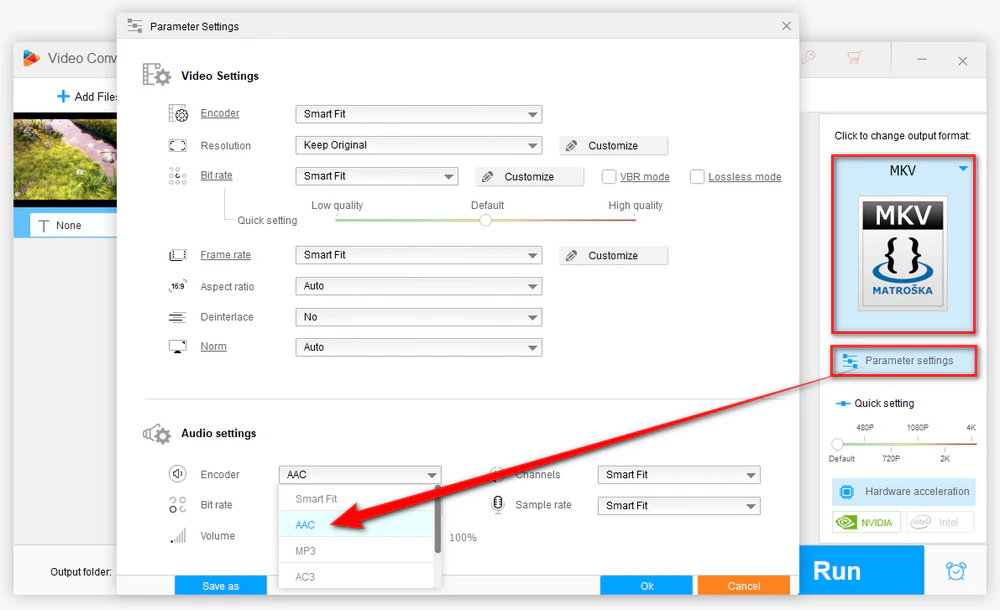
Click the format image on the right to open the output library and go to the “Audio” category. Choose “AAC” when you specifically need a .aac file. For normal music playback and device use, choose “M4A”; if necessary, open “Parameter settings” and confirm AAC as the audio encoder.
If the source is a video, selecting an audio profile tells the converter to create an audio-only output. For example, a video can be turned into AAC/M4A without keeping its picture.
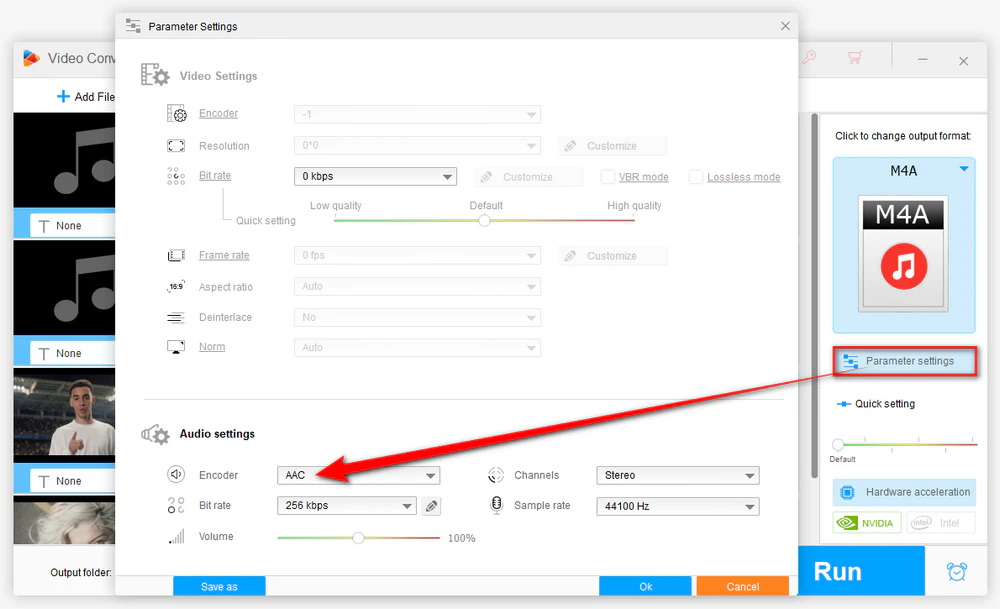
Open “Parameter settings” if you need to change the audio bitrate, sample rate, channels, encoder, or volume. You can also use the trim tool before conversion to keep only the part you need.
Note: There is usually no benefit in simply choosing a much higher bitrate than the source. A higher number cannot restore audio detail that was already lost in a compressed source file.
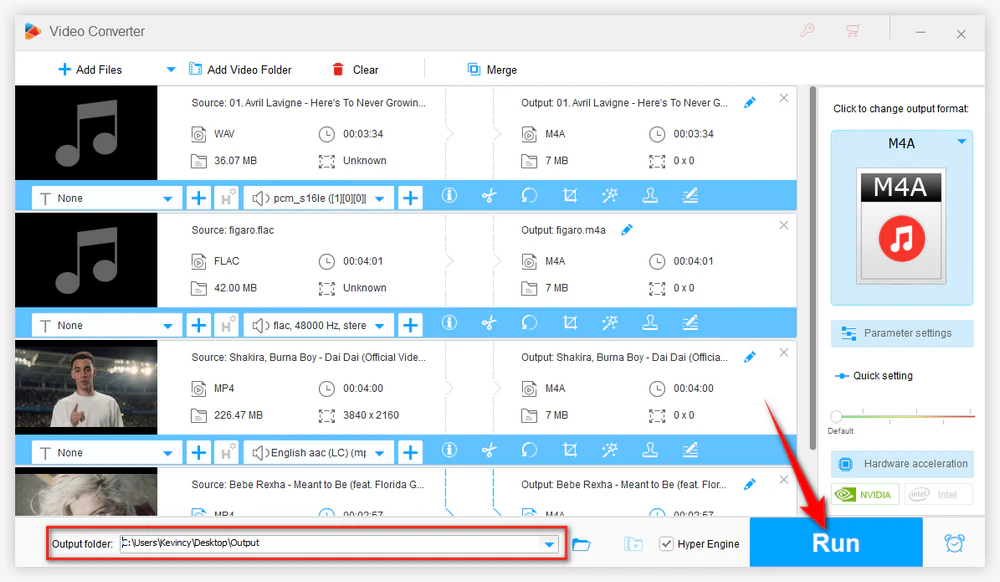
Click the “Inverted Triangle” button at the bottom to choose an output folder. Finally, press “Run” to start converting the files. When batch mode is used, all tasks with the selected output settings will be processed in sequence.
Sometimes the picture is fine and only the audio codec causes a compatibility problem. In that case, do not choose an audio-only profile, just change the audio format of a video: Import the video, open the output library, and select the video format you need for the destination device or app.
Next, open “Parameter settings” and set the Audio Encoder to AAC. Keep the resolution, frame rate, and other video settings appropriate for your source and target. Then choose the output folder and press “Run”.
This creates a video file whose audio track is encoded as AAC. Depending on the chosen output profile and settings, the video stream may also be encoded during the process.
AAC is normally used as a lossy audio codec. If you convert an uncompressed or lossless source to AAC, the new file can be much smaller, but some audio information is discarded during encoding. That is expected behavior, not a conversion error.
Converting one lossy file to another lossy format can introduce additional quality loss. For example, changing an already-compressed source to AAC does not make the original recording clearer. When possible, start from the best available source and avoid repeated re-encoding.
If your only goal is to change the container while keeping an existing AAC stream unchanged, look for a remux or stream-copy method instead of encoding the audio again.
No. AAC is an audio codec. M4A is an audio-only MPEG-4 file container that can store AAC audio, and it can also contain other supported audio codecs such as ALAC. A standalone .aac file commonly carries AAC audio in an ADTS stream. For everyday music use, AAC inside M4A is often easier to manage.
The built-in Apple Music app can convert supported songs in your library. Go to “Music > Settings > Files > Import Settings”, choose “AAC Encoder”, select the song, and use “File > Convert > Create AAC Version”. Apple keeps the original and creates a converted copy. See Apple's current conversion instructions for details.
Yes. Browser-based services such as Convertio or CloudConvert can handle AAC conversions without installing desktop software, and they work from modern mobile browsers as well. They are convenient for occasional files, but upload limits, processing time, account limits, and privacy requirements vary, so a local desktop converter is usually better for large batches or private media.
Yes. Add the video to the converter and choose AAC under the Audio category. The video track is omitted and the selected audio track is encoded to an audio-only .aac file. If you do not specifically need the .aac extension, AAC-encoded M4A is another practical choice.
“Convert to AAC” can mean several different things, so choose the output based on what you actually need. Use AAC-encoded M4A for most everyday audio files, use .aac when a specific workflow requires it, extract AAC/M4A when you only need the sound from a video, or keep the video and set its audio track to AAC. HD Video Converter Factory Pro brings these tasks into one straightforward Windows workflow.

Kevincy joined the WonderFox team in 2014 and has been a senior columnist ever since. With over two decades of experience in the video editing industry, he shares tutorials, tips, and how-to guides on video/audio processing and personal DVD backups. Family-oriented and passionate about helping others, he is dedicated to making video and audio processing easier for readers.


Kevincy joined the WonderFox team in 2014 and has been a senior columnist ever since. With over two decades of experience in the video editing industry, he shares tutorials, tips, and how-to guides on video/audio processing and personal DVD backups. Family-oriented and passionate about helping others, he is dedicated to making video and audio processing easier for readers.

WonderFox HD Video Converter Factory Pro
1. Convert audio and video with 500+ output presets.
2. Batch convert or extract audio from multiple files.
3. Trim, merge, crop, rotate, flip, and watermark media.
4. Adjust video/audio parameters for different needs.
5. Download online video/audio from 1000+ websites.
6. Record screen, gameplay, webcam, and system audio.
7. Compress media, make GIFs, ringtones, and more...

Privacy Policy | Copyright © 2009-2026 WonderFox Soft, Inc. All Rights Reserved
