


TeamViewer is one of the most popular remote connectivity software that allows users to control and monitor various devices remotely. With TeamViewer, users can easily hold online meetings, seminars, and so on. While doing these, users may want to record the content for review or sharing, etc. Luckily, TeamViewer offers a simple screen recording feature that enables you to capture the remote-control operation without any hassle. This post will show you how to enable TeamViewer screen recording and also provide an alternative recorder for you, as TeamViewer has some limitations on screen recording. Just read on!
As stated before, TeamViewer has a built-in screen recorder that allows you to record online meetings, sessions, etc. without hassle. However, some users may not be clear about its recording function. Given that, this part will illustrate how to enable TeamViewer record screen step by step.
Step 1. Launch TeamViewer and make a connection to another device to start a TeamViewer remote-control operation.
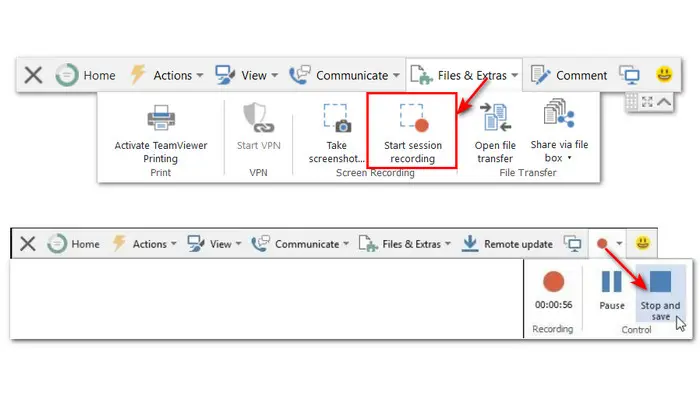
Step 2. Select “Files & Extras” in the top toolbar and click “Start session recording”. Then you will find that the TeamViewer screen recording task begins.
Step 3. Once you finish the TeamViewer sessions and want to stop recording, you can press the red circle-shaped button in the top toolbar and click “Stop and save”, then a window will pop up with the saved recordings.
Tips: You can set a specific destination folder for the recordings to automatically store them once you end the session or stop the recording. Follow the steps below to enable the auto-save feature.
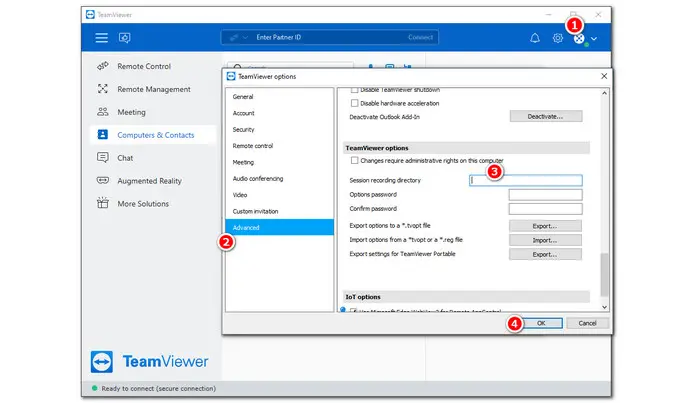
1. Click the gear icon at the upper right corner of TeamViewer;
2. Go to the “Advanced” tab and scroll down to “TeamViewer options”;
3. Type your desired folder in the box next to “Session recording directory”;
4. Click “OK” to save the changes.
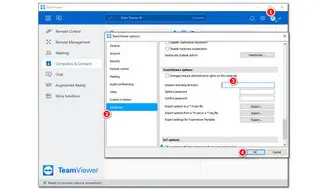
Step 1. Open TeamViewer on your computer and click on the gear icon in the upper right corner to open the TeamViewer options. (You can also press the three-line menu and go to "Extra" > "Options" to open the TeamViewer options.)
Step 2. Navigate to “Remote control” in the left pane and then check the box “Start recording of remote control sessions automatically” under the Remote control defaults.
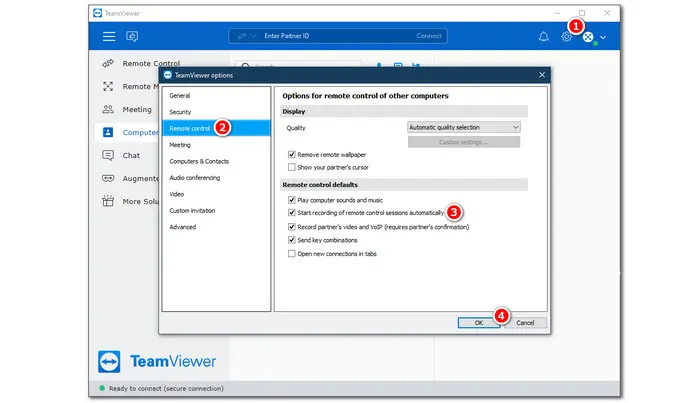
Step 3. Move to the “Meeting” option and check the “Auto record meeting” box under the Meeting defaults section. Press OK to save the changes.
Then, you can start a connection to a TeamViewer session or meeting, and the content will be recorded automatically now!
Note: Although TeamViewer offers a built-in recording feature, it also has some disadvantages that may not satisfy your requirements.
In regard to the disadvantages of the built-in recording feature of TeamViewer, this post also provides an alternative online meeting screen recorder for you to record TeamViewer sessions and other online meetings with audio in ordinary formats. Let’s take a look if you’re interested.
HD Video Converter Factory Pro offers the best screen recording experience for you to record TeamViewer meetings with or without audio and your own sound in high quality. It is simple to use, feature-packed, and well-designed. Download it here and give it a try now!
WonderFox HD Video Converter Factory Pro is a feature-rich audio & video processing application that can work as a practical screen recorder to help you record everything on your Windows PC, including TeamViewer meetings. It enables you to record the screen with system and microphone audio simultaneously. Additionally, you can also use this screen recorder to record audio-only files in MP3, AAC, AC3, and WAV format. Before recording, you’re allowed to customize the recording region, format, quality, frame rate, etc.
You can also use this software to edit recordings by trimming, cropping, merging, converting, compressing, and so on.
Free downloadFree download this program here now and record TeamViewer sessions on Windows with the given instruction below.
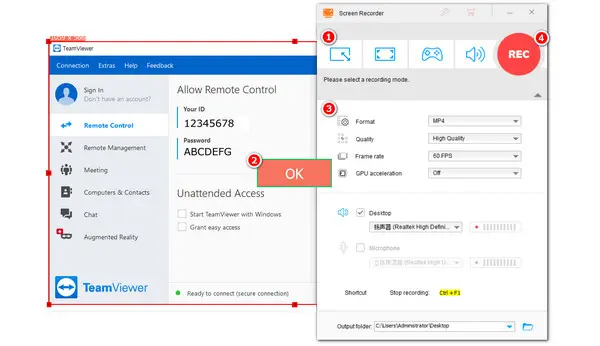
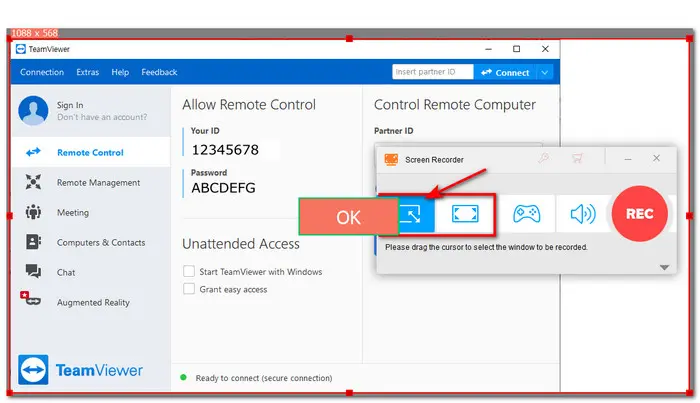
Launch HD Video Converter Factory pro on your PC and enter the “Recorder” module. Then choose a recording mode.


After choosing the recording mode (Custom mode & Full screen mode), drag the cursor to select the recording area and click OK.
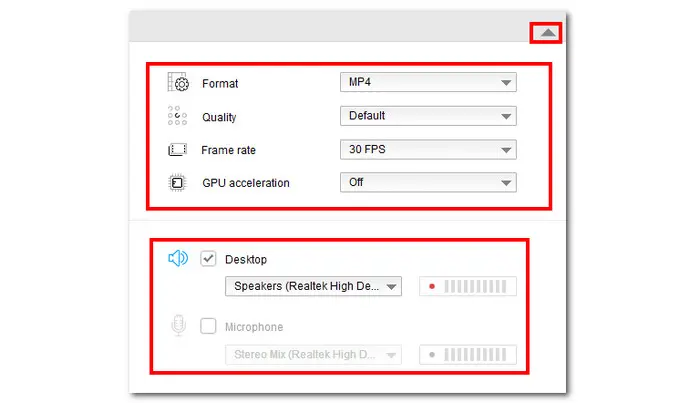
Click the arrow icon if the recording settings didn’t show up. The default recording format is MP4, you can also open the “Format” drop-down list to choose other formats (AVI, MKV, and MOV supported). Then modify the recording quality and frame rate and turn on the GPU acceleration or leave them as default. Move down to check the audio source you want to record.
Finally, choose an output folder by clicking the down-arrow icon at the bottom of the interface. When everything is ready, click the red “REC” button to start recording after a five-second countdown. If you want to stop the recording when the session is over, just click the square stop icon on the minimized tray or press the hotkey “Ctrl + F1”. The recorded video will pop up in the folder you set.


Also Read: Record Google Hangouts | Record VoIP Calls | Record Overwatch Gameplay
If you record TeamViewer with its built-in screen recorder, you can find the recordings in the default folder: C:/Users/username/AppData/Local/Temp/TeamViewer/Version. Of course, you can change the destination folder.
Yes. Audio is supported by TeamViewer. You can hear all of the sound coming from the remote computer from the system sound or other installed programs with its remote audio and video.
To convert TVS recordings to other formats in TeamViewer, you can click the three-line menu in the upper left corner of TeamViewer and move to “Extra” > “Play or convert recorded session...”. Choose the .tvs file and then click “Convert”. It enables you to choose the video codec and resolution to convert the selected TVS file to AVI and other formats. Note that TeamViewer can only use the codecs currently offered by the operating system.
That’s all I want to share about how to record TeamViewer sessions on Windows and some FAQs about TeamViewer screen recording. Hope you can find this article helpful for your TeamViewer meeting recording. Thanks for reading! Have a good day!

WonderFox DVD Ripper Pro
WonderFox DVD Ripper Pro is a professional DVD ripping program that can easily rip any DVD, be it homemade or commercial, to all popular formats including MP4, MKV, MP3, WAV, H264, H265, Android, iPhone, etc. without a hitch. It also lets you edit and compress DVD videos at high efficiency. Download it to enjoy a fast and trouble-free DVD-ripping experience.
Terms and Conditions | Privacy Policy | License Agreement | Copyright © 2009-2026 WonderFox Soft, Inc.All Rights Reserved