

Need to turn one picture into a short MP4 clip or combine a folder of photos into a slideshow? This guide explains how to make a video from images on Windows, online, iPhone, and Mac. It shows how to keep a photo sequence in the right order, and includes practical tips for aspect ratio, image duration, music, and output quality.
 Kevincy | Updated on Jul 13, 2026
You can create two common kinds of image-based videos. A single-image video keeps one JPG, PNG, screenshot, poster, or cover on screen for a chosen duration. An image-sequence video combines multiple pictures into a slideshow, presentation, stop-motion clip, or simple time-lapse. MP4 is usually the most convenient output because it plays on most devices and can be uploaded to common video platforms.
JPG and JPEG are practical for camera photos because they usually take less space. PNG is useful for screenshots, diagrams, logos, and graphics that need sharp text or a transparent background. However, a standard MP4 video uses opaque frames, so do not expect transparent areas in a PNG to remain transparent after conversion.
For a smoother result, prepare the files before importing them:
1. Rename the images with numbered prefixes such as 001, 002, 003 so they load in the intended order.
2. Use images with a similar orientation whenever possible. Mixing portrait and landscape pictures may create borders or require cropping.
3. Choose the target canvas in advance: 16:9 for regular video, 9:16 for Shorts/Reels/TikTok, or 1:1 for a square post.
4. For an ordinary slideshow, keeping each photo on screen for about 3–5 seconds is a useful starting point.
HD Video Converter Factory Pro can turn one image or a numbered sequence of JPG, JPEG, PNG, BMP, GIF, TIFF, RAW, and other common image files into an MP4 video on Windows. Adjust the frame size, quality, and time each picture remains on screen.
WonderFox HD Video Converter Factory Pro includes a dedicated Photo to Video Maker for Windows. It can turn a single image into a static clip or combine many JPG, JPEG, PNG, BMP, TIFF, RAW, and other common pictures into one MP4 slideshow. This is more useful than a basic image converter that accepts only one picture at a time.
The tool lets you set the output width and height, quality, and residence time for each image. It first creates an MP4 file. After that, you can open the finished video in the Converter module to add background music, trim or merge clips, compress the file, or convert it to MOV, MKV, WebM, and other formats when needed.
Now, get the software on your PC and follow the steps below.
DownloadDownload and install the software on your Windows PC. Place the pictures you want to use in one folder and rename them in sequence if their order matters.
Run HD Video Converter Factory Pro and select Toolbox on the home interface. Then, click Photo to Video Maker.
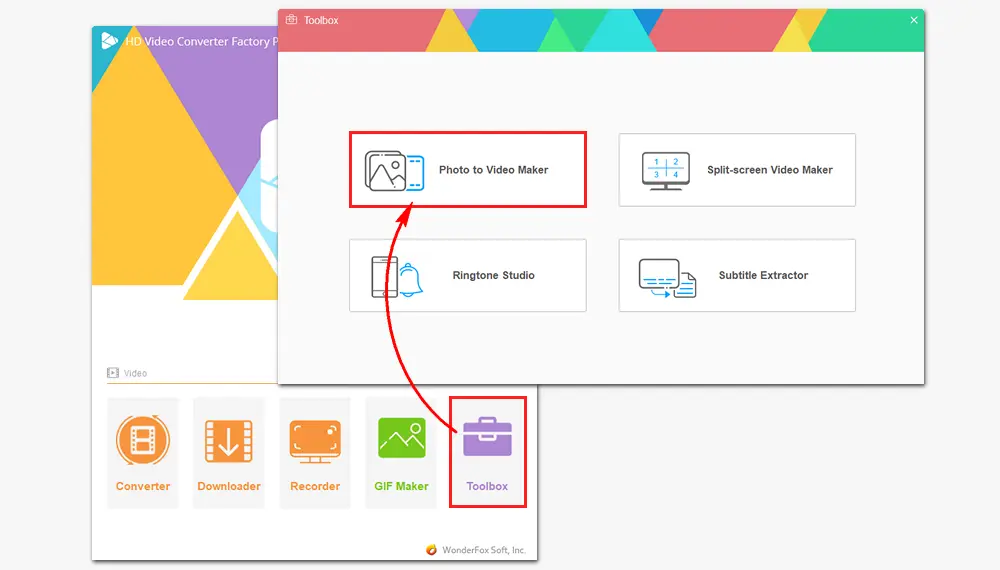
Tip: In Toolbox, you can also make ringtones for Android/iOS devices, put multiple videos on one screen with different stitching effects, and extract subtitles from a video to ASS/SRT format.
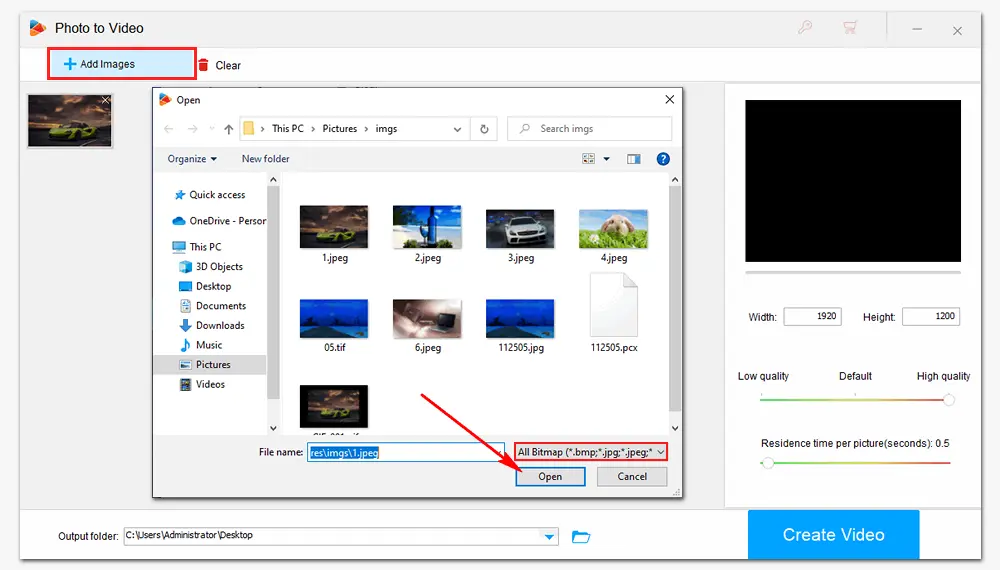
Click Add Images in the upper-left corner, select the JPG, PNG, or other pictures you need, and click Open. You can hold Ctrl to select multiple files, or drag and drop the images into the window.
The imported files normally follow their filename order. If you are working with a sequence, names such as 001-cover.jpg, 002-photo.png, 003-end.jpg make the order easier to control. Check the list before creating the video.
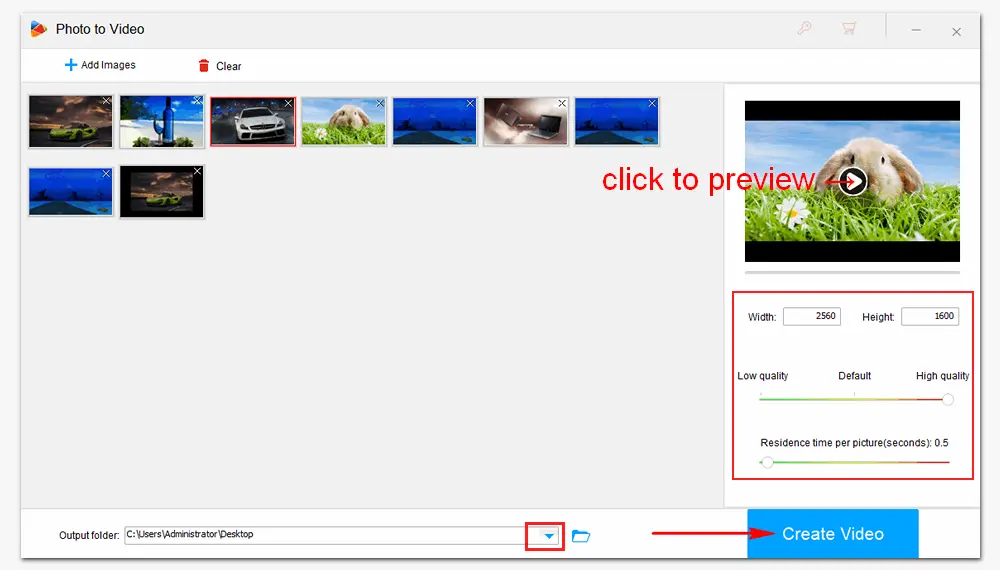
Use the preview window on the right to check the sequence. Then set the video Width & Height, Quality, and Residence Time for each picture. A duration of 3–5 seconds works well for most photo slideshows, while a faster image sequence may need a much shorter value.
Click the inverted triangle at the bottom to choose an output folder. Finally, press Create Video. The Photo to Video Maker exports an MP4 file that you can play, rename, edit, or upload.
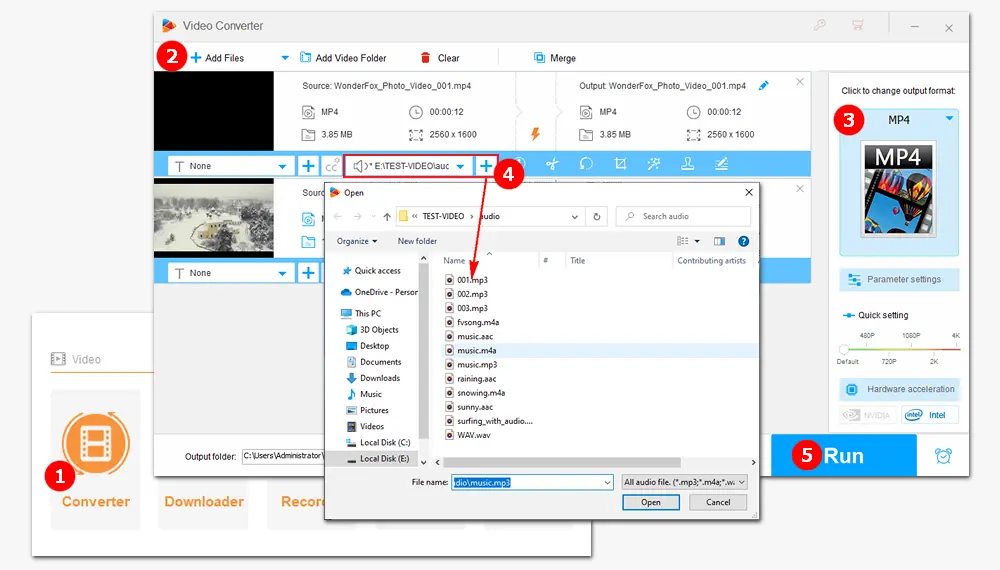
The Photo to Video Maker creates a silent MP4. To add music, return to the home screen and use the Converter module:
(1) – Select Converter and click Add Files to import the MP4 you just created.
(2) – Click the format image on the right and choose an output profile. MP4 with H.264 is a practical choice for broad playback and sharing compatibility.
(3) – Click the second “+” button below the source file, locate your music, and add it as the audio track.
(4) – Choose the output folder and press Run to export the video with music.
Tip: Use music that you created, licensed, or have permission to share. If the song is longer than the slideshow, trim the audio or extend the image duration before publishing.
1. Convert videos to MP4, MKV, AVI, and 500+ formats;
2. Save 720p/1080p/4K/8K videos from websites;
3. Record meetings, gameplay, shows, live streams, etc.
4. Cut, crop, rotate, flip, merge, compress, add subtitles, and more.
An online photo-to-video maker is convenient for a small project when you do not want to install software. The trade-offs are slower uploads, browser or account limits, and less privacy for personal photos. Large image sets are usually easier to process with a desktop tool.
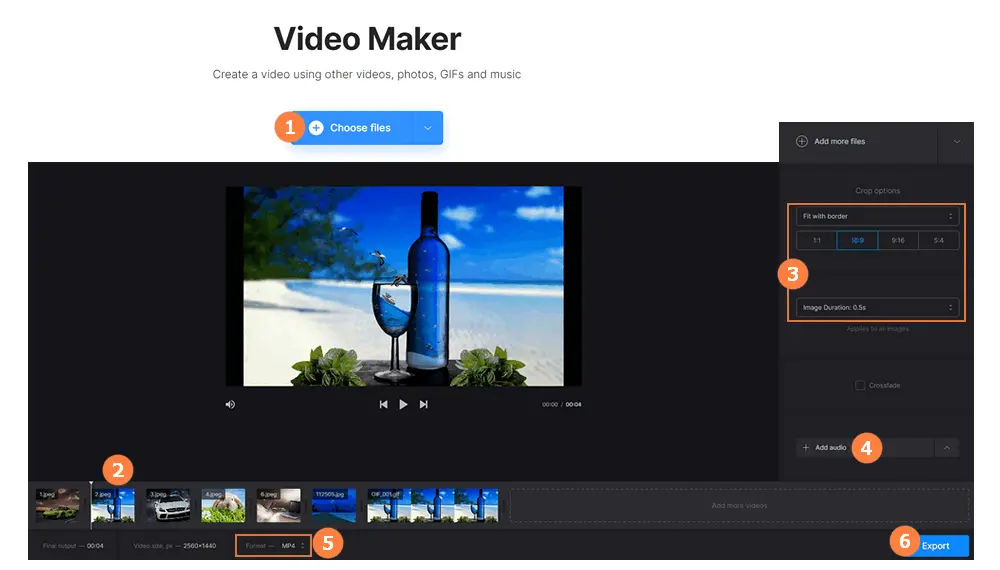
Clideo Video Maker works in a browser and lets you combine images with audio, text, GIFs, and other media on a timeline. Free exports include a Clideo watermark and have lower resolution limits, so it is best suited to a quick test or a small personal slideshow.
Step 1. Open Clideo Video Maker and upload your JPG, PNG, or other image files.
Step 2. Place the pictures on the timeline and drag them into the required order.
Step 3. Choose the canvas aspect ratio, fit or crop each image, and adjust how long every picture stays on screen.
Step 4. Add transitions, text, or a background audio track when needed.
Step 5. Preview the project, click Export, and download the finished video.
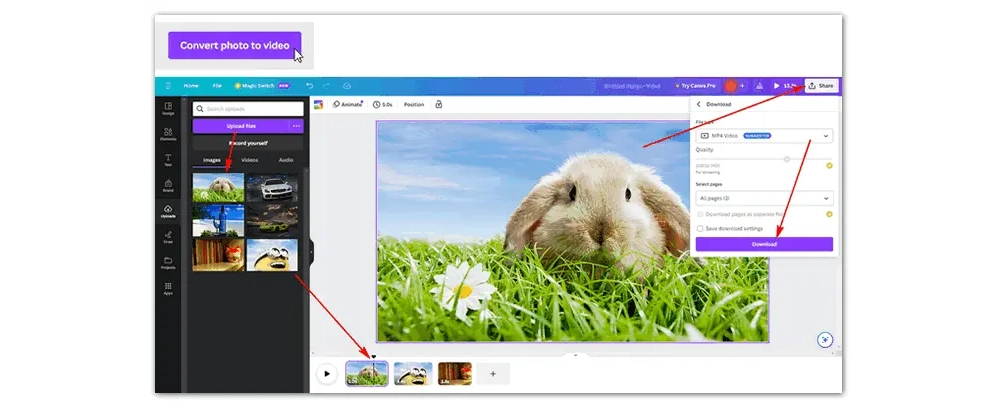
Canva Photo to Video is a better fit when you want templates, text, animations, transitions, stock elements, and music in one browser-based editor. You can download the finished design as an MP4. An account is generally needed to save and export a project, and premium assets may require payment.
Step 1. Start a video design and upload your pictures from the Uploads panel.
Step 2. Add the photos to separate pages or place them on the video timeline, then rearrange them in the intended order.
Step 3. Set each page duration. Add transitions between pages and, if needed, titles, animations, or a music track.
Step 4. Preview the full slideshow. Click Share > Download, choose MP4 Video, and save the file.
Tip: To avoid unexpected watermarks or licensing limits, use your own media or items marked as free.
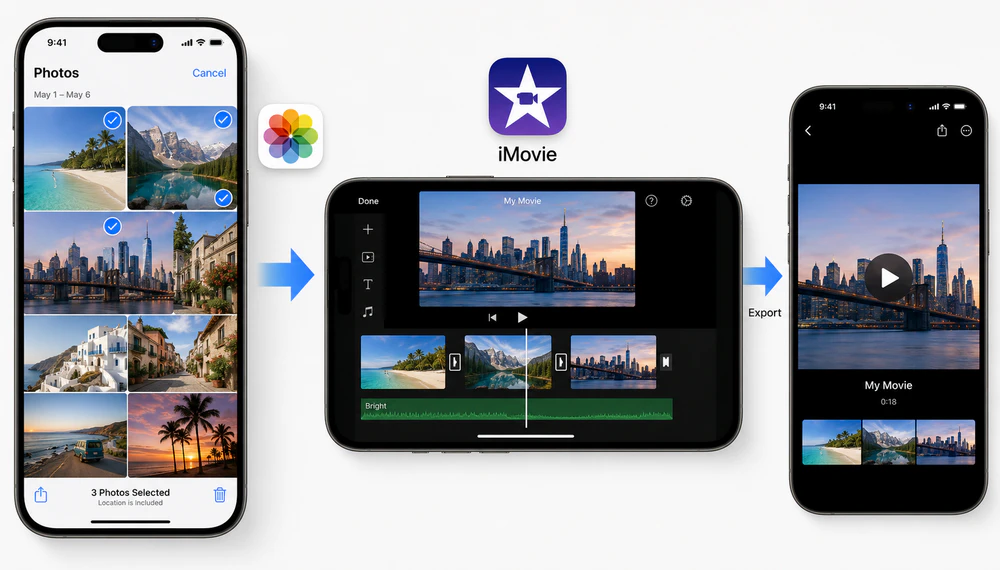
The Photos app can quickly play selected pictures as an automatically formatted slideshow: select the photos, tap the More button, and choose Play as Slideshow. For a video file you can edit and save, iMovie gives you more control.
Step 1. Open iMovie, tap Start New Project, and choose Movie. You can also use Magic Movie for an automatically assembled result.
Step 2. Select the photos and any video clips you want, then create the project.
Step 3. Drag items to change their order. Tap a photo in the timeline to change its duration, crop or zoom it, and adjust the transition to the next picture.
Step 4. Add titles, filters, voice-over, or music as needed.
Step 5. Tap Done > Share > Share Video, choose the output options, and tap Save Video or Save to Files.
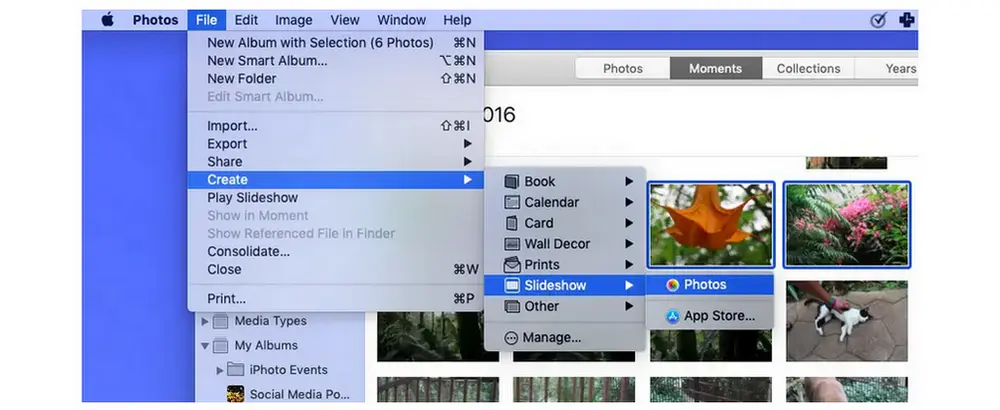
Step 1. Import the images into Photos on your Mac and select the pictures and videos you want to use.
Step 2. Choose File > Create > Slideshow > Photos. Choose New Slideshow, enter a name, and click OK.
Step 3. Drag the thumbnails at the bottom into the intended order.
Step 4. Choose a theme, music, and timing. Preview the slideshow and make any final changes.
Step 5. Click Export in the toolbar, or choose File > Export > Export Slideshow, then select the filename and save location.
Turning images into video can mean creating a one-picture MP4, joining a JPG or PNG sequence, or building a slideshow with music and transitions. Windows users can use WonderFox HD Video Converter Factory Pro for a straightforward offline workflow. Clideo and Canva are convenient for smaller browser-based projects, while iMovie and Photos provide built-in Apple workflows. Whichever method you use, preparing the image order, aspect ratio, and display time first will save the most editing work later.
Yes. Add a single picture to the Photo to Video Maker and set how long it should remain on screen. This is useful when a platform accepts video but not a standalone image.
Yes. A photo slideshow can contain different supported image types. For a consistent appearance, use similar dimensions and orientation, or prepare a common canvas size before importing them.
Image makers often follow the filenames or the order supplied by the file picker. Rename the files with zero-padded numbers such as 001, 002, and 003, then import them again.
Usually not. Standard MP4 playback uses an opaque video frame, so transparent pixels need to be rendered against a background. Add the background color or image you want before conversion if the final appearance matters.
For a normal slideshow, start with 3–5 seconds per image. Use 16:9 for regular landscape video, 9:16 for vertical mobile video, or 1:1 for a square post. The correct choice depends on where you plan to watch or upload the result.
On Windows, first create the silent MP4 in Photo to Video Maker, then add a music track in the Converter module. On iPhone, iMovie can combine photos, transitions, titles, and music in one project. Canva and Clideo also provide browser-based audio tools.

Kevincy joined the WonderFox team in 2014 and has been a senior columnist ever since. With over two decades of experience in the video editing industry, he shares tutorials, tips, and how-to guides on video/audio processing and personal DVD backups. Family-oriented and passionate about helping others, he is dedicated to making video and audio processing easier for readers.


Kevincy joined the WonderFox team in 2014 and has been a senior columnist ever since. With over two decades of experience in the video editing industry, he shares tutorials, tips, and how-to guides on video/audio processing and personal DVD backups. Family-oriented and passionate about helping others, he is dedicated to making video and audio processing easier for readers.

WonderFox HD Video Converter Factory Pro
1. Convert the finished MP4 to MOV, MKV, WebM, AVI, and other formats;
2. Add a background audio track to a silent photo video;
3. Cut, merge, crop, rotate, compress, and add subtitles or watermarks;
4. Adjust resolution, frame rate, bitrate, codec, and audio settings;
5. Process multiple video files in a batch on Windows.

Privacy Policy | Copyright © 2009-2026 WonderFox Soft, Inc. All Rights Reserved
