
Convert HD/4K video to YouTube video specs
![]() Convert Video
Convert Video

![]() by Michelle
by Michelle
Updated on May 22, 2026
After capturing stunning HD or 4K footage with a digital camera, such as a GoPro, you may wish to upload it to YouTube. But how can you do so without compromising video quality? Don’t worry. In this guide, I’ll teach you everything you need to know about uploading high-quality videos to YouTube, covering how to optimize your videos for the platform and tips for preserving the best quality.
👉 You may need a video enhancer during the process, which can be downloaded right here:

YouTube supports HD (720p/1080p) and 4K videos. But to be able to upload an HD or 4K video to YouTube smoothly, there are requirements for the video to meet.
If you want to upload a video to YouTube without losing quality, ensure the video follows YouTube’s recommended video upload specs:
| Container | MP4 |
|---|---|
| Video Codec | H.264 (progressive scan) |
| Audio Codec | AAC-LC (stereo, 48 kHz, 384 kbps) |
| Frame Rate | Keep the original frame rate as it was recorded when uploading |
| Aspect Ratio | 16 : 9 |
| Video Bitrates for 2160p (4K) | SDR Uploads with Standard Frame Rate (24, 25, 30): 35 - 45 Mbps HDR Uploads with Standard Frame Rate (24, 25, 30): 44 - 56 Mbps SDR Uploads with High Frame Rate (48, 50, 60): 53 - 68 Mbps HDR Uploads with High Frame Rate (48, 50, 60): 66 - 85 Mbps |
| Video Bitrates for 1440p (2K) | SDR Uploads with Standard Frame Rate (24, 25, 30): 16 Mbps HDR Uploads with Standard Frame Rate (24, 25, 30): 20 Mbps SDR Uploads with High Frame Rate (48, 50, 60): 24 Mbps HDR Uploads with High Frame Rate (48, 50, 60): 30 Mbps |
| Video Bitrates for 1080p (FHD) | SDR Uploads with Standard Frame Rate (24, 25, 30): 8 Mbps HDR Uploads with Standard Frame Rate (24, 25, 30): 10 Mbps SDR Uploads with High Frame Rate (48, 50, 60): 12 Mbps HDR Uploads with High Frame Rate (48, 50, 60): 15 Mbps |
| Video Bitrates for 720p (HD) | SDR Uploads with Standard Frame Rate (24, 25, 30): 5 Mbps HDR Uploads with Standard Frame Rate (24, 25, 30): 6.5 Mbps SDR Uploads with High Frame Rate (48, 50, 60): 7.5 Mbps HDR Uploads with High Frame Rate (48, 50, 60): 9.5 Mbps |

Convert HD/4K Video to YouTube Specs
Select the target YouTube profile and let WonderFox HD Video Converter Factory Pro convert your videos to YouTube upload specs in just a few clicks. No complex settings, just a fast and simple solution. Download the program and give it a try!


So the next question is, how do you prepare your videos to fit the upload specs above?
It might seem a heavy task at first sight, but we can use a dedicated video to YouTube converter to help with the video optimization.
On Windows, WonderFox HD Video Converter Factory Pro is such a tool that can convert videos directly to a YouTube-friendly format ready for upload. It’s available as a free trial, and you can click here to download itclick here to download it. Then follow the steps below:

Launch HD Video Converter Factory Pro and open Converter. Click + Add Files to load your videos, or simply drag and drop the files into the program.
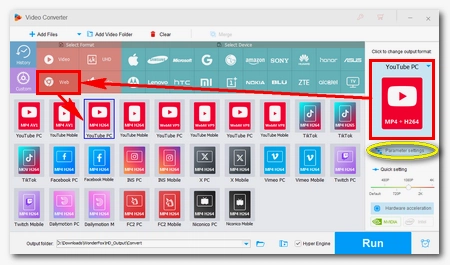
Open the Output Format on the right and navigate to the Web section. Select the YouTube PC - MP4 H264 profile for the standard video (16:9), or YouTube Mobile - MP4 H264 if you want to upload a shorts.
💡 For 2K/4K videos, you can also click the Video tab and pick H265 for MP4. This can balance size and quality to ensure faster upload while still maintaining the quality.
💡 You can manually adjust the video settings in Parameter settings, for instance, by selecting an appropriate resolution, frame rate, and video bitrate based on the recommended values mentioned above.
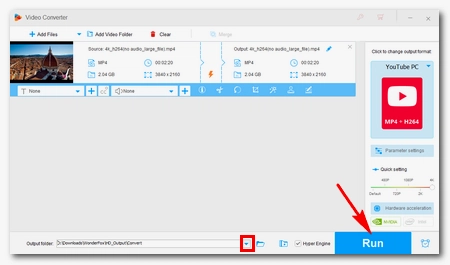
Click the ▼ button to choose an output folder, and click Run to start the conversion.
The process may take some time depending on the video length and the selected settings. If your computer has an up-to-date NVIDIA or Intel QSV graphics card, you may use GPU acceleration to boost the conversion speed.
After getting the optimized videos, you can try uploading them to YouTube and see the result. Here are the general steps to upload a video to YouTube from a computer:
Step 1: Open YouTube and sign into your account.
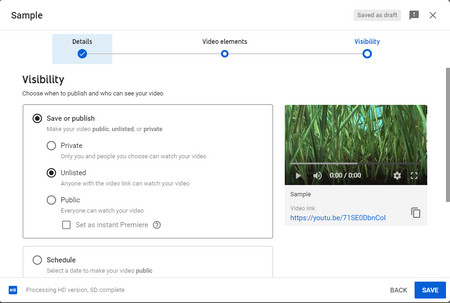
Step 2: Click Create in the top-right corner and select Upload Video.
Step 3: Upload your optimized HD or 4K video and edit the details.
Step 4: After the video completes uploading, publish it.
Uploading videos from a computer generally performs better than from a mobile phone. Specifically, the YouTube mobile app will cap the resolution to 1080p even if you upload a 4K video.
Even if your video isn’t 4K, you can upscale it to 4K (e.g., convert 1080p to 4K) so that YouTube can assign a higher-quality compression codec like VP9 or AV1, which will allocate more bandwidth to maintain the final clarity.
Before converting your videos in WonderFox HD Video Converter Factory Pro, you can easily set the output resolution to 4K using the Quick setting or Parameter settings.
It’s the same logic as upscaling to 4K.
An unstable network connection may cause YouTube to allocate lower bandwidth to your video to ensure a successful upload, thereby compromising video quality.
YouTube does not like interlaced videos, so ensure your footage is in progressive scanning (e.g., 1080p, not 1080i). See how to deinterlace.
It can take from a few minutes to hours, depending largely on your internet connection and video length.
This is mainly because of the wrong video format. Check whether your video format and settings are supported by YouTube and use HD Video Converter Factory Pro to adjust them based on the recommended specs.
This problem often occurs if you're uploading a video in the wrong format. The supported file types are: .MOV, .MPEG4, .MP4, .AVI, .WMV, .MPEGPS, .FLV, 3GPP, WebM, DNxHR, ProRes, CineForm, and HEVC.
This is because YouTube will first process your video in low resolution to accelerate the uploading process. Higher resolutions like 4K can take several hours to process, depending on the video format, length, frame rate, and resolution. If you want others to view your content in the original quality when you publish, you could first upload your video as unlisted or private and wait for the high-resolution process to be completed and then make it public.
🔔 To view 4K videos, your browser or device needs to support VP9.
YouTube always re-compresses videos. So there will be a quality loss when you upload a video to YouTube. Using the correct YouTube video specs can help reduce quality loss. But other factors can also affect video quality. Check Why YouTube Video Quality is Bad after Upload for more info.
I write about multimedia topics, including video and audio conversion, compression, editing, and downloading. I joined WonderFox in 2020, and my goal is to help readers solve everyday tech problems more easily. In this guide, I shared with you how to upload high-res videos, such as HD and 4K footage, to YouTube while preserving high quality.
![]()
![]()
![]()
Powerful DVD Ripper for Windows

WonderFox DVD Ripper Pro is a professional DVD ripping program that can easily rip any DVD, be it homemade or commercial, to all popular formats including MP4, MKV, MP3, WAV, H264, H265, Android, iPhone, etc. without a hitch. It also lets you edit and compress DVD videos at high efficiency. Download it to enjoy fast and trouble-free DVD ripping experience.

