Need to add a voice over to your tutorial video? WonderFox HD Video Converter Factory Pro has a beginner audio recorder that lets you effortlessly record and add voice over to any video. It also allows you to record video and voice over at the same time. Easy, fast, and powerful!


Want to make your videos more engaging? Adding a voice over is a simple way to explain what is happening on screen, guide viewers through a tutorial, or make a presentation feel more personal. This updated guide keeps the main PC workflow, and also covers quick voice recording on Windows 10/11, recording voice with background music, adding narration to Google Slides, and using the built-in voice over tools in TikTok and Instagram.
Ready to make your voice over? You can directly jump to the #How-to part.
Producing quality voice over involves the following essential tips:
1. Prepare a well-crafted script. This helps maintain focus and clarity during the recording process. Avoid using complex sentences to ensure that the message is easy to understand. It’s also helpful to read your script out loud several times before the actual recording to adjust your tone, pace, and emotional delivery, making it sound more natural.
2. Create an ideal recording environment. Select a quiet location free from background noise. Remember to turn off fans and close windows to eliminate any distracting sounds.
3. Choose a suitable microphone that captures clear audio. For a better result, you can also invest in a pop filter. This is a simple device that can reduce harsh popping sounds and plosives from letters like ‘p’ and ‘b’, which can distort the recording. It’s an inexpensive but effective tool for achieving cleaner audio.
4. Use reliable audio recording software that is compatible with your device. For quick notes, the built-in Windows recorder is enough. For a video voice over, a recorder that can export MP3/WAV and capture microphone plus system audio will save extra conversion and mixing work later.
5. Keep the background track under control. If you want to speak over music, lower the music volume first and record a short sample. Your narration should always be easier to hear than the background music.
6. Some creators also stand while recording to improve breath support and energy. You don’t have to copy another person’s voice, but listening to a delivery style you like can help you find the right pace and mood.
Now, follow the steps below to start your voice over journey.
The very first step is to write down what you’re going to say. A scripted voice over can avoid meaningless fillers and allows for a more natural and more effective delivery.
After writing your script, practice reading it aloud to adjust your tone, pace, and emphasis.
You don’t have to spend much on a high-end microphone. Even a budget-friendly external mic can often outperform a laptop’s built-in microphone for voice over work. USB microphones such as Razer Seiren Mini or Logitech Yeti Orb are common entry-level choices, but a headset mic can also work for casual tutorials and slideshows.
Before recording, check that Windows is using the correct input device. On Windows 10, open Settings > Privacy > Microphone and allow apps to access the mic if the recorder cannot detect it. On Windows 11, go to Settings > Privacy & security > Microphone and make sure microphone access is enabled.
A great audio recording program is also important. For beginners, WonderFox HD Video Converter Factory Pro is recommended here because the recording steps are simple and the recorded file can be saved as MP3, WAV, AAC, or AC3. This is more flexible than the built-in Windows recorder when you need a voice over file for video editing, Google Slides, or later audio conversion.
Free download and install the handy recorder on your PC here:
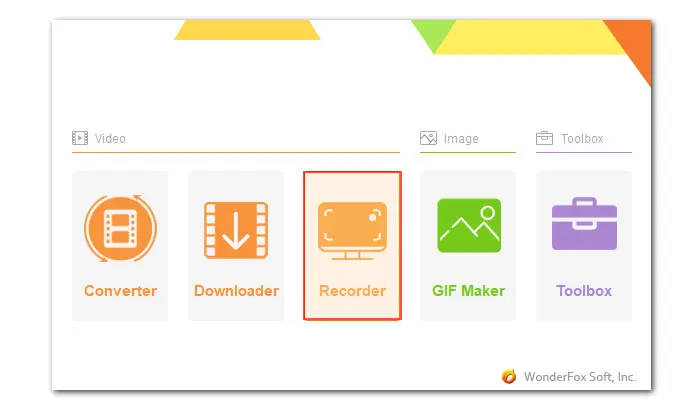
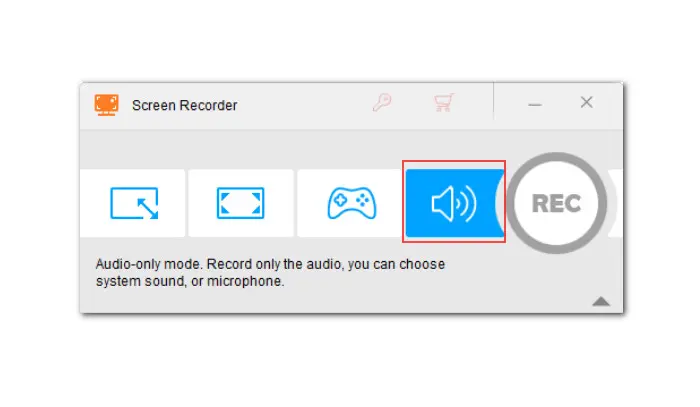
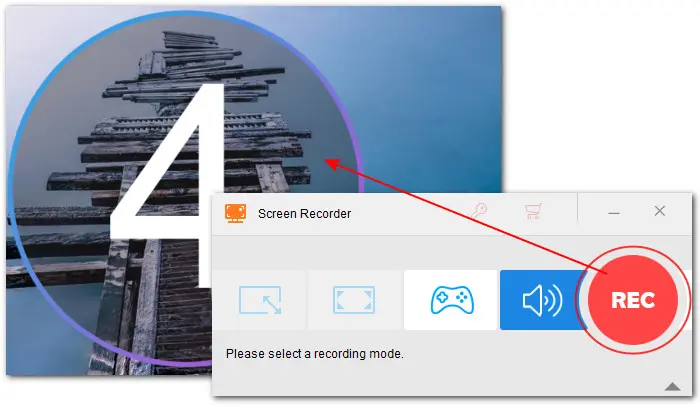
The installation can be done in a minute. Then launch the software and click ‘Recorder’ on its startup interface.

Then click on the speaker icon to activate the ‘Audio-only’ mode.

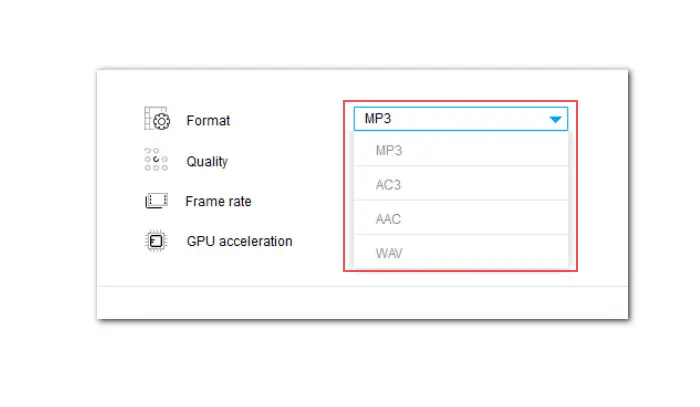
Next, from the ‘Format’ drop-down list, choose a recording format for your voice over: MP3, WAV, AAC, or AC3. WAV is a good choice when you want higher quality for later editing. MP3 is smaller and works well for most sharing, video editing, and Google Slides projects.
Tick off the ‘Microphone’ checkbox and select the correct microphone that you’re using for voice over. If you also need to record background music, a game sound, a browser tab, or other computer audio while speaking, tick both ‘Desktop’ and ‘Microphone’ instead.
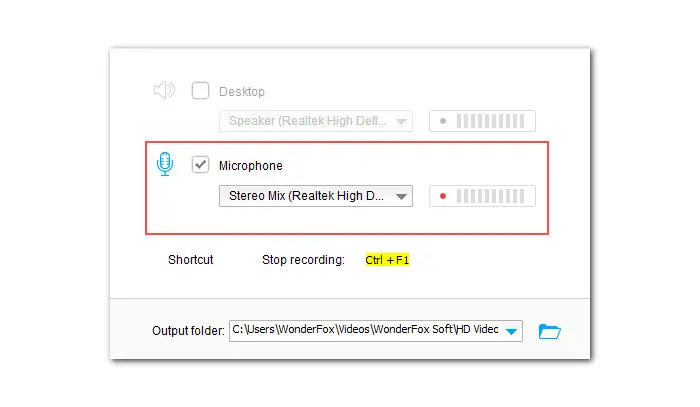
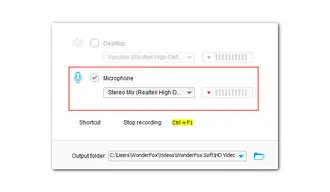
You can hit the downward triangle button to specify an output folder or just leave it as default.
Now, it’s time to record your voice over. However, before diving into the main recording, it’s wise to run a test recording to identify possible issues with sound quality and microphone setup.
Just click the red ‘REC’ button to initiate the recorder. The recording will start immediately after a 5-second countdown.
To end the recording, press ‘Ctrl + F1’ on your keyboard.
Then review the test result using headphones. Pay attention to the voice clarity, volume level, and any background noise.
Make some adjustments if you notice issues like background noise, low volume, or unclear audio. For example, you can move to a quieter space to minimize the noise or hold your microphone about 6-12 inches away from your mouth for optimal voice quality.
In addition to fixing tech issues, you should also refine the speaking tone, pace, and emotion during the test session.
Once you’ve addressed all issues and are satisfied with the resulting quality, you’re ready to do the full voice over recording.
Get your script ready and relax. Tap the ‘Rec’ button to start and use the shortcut ‘Ctrl +F1’ to complete your voice recording.
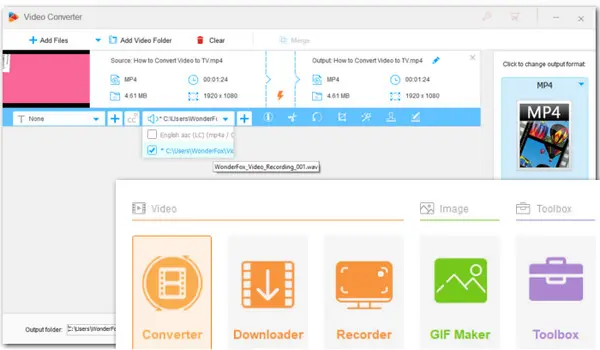
When you finish recording, it’s time to add voice over to your video. The good news is that WonderFox HD Video Converter Factory Pro also includes a simple editor and allows you to add audio to a video in any possible format. Here are the steps of how to add voice over on video:
Step 1. Run the program and select ‘Converter’.
Step 2. Straightly drag and drop the video you want to do a voice over into the program. Alternatively, you can hit the top ‘Add Files’ or ‘Add Video Folder’ button to import it.

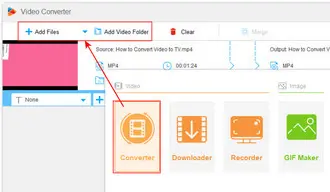
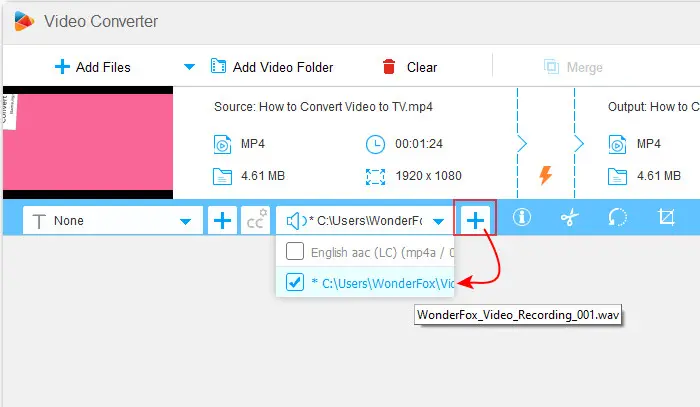
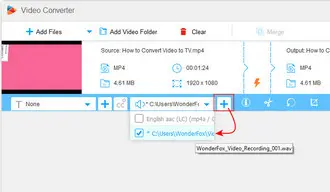
Step 3. On the editing toolbar, hit the second ‘+’ icon on the left of the ‘i’ button. Browse the target recorded voice over file and select it. Click ‘Open’ to add it.
The program currently doesn’t allow preview of the final result. That can be a little annoying. But the editing process is quick and if your voice over is well-structured, this caveat won’t bother you a lot.
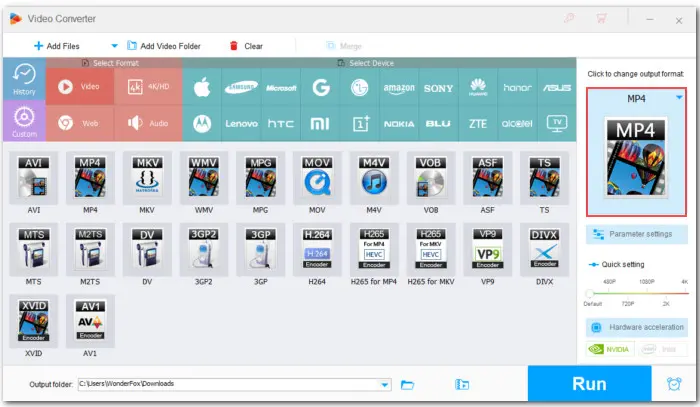
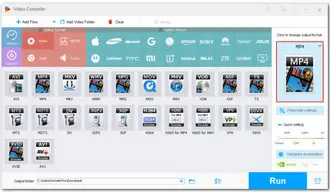
Step 4. Click on the format image on the right of the window to enter the output preset library. Choose an output profile based on your project purpose.
Step 5. You can also change the file destination if needed. Finally, hit ‘Run’ to export the video with added voice over.
That’s it. These are the full steps of how to do a voice over for your video on PC. All you need is:
One might ask, is it possible to record a voice over without the need for additional equipment or software? Yes. Windows, Google Slides, TikTok, and Instagram all offer different ways to work with voice narration. The built-in tools are good for quick jobs, while a desktop recorder is better when you need more control over format, source, and later editing.
If you only need a simple voice note, you can use the built-in Windows app instead of installing a third-party recorder. On Windows 10, search for Voice Recorder. On Windows 11, search for Sound Recorder. Connect or select your microphone, press the record button, and stop the recording when finished.
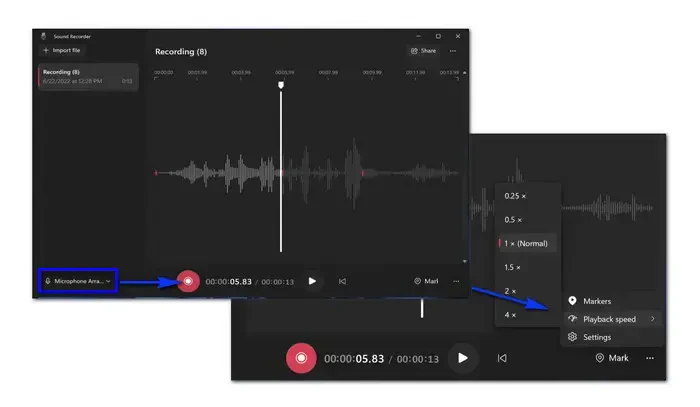
This method is convenient for short notes, interviews, or draft narration. However, it is not always the best choice for a video voice over because the output format and editing options are limited compared with a dedicated recorder. If you need MP3/WAV output, microphone plus system audio, or quick conversion/editing afterward, use the PC solution above.
To record your voice with background music on Windows, choose Audio-only mode in WonderFox Recorder, select your preferred format, and check both Desktop and Microphone. The Desktop source captures the music playing on your computer, while the Microphone source captures your narration.
For a cleaner result, prepare the music first, lower its volume, run a short test, and then start the actual recording. You can play music from a local media player, browser, or other app during the recording. After recording, you can open the file in the Converter module to trim unwanted parts, convert the format, or adjust audio settings if necessary.
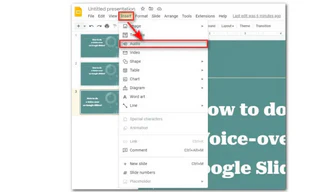
Google Slides does not include a built-in voice recording button. The practical workflow is to record your narration first, upload the audio files to Google Drive, and then insert them into slides one by one.
Step 1. Prepare your slides and write a short script for each slide. You can record the narration slide by slide, or record a longer track and split it later.
Step 2. Use the PC recording steps above to create your voice-over files. MP3 is recommended for smaller file size, while WAV is useful if you still need to edit the audio before uploading.
Step 3. Upload the audio files to Google Drive. Open your presentation, choose the target slide, and go to Insert > Audio. Select the matching audio file from My Drive.
Step 4. Click the speaker icon on the slide and use Format options to adjust playback settings, such as whether the audio starts automatically or plays on click. Repeat the process for other slides as needed.

Adding voice over on TikTok is quite easy. Here is how:
Step 1. Open the app and tap the ‘+’ icon to start a new video.
Step 2. Press the record button or the ‘Upload’ button if you’ve already got the video prepared.
Step 3. Tap the ‘Check’ button to move on to the editing process.
Step 4. Tap the white arrow to expand the editing menu on the right side of your screen.
Step 5. Scroll the menu and find the microphone option. Tap it.
Step 6. Then, tap the button to start recording and press it again to stop it.
Step 7. The best part of this native recorder is that you can go back and delete any parts that you’re not satisfied with. Those marked as red show the parts that have a voice over.
Step 8. If your source video has audio and you want to replace that with your voice, check the ‘Replace original sound with recording’ option at the bottom.
Step 9. Next, save your editing and move on to add background music and adjust the volume if necessary. Done with your editing and then share your video on TikTok for a broader audience now!
Et voilà! That’s how to do a voice over on TikTok.
Instagram also provides a native option to add your voice over to Reel. Follow the detailed steps below:
Step 1. Start the Instagram app on your phone.
Step 2. Tap the plus sign in the top right corner and select ‘Reel’.
Step 3. Similar to TikTok, Instagram allows you to record a new reel or upload a ready-made video.
Step 4. At the bottom of the screen, tap the ‘Voiceover’ button.
Step 5. Hold the record button to start recording a live voice over for your reel. You can voice over the whole video or drag the slider to choose a part to add your voice.
Step 6. If you want to add a pre-recorded voice over to your video, choose ‘Add audio’ at the bottom and continue with the ‘Save’ option to select the audio file.
Step 7. When you finish the voice over recording, click ‘Done’. You can proceed with other editing tools or directly post the video on Instagram Reel.
Q1: How do you do voice over on a video?
The basic process is simple: write a script, prepare your microphone, record a short test, record the final narration, and then add the voice-over file to your video editor. In this guide, WonderFox HD Video Converter Factory Pro is used as the PC example because it can record voice and then add the recorded audio to a video in the same program.
Q2: Can I record my voice on Windows without extra software?
Yes. Windows 10 includes Voice Recorder, and Windows 11 includes Sound Recorder. They are fine for simple microphone recordings. For a more flexible voice-over workflow, such as exporting MP3/WAV, recording computer sound and microphone together, or converting/editing the recorded file, a dedicated recorder is still more practical.
Q3: How do I record voice with background music?
Use a recorder that can capture both system audio and microphone audio. In WonderFox Recorder, enable both Desktop and Microphone, play your background music, and speak over it. Always test the volume balance first so the music does not cover your voice.
Q4: Can I add a voice-over directly in Google Slides?
Not directly. Google Slides lets you insert audio, but it does not provide a built-in recording button. Record your narration first, upload it to Google Drive, and then insert the audio into the matching slide through Insert > Audio.
Q5: How do I voice over a video on my iPhone?
You can use iMovie, TikTok, or Instagram on iPhone. In iMovie, create a project, import your video, tap the plus sign, choose Voiceover, and start recording after the countdown. For quick social posts, TikTok and Instagram Reels also have built-in voice-over tools.

Kevincy joined the WonderFox team in 2014 and has been a senior columnist ever since. With over two decades of experience in the video editing industry, he shares tutorials, tips, and how-to guides on video/audio processing and personal DVD backups. Family-oriented and passionate about helping others, he is dedicated to making video and audio processing easier for readers.
![]()
![]()
![]()
![]()
Terms and Conditions | Privacy Policy | License Agreement | Copyright © 2009-2026 WonderFox Soft, Inc. All Rights Reserved