

 Michelle | Updated on Jul 10, 2026
WonderFox Free HD Video Converter Factory leads our list of the best video editing software for Windows. This feature-rich program offers editing tools to cut, crop, merge, rotate and compress videos easily, and add special effects, filters, subtitles and audio tracks.
You can import videos of various formats such as MP4, MKV, AVI, MOV, M4V, WTV, WebM, and FLV and export them to over 500+ formats and device presets. Plus, it can edit HD and 4K videos without losing the original quality. Best of all, it's totally free and has no watermark. Here is how to use it to edit videos on Windows.
💡 As a multi-functional program, WonderFox Free HD Video Converter Factory can also download videos and audio from online websites.
Step 1: Download and install Download and install WonderFox Free HD Video Converter Factory on your Windows.
Step 2: Launch the software and open "Converter".
Step 3: In the Video Converter program, click "Add Files" to add a video you want to edit. You can also directly drag the video into the program interface to import.
Step 4: You will see a row of editing tools below the video you just imported. The editing tools from left to right are Trim (scissor-shaped), Rotate (circle), Crop (rectangle), Effect (wand), Watermark, and Metadata. Clicking on each button will open a new window where you can edit the video accordingly. If you want to merge multiple video files, you can click the Merge button on the top to open the Video Merger, where you can combine multiple videos into one. Furthermore, you can manage the subtitle and audio tracks to add, replace, or remove them as needed.
Also read: Trim Video | Add Effects to Video | Crop Video | Merge Video
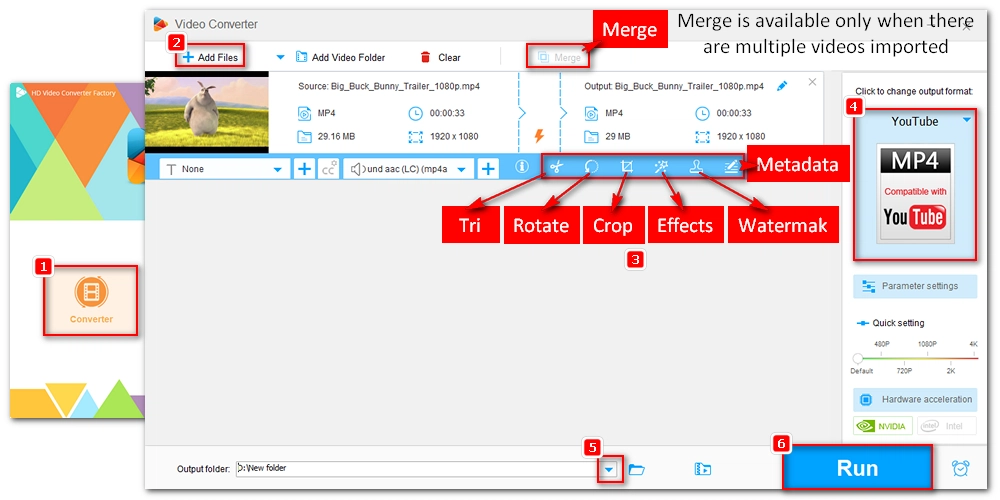
Step 5: Click the Format icon on the right to unfold the output format list. Open the "Video" tab and select your preferred video format. If you don’t know what format to choose, you can keep the same video format or choose "MP4" (a universal video format) as the output profile.
Step 6: Press the ▼ button to set a destination folder.
Step 7: Hit "Run" to export the video.
Clipchamp is an online video editing tool acquired by Microsoft in 2021 and is now built into every Windows 11 system to replace the old Video Editor app. Although lightweight, it's full-featured and provides all essential editing features such as trim, split, rotate, merge, and more. Compared to Video Editor, Clipchamp supports more formats and offers superior editing performance. However, it's only suitable to edit 1080p videos and lower, as exporting higher resolutions requires a paid plan. Let’s take a look at how to edit videos in Clipchamp.
Step 1: Search for clipchamp in the Windows 11 search box and select the matching result.
💡 On Windows 10, you can access Clipchamp's web service at https://clipchamp.com/en/. But the processing speed can be relatively slower.
Step 2: Sign in with your Microsoft account.
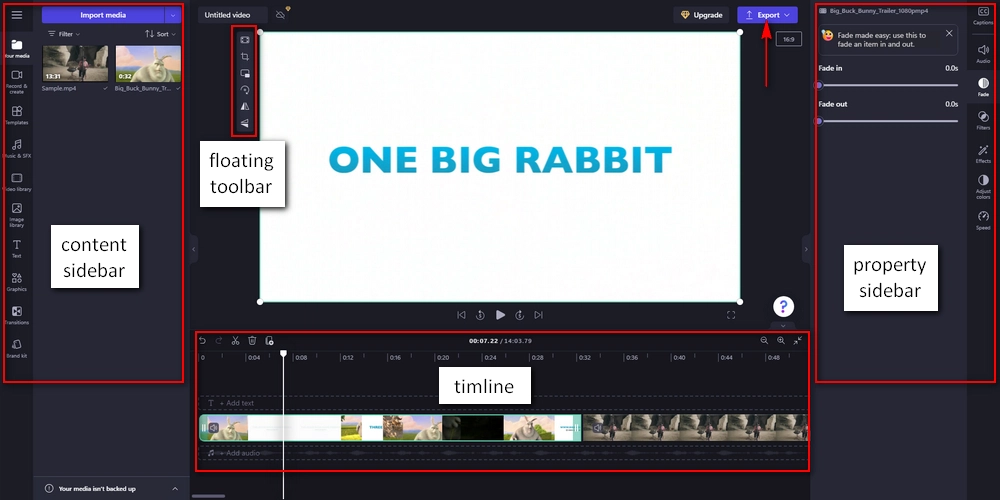
Step 3: In the Clipchamp main interface, click "Create a new video" to enter the workspace.
Step 4: In your media, click "Import media" to import one or more video files from your device or cloud drive. If you don't have a video, you can record a video from your screen or camera by selecting "Record & create" in the left sidebar.
Step 5: Next, drag the media files onto the timeline and rearrange the order. You can remove blank space by right-clicking on it and select "Delete all visual gaps".
Step 6: Select the media on the timeline, and a floating toolbar will appear on the left side of the video player. You can use the provided tools to fill, crop, rotate, flip, and apply picture-in-picture effects.
Step 7: Drag the front and rear handles on the timeline to trim the video as needed. Or you can drag the Seeker and click the Split (scissors) button to split the video.
Step 8: In the left sidebar, you can retouch your media with templates, music & SFX, stock video, stock image, text, graphics, transitions, and brand kit.
Step 9: In the right sidebar, you can further edit the video by changing the volume, adding transitions, applying filters and effects, and adjusting colors and speed. You can even turn on auto-captions for your video.
Step 10: When you finish editing, click the "Export" button in the upper right corner to export the media to your device or share it on social platforms. Maximum quality output in Clipchamp is 1080P.
🔔 If you imported multiple videos, you will export them as one file.
Video Editor is a built-in video editing app for Windows 10, and on Windows 11, you can still access it via the legacy Photos app. It’s a handy tool for quick edits, such as trimming, splitting, and merging videos, as well as for adjusting playback speed, switching between landscape and portrait modes, or removing black bars. However, note that the app has limitations regarding file formats and image quality: it does not support resolutions higher than 1080p and is compatible with only specific file formats. In other words, you may be unable to edit videos captured by devices like GoPro cameras.
That said, if you only need to perform simple, quick edits on SD or HD video, it’s worth learning how to use Video Editor. (The following steps are based on Windows 11.)
Step 1: Enter photos in your Windows search bar and select the "Photos" app.
Step 2: Select "Settings" and find "Photos Legacy".
Step 3: Click "Open Photos Legacy".
Step 4: Switch to the "Video Editor" tab and click "New video project" to start a new project.
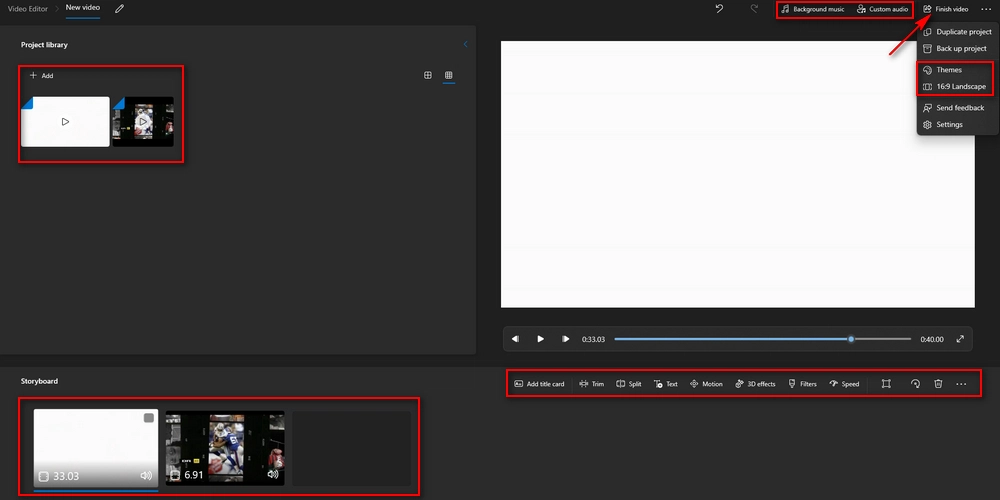
Step 5: Click "Add" to add the video file(s) to the project library.
Step 6: Drag the video to the Storyboard pane. If there are multiple videos, you can drag to change the video order.
Step 7: Now, select a media file and use the editing tools provided under the video player to trim, split, add text, camera motion, and 3D effects, apply filters, change speed, remove black bars, and rotate the video.
Step 8: You can also click "Background music" and "Custom audio" at the top to add background music to all media files or insert custom audio into a certain media file.
Step 9: Click on the three-dot menu in the upper right corner and select a theme and size for your video.
Step 10: Finally, click "Finish video" and choose a video quality to complete the export. Like Clipchamp, the maximum export resolution is 1080P HD.
Before Clipchamp and Video Editor, Windows Movie Maker was the official video editor for creating and editing videos on Windows. You can make amazing videos with music, still images and narration. In addition, it has simple editing functions to help you cut, clip, combine, add special effects, and more.
This is a very easy-to-use and practical app. That’s why many people still want Movie Maker to edit video files. However, the app was discontinued by Microsoft in 2017. If you are still nostalgic about it and prefer to use it to edit videos on Windows 11, that’s possible too. You just need to download the Windows Live Essentials 2012, which contains Movie Maker. Next, I’ll show you how to install Windows Movie Maker to edit a video on Windows 11.
Step 1: Download the 2012 version of Windows Live Essentials from http://web.archive.org/web/20160423192125/http://wl.dlservice.microsoft.com/download/1/9/4/194B1919-A211-441F-BC0E-34F6B533B876/en-gb/wlsetup-all.exe.
Step 2: Run the installer. When it asks what you want to install, select "Choose the programs you want to install".
Step 3: Then only check the checkbox before "Photo Gallery and Movie Maker" and leave other options unselected to avoid redundant software installation.
Step 4: Click "Install" to finish the installation.
Step 5: Open Windows Movie Maker and click "Accept" to enter the workspace.
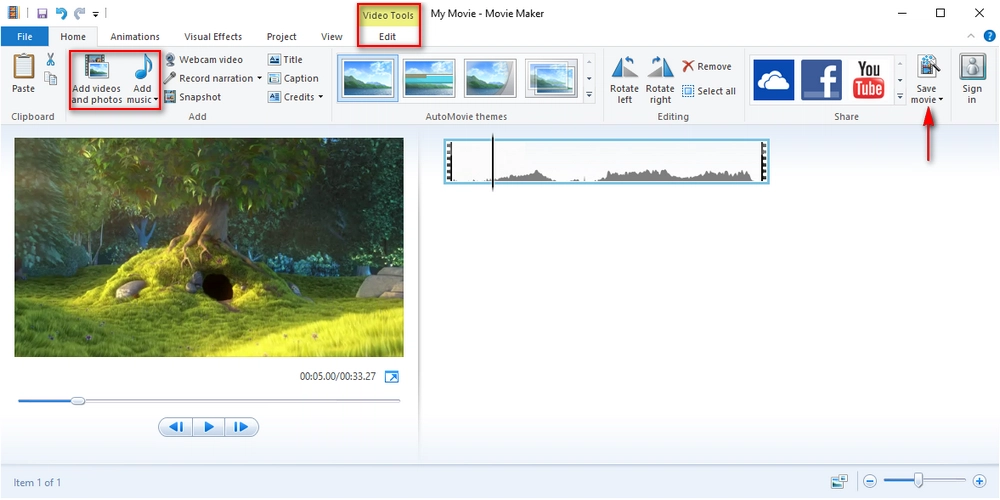
Step 6: Click the "Home" tab > "Add videos and photos" and import the videos into the program. You can also use "Webcam video" to record a video from your webcam for editing.
Step 7: Click "Add music" to add an audio file from your device. You can also use "Record narration" to record your narration using your microphone.
Step 8: In the Storyboard pane, drag the media files to change the order.
Step 9: If you want to trim the video, navigate to the point where you want to start and click the "Edit" tab > "Set start point". Repeat the same step to set the end point. You can also use the "Split" tool to split the video into two clips.
Step 10: If you want to add transitions between clips, you can click "Animations" on the ribbon. Then choose the transition effect you want.
Step 11: You can also click "Visual Effects" to add your preferred effects to your video project.
Step 12: To display text on the video, click the "Home" tab > Caption. Then enter the caption you want to insert. Choose a font and style, and add effects to the text if desired.
Step 13: After editing, click "File" > "Save movie" > select a save type, and then follow the next few prompts to save the video.
Today, advancements in technology have made everything simpler. In the world of post-production, there are many video editing software that can streamline our editing workflow. Even better, just as Apple developed its own video editor iMovie, Microsoft also launched its built-in Clipchamp app that can help us record, edit, and share video in one stop. But that’s not where it ends. On Windows 11, you can not only use the native video editor Clipchamp, but also try other efficient video editing software, including the Video Editor app in Photos, the legacy Windows Movie Maker, and the third-party WonderFox Free HD Video Converter Factory. These programs are safe, free, and easy to use. You can find your favorite tool here to start editing a video on Windows now.
That’s all I want to share about how to edit videos on Windows 11 and 10. I hope this article can be of some help. Thank you for reading till the end. Have an amazing day!
Yes, Windows 11 has a video editor called Clipchamp, which is preinstalled on every Windows 11 machine. On your Windows 11 desktop, go to the search box and type in clipchamp to access Clipchamp. Note that you need to log in with your Microsoft account to use the app.
Clipchamp replaced the Video Editor app as the default video editor in Windows 11. But you can still access Video Editor by downloading Microsoft Photos Legacy.
Clipchamp is a freemium product in Windows 11. You can use Clipchamp to import, edit, and export your own video completely for free. But most of the stock clips, pictures, etc. need a premium Clipchamp subscription.
There are many video editing software available to help you edit videos on Windows for free. You can try Clipchamp, the legacy Video Editor app and Windows Movie Maker, or use third-party programs like WonderFox Free HD Video Converter Factory.

I write about multimedia topics, including video and audio conversion, compression, editing, and downloading. I joined WonderFox in 2020, and my goal is to help readers solve everyday tech problems more easily. In this guide, I have shared four free methods to edit videos on Windows 11 and 10. Hope you find them useful!


I write about multimedia topics, including video and audio conversion, compression, editing, and downloading. I joined WonderFox in 2020, and my goal is to help readers solve everyday tech problems more easily. In this guide, I have shared four free methods to edit videos on Windows 11 and 10. Hope you find them useful!
WonderFox DVD Ripper Pro
WonderFox DVD Ripper Pro is a professional DVD ripping program that can easily rip any DVD (whether homemade or commercial) to all popular formats including MP4, MKV, MOV, AVI, MP3, WAV, H264, H265, Android, iPhone, and so on. It also lets you edit and compress DVD videos efficiently. Download it to enjoy a fast and trouble-free DVD ripping experience.

Privacy Policy | Copyright © 2009-2026 WonderFox Soft, Inc.All Rights Reserved
