![]() by Vita
by Vita
Updated on Aug 11, 2023
Here are two hassle-free methods introduced to burn PowerPoint files to DVD discs on Windows systems, by means of which, you can not only store your presentation files in a DVD disc but also play them on a standalone DVD player in handy. Let’s go through the specific process of how to burn a PowerPoint to a DVD.
For PowerPoint presentation files back-up, many people still insist on physical DVD discs, instead of cloud storage services. And another important aspect that people want to burn PowerPoint to DVD is to play presentation files on a standard DVD player when there is no presentation software. In some ways, DVD is still having a huge superiority compared with modern backup tools and media. Meanwhile, since Windows has preloaded the DVD authoring function and programs, burning Microsoft PowerPoint files becomes much simpler than ones on other platforms. You don’t have to install any external DVD burning software or plug-ins and according to your intentions. Here are two ways to go.
Also Read: Embed DVD into PowerPoint l Play Embedded Video in PowerPoint Smoothly l Fix Codec Unavailable PowerPoint Errors
The built-in DVD authoring feature on the Windows system empowers you to burn Data DVD that can be edited or you can add new content into the DVD disc. Data DVD is an ideal option for backup purpose and it functions a bit like a flash hard drive. The following is how to burn a PowerPoint to a DVD for storage.
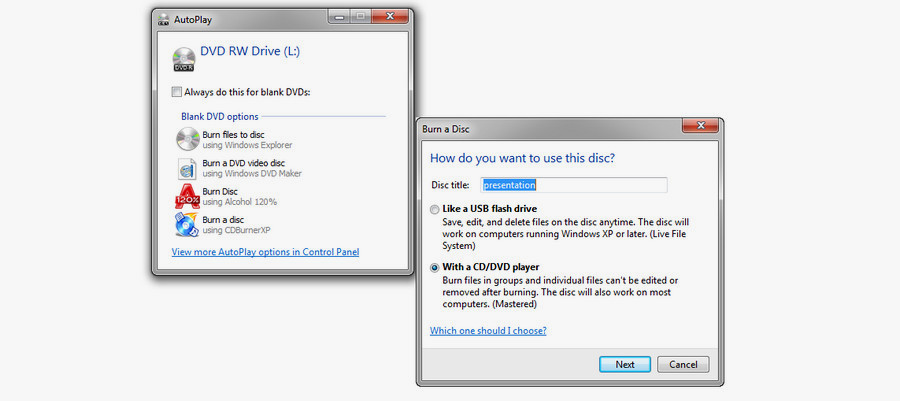
Step 1. Insert a blank DVD disc into your computer, and an AutoPlay dialog appears. Click Burn files to disc.
Step 2. On the Burn a Disc dialog, enter the disc title and choose Live File System or Mastered formats. Live File System means that you can add new content into the disc later as long as there is enough capacity. As for Mastered format, once you burn files into the disc, no matter how much space they occupy, after you finalize the burning process, you can’t burn more files into the DVD disc unless you erase the disc.
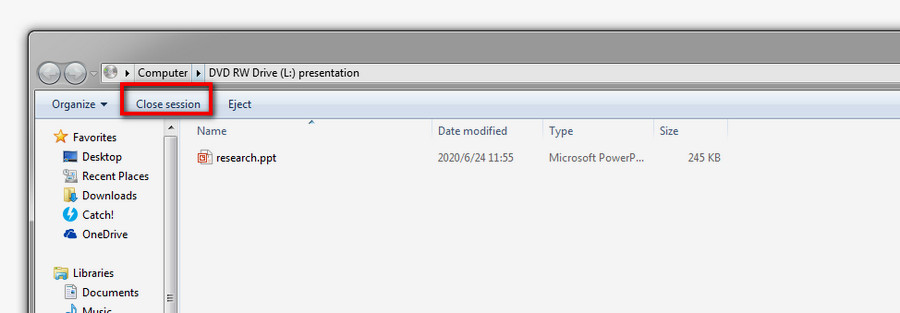
Step 3. The format process will take a while. If you choose the Live File System format, then drag the PowerPoint presentation file into the window of the DVD drive, then click Close session.
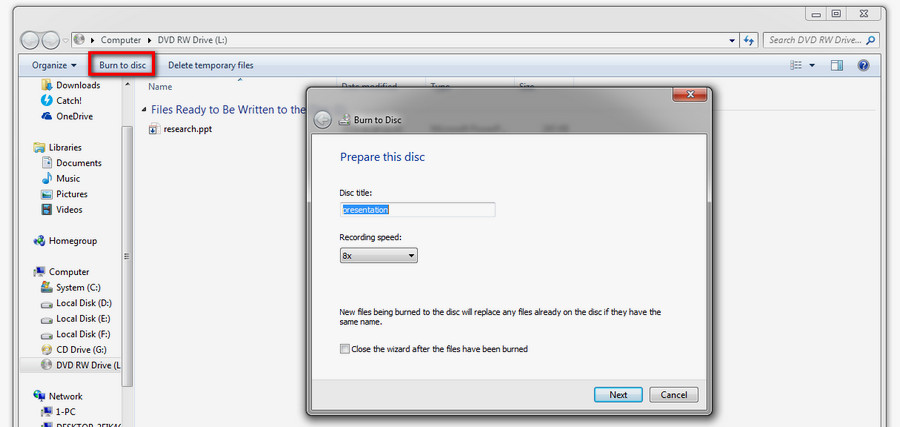
If you choose Mastered format, click “Burn to disc”, then enter the DVD title, choose a DVD burning speed and hit Next.
If you are trying to burn a playable DVD on Windows, you need to convert PowerPoint to DVD-Video format that is widely compatible with most DVD players and computers. But before that, it is recommended that you convert the PowerPoint file to video first in consideration of compatibility with major DVD video authoring programs, including the one we will introduce later. So this method on how to put a PowerPoint on a DVD is divided into two parts: Export the PowerPoint file as a video and burn the video to a DVD-Video disc.
Step 1. Run PowerPoint program, open the presentation file.
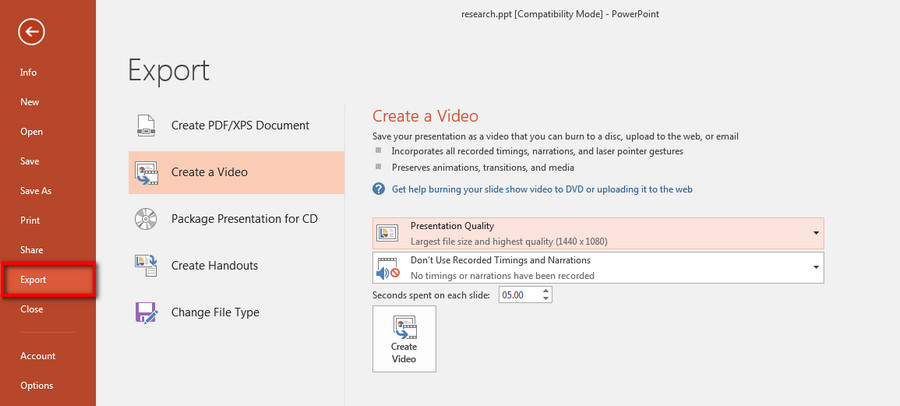
Step 2. Go to File > Export > Create a Video.
Step 3. Choose a video resolution and choose how many seconds of each slide to display.
Step 4. Click Create Video, find a location for saving the exported video, and hit Save to export it as MP4 video.
The preinstalled Windows DVD Maker on Windows 7 and Windows Vista allows you to create DVD slideshows and DVD videos. At the same time, it offers some flexible DVD creation settings. No complex process or more installation, Windows DVD Maker is a great option for this task.
Step 1. Pop a blank drive into your computer, click Burn a DVD video disc, Windows DVD Maker runs. Or you can type in the program in the search box of the Start menu, find and open Windows DVD Maker.
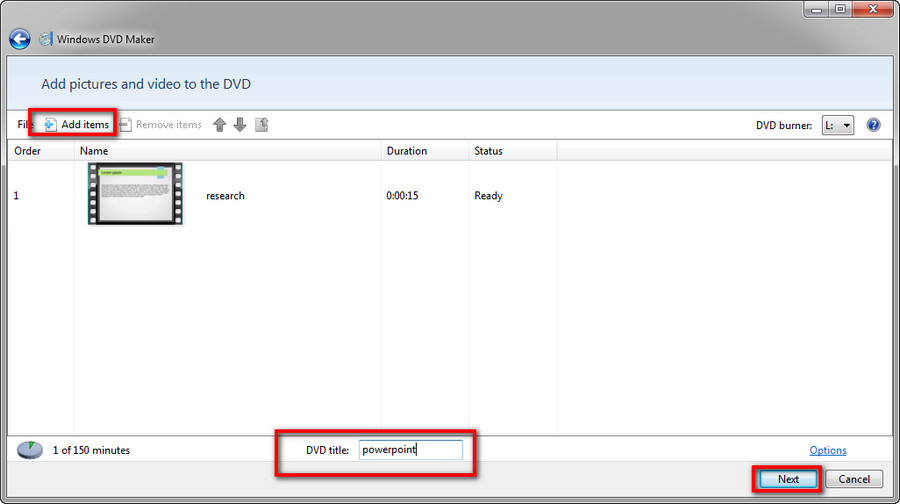
Step 2. Click Add items, select and import the MP4 presentation video, fill in the DVD title, click Next.
Tips. Go to the Options window in which you’re able to alter the playback mode, aspect ratio, format, and burning speed.
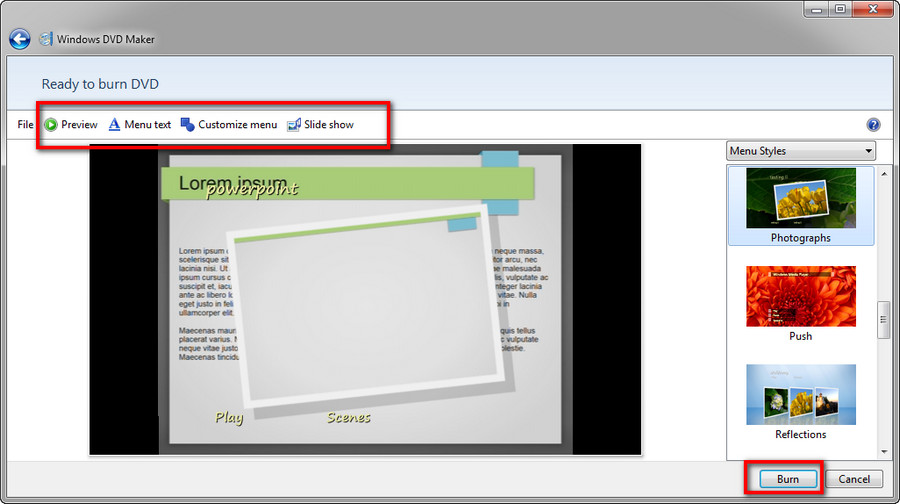
Step 3. Select a DVD menu style, add menu text, and customize the menu. Click Preview to check out the effect. Click Burn, then.
We have come to the end of this post and hope you have learned how to burn a PowerPoint to a DVD. If you still have questions, please let us know anytime.
Since Windows 8/10, Windows DVD Maker has been abandoned, so users need to take the help of third-party DVD burning software. We have curated a list of alternative options>> The Best 5 Free Alternatives to Windows DVD Maker. You can choose one to finalize the PPT to DVD burning process.
More Useful Tools to Help Handle Multiple Media Tasks
WonderFox DVD Ripper Pro
The simple and fast DVD ripping software converts (homemade and commercial) DVD video discs, ISO images, as well as DVD folders to over 300 digital file formats. Its 1:1 DVD to ISO/DVD folder features makes DVD backup a cinch.