

DaVinci Resolve may reject a file completely, import only its audio or video, show no sound, report Media Offline, or play the clip so poorly that editing becomes impractical. These symptoms do not always have the same cause. This guide helps you identify what is actually wrong and apply the most suitable fix without converting every file blindly.
 Kevincy | Aug 3, 2026
Start with the symptom instead of the filename extension. A container such as AVI, MOV, MP4, or MKV can hold many different video and audio codecs. DaVinci Resolve may support the container but not the particular streams inside it. Support also varies by operating system, Resolve version, Free or Studio edition, and available decoding hardware.
The file does not appear or cannot be added: The video or audio codec may be unsupported, the file may be incomplete or damaged, Resolve may not have permission to access its location, or the path may point to unavailable cloud or removable storage.
Only audio imports: Resolve can decode the audio stream but not the video stream. This often happens with a codec, bit depth, chroma format, profile, or hardware-decoding limitation.
Only video imports or the clip has no sound: The audio stream may be unsupported, missing, damaged, incorrectly mapped, muted, or routed to the wrong output inside Resolve.
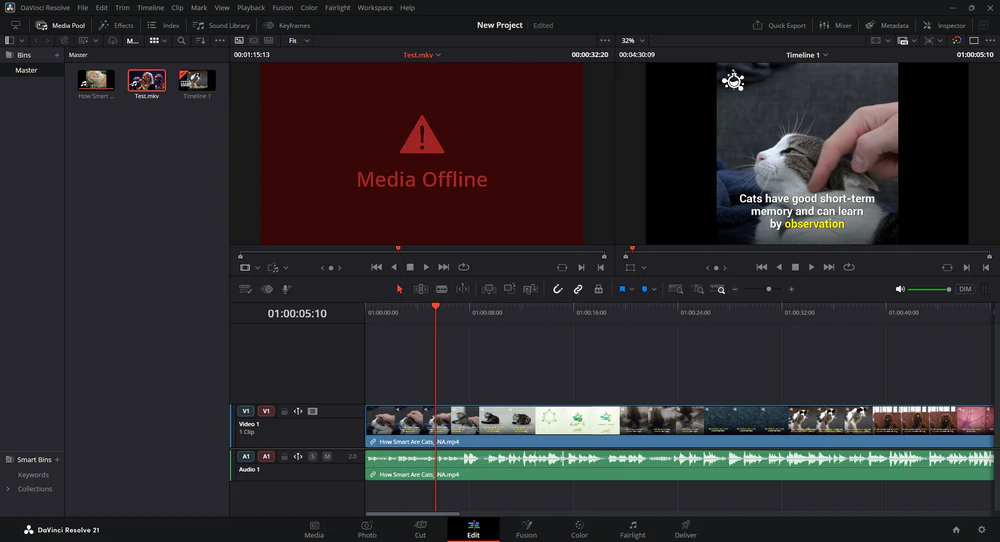
Media Offline appears after import: The source file may have moved, the drive may be disconnected, permissions may have changed, or proxy and cache media may no longer match the original clip.
The clip imports but playback is choppy: Import has succeeded. The problem is usually decoding load, high resolution or frame rate, long-GOP compression, effects, slow storage, insufficient hardware, or unsuitable preview settings.
Important: Renaming a file extension does not change its codec or repair the media. It may only hide the real problem. Check the streams first, then remux, re-export, repair, or transcode as needed.
Open the media in another reliable player. Scrub through the beginning, middle, and end, and confirm that both picture and sound are present. If the file also freezes, ends early, or has no audio outside Resolve, the source itself may be incomplete or damaged. Re-copy it from the camera or storage card, download it again, or re-export it from the program that created it.
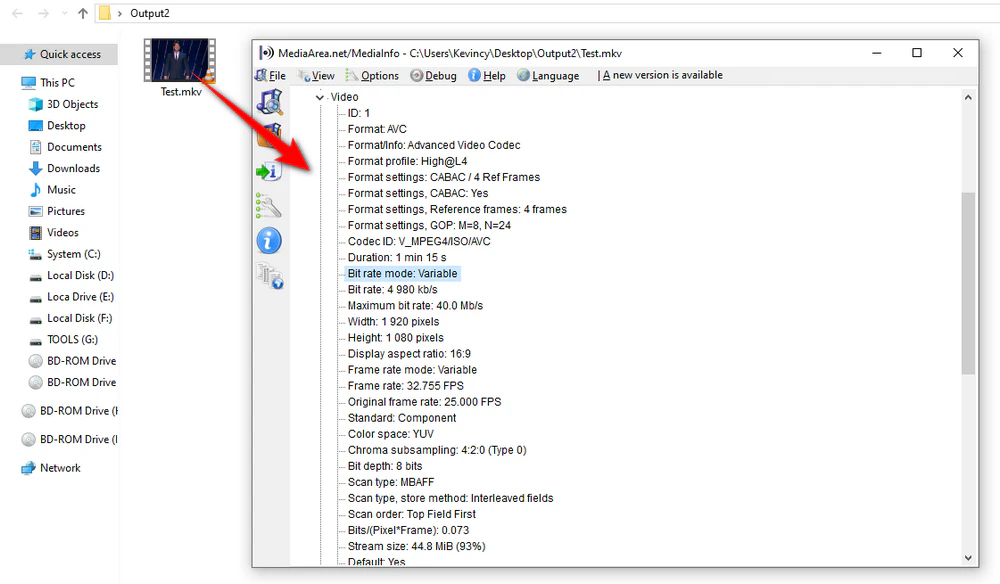
Use MediaInfo or another media information tool to view the container, video codec, audio codec, bit depth, chroma subsampling, frame rate mode, sample rate, and number of audio channels. Compare those details with Blackmagic Design's supported codec list. Do not rely on an old list because codec support changes between releases and platforms.
Copy one problem clip to a local folder such as D:\Test on Windows or a folder in your home directory on macOS. Give it a short, plain filename. Avoid a very long path, unusual symbols, a disconnected network location, an online-only cloud placeholder, or a removable drive that may sleep. On macOS, also confirm that Resolve has permission to access the folder or removable volume.
Create a blank project and import both the problem file and a small clip that has worked before. If neither imports, update Resolve, restart the computer, verify storage permissions, and update the graphics driver from the GPU manufacturer. If only one file fails, focus on that file rather than resetting the whole application.
Encrypted, rental, subscription, or otherwise protected media is not intended for normal editing. Obtain an unprotected source that you are authorized to edit. A converter cannot make a physically damaged or access-controlled file usable in a legitimate workflow.
WonderFox HD Video Converter Factory Pro can batch transcode video and audio, change codecs, frame rates, and other settings, then create more editing-friendly files for DaVinci Resolve on Windows.
Transcoding is the most practical fix when Resolve cannot decode a stream, imports only part of a clip, or struggles with media created by a phone, screen recorder, older camera, messaging app, or uncommon encoder. It is also useful when the source technically imports but is too compressed for comfortable editing.
WonderFox HD Video Converter Factory Pro provides a straightforward workflow for Windows users. It supports batch conversion, hardware acceleration, common delivery codecs, editing-oriented profiles, audio-only output, and detailed video and audio controls. Keep the original files until the converted clips have been checked in Resolve.
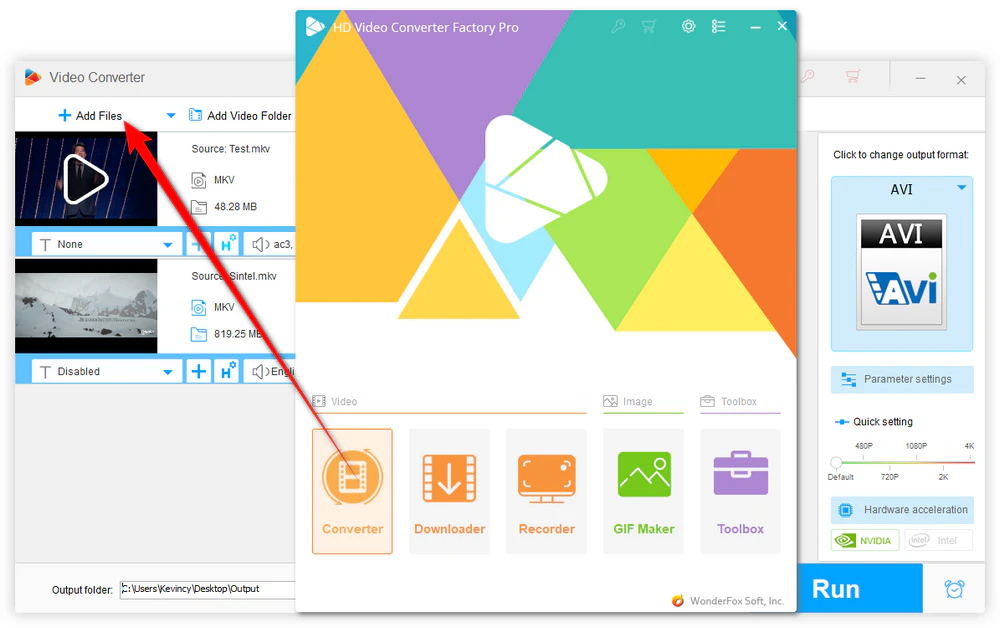
Launch the software and open Converter. Click Add Files, Add Video Folder, or drag the source media into the workspace. Test one representative clip first before processing a large batch.
Open the output profile list. For a broadly compatible video, select a common profile and make sure both the video and audio codecs are supported on your Resolve system. For a smoother editing experience, choose an editing-oriented intermediate profile such as Apple ProRes when appropriate; it creates much larger files but is easier to decode than highly compressed camera or delivery media.
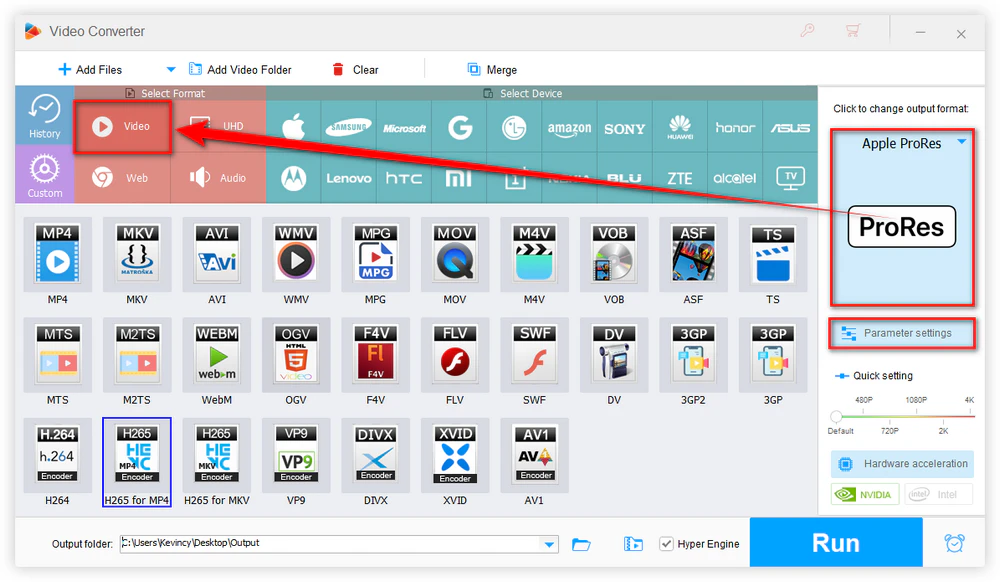
For an audio-only source that refuses to import or behaves unpredictably, choose an uncompressed audio profile and use a standard sample rate such as 48 kHz. When a phone or screen recording imports with drifting audio, uneven seeking, or unstable playback, open Parameter settings and convert it to a constant frame rate that matches your intended timeline. Variable-frame-rate media is not automatically invalid, but normalizing its timing can prevent editing and sync problems.
⚠️ Do not lower resolution, frame rate, or bitrate unless you need smaller proxy-like files or the computer cannot handle the originals. Unnecessary changes add another generation of compression without solving a codec-specific problem.
Select a local output folder and click Run.
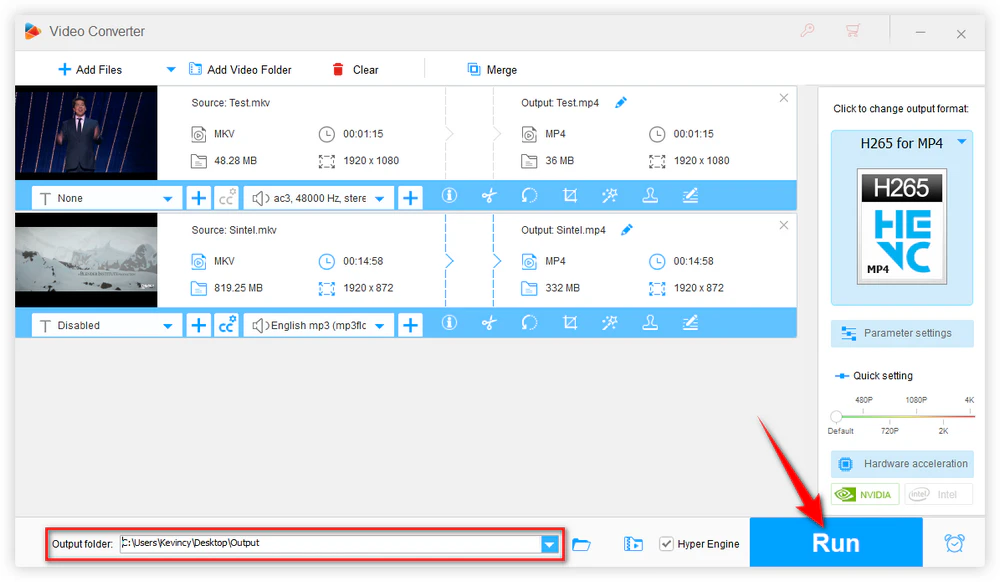
After conversion, play the new file from beginning to end, confirm that audio stays in sync, and then import it into a new Resolve bin. If the test clip works, process the remaining files with the same settings.
If a file still fails after a normal transcode, return to the original source. It may have damaged frames, an incomplete header or index, missing media data, or another structural problem. Re-copying or re-exporting from the source is safer than repeatedly converting a broken file.
First, check whether the clip contains an audio stream and whether Resolve displays a waveform. Then make sure the clip, track, and main output are not muted or dimmed. Open the Mixer and place relevant track and bus faders near 0 dB. In Clip Attributes > Audio, confirm that the source channels are mapped to the intended mono or stereo tracks.
Next, open Preferences > System > Video and Audio I/O and select the correct output device and speaker configuration. If Resolve was opened before headphones, an audio interface, or an HDMI monitor was connected, save the new choice and restart Resolve. In Fairlight, verify that the track is assigned to the main bus and that the meters move during playback.
If the source plays with sound elsewhere but has no waveform or audio stream in Resolve, transcode only the audio or the whole clip. A standard PCM or widely supported audio stream with valid metadata is more dependable than an unusual or malformed track.
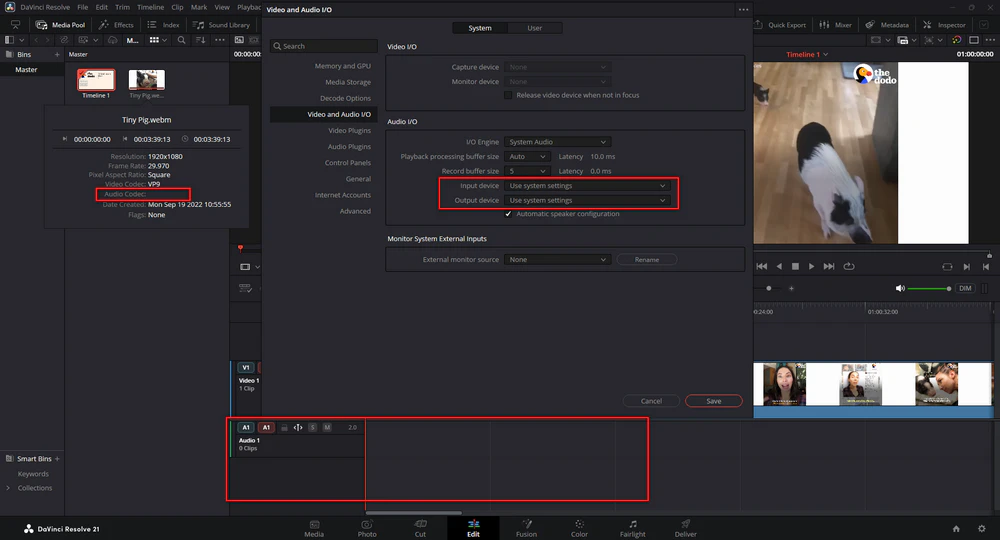
This is usually a video-decoding issue, not a damaged audio track. Inspect the video codec, profile, bit depth, and chroma format. Some combinations require Resolve Studio, a supported GPU, a newer driver, or a different operating-system decoder. Updating Resolve 21 or later may add support for newer camera and hardware formats, but an update will not make every codec work on every computer.
The reliable workaround is to transcode the video stream to a codec supported by your installed edition and platform. Avoid installing random codec packs; Resolve often uses its own media framework, and a system codec pack may not affect import support.
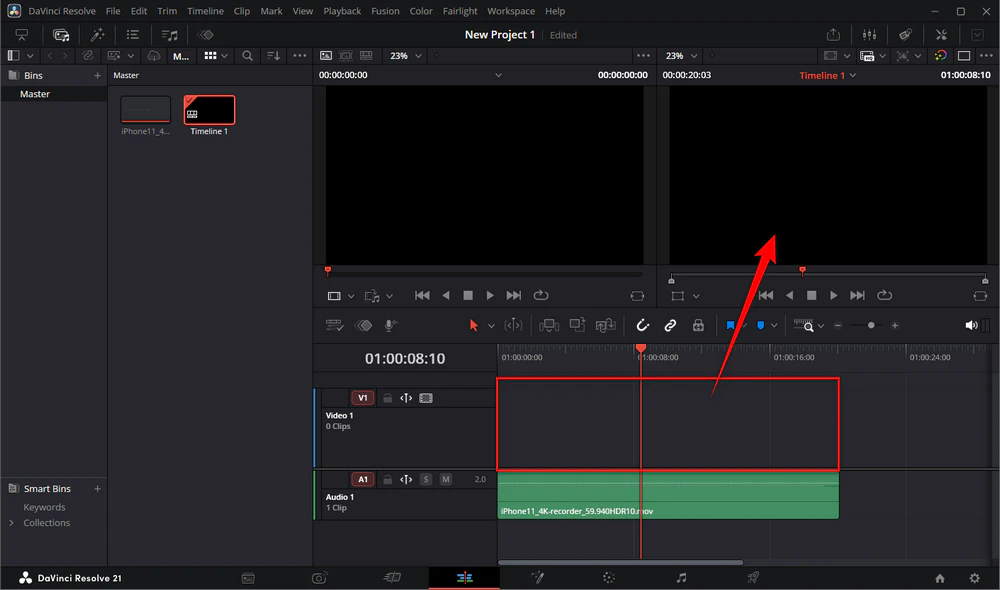
If the source files were moved or a drive letter changed, select the affected clips in the Media Pool and use Relink Selected Clips or Change Source Folder. Reconnect external drives, make online-only cloud files available locally, and restore folder permissions. If only proxies are offline, relink or regenerate proxy media rather than replacing the camera originals.
When Media Offline appears only on certain frames, test the original clip outside Resolve. Damaged frames, interrupted camera recordings, or a broken index can produce intermittent offline frames even when the file imports.
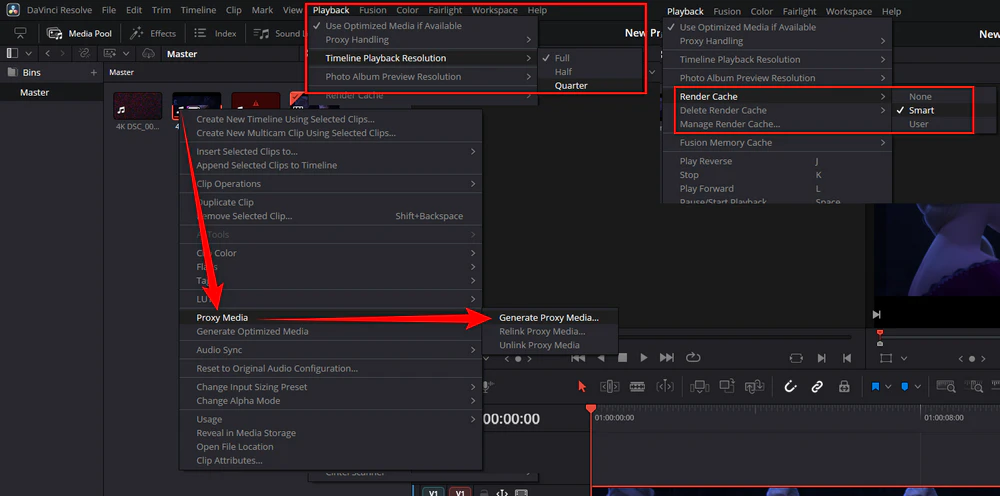
Do not convert the master immediately if Resolve can already read it. Try the built-in performance tools first:
Use Timeline Proxy Resolution: Choose Half or Quarter resolution from the Playback menu to reduce viewer load without changing the original file.
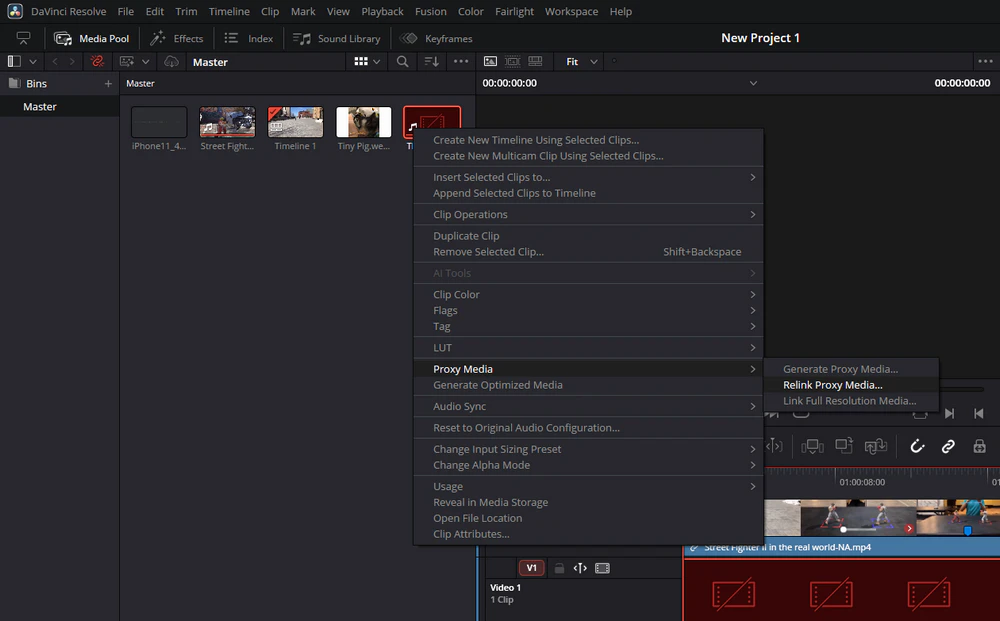
Generate Proxy Media or Optimized Media: Create easier-to-decode working files, edit with them, and keep the originals for final rendering. Store proxies and cache on a fast local SSD with enough free space.
Enable Render Cache: Smart cache can render demanding effects automatically. User cache lets you choose the clips or effects that should be cached.
Use Render in Place: Render a particularly heavy Fusion, noise-reduction, retiming, or effects clip and replace it temporarily on the timeline.
Reduce the workload: Close other demanding applications, use current GPU drivers, confirm that Resolve is using the intended GPU, and avoid editing high-resolution media from a slow network drive. If the source codec is still the bottleneck, transcode it to an editing-friendly intermediate instead of simply lowering the bitrate.
The extension alone cannot answer that question. Resolve must support the container, the video and audio codecs, and their specific profiles on your operating system and edition. Inspect the streams and compare them with DaVinci Resolve supported formats.
Changing .avi to .mp4, for example, only changes the label. It does not rewrite the container or codec. Use a proper remux when the streams are already supported, or transcode when they are not.
The audio codec is readable, but the video stream is not. Common reasons include an unsupported codec profile, bit depth, chroma format, missing hardware decoding, or a feature limited to Resolve Studio. Transcoding the video is usually the quickest cross-system fix.
Any lossy re-encoding can change the image or sound. Use a high-quality setting or an editing intermediate, avoid repeated conversions, and keep the camera originals. A larger output file is normal when converting highly compressed footage to an easier editing codec.
Studio can add codec, hardware-acceleration, resolution, and advanced-feature support, but it is not the answer to every bad file. Check the official feature and codec tables first. A damaged source, wrong audio routing, missing drive, or slow storage will still need its own fix.
When DaVinci Resolve has an import problem, first determine whether the file is rejected, partially imported, offline, silent, or merely difficult to play. Test the original outside Resolve, inspect its real codecs, copy it to accessible local storage, and try a clean project. Transcode only when the stream or timing needs to be changed; use relinking and audio settings for problems that conversion cannot solve; and use proxies, cache, or an editing intermediate when performance is the real issue.
This order saves time and protects quality because it targets the actual cause instead of treating every Resolve problem as a simple format conversion.

Kevincy joined the WonderFox team in 2014 and has been a senior columnist ever since. With over two decades of experience in the video editing industry, he shares tutorials, tips, and how-to guides on video/audio processing and personal DVD backups. Family-oriented and passionate about helping others, he is dedicated to making video and audio processing easier for readers.


Kevincy joined the WonderFox team in 2014 and has been a senior columnist ever since. With over two decades of experience in the video editing industry, he shares tutorials, tips, and how-to guides on video/audio processing and personal DVD backups. Family-oriented and passionate about helping others, he is dedicated to making video and audio processing easier for readers.

WonderFox HD Video Converter Factory Pro
1. Batch convert video and audio to 500+ profiles.
2. Change codecs, frame rates, and audio parameters.
3. Trim, merge, crop, rotate, flip, and compress media.
4. Download supported online video and audio streams.
5. Record screens, gameplay, webcams, and audio.
6. Make animated GIFs from video or image sequences.
7. Extract audio, subtitles, make ringtones, and more.

Privacy Policy | Copyright © 2009-2026 WonderFox Soft, Inc. All Rights Reserved
