"Why does it say 'file is too large for destination' when the destination has more than enough space, and how to fix it?"
If your USB flash drive shows that the file is too large, though it's not, it's most likely because your USB flash drive is formatted with the FAT32 file system, which supports a maximum file size of 4GB for a single file. When your file is around or over 4GB, you won't be able to transfer it to USB even if there is enough free space.

Let's learn a quick concept first. A file system is a structure that organizes data stored on a disk drive. In addition to FAT32, there are exFAT and NTFS file systems, which support much larger file sizes than FAT32. Therefore, to fix the 'file is too large for the destination file system' error, you can try to reformat FAT32 to NFTS or exFAT to overcome the FAT32 file size limitation. However, please note that fewer devices are compatible with exFAT and NTFS. If your device can only read FAT32, you will need to compress or split the files into smaller files to place them on a FAT32 storage device.
Below, you will learn three methods on how to fix this problem. Please continue reading.
As mentioned earlier, NTFS and exFAT can hold large files exceeding 4GB. You can change the FAT32 file system to one of these to fix this problem. If you want to use the file later on a Windows system, it's recommended that you convert FAT32 to NTFS.
On Windows, you can convert FAT32 to NTFS with or without formatting. But before proceeding, please back up all your USB data in advance to prevent data loss (IMPORTANT).
1️⃣ Change FAT32 to NTFS using CMD without formatting (no data loss; cannot reverse conversion)
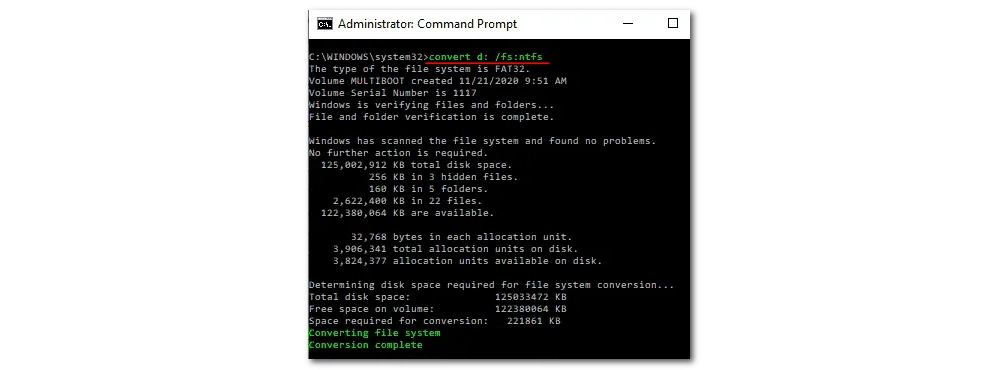
Step 1: Type in “CMD” in your Windows search bar. Right-click Command Prompt and run it as administrator.
Step 2: In the Command Prompt, type convert drive letter: /fs:ntfs. Then press Enter.
🔔 The drive letter means the drive letter your drive. For example, if you want to convert your D drive to NTFS, you can type convert D: /fs:ntfs.
Watch this video for more reference:
2️⃣ Reformat FAT32 into NTFS (risk of data loss)
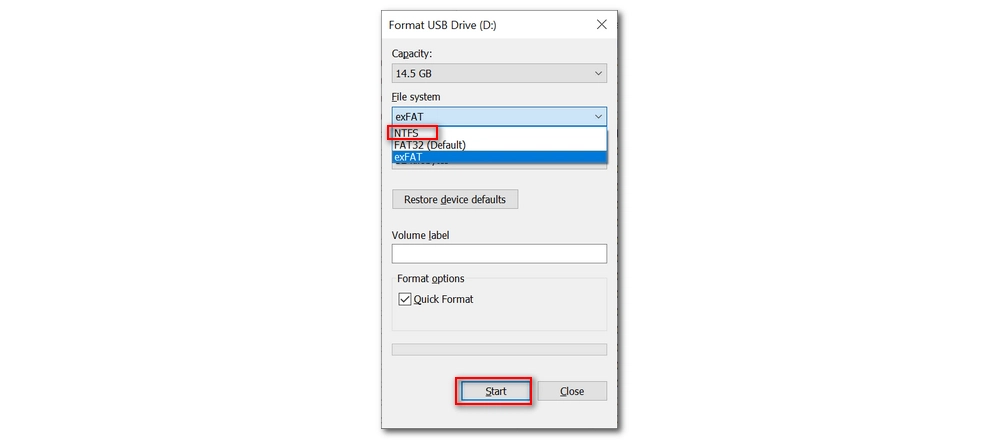
Step 1: Right-click on your FAT32 disk drive and select the Format option.
Step 2: Open the File system drop-down box and select the NTFS option. (Or you can select exFAT depending on your needs)
Step 3: Click Start. Your flash drive is now reformatted into the NTFS file system.
On Mac, you can reformat FAT32 to exFAT using Disk Utility:
Step 1: Use your launchpad to search for "Disk Utility" and open it.
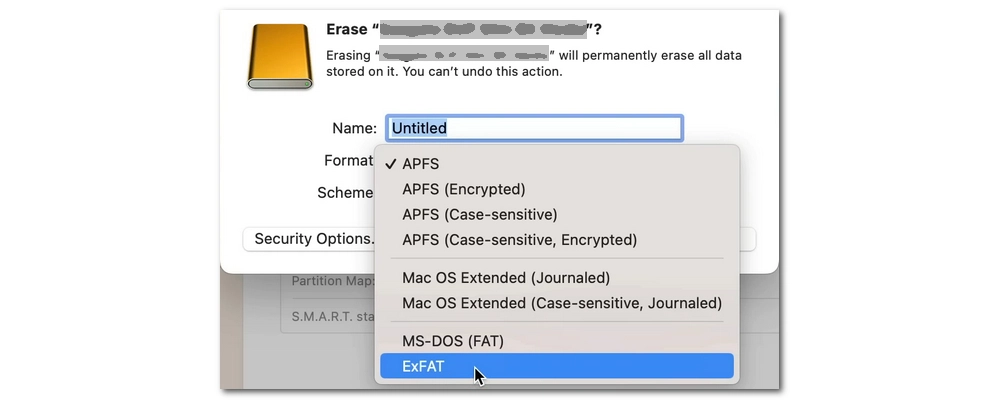
Step 2: Select the drive on the left, and then click the Erase button.
Step 3: Choose exFAT from the Format drop-down box.
Step 4: Click Erase to change it to exFAT format.
💡 If the above steps are too difficult for you, you can try a FAT to NTFS converter tool that will simplify the process for you.
If method 1 doesn't work for you, you'll need to compress the files you want to transfer. In most cases, if you want to transfer video files, you can use a video compressor to compress them.
WonderFox Free HD Video Converter Factory is a versatile video processing software on Windows that can easily convert several GB video files to low MB video files while maintaining good video quality. Furthermore, it also estimates the output file size so you know whether the output video will fit your USB. Now, let’s download download this software for free and see how to compress video files to fit on USB.
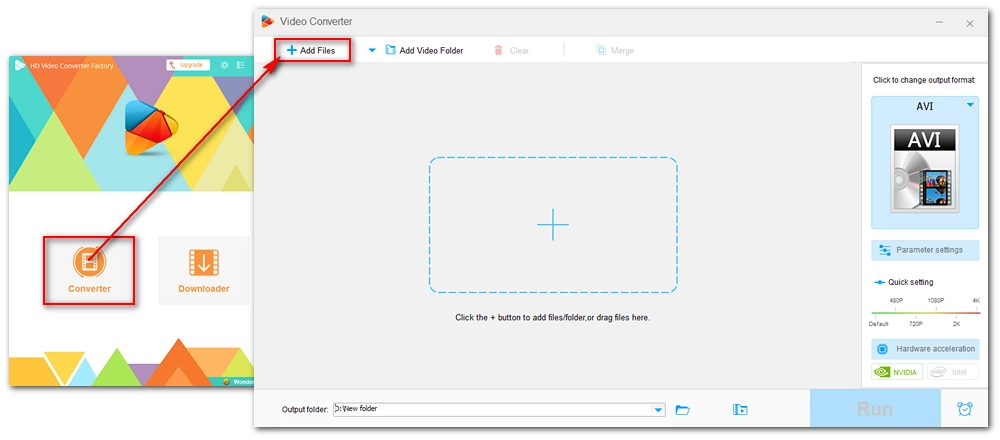
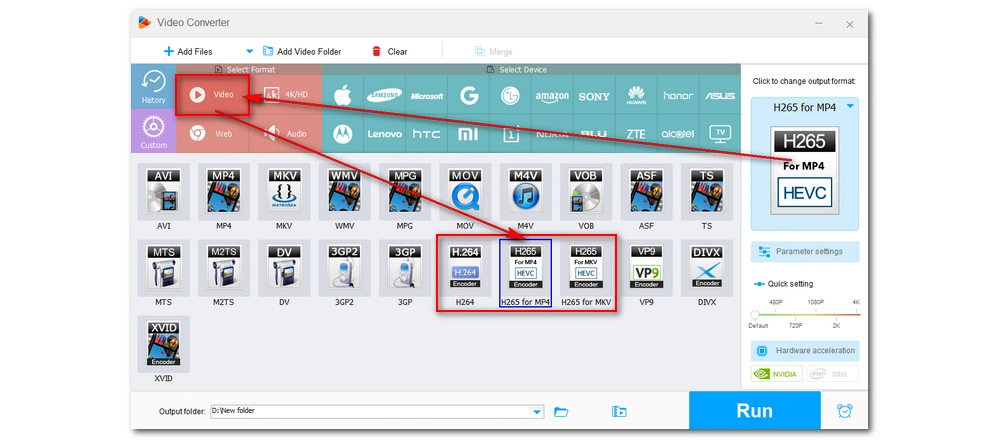
Step 1: Run the software, then select the Converter module.
Step 2: Click Add Files to import your video file into the conversion list.
Step 3: Press the format image on the right to open the output format page. Next, head to the Video format section and choose your preferred format as the output profile.
💡 We recommend using H264 as the output format since it's compatible with most platforms and devices. We also suggest H265 for MP4 if your target device supports it. By using the high-efficiency HEVC/H265, you can significantly reduce the file to half size compared with using H264. Meanwhile, the video quality is kept original.
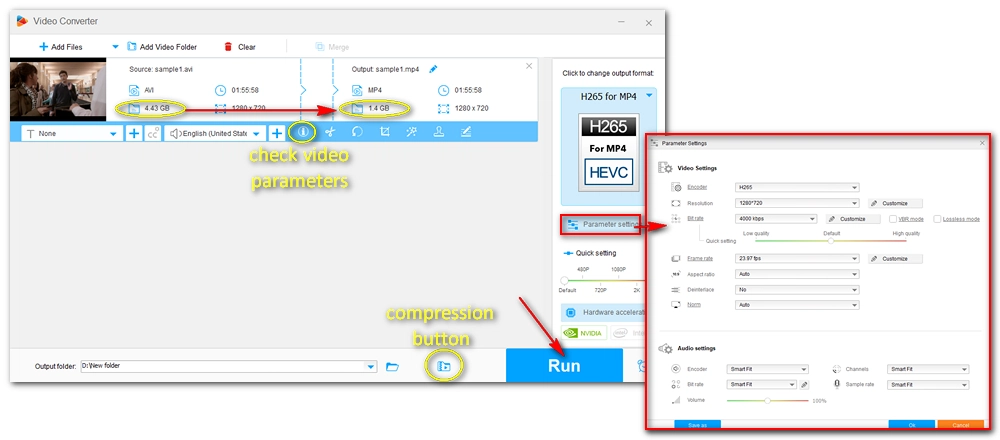
Step 4: After selecting the output format, you can see the estimated output file size on the right side of the video. If the size is less than 4GB, you can hit the Run button to start the compression immediately (you won’t lose much quality this way).
Otherwise, you need open Parameter settings and change the video resolution, bitrate, and frame rate to a lower value to further shrink the video size.
💡 Click the information icon ⓘ in the video task to see the original video parameters.
Step 5: Finally, click the ▼ button at the bottom to set an output folder and press Run to finish the process.
💡 The program also comes with a video cutter that can cut large files into small video chunks.
For large document files, software, games, etc., you can use file archivers to split them into multiple small chunks and then transfer them to your FAT32 device. Free file archivers like WinRAR and 7-Zip can compress and split large files into several small files effectively. Here, we will take 7-Zip as an example and show you how to split a 4GB large file into 1GB small chunks.
Step 1: Download and install the latest version of 7-Zip from https://www.7-zip.org/.
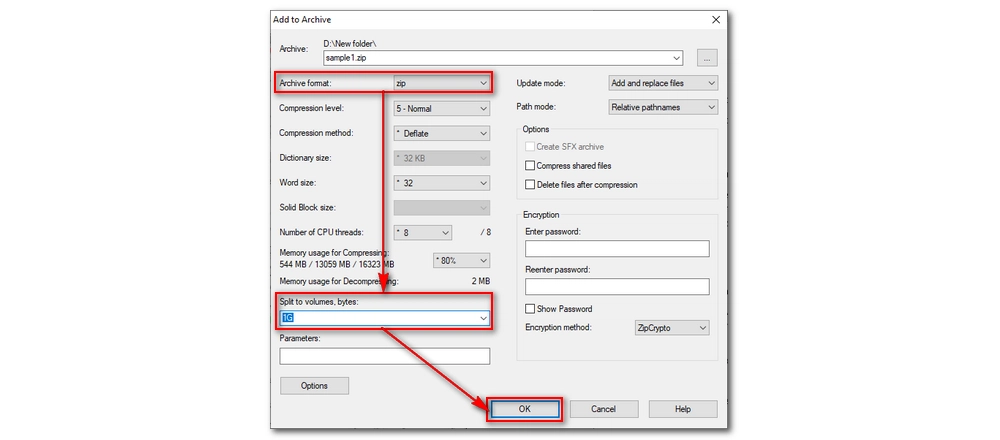
Step 2: Right-click the large file you wish to split and select 7-Zip > Add to archive.
Step 3: In the popup window, choose the Archive format as zip. Then in the Split to volumes, bytes section, enter a size you want or choose a size from the drop-down options. In the test, we entered 1G as the split size.
Step 4: Now, click OK to begin the compression and splitting process.
After the splitting, you should have no problems transferring the files to your USB flash drive.
| File System | FAT32 | exFAT | NTFS |
|---|---|---|---|
| Max Partition Size | 32GB for all OS, 2TB for some OS | 128PB | 2^32 clusters – 1 cluster |
| Max File Size | 4GB - 1 Bytes | 16EB | 2^44 bytes (16 TeraBytes) minus 64KB | Supported OS | All operating systems | Windows XP and Windows Server 2003 with update KB955704, Windows Embedded CE 6.0, Windows Vista with Service Pack 1, Windows Server 2008, Windows 7, Windows 8, Windows Server 2008 R2 (except Windows Server 2008 Server Core), Windows 10, macOS starting from 10.6 | All Windows operating systems (In Mac OS X, the NTFS file system is read-only) |
If you put a 5GB file onto a USB stick and it says "the file is too large for destination file system", this is caused by the FAT32 file system. You can easily avoid this error by changing FAT32 to NTFS or exFAT. However, if you do not want to reformat your USB or flash drive, or your target device only supports FATT32, you must compress or split the file to less than 4GB.
That’s all we want to share about how to fix files too large for USB. We hope these methods help resolve your issue. Thank you for reading to the end. Have a nice day!
When this error message pops up and your storage device has enough space, it means that your device has a maximum file size limit. Your device is most likely formatted using the FAT32 file system, which has a file size limit of 4GB per file. Some older flash drives may also use FAT16, which has a file size limit of 2GB.
FAT32 is the most universal file system that is compatible with all operating systems, while NTFS works on Windows systems only. If you need to use a flash drive on all platforms, FAT32 is the recommended format. Otherwise, NTFS is the better option for improved reliability, disk space utilization, and overall performance.
You can convert your USB drive from FAT32 to NTFS without formatting (and thus without losing data) by using Command Prompt:
1. Type “CMD” in the Windows search bar, right-click "Command Prompt," and run it as an administrator.
2. Type the command convert [drive letter]: /fs:ntfs (replace [drive letter] with the letter of your USB drive, e.g., convert D: /fs:ntfs), and press Enter.
1. Convert the file system of your USB drive: Use CMD or a converter software to convert FAT32 to NTFS.
2. Compress the files: Use video compression software like WonderFox Free HD Video Converter Factory to reduce the size of video files.
3. Split the files: Use file archivers like 7-Zip to split large files into smaller chunks that fit within the FAT32 file size limit. For example, you can split a 4GB file into four 1GB segments.

1. Convert DVD files to MP4, MP3, and 500+ output formats;
2. Support ISO image and DVD Folder conversion;
3. Rip DVD with wanted subtitle and audio tracks;
4. Modify video codec, resolution, bitrate, etc. and deinterlace DVD;
5. Edit and compress DVD videos before conversion;
6. 50X faster conversion speed with hardware acceleration;
7. Built-in DVD player;
Privacy Policy | Copyright © 2009-2026 WonderFox Soft, Inc.All Rights Reserved
