Update: We discovered an easier way to change default tracks for MKV files in Method 2.
We found a simple way to change the default audio and subtitle tracks for MKV using Jmkvpropedit.
Jmkvpropedit is a GUI based on the open source mkvpropedit (part of MKVToolNix). It allows editing MKV metadata without remux, which means it can set the track you want as the default instantly. Here is a step-by-step guide on how to change the default audio and subtitles in MKV using Jmkvpropedit.
Important: The change is made on the source, so make a copy of your original file before you follow the steps below.
Step 1. Download and extract Jmkvpropedit .zip file to your C drive. Jmkvpropedit releases at: https://github.com/BrunoReX/jmkvpropedit/releases.
Note: Be sure to enable "JavaSoft (Oracle) registry keys" if you install Java on Windows from adoptium.net or similar.
Step 2. Run JMkvpropedit.exe and drag your MKV file into the “Input” interface.
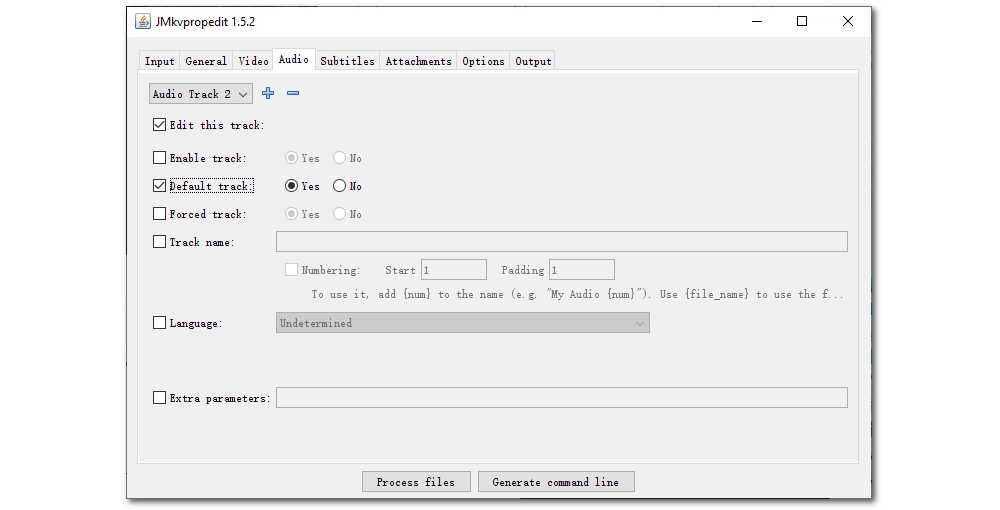
Step 3. Go to the “Audio” tab and next to Audio Track 1, click the plus button to add as many audio tracks as there are in your MKV video. Then, choose the track that you want to set as default and check “Edit this track” > tick “Default track” > keep it as “Yes”. For the rest tracks, select them one by one > Edit this track > Default track > change Yes to No.
Step 4. Go to the “Subtitle” tab and repeat the previous step to change the default subtitle if you need.
Step 5. Open “Options.” Click “Browse” and choose the JMkvpropedit.exe as the executable file.
Step 6. Click “Process files” at the bottom to finish the editing. Now the default audio/subtitle track is changed.
Tip: In the last “Output” tab, you can see the command lines generated.
MkvDefaultTrackChanger is a lite GUI app designed to change the default subtitles and audio tracks in MKV files. Since it only changes metadata and does not involve remuxing, it is fast.
Compared to Jmkvpropedit, this tool is much easier to use and the whole process can be completed in just a few clicks. Make sure to make a copy of the original file before continuing with the following steps.
Step 1. Go to the release page of MkvDefaultTrackChanger: https://github.com/MikeMoolenaar/MkvDefaultTrackChanger/releases, and download the correct version to your computer.
Step 2. Unzip the file and run the .exe program.
Step 3. Click “Browse files” and load your MKV file.
Step 4. Adjust the default audio and subtitle as needed.
Step 5. Click “Apply” to save the changes.

Removing unwanted audio and subtitles from MKV can also help you keep the desired language track while reducing the bloated file size. We can use the free video program WonderFox Free HD Video Converter Factory to easily handle this. Download the free program to get started:
Step 1. Open Free HD Video Converter Factory on your PC.
Step 2. Click “Converter” to open the converter program.
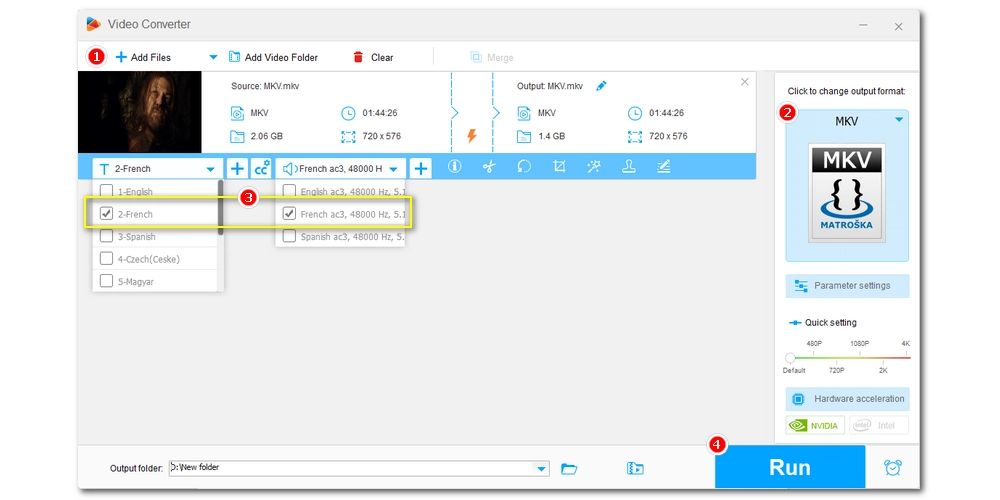
Step 3. Drag your MKV file into the converter and on the right side of the program, choose an output video format.
Step 4. Under the video task, click the subtitle and/or audio drop-down lists and select the track you want to keep.
Tip: For editing subtitle tracks, you can save the subtitle as hardcoded or CC.
Step 5. Click “Run” to export video with the desired tracks.
Note: WonderFox Free HD Video Converter Factory [quick download quick download] is available for more video- and audio-related tasks. You can use the same program to convert MKV to MP4 with subtitles, cut and merge videos, change video/audio file type, edit parameter settings, and download YouTube videos. As the cherry on top, the software is totally safe and free to use.

WonderFox DVD Ripper Pro
WonderFox DVD Ripper Pro can help you fast rip any DVDs, even the protected ones, to popular digital formats without error. Meanwhile, it offers options to keep your desired audio and subtitle tracks effortlessly. Get it now to have a try!
Privacy Policy | Copyright © 2009-2026 WonderFox Soft, Inc.All Rights Reserved
