

You can easily make online video calls on platforms like WhatsApp, Messenger, Viber, Duo/Meet, WeChat, and Discord. Whether for work purposes or personal review, you may want to record these calls and save them locally. While some of these services offer built-in recording features, they often come with restrictions, like requiring a paid membership or host permissions, which make what should be a simple task a challenge in many cases. Don't worry, though. This article will show you third-party methods to effectively record video calls (including audio) on various devices. They'll be your universal solutions for all apps. Just read and follow.
 Michelle | Updated on Sep 11, 2026
Disclaimer: This guide is provided for informational and educational purposes only. Recording video calls without the consent of all or one participant may violate local, state, federal, or international laws. Always check your local laws and obtain explicit consent from all parties before initiating any recording. WonderFox assumes no liability for misuse of this information or third-party recording tools.
To record a video call with audio on Windows, WonderFox HD Video Converter Factory Pro is an excellent option among the many screen recorders on the market. It allows you to record high-quality video calls while simultaneously capturing both your voice and the caller audio. Additionally, it supports recording other screen activities, like streaming videos, tutorials, and gameplay. With only a few simple clicks, you can customize the recording settings, including the recording area, format, and quality, and start recording without hassle.
One the recording is complete, the software also enables you to further edit, convert, compress the recordings and do more. All the video processing functions are easy to get started with. Just downloaddownload this software and follow the tutorial below to see how to record video call on Windows!
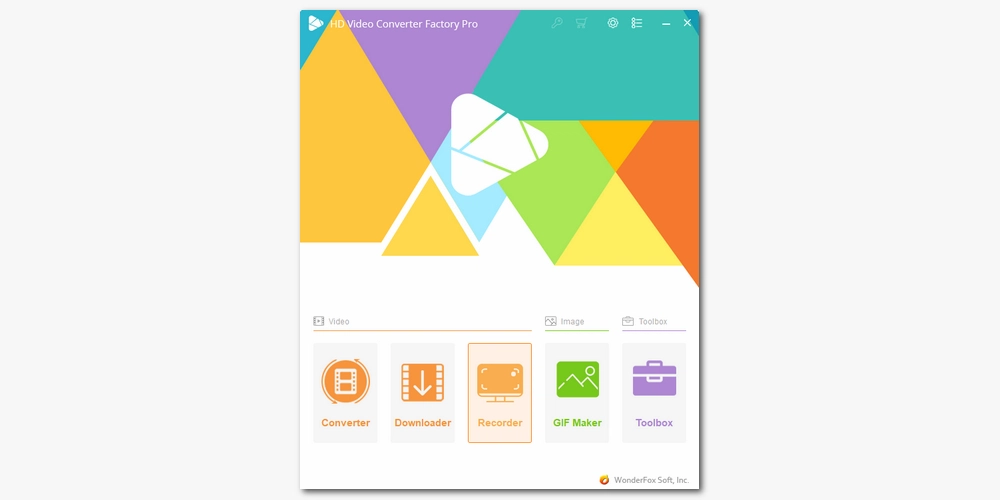
Launch HD Video Converter Factory Pro and click Recorder to enter the Screen Recorder interface.
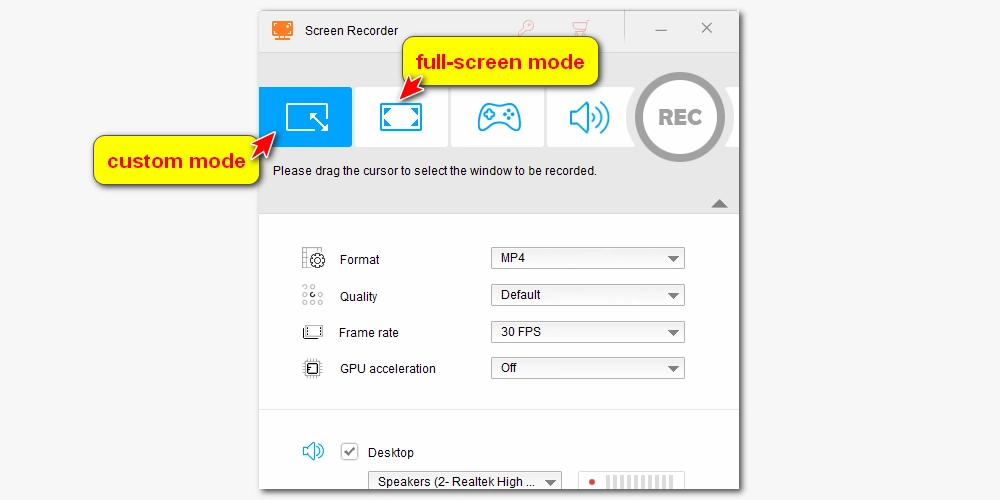
At the top of the interface, choose the first Custom mode, and drag the cursor to select the recording area and confirm. You can also select the second Full-screen mode to record the entire screen of your computer.
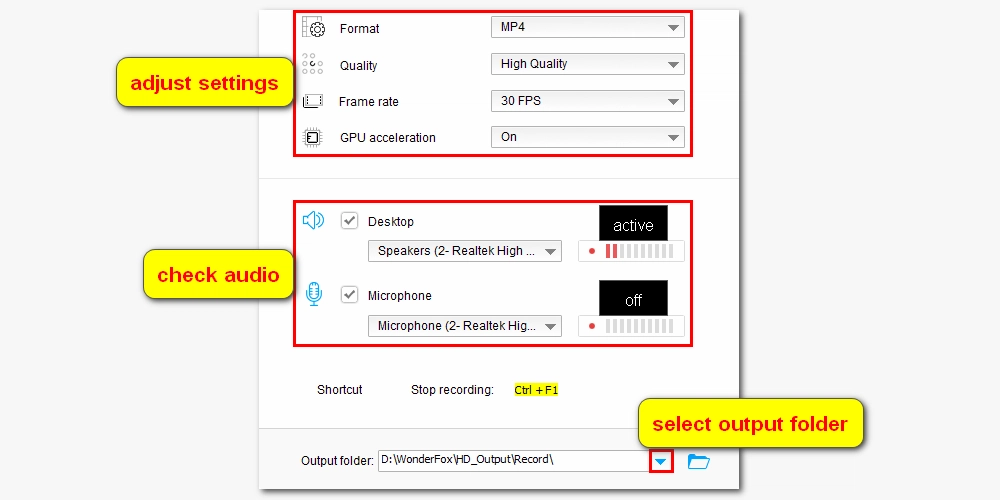
Move down to select a recording format, quality, and frame rate according to your preferences. You can also toggle on GPU acceleration if your computer supports hardware acceleration. This option will provide more stable recording performance.
Next, enable the Desktop and/or Microphone audio sources so you can record the computer sound and your voice.
💡 Pro Tip: Test Your Audio Before You Record
To make sure you capture both caller audio and your own voice, play a sample audio file and speak into your microphone:
Note: If you have more than one headset or microphone plugged in, select the specific device name in the dropdown menu in the program.
Don't forget to choose an output destination for your recordings at the bottom of the interface.
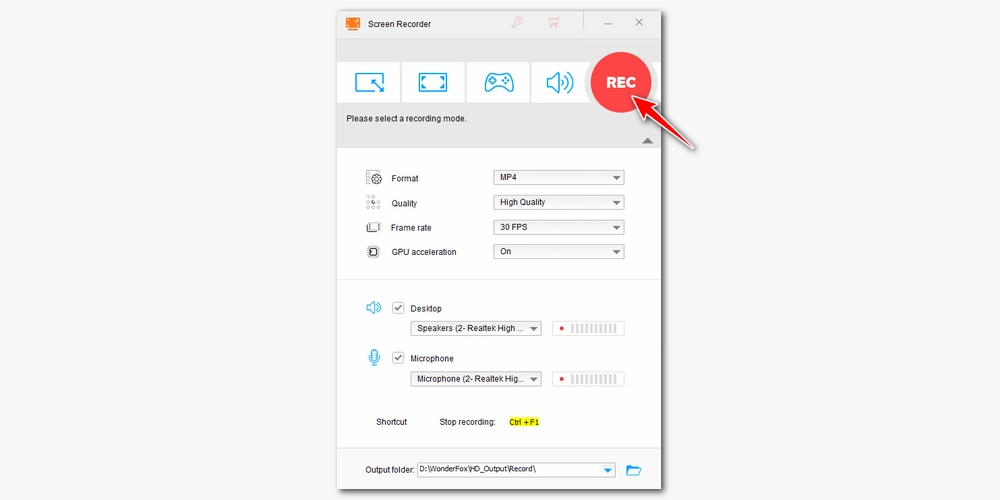
Start the video call you want to record, then click the red REC button to start recording after a five-second countdown. Once you finished the video call and want to end the recording, just click the stop button or press Ctrl + F1. The recorded video will be kept in the folder you set.
Also read: How to record VoIP calls >>
WonderFox HD Video Converter Factory Pro can do more besides recording. It allows video and audio conversion, editing, downloading, GIF and ringtone making. More useful features are awaiting your exploration. Give it a try now!
For Mac users, there is no need to download other third-party screen recorders since QuickTime Player can act as a screen recorder and is pre-installed on Mac computers. But QuickTime only supports screen recording with the mic voice by default. To record video calls with internal or system audio at the same time, you need to install a virtual audio driver like BlackHole and configure it with your Microphone device as an aggregate device.
Here are the detailed steps:
Step 1: Download the BlackHole 2ch audio driver at https://github.com/ExistentialAudio/BlackHole. Then run the installer and complete the installation.
Step 2: Press Command + Space and search for Audio MIDI Setup. Open it.
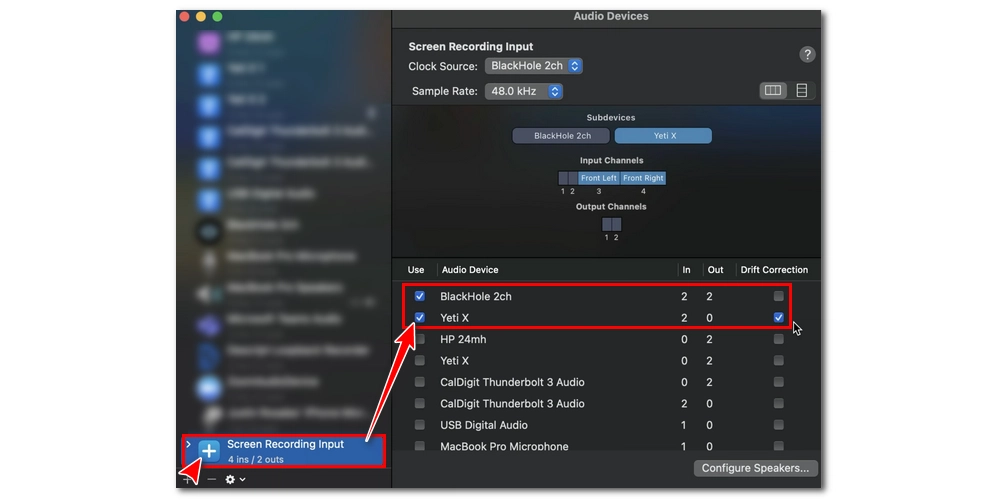
Step 3: Click the + button in the bottom-left corner and select Create Aggregate Device. Then double-click the name and rename it to Screen Recording Input.
Step 4: On the right panel, check the boxes for BlackHole 2ch and your microphone (be sure to select the entry that shows a number under the In column). Also, keep Drift Correction checked to ensure your microphone and computer audio stay synchronized.
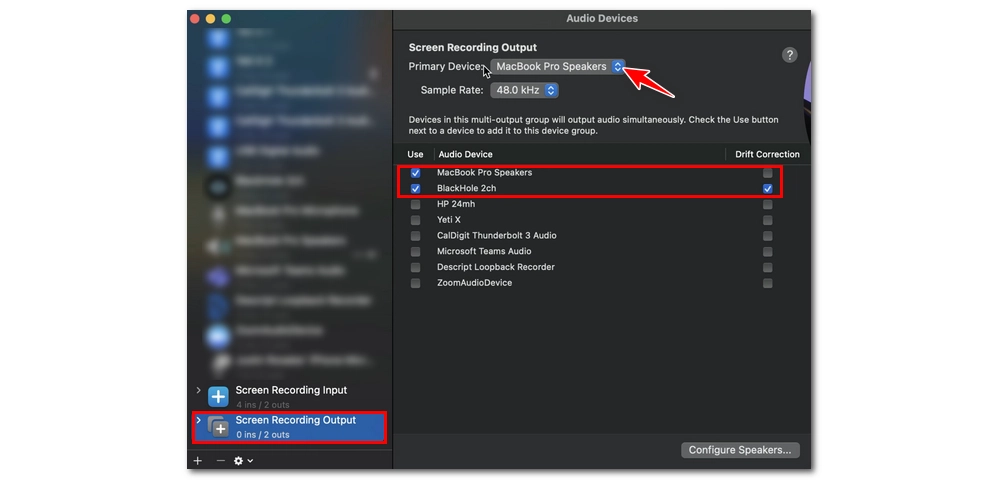
Step 5: Click the + button again and select Create Multi-Output Device. Then rename it to Screen Recording Output.
Step 6: Check the boxes for your primary audio listening device (make sure it appears at the top of the list) and then BlackHole 2ch.
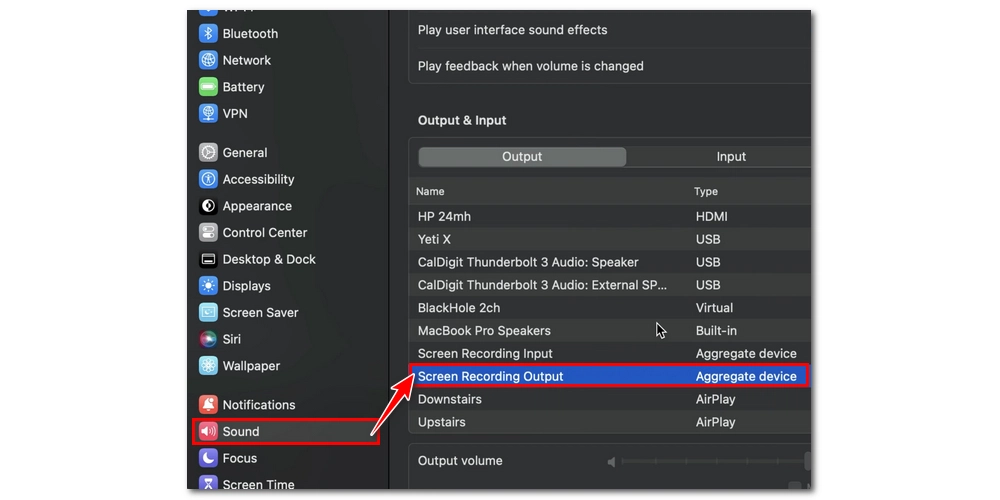
Step 7: Press Command + Space, open System Settings > Sound.
Step 8: Under Output, select Screen Recording Output.
Step 9: Launch QuickTime Player. Choose File > New Screen Recording from the top menu bar.
Step 10: Click Options and select Screen Recording Input as your audio source. You can then set the recording path, countdown time, or decide whether to enable the Show Mouse Click feature. Choose the mode Record Entire Screen or Record Selected Portion to select the recording area.
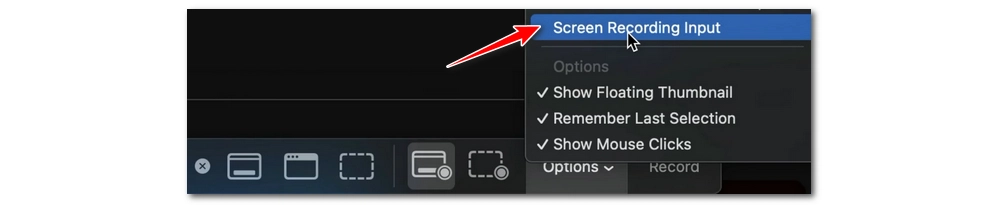
Step 11: Once all settings are ready, hit Record to start recording your video call. To finish the recording, hit the stop button in the top menu bar.
🔔 After completing your recording, you should go back to System Settings > Sound > under Output, switch back to your normal speakers or headphones.
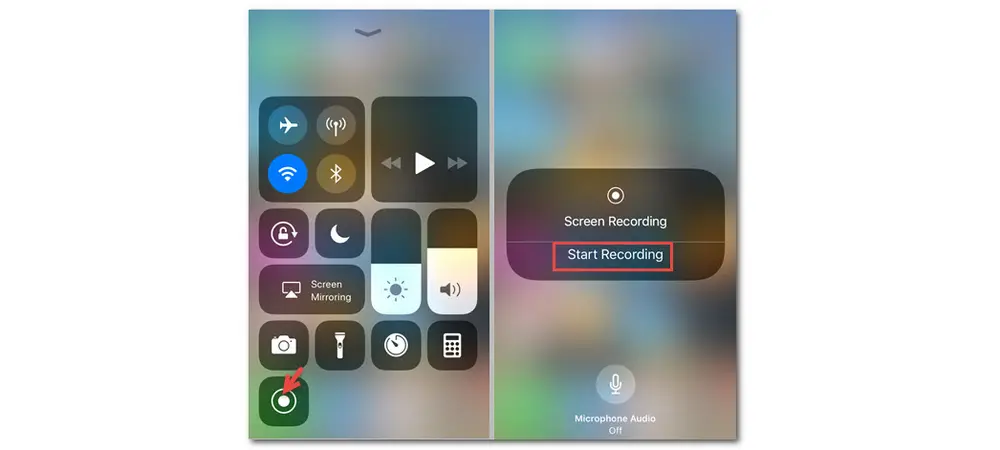
Recording video calls on iPhone isn't a tough task as there is also an in-built screen recorder with iPhone. It allows you to capture anything on your screen with audio. But one thing to note is that during calls, iPhone will not let you record audio from other users for privacy reasons. But the workaround is simple, you can just turn on speakerphone to let the iPhone mic capture the voice from the other party. Follow the simple guide below to see how to record video call with audio on iPhone.
Step 1: Go to Settings on your iPhone and tap on Control Center > Customize Controls. Then click the + icon right next to Screen Recording to add the screen recording feature to your Control Center.
Step 2: Swipe down to expand the Control Center and tap on Record to start recording. Click the microphone icon to enable screen recording with audio. Now, start a video call and turn on speakerphone at maximum volume so that both your voice and the caller's voice coming through the speaker will be captured.
Step 3: To end the recording, just click the record button in the Control Center. The recorded video will be saved in the Photos application.
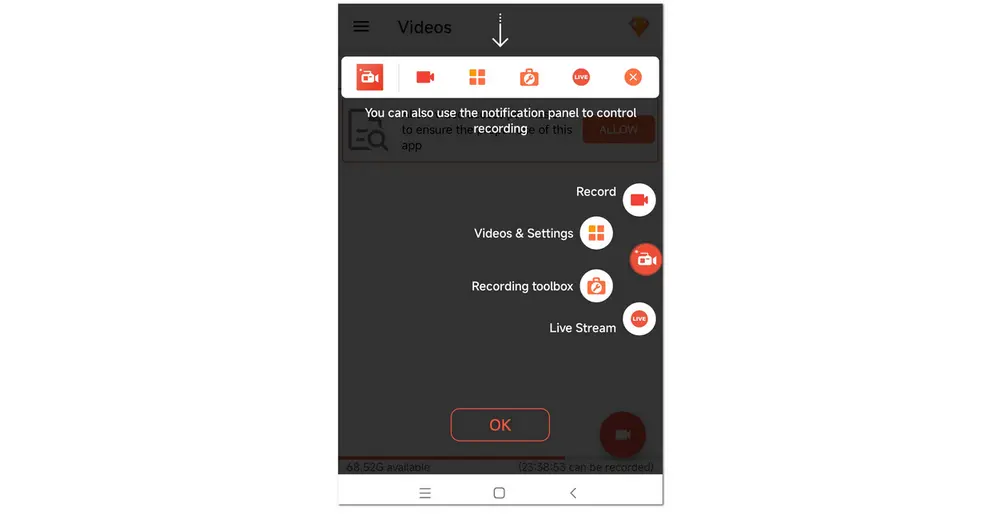
Android phones are also preloaded with the screen recording feature, but it doesn't offer many options. And there may be some differences between various Android models. In this case, this post will take AZ Screen Recorder to show you how to screen record video call with sound on Android. Let's have a look below.
Step 1: Search for AZ Screen Recorder in your Google Play Store and download it to your smartphone. Then launch it. It will then pop up a window to let you allow to display over other apps for convenient recording.
Step 2: Open the messaging app and start a video call. Then tap on the floating recording button or swipe down to the notification to start recording after a three-second countdown.
Step 3: To finish recording, you can also click the floating button or swipe down and press Stop.
Make sure there is enough light in your room and the primary light source in front of you to prevent dark, grainy video. Also try to record in a quiet, furnished room to minimize echo.
Try wearing headphones so that the system sound and microphone audio can be captured in clean source.
Screen recording can be resource-intensive. To prevent lags, close all unnecessary apps in the background to allow more power for your recorder.
If allowed, select MP4 as the output format for the best compatibility, and aim for 1080p resolution at 30 FPS to keep motion smooth without inflating file size.
Before an important call or meeting, record a short clip of yourself playing a video and talking into your mic. Play it back to check if the video and audio quality meet your standards.
Above is all the information about how to record video calls on different platforms. If you are looking for a reliable video call recorder, just choose one from the list according to your device. Thanks for reading!
Yes. But the native recording options inside the calling apps usually notify others when recording begins. To record video calls secretly, you need to use third-party screen recorders. That said, it's recommended to gain consent from all parties before recording any call to avoid legal risks.
You need to make sure the screen recorder you use supports both microphone and internal sound capturing at the same time. Additionally, ensure that the audio input and output devices are set up correctly.
You can use a third-party video editor to edit the video recording. Or if your screen recorder already includes a video editor, you can trim the recording without leaving the app. For instance, WonderFox HD Video Converter Factory Pro provides a video editor that let you trim, crop, rotate, merge, apply filters, and add watermarks to a video easily and quickly. Check out this guide: How to Edit Screen Recording.
With the recording methods above, you can record virtually any video call, including WhatsApp, Messenger, Duo/Meet, Viber, Discord, WeChat, Line, Signal, Slack, Skype, and Vonage.

I write about multimedia topics, including video and audio conversion, compression, editing, and downloading. I joined WonderFox in 2020, and my goal is to help readers solve everyday tech problems more easily. In this guide, you can find working and reliable solutions to record a video chat session from all apps on different devices. Hope this post can be helpful to you!


I write about multimedia topics, including video and audio conversion, compression, editing, and downloading. I joined WonderFox in 2020, and my goal is to help readers solve everyday tech problems more easily. In this guide, you can find working and reliable solutions to record a video chat session from all apps on different devices. Hope this post can be helpful to you!
WonderFox DVD Ripper Pro
WonderFox DVD Ripper Pro is a professional DVD ripping program that can easily rip any DVD, be it homemade or commercial, to 500+ popular formats and devices including MP4, MKV, MP3, WAV, H264, H265, Android, iPhone, etc. without a hitch. It can also edit DVDs with basic video editing tools. Compressing DVD videos and modifying the parameters are also supported. Download it to enjoy a fast and trouble-free DVD ripping experience.
* Please DO NOT use it to rip any copy-protected DVDs for commercial use.

Privacy Policy | Copyright © 2009-2026 WonderFox Soft, Inc.All Rights Reserved
